Every second car enthusiast who tries to repair his favorite four-wheeled friend with his own hands has encountered the problem of how to remove the crankshaft pulley. After reading the instructions in the maintenance and repair manual, at first glance, the procedure does not seem complicated, however, when you first try to unscrew the ill-fated bolt, it turns out that this is not so easy. It is completely unclear how to fix the crankshaft so that it does not rotate. Another problem is where is the best way to get to the treasured bolt. Removing the crankshaft pulley causes a lot of trouble because it is too tight. There is a high probability of damaging many parts of the engine compartment or the paintwork of the body.
The problem is that the crankshaft pulley bolt (or nut, depending on the model) is tightened with great force during installation. This is done so that it does not unwind spontaneously, since if unscrewed, serious damage and expensive repairs cannot be avoided. The degree of tightening gradually increases as the engine operates and is aggravated by sticking, coking, and corrosion.
In reality, the entire dismantling process can take 10-15 minutes, but there are some techniques you need to know and use. Different motor models use either a bolt or a nut to secure the pulley. Each option should be considered.
How to unscrew the crankshaft pulley nut?
The nut at the end of the crankshaft holding the pulley is a sign of the engine of a classic rear-wheel drive car like VAZ from model 2101 to 2107, Niva and the like. Such a nut is also called a “ratchet”, since it can have ledges for a “crooked starter”.
It is better to do the work above the inspection hole. The crankshaft should be secured by placing the gearbox in 4th gear and applying the parking brake. You should stock up on the following tools in advance:
- socket or socket wrench 36 (or 38);
- lever extension in the form of a piece of pipe.
While under the car, try to unscrew the nut with a wrench with a sufficiently long lever. If the attempt is unsuccessful, put the gearbox in neutral and proceed as follows:
- the candlesticks are removed;
- while in the pit, install the key and extension so that the end rests on the floor or spar as the shaft rotates;
- turning the key in the ignition switch gives a short-term impulse.
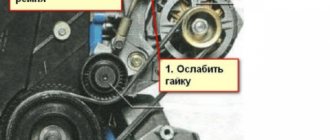
As a rule, on the first or second attempt the nut comes off and is then unscrewed with a regular wrench. Don't forget to loosen and remove the alternator belt.
How to unscrew the crankshaft pulley bolt?
The bolt holding the pulley predominates in engines in front-wheel drive cars, when the block is located perpendicular to the axis of the car. In this case, you will have to tinker more, since it is more difficult to get to the bolt. To work you should prepare:
- jack;
- “tragus” (stump);
- a socket to the size of the bolt with an extension and lever;
- set of automotive tools.
In search of an answer to the question of how to remove the crankshaft pulley, many car enthusiasts begin to look for an opportunity to do this without prior preparation. By definition, such attempts cannot be successful.
In order to correctly remove the pulley, you must perform the following manipulations::
- the right front part of the car is lifted, the wheel is removed;
- the car is installed on a “tragus”;
- From the top side of the hood, all parts that impede access are removed: the air filter and the engine mudguard;
- the alternator belt is removed;
- to fix the crankshaft, the plug on the clutch block is opened and a pry bar is inserted into the resulting window to jam the flywheel teeth;
- under the wheel arch, a head with an extension and a lever is put on the pulley bolt;
- the bolt is unscrewed counterclockwise.
In the vast majority of cases, the bolt can be unscrewed. If it does not give in, then you can add the length of the lever. If this does not help, then you should use the help of the starter as described for the pulley nut in the “classic”.
We remove the pulley using folk automotive experience
Any threaded connection, even if tightly tightened. can be untwisted with less effort if you use some folk-automotive tricks. The problem of how to unscrew the crankshaft pulley ceases to be such if you moisten the bolt head or nut in advance with special WD oil, vinegar or brake fluid. Sometimes lightly tapping the edges of the nut helps.
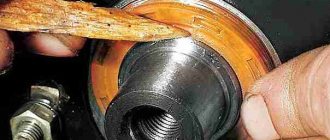
Unscrewing a bolt or nut does not always solve the problem, since the pulley is held quite firmly on the shaft. You can remove the pulley using a regular pry bar, carefully prying it off from different sides. It is important that the force application point is as close to the shaft as possible. For hopeless cases, it is necessary to use a crankshaft pulley puller. This is a special device, which is a pin with a nut on which 2-3 grips are attached. The ends of the grippers are secured to the edges of the pulley, and the end of the pin rests against the center of the shaft. By twisting it clockwise, you can gradually pull the pulley off the shaft.
You should not be sure that in all cars, without exception, the crankshaft rotates clockwise.
For example, in some Honda cars the crankshaft rotates counterclockwise. It follows from this that the thread on the pulley nut (bolt) will be left-handed.
We recommend: Which is better, electric corrector or hydrocorrector for headlights on a VAZ 2110: pros and cons
Why is it difficult to remove the pulley?
No. 1. Depending on the engine design, make and model of the car, the difficulty of removing the pulley varies. Some machines have a lot of space to comfortably carry out repair work, while others have very little free space. The pulley design elements cover the pulley.
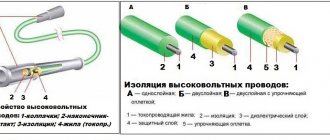
The structure of pulleys is also different, there are 2 types:
Damper pulleys have an additional outer ring with an elastic band in their design, which absorbs vibrations and micro-vibrations.
Before you start removing the pulley, you need to loosen the tension nuts and bolts, remove the generator and power steering belt.
No. 2. In the factory assembly, the pulley is seated on the engine crankshaft, pressed with a bolt or nut and tightened with high compression force. Thus, the factory assembly is very strong. Therefore, if you have never removed the pulley, it will be more difficult to dismantle it the first time.
In addition to tightening with the maximum permissible force with a special torque wrench, during operation, the engine becomes very hot, the threaded connection is tightened even more and sticks. And external factors influence the outside, due to which the threaded connection may be subject to corrosion.
Some engine models cannot be repaired; they are disposable. These are, for example: 1AZ-FSE, 3UZ-FSE. Each power unit was examined in detail.
No. 3. If you disengage the clutch, the engine crankshaft can be freely turned with a wrench. Therefore, in order to unscrew the crankshaft pulley nut, you need to stop the shaft from turning. If, when you press the clutch, the speeds do not change, then it is not working. Air may have entered the system. In this case, you need to bleed the clutch.
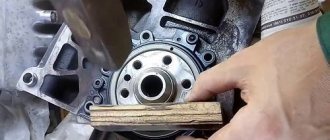
Why are special technological holes made in pulleys? In auto repair shops, there is a special device for fixing the shaft, which must be bolted to the pulley and the shaft locked.
If there is no special device for fixing the shaft, which is screwed to the pulley, then you need to install good anti-roll devices under the wheels of the car and put 4th gear on the gearbox.
Or, the third option is to rest a pry bar against the flywheel teeth and fix the crankshaft from turning while unscrewing the pulley nut.
Another option is to insert a pin into the pulley hole, and install a pry bar around the pin and the second stop, as in this figure.
Checking the condition and replacing the timing belt
We check the condition of the timing belt on a cold engine (15–35 °C) every 15 thousand kilometers.
Use a 5mm hex to unscrew the four screws securing the front upper timing cover...
...and remove the cover. We hang the right front wheel and engage fifth gear in the gearbox. By rotating the wheel clockwise, we turn the engine crankshaft and inspect the timing belt. With normal belt tension...
How to unscrew the crankshaft pulley
Depending on the design of the crankshaft, the pulley is attached to it either with a nut or a bolt. On rear-wheel drive vehicles, the pulley is usually secured with a nut.
The engines of some rear-wheel drive cars can be started with a special crank, for which special protrusions are made for engaging the crank. This handle is also called a “crooked wrench,” and the engagement for this wrench is called a ratchet.
The pulley fastening nut is installed with a size of 36 or 38 mm on a wrench. Use a socket wrench. The key is strengthened by welding a long handle or putting on a tube to increase the “shoulder”.
How to unscrew the pulley nut:
- Place the car on a pit or overpass.
- Apply the hand parking brake.
- Turn on 4th gear at the gearbox, put chocks under the wheels.
- Do not tap too hard on the edges of the nut.
- Throw on a socket wrench, extend it with a pipe and remove the stuck nut.
If the pulley nut does not come off:
- Move the gearbox handle to neutral.
- Remove the spark plug wires from the spark plugs to prevent the engine from starting.
- Place a socket wrench on the nut and extend it with a pipe. Place the wrench in such a way that the pipe rests against the ground or the machine spar on the right side to prevent the pulley from turning clockwise.
- We make a couple of short sharp turns of the ignition key to turn on the starter. The starter will begin to rotate the flywheel, the flywheel will rotate the crankshaft, and the pulley will be secured with a key. In this case, the stuck nut usually “comes off” quickly.
The crankshaft pulley on front-wheel drive vehicles is generally secured with a bolt. To remove the crankshaft pulley of a front-wheel drive car, you must proceed in this order:
- Raise the front right side of the car with a jack. Place a trestle, stump or a pair of wheels with rims.
- Remove the wheel.
- Dismantle and remove the air filter with housing.
- Remove the protective cover.
- Loosen the belt tensioner and remove the alternator belt.
- To fix the crankshaft, you need to remove the plug in the clutch housing, then insert a pry bar into the hole and rest it between the flywheel teeth.
- Now you need to put on the socket wrench, extend it with a pipe and sharply try to turn it counterclockwise. The main thing is to remove the stuck pulley bolt.
If it is not possible to remove the bolt from its place, then we use the method of unscrewing it with a starter. This method is shown above.
Helpful advice from locksmiths who have seen a lot: use solvent or WD-40, or a similar rust preventative. After spraying it on the thread (if the pulley is secured with a nut), you need to wait 15 minutes, then try to unscrew it. If it’s a bolt, then it’s not easy to apply this product to the threads, although if you spray it around the bolt, it’s possible that liquid will pass through the micro-cracks and decarbonize the joint.
Unscrew the pulley nut
The nut that holds the pulley at the end of the crankshaft indicates that we are working with a classic version of the engine, namely a VAZ-type car. So, before starting work, you need to prepare the necessary tool, namely a socket or socket wrench for “36” or “38”, you also need to prepare a piece of pipe about 30 cm (later you will find out why). It is better to do the work above the inspection hole. If this is not possible, then it is better to use a jack and definitely a tree stump (better to be safe).
We set the gearbox lever to the fourth gear position and turn on the parking brake mode (handbrake). We try to unscrew the nut using a wrench with a long lever while being under the car. If the attempt fails, you need to use another option.
Set the gearbox lever to the neutral position and remove the spark plugs. We install the key so that it rests (in the case when the length of the key is not enough, a pipe is used) against the floor or the rear spar in the direction of movement of the crankshaft. When the requirements are met, it is necessary to turn the ignition key to give short-term pulses. Sometimes the nut fits so tightly that you can’t get it off the first time. Mostly it is released on the third or fourth try. Once the nut is stripped, it can be tightened with a wrench.
Pulley removal
Unscrewing a fastening bolt or nut is only half the battle. Next you need to pull the pulley out of the shaft. The pulley cannot be removed easily by hand unless its seat is broken. In addition, if the pulley fits tightly onto the shaft, it is also secured against turning by a key.
There are special pullers for removing the pulley from the shaft. There are mechanical and hydraulic pullers.
The design of a mechanical puller is simple. Usually it has three legs, with which you need to hook the pulley itself, and rest the central rod against the shaft. After which, you need to rotate the rod, the legs will straighten and pull the pulley towards you.
It also happens that when using a puller, the walls of the pulley grooves cannot withstand and break off. Therefore, when using pry bars, they must be engaged as close to the shaft as possible.
Dismantling and replacement
Regardless of the design, where the part is located, it is important to remove and install it in the same order. Depending on the location of the motor, the part is located in the front part behind the cooling radiator. But if the motor is placed across the engine compartment, then your hand will not reach the part. Because to remove the crankshaft pulley, you need to remove the right wheel. If it is difficult to change, it makes sense to pay attention to the drawing, the work will speed up.
The vehicle is rolled onto the inspection hole and secured so that the car does not move from its place. To get there and remove the structure, you need to unscrew all the parts that impede access (air filter, mud flaps, etc.). Remove the generator belt. Next, open the clutch block plug and insert a pry bar into the hole to lock the flywheel.
The elements of the part are characterized by strong fixation, so they are not easy to remove. To turn a part, it is necessary to make a lot of effort. If dismantling is performed for the first time, it will be difficult to unscrew the crankshaft pulley. The reason is that factory production is characterized by strong tightening of the component parts.
Important! The right screw pattern means that the unscrewing process occurs counterclockwise. The car part spins in the other direction, so if it has oxidized, it is not so easy to disassemble it; it is useful to use additional means.
How to unscrew the crankshaft pulley nut
When turning fasteners, it is important to follow the recommendations, then the process will take at least 15 minutes. The effort should be applied as close to the camshaft as possible:
- use a pry bar to pry it up from all sides;
- If necessary, use a special universal crankshaft pulley puller for this part.
The device is presented in the form of a hairpin with 2-3 grips. The end of the gripper is secured to the edges of the part, and the end of the pin is placed in the middle of the shaft.
Scroll clockwise. But not all brands of cars turn clockwise; in some cars, the work must be done in the opposite direction. In this case, it is important to put your gear lever in 4th speed and turn on the handbrake.
If you can’t turn it, the lever should be in the neutral position. The next step is to remove the candlesticks. The key is placed on the floor or on the rear side member and turned in the direction of movement of the device.
All maneuvers make it easier to scroll, so further actions must be performed manually; if necessary, lubricate with brake fluid or WD grease. In addition, tapping the edges of the head can make your work easier.
How to remove the crankshaft pulley bolt
To do the job efficiently, the disassembled machine is placed on a stump. The pin holds the part together and is usually found in front-wheel drive automatic cars. The thread is designed in such a way that it is tightened during the torque when moving.
It is necessary to perform actions that open access to the base. To do this, it is important to stop the rotation well. A mount is used as a fixation. The tool is inserted into the flywheel gears. It must be adjusted securely so that it does not fall out during the turning process. Therefore, it is better to do the work with an assistant. Next, put a socket head of the same diameter as the pin onto the pin, attach a lever and an extension (a piece of durable pipe). After this they begin to slowly unscrew it.
Important! The longer the extension, the easier it is to unwind.
People's automobile experience
The difficulty of dismantling lies in the specially selected strong connection, without play. The fasteners are tightly screwed. They practice using a pry bar, while slowly pressing on the back surface of the part.
Video
This video contains useful tips on how to unscrew the nut securing the pulley to the crankshaft of a car engine.
An option for unscrewing the crankshaft pulley bolt using a poly V-belt.
How to remove the crankshaft pulley on a VAZ (2108, 2109, 21099, 2110, 2111, 2112, 2113, 2114, 2115).
How to remove the crankshaft pulley bolt. Bolted connection.
How to tighten a crankshaft pulley very quickly.
Removes the crankshaft pulley on a Honda car without a special key.
Source
Removing the damper
On a VAZ 2110, the damper is removed in the following sequence:
- Disconnect the ground from the battery;
- Remove the radiator fan and fluid coupling;
- After loosening the bolts securing the fan pulley, remove the belt;
- It is advisable to remove the radiator, but if it does not interfere, you can leave it, protecting it from damage from the engine compartment with a sheet of plywood or cardboard;
- Remove the pulley from the radiator fan;
- We gain access to the damper, unscrew the bolts, dismantle it;
- When removing the hub, you need to secure it from turning (for which there is a special tool).
Next we proceed depending on the purpose of the analysis. If you only need to replace the damper, we do it and assemble everything in the reverse order.
You should know that replacing the liners on a VAZ 2110 can be done either with or without removing the crankshaft. But this requires a special device, and besides, it is better to entrust such work to an experienced mechanic - a mechanic.
If the crankshaft was dismantled to replace the liners or half rings, then we continue:
8. Remove the lightweight or regular crankshaft; 9. We remove the half rings; 10. We evaluate the condition of the liners, and if they do not need replacement yet, then be sure to remove them and mark each of them; 11. But, unfortunately, no matter how carefully the owner treats his VAZ 2110, sooner or later the time for physical wear comes for the liners - they need replacement.
- Four repair kits of inserts are produced for the VAZ 2110. You need to buy them only as a set, and only in a strict sequence of sizes. Sometimes, however, situations are possible when you have to purchase them “through size”;
- thus, the crankshaft only lasts for four (and sometimes even three) overhauls;
- replacement of liners cannot occur without grinding the crankshaft. The only exception is if it is replaced with a new one. At the same time, an experienced craftsman can turn the crankshaft into a lightweight one.
But if replacing the crankshaft pulley is not such a difficult task, and almost any home craftsman can do it, then grinding and tuning the crankshaft should be entrusted only to experienced motorists.
When reassembling, please note that the groove on the hub must be aligned with the segment key. In addition, the bolt holding the hub requires a torque wrench. Its tightening torque should be 400 N/m.
Crankshaft pulley HOW TO REMOVE? 2115 vases
puller - two or three legs and a screw. you hug the pulley with your paws, and use the screw to rest against the shaft axis. When screwing in the screw, you pull off the pulley
How do you imagine this? Where will you insert the puller arms?
puller - two or three legs and a screw. you hug the pulley with your paws, and use the screw to rest against the shaft axis. When screwing in the screw, you pull off the pulley
How do you imagine this? Where will you insert the puller arms?
I don’t remember exactly, but I think at 99 there were holes in the pulley - that’s where the puller’s paws are inserted.
Can't be. They were always the same and without holes.
I don’t remember exactly, but I think at 99 there were holes in the pulley - that’s where the puller’s paws are inserted.
Can't be. They were always the same and without holes.
or a puller. It seems like two-legged people can crawl up there.
You can't get there with a puller. But using a reverse hammer is very convenient. https://autoremteh.ru/obratnye_molotki/
I don’t remember exactly, but I think at 99 there were holes in the pulley - that’s where the puller’s paws are inserted.
Can't be. They were always the same and without holes.
puller - two or three legs and a screw. you hug the pulley with your paws, and use the screw to rest against the shaft axis. When screwing in the screw, you pull off the pulley
How do you imagine this? Where will you insert the puller arms?
We weld the extractor to them and pull it out - such an infection often happens - and then only replacement.
By the way, this pulley can be easily pricked with a chisel. But then it’s also just a replacement.
We weld the extractor to them and pull it out - such an infection often happens - and then only replacement.
By the way, this pulley can be easily pricked with a chisel. But then it’s also just a replacement.
We weld the extractor to them and pull it out - such an infection often happens - and then only replacement.
By the way, this pulley can be easily pricked with a chisel. But then it’s also just a replacement.
I tried to screw in the self-tapping screw with pliers, but it wouldn’t budge, I was more afraid of damaging something.
Chevrolet Niva › Logbook › Crankshaft pulley and gas rack
This morning I needed to go to the garage. At the same time I decided to throw a “blanket” over the engine.
After a long stay in the cold, switching to gas occurred intermittently due to “sticking” of the gas injectors. Enabling the “injector warming” function in the gas ECU improved the situation, but not by much. But turning on the “blanket under the hood” function had a noticeable effect!
I arrive at the garage, open the hood...the picture is as follows:
Without lowering my head, I wonder what’s going on there.