The Lada Largus fuel filter is the most important element of the engine power system of a domestic station wagon. It is responsible for the cleanliness of the fuel entering the combustion chamber of the car.
Probably every car owner understands that there is no perfectly clean fuel at any gas station. This is especially true at gas stations in Russia, where we actually live. Not only is the gasoline for LADA LARGUS at gas stations of low quality, but it may contain dirt, condensation and other small particles. To prevent all this “good” from getting into the injector, a fuel filter is used on the car.
Most often, a modern car is equipped with 2 fuel filters - coarse and fine. The coarse filter is a mesh that filters out large dirt particles, and the fine filter filters out the rest.
It is noteworthy that timely replacement of the fuel filter can increase the engine life by up to 30%.
Where is the Lada Largus fuel filter located?
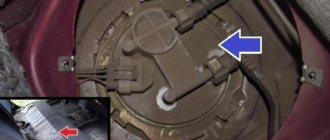
This question worries many owners of domestic station wagons. The fact is that on injection Lada cars the fuel filter was always located above the rear beam and replacing it was a simple task. However, many who buy Lada Largus as their own plan to maintain their car themselves. But, not finding a fuel filter in the usual place, they begin to search on the Internet for the answer to the question “where is the fuel filter on the Lada Largus?” And only then do they find out that the fuel filter on the Lada Largus was moved directly to the fuel tank. Those. the filter itself acts as a glass in which the fuel pump is installed.
This is a proven solution that has been used on most foreign cars for several decades. In terms of replacement, of course, it’s not the easiest thing, but again, this is not such a common procedure.
How to change the filter element with your own hands
So, the step-by-step algorithm for replacing the fuel filter on Largus is as follows:
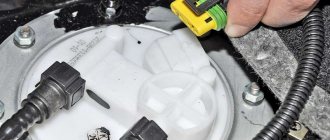
- Remove the rear sofa cushion and lift the plastic hatch that is located under it. For greater convenience, experts recommend removing the carpet.
- Having disconnected the battery in advance, bend the tab located on the fuel pump connector and turn it off.
- Next, you need to connect the battery and start the engine. The running engine should run for two to three seconds and then stall. Next, de-energize the entire system again by disconnecting the terminals. Disconnect the fuel pipe and turn the fuel pump retaining washer counterclockwise. Using a special mounting spatula will help make the job easier.
- Having completed all the above steps, the fuel pump module can be removed without any problems. If necessary, the mesh filter or the fuel pump is replaced completely. After replacement, you need to reassemble the entire structure in reverse order.
It’s still not worth disassembling the fuel pump system to replace filter parts. Such repairs may negatively affect the condition of the entire fuel system in the future. It’s better not to save money and change the entire design of the fuel pump. Many auto repairmen believe that changing the fuel filter on a Largus is quick and easy if you study the features of its design and location in the car in advance.
Lada Largus fuel filter replacement interval
According to the official regulations, the Lada Largus fuel filter has a resource equal to the entire service life of the car. In other words, AvtoVAZ says that the fuel filter does not require replacement and is designed for the entire service life of the car. And this is at least 160 thousand kilometers.
But from the experience of owners of such cars, we can conclude that the coarse filter begins to become clogged at 30-40 thousand kilometers, and the fine filter - at 80-90 thousand kilometers. In other words, the fuel filter on the Lada Largus really can withstand long mileage, but I would recommend changing the fuel filter much earlier.
The optimal replacement option is considered to be 30 thousand or 24 months. Believe me, with our quality of fuel this will be the most correct option. It’s both good for the car and easy on the pocket. When replacing the fuel filter, it is not necessary to drain gasoline from the Largus tank.
Expert comment:
The fuel filter on the Lada Largus, like on any other car, requires replacement. I don’t understand why AvtoVAZ engineers suddenly decided to make it maintenance-free. What changed? Has the quality of the fuel improved or have some innovative materials been used for filtration? I have been working in various services for over 30 years and have seen a lot in my time. And a common cause of car breakdowns is untimely car maintenance. Do it correctly and on time and you will be happy.
Victor, 56 years old, Vladivostok.
Prerequisites for replacing the fuel filter Lada Largus
— Partial loss of vehicle traction; — Poor start; — Unstable operation at idle; — Increased fuel consumption.
If you notice at least one of these signs, then the first thing you should think about is replacing the Lada Largus fuel filter.
Comment from the forum:
I have always considered replacing the fuel filter in gasoline cars to be a very subtle perversion. Paraffin is deposited in diesel engines. And there is nothing to be deposited in gasoline. Mechanical impurities will not create criminal obstruction in the filter.
vishnu, user of the DROM.ru forum, more than 15 years on the forum.
Lada Largus: a box with a secret
"Lada-Largus" is a copy of the "Dacia-Logan MCV", known in some European markets under the Renault brand. The localization of production at AVTOVAZ has so far affected only small things. The most noticeable parts are the radiator grille and the nameplates on the rear doors: they feature the branded boat and the familiar name LADA. The machine's components were borrowed from other Renault models - Logan, Symbol, Megan (ZR, 2008, No. 2; 2010, No. 4; 2012, No. 3).
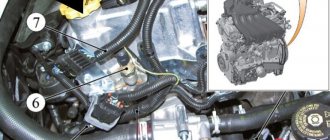
When replacing spark plugs on a K4M sixteen-valve engine, the main thing is not to drop the fasteners of the individual ignition coils: the bolt easily slides off the head and disappears into the abyss between the intake manifold and the valve cover. If you don’t catch it, it can later cause trouble by shorting out electrical circuits or rubbing holes in the plastic manifold.
To remove the connector from the individual ignition coil, press down the latch tab. If there is a lot of resistance, slide the connector onto the coil, selecting some play, and then press. To remove the connector from the individual ignition coil, press down the latch tab. If there is a lot of resistance, slide the connector onto the coil, selecting some play, and then press.
On the eight-valve K7M (they also install such ones) the candles are in full view. But don’t rush to rejoice: before you take the spark plug wrench, remove dirt from the bottom of the spark plug wells, otherwise it will certainly fall into the cylinders. First, we separate the stuck together grains of sand with a thin, hard brush or piece of wire, and then blow them out with compressed air. Perhaps, in this discipline there is complete parity between “different-valve” engines.
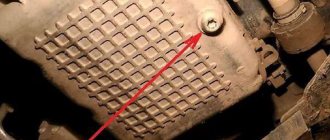
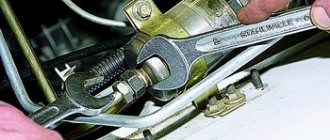
It is easier to change the oil in an eight-valve unit: if you remove the exhaust manifold protective cover by unscrewing three nuts, you can hook onto the filter housing from under the hood. And even a chain puller. But it is advisable to purchase an original cup puller - it is relatively inexpensive, and it is much more convenient to work with (and you don’t have to remove the casing). The drain plug is for an 8 square socket, have this key ready in advance. Access to the plug is possible through the slots in the standard protection of the engine compartment.
The oil filter (shown by the arrow) is hidden away. Even if you have a puller, act carefully so as not to damage the communications. It is better to immediately cover the engine number (in a circle) with anticorrosive. The oil filter (shown by the arrow) is hidden away. Even if you have a puller, act carefully so as not to damage the communications. It is better to immediately cover the engine number (in a circle) with anticorrosive.
The approach to the filter on a sixteen-valve valve depends on the presence of an overpass or inspection ditch. If these amenities are available, then it is better to remove the protection by unscrewing the six bolts and enter from below. No - we get up from above, removing the protective screen of the fuel rail. In any case, there is nothing to do here without a filter cup remover, since the communications of the power steering, generator and air conditioner greatly interfere. Compared to Priora, this option receives a well-deserved two in the final protocol.
Replacing the coolant is no easier, since the system does not have drain plugs. There is nothing left to do but remove the lower radiator pipe, risking getting burned by hot liquid (there is more escape when it is hot) or inhaling toxic fumes (from the trough they “smell” much more strongly than from the narrow neck - but how to get into it?) . To compensate, there are fittings to remove air from the filled system, but this is little consolation.
View of the power unit with the engine compartment protection removed. The drain plugs of the engine and gearbox are shown by arrows, the butterfly filler plug of the box is circled. View of the power unit with the engine compartment protection removed. The drain plugs of the engine and gearbox are shown by arrows, the butterfly filler plug of the box is circled.
PRODUCT NUMBER ONE
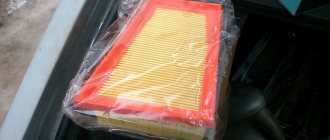
You can probably handle replacing the air filter on both modifications. Considering that the cover is attached with self-tapping screws, we recommend that before installation you feel for the entry of the thread: after turning the fastener counterclockwise, catch the gap and only then turn it clockwise. This way it will be possible to preserve the thread, and therefore the body itself, for many years.
Neither a fuel nor a cabin filter is provided - a huge minus. If you can live carefree without the first, as the experience of using Logans shows, up to 200 thousand km, then sometimes you can’t do without the second on our dusty roads. “Garage workers” propose to embed a filter from a Nissan-Micra (or Renault-Modus) into the body of a standard heater, cutting through a window 150 × 38 mm (ZR, 2008, No. 9). Most likely, this technology will also take root at AVTOVAZ official dealers. But why doesn't the plant improve the heating system?
Saving on a cabin filter looks ridiculous. The plane in which the window must be cut is shown by an arrow. What prevents you from doing this at the factory, even if you close the hole with a plug? Saving on a cabin filter looks ridiculous. The plane in which the window must be cut is shown by an arrow. What prevents you from doing this at the factory, even if you close the hole with a plug?
If you decide to install the filter yourself, take your time: move the passenger seat back, lie down comfortably on the floor and use a shoe knife (or better yet, a piece of hacksaw blade) as carefully as possible so as not to accidentally make a hole in the heater radiator. And protect your eyes from falling chips!
PRODUCT NUMBER TWO
You are unlikely to change the timing belt yourself, since to do this you need to have mandrels to align the crankshaft and camshaft in the only correct position (this applies to a greater extent to the K4M), as well as hang the power unit and remove the right support. None of this is easy, so most owners find it easier to turn to specialists.
God forbid you start replacing the timing drive on a sixteen-valve engine without such mandrels (shown on the left side of the photo). The fact is that there are no keys or pins in the connection of the shafts with the pulleys. God forbid you start replacing the timing drive on a sixteen-valve engine without such mandrels (shown on the left side of the photo). The fact is that there are no keys or pins in the connection of the shafts with the pulleys.
The automatic serpentine belt tensioner is only available in the version with air conditioning (applies to both engines). To remove the old belt, first dismantle the right side panel of the engine compartment and move the tensioner to the side, using a 15mm wrench to grab the roller bolt. We check the bearings of the mounted units and the rollers themselves - support and tension: you should not feel the balls rolling.
The drive of mounted units on the K7M (pictured) is no different from that on the K4M. Moving the tensioner clockwise by the roller bolt, insert the pin into the holes on the sectors (shown by arrows). The drive of mounted units on the K7M (pictured) is no different from that on the K4M. Moving the tensioner clockwise by the roller bolt, insert the pin into the holes on the sectors (shown by arrows).
SEE THE ROOT
It is easier to replace headlight bulbs on the right. The battery prevents access to the left headlight; it is often better to remove it. Especially if your hand is calloused and your fingers are not like a pianist’s. And yet, in most cases, it is possible to fasten the spring latch of the H4 lamp, although not the first time. Access to the turn signal is more or less acceptable.
To replace the fog lamps, you will have to lie on the ground and unscrew the corner screen fasteners under the bumper. The work is dirty and terribly unpleasant, especially in the slush. The question is, what prevented you from providing technological windows in the mudguards, as is done on many French cars?
To replace the bulbs, the lantern must be removed, and you will suffer with the tightly tightened upper fastening knob. The board with lamps is secured with three latches. To replace the bulbs, the lantern must be removed, and you will suffer with the tightly tightened upper fastening knob. The board with lamps is secured with three latches.
To replace lamps, headlights must be removed. It seemed that ) had provided such a scheme for attaching the lights, which one could reluctantly come to terms with - to dismantle it, you need to unscrew two plastic thumbs. But the top one turned out to be tightened to death; even with cobra-type pliers they could not touch it. Fortunately, at the end of the head there was a recess for Torx-30.
“Alas, the “casket” did not open as easily as we would like. Poor access to the oil filter let us down, but most importantly, the rear optics were disappointing. It would be a good idea for the plant to standardize the tightening torque of the flashlight fasteners so that we don’t break our fingers on it.”
Thank you (Strogino, Moscow)
for assistance in preparing the material.
Replacing the fuel filter Lada Largus
First of all, I would like to say that even an amateur auto mechanic can perform such work. To do this, you only need tools, a place where the work will be done and a little free time.
1. Remove the rear seat cushion.
2. Open the inspection hatch cover.
3. Disconnect the wire connector and move the wire harness to the side so that it is not in the way.
4. By pressing the latches, disconnect the fuel pipe and move it to the side. If you have not relieved the pressure from the system, then at this moment fuel may leak from it.
5. Using a mounting tool or a wide screwdriver, unscrew the fixing ring.
6. Take out the glass completely and move it to a place convenient for work, for example, on a workbench. Next we will analyze the glass.
7. To replace the mesh, use a flat screwdriver - carefully bend the latch and disconnect the lower part of the module. We remove the mesh.
8. To replace the fine fuel filter, disassemble the module, as shown in the photo:
... and install new filters in place. Then we simply put everything back together in reverse order.
After assembly, do not try to start the engine immediately. Turn the key several times to give the pump time to circulate fuel throughout the system.
Removing the fuel pump module for Lada Largus video
We disassemble the module in order to replace the filter
The main thing to remember: first disconnect the brown connector. Then remove the level sensor by unfastening the clamp with a screwdriver.
Similar clamps hold the top cover. Having removed it, disconnect the white connector (see photo). How to remove the lower part of the module is discussed in the previous chapter. But you will have to tinker with the nozzles: when putting them on or removing them, the fittings must be held above the steam.
No one was able to achieve results right away.
Instead of standard pipes, black, shiny and beautiful, you can buy corrugated hoses from a VAZ-2110 car. This replacement is proven.
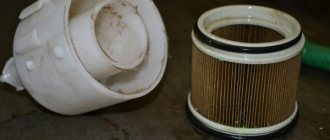
What is the best way to deal with the flask?
On the Lada Largus, the fuel filter is a flask containing paper. This flask is not sold separately and cannot be replaced. But it can be cut to remove the filter element completely.
Fuel filter housing
At the last step, both halves are glued together, and drying is done under pressure (on ties).
For gluing, use any petrol-resistant sealant.
So, we have an “empty” filter housing that is being installed in place. After assembling the module, it can be used, but there is a condition: after 1000-2000 km the module will have to be replaced. Follow our advice if the engine has run for 150-160 thousand and you don’t feel sorry for it anymore.
What not to do!
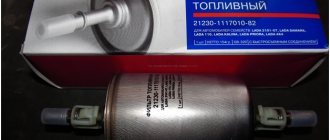
It would seem that you can drive for a long time with a cleaned bulb, you just need to insert a new filter into the fuel line. This is usually done by taking a filter from Renault Logan (phase 1).
Fitting the filter into the line under the hood
It turns out this:
- If the flask is empty and an “external” filter is added, the engine starts and stalls after 2-3 seconds;
- If the flask has not been cleaned, adding a new filter is useless: the load on the pump increases, and that’s all.
Let the reader draw his own conclusions.
Alternative option
Below is a flask that looks almost the same as the original Lada Largus fuel filter.
JS Asakashi brand components
This flask can be installed instead of the standard one. You just need to shorten the fastening elements (tubes) by about 20 mm. We were talking about filters for Nissan cars:
- JS ASAKASHI FS22001
- JAPANPARTS FC-130S
- PATRON PF3924
Fuel filter Lada Largus 16 valves article number
Since the Lada Largus fuel filter is designed for its entire service life, the manufacturer does not imply its replacement. Accordingly, there are no original fuel purification filters for Largus on sale.
Even if you go to the catalog, you will not find a fuel filter separately on the diagram. Only the electric fuel pump module assembly. It can be ordered using article number: 172024388R.
This module costs from 6.5 to 10 thousand rubles approximately. However, not everyone is willing to spend so much money on fuel system maintenance. Therefore, many manufacturers have launched the production of separate fuel filters for Lada Largus. Further in the table you will find the article numbers of fuel filters for 16 cl and 8 valve Lada Largus engines.
Table 1 - article numbers of fuel filters for the Lada Largus from third-party manufacturers
| Brand | Name | vendor code | Price |
| LynxAUTO | Submersible fuel filter | LF-249M | 1200rub |
| MASUMA | Fuel filter | MFFN225 | 1100r |
| Sat | Fuel filter | ST-172024388R-SF | 1300rub |
These filters can be found in almost any region, since the brands are well-known and known everywhere.
As for the mesh (coarse filter), it can be ordered by article number:
MPU025N MASUMA fuel filter (mesh) HS110138 PATRON fuel pump mesh
I found only 2 options, but I'm sure there are others. Anyone who has installed any proven grids, please write in the comments. I'll add options to the article.
If you plan to replace the pumping station assembly, then you can buy analogues of the entire fuel module. Here are some of them:
Table 2 - article numbers of fuel filters for the Lada Largus from third-party manufacturers
| Brand | Name | vendor code | Price |
| Ween | Fuel pump module | 192-0001 | 4500rub |
| Startvolt | Fuel pump module | SFM 0901 | 2900rub |
| Achr | Electric fuel pump assembly | EFM1160301 | 2900rub |
| Dynamatrix | Fuel pump | DFM1160301 | 3200rub |
| Amd | Electric fuel pump | AMD.FP167 | 3550rub |
| Henko | Fuel pump assembly | MV-PFA18 | 3500rub |
| Krauf | Module assembled with fuel pump | KR0820M | 3560rub |
| Miles | Fuel pump assembly renault logan i 1.4/1.6 04- / sandero i/ 3 bar ap44002 | AP44002 | 3570rub |
| Stellox | Fuel pump | 10-02035-SX | 3540r |
| Sat | Fuel pump assembly nissan almera g15ra/renault logan2/sandero2 13-/duster 13 | ST-17042-00Q0G | 3640rub |
WHEN TO CHANGE
The fuel filter of any car never lets the motorist know that it is dirty. It is important to monitor this unit, occasionally checking its condition, and change it in time. Due to the specificity of its device, the Largus fuel filter is simply endowed with a “heroic resource”. According to the manufacturer, the filter element together with the fuel pump are designed for the entire service life of the car (about 160,000 kilometers). However, is this really so? Judging by practice, no.
Prototypes of the Lad Largus and their closest relatives, the Renault Logan, which have already traveled a considerable mileage, showed not only a longer service life of the engines (up to 300,000 kilometers), but also a completely different service life of the models’ fuel filters. Considering the general statistics, we can highlight the following:
- the “mesh” of the fuel pump, which passes gasoline after the coarse filter, or the fine filter can last no more than 30-45,000 kilometers;
- the main fuel filter has a service life of 80-120,000 kilometers, and as noted earlier, it changes along with the fuel pump.
Auto repair specialists recommend that every Lada Largus owner remove the fuel pump and check the degree of filter contamination every 20,000 kilometers. It is advisable to carry out an unscheduled inspection if:
- slight loss of traction;
- slight decrease/increase in fuel consumption;
- problems with the fuel system.
You will not be able to know if the fuel filter is dirty unless you regularly check its integrity and condition. Due to the specific design, the fuel cell on Largus is endowed with a “heroic resource”. As AvtoVAZ says, fuel filters together with the fuel pump are designed for the entire period of operation of the car, that is, about 160 thousand kilometers. But is this true? Based on practical experience, no.
Considering the average statistics, we can highlight the following:
- a mesh filter in the nozzle of the injection system, which passes fuel through itself after primary and fine cleaning, can last no more than 30-45 thousand kilometers;
- The main fuel filter has a service life of 80-120 thousand kilometers.
Experienced car repairmen advise every Largus owner to dismantle the entire fuel pump module and check the level of filter contamination every 20 thousand kilometers. The check is also carried out if:
The main difference between the fact that it is the fuel filter element that is dirty is the gradual appearance of the symptoms described above.
What does the Lada Lagrus fuel filter look like in cross-section after 140 thousand km of run?
If you are still in doubt whether or not to change the fuel filter, then just look at the photo below:
The fuel filter was removed from a Lada Lagrus 8 valve car, which traveled approximately 140 thousand km. The car was purchased ex-showroom and the fuel system has never been serviced. The prerequisite for the replacement was a decrease in pressure in the fuel system, which led to a loss of vehicle power. After replacing the fuel filter, the car became playful and the pressure in the system returned to normal.
Symptoms of malfunction
The most common signs of filter clogging in power supply systems for 8-valve and 16-valve motors are:
- the appearance of unjustifiably high fuel consumption;
- the presence of engine jerks, especially during loads;
- the motor tends to stall;
- interruptions in fuel supply;
- a sharp decrease in the level of traction.
In some situations, the Lada Largus engine begins to stall unjustifiably while in idle mode. You can come to the conclusion that the filter is clogged only after some time, when these symptoms progress in their manifestation. If the breakdown is accompanied by a sudden nature, then it is likely that the reason does not lie in the filter.
When to change
The fuel filter of any car never lets the motorist know that it is dirty. It is important to monitor this unit, occasionally checking its condition, and change it in time. Due to the specificity of its device, the Largus fuel filter is simply endowed with a “heroic resource”. According to the manufacturer, the filter element together with the fuel pump are designed for the entire service life of the car (about 160,000 kilometers). However, is this really so? Judging by practice, no.
Prototypes of the Lad Largus and their closest relatives, the Renault Logan, which have already traveled a considerable mileage, showed not only a longer service life of the engines (up to 300,000 kilometers), but also a completely different service life of the models’ fuel filters. Considering the general statistics, we can highlight the following:
the main fuel filter has a service life of 80-120,000 kilometers, and as noted earlier, it changes along with the fuel pump.
Auto repair specialists recommend that every Lada Largus owner remove the fuel pump and check the degree of filter contamination every 20,000 kilometers. It is advisable to carry out an unscheduled inspection if:
- slight loss of traction;
- slight decrease/increase in fuel consumption;
- problems with the fuel system.
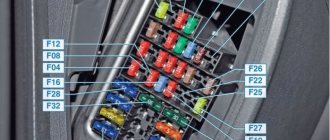
Matiz fuse diagram
On machines manufactured in 2007 and other years, a standard electrical circuit is used. On the covers of the blocks there is a designation and decoding in Russian of each element separately.
Turn safety
In Matiz it is located in the cabin unit at number 4. There is also a corresponding relay R11. Replacement of parts is carried out in the standard manner using specialized pliers.
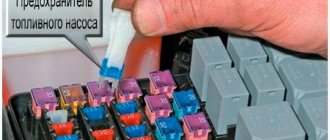
Fuel pump fuse
The corresponding fuse is installed under the hood. Insert F4 transmits power to the closing circuit of relay R5 installed nearby. Finding the relay is easy. When the ignition is activated, it clicks characteristically.
Starter fuse
In most modifications, this part is mounted in the interior part of the unit under number F14. Some configurations have a modified layout. Here, part No. 08 is responsible for exciting the starting device.
Radio tape recorder
Power is supplied from the ignition switch through fuse F6. Some car enthusiasts, when installing more efficient acoustics, transfer power directly from the battery.
Cooling Fan
The only cooling option for the Matiz radiator is protected through fuse Ef15 of the main unit located under the hood.
Wiper fuse
Each of them is powered by a separate element. In a standard chain, these are 8 and 9 for the left and right sides. There is only one system relay and this is insert No. 12 of the interior module.
Window lifters
The fifth interior fuse supplies power to the power door window system. The gear motor gearboxes are installed in the doors.
Air conditioner fuse
The compressor installation of the unit is controlled via F14 of the engine compartment module. The relay should be considered separately. The air conditioning mode device is powered by switch No. 3, and the electric clutch circuit is powered by No. 10.
Central lock fuse
The device receives power through its own insert, mounted separately. You should look for it next to the shutdown buttons or under the dashboard, depending on the year of manufacture and modification of the car.
Wiper
The windshield washer fuse is located at number 9 in the interior module. The windshield washer relays are located in the engine compartment near the reservoir with the appropriate fluid.
High beam
This mode is activated through fuses 8 and 9 of the engine compartment. The switches are located near the optical elements.
Generator fuse
Common to several circuits, No. 4 of the motor block is also responsible for powering the installation devices. When the fuse element constantly burns out, you should check the voltage regulator installed on the fender of the car.
Emergency crew
Signaling is more complex than it seems. Element F12 is responsible for powering the button. The voltage supply to the switch passes through fuse 3. The switch is mounted in standard wiring at number 11 and operates in parallel with the turns.
Charging fuse
Battery protection equipment is installed in close proximity to the battery. This is necessary because it makes it easier to access parts.
Dimension fuse
The system is powered by different elements, which is determined by the requirements of the modern automotive industry. Here these are parts 12 and 13 of the engine compartment. The manufacturer saved money - only one R9 relay is installed.
Watch
Receive voltage from two elements. In standard wiring these are safety inserts for emergency lights. The backlight comes from the board's general lighting line.
Signaling
By default, the mounting block does not have protective inserts for the car's anti-theft alarm system. This is due to the requirement of a security system mounted on the machine in stock, if one is included in the package.
Ignition fuse
From element No. 2 of the engine compartment module, power is supplied to the lock cylinder. If the contacts are constantly burning, you should check this one. The ignition coil is powered by a generator.
DEVICE AND PRINCIPLE OF OPERATION
An engine, similar to a living organism, is able to “live” for a long time only on the condition that it consumes pure raw materials for its functioning. In terms of the fuel system, the fuel filter is responsible for organizing the purity of the gasoline entering the car engine. This part, simple in structure, performs functions of great importance for any transport. In particular, this Lada Largus unit allows:
- prevent large fractions from entering the injector and cylinders along with gasoline;
- filter out a considerable amount of small fractions also present in the fuel;
- extend the service life of both the engine and the entire fuel system.
Source
Fuel pump mesh
HTTP/1.1 200 OK Server: nginx Date: Sun, 02 Feb 2022 09:23:36 GMT Content-Type: text/html; Transfer-Encoding: chunked Connection: close X-Powered-By: PHP/5.2.6-1 lenny13 Set-Cookie: PHPSESSID=e8a60231e2295d3b406bec63375ff6d4; path=/ Expires: Thu, 19 Nov 1981 08:52:00 GMT Cache-Control: no-store, no-cache, must-revalidate, post-check=0, pre-check=0 Pragma: no-cache Vary: Accept-Encoding
Fuel pump mesh – Lada Largus Club
Register Login
- home
- News
- AVTOVAZ news
- Autoworld news
- About cars
- Forum Active topics
- Club forum
- Club in the regions
- Best photos
- User photos
- Club meetings
- Our Largus
- Largus van
- Largus Cross
- AVTOVAZ
- Renault
- Bortoviki
- All bortoviks
- About the car
- Color spectrum
- Those. characteristics
- Documentation
- Painting plan
- Reviews
- About the club
- Contacts
Mounting block relay in the engine compartment
Convoy
Name
Consumers
Cooling fan high speed relay (for vehicle with air conditioning)
Cooling fan motor
Air conditioning compressor electromagnetic clutch
Low speed cooling fan relay (for vehicle with air conditioning) or cooling fan relay (for vehicle without air conditioning)
Cooling fan electric motor (for a car with air conditioning - through a resistor)
Fuel pump and ignition coil relay
Fuel pump and ignition coil
Engine control system main relay
Oxygen concentration sensors (heating circuit); speed sensor; fuel injectors; adsorber purge solenoid valve; relay windings K1, K3, K2; Engine control ECU
Fog light relay
Fog lamps
Heater Fan Relay
Heater fan motor
In order to replace fuses or relays, you need to disconnect the negative terminal from the battery.
To access the fuses and relays in the engine compartment, press the three latches
Removing the cover of the mounting block
A faulty fuse is determined by a blown jumper visually or using a tester.
To remove the fuses, you can use tweezers, which are located on the cover of the interior block (Fig. 3).
A new fuse or relay should be installed only after the cause of its operation has been found.
It is necessary to determine why the overload occurred in this circuit.
Fuses of the mounting block in the car interior (Fig. 4)
Designation (A)
Protected circuit elements
windshield wiper; coils of the heated glass of the tailgate; switching block
power supply of the instrument cluster; relay windings K4 of the fuel pump and ignition coils;
power supply to the engine control system ECU from the ignition switch
brake lamps
direction indicator lamps; engine management system diagnostic connector; immobilizer coils; switching block
Left headlight headlight bulbs (low beam); signaling device for low beam headlights in the instrument cluster
Headlight bulbs for the right headlight (low beam)
Left headlight headlight bulbs (high beam); high beam headlight indicator in the instrument cluster
Right headlight headlamp circuit (high beam)
F13 (30) and F14 (30)
Electric window circuits for rear and front doors, respectively
ABS control unit circuit
Driver and front passenger seat heating circuits
Audio signal circuit
Left side headlight lamps; side light bulbs of the left rear light; license plate lamps
Side light bulbs for the right headlight; side light bulbs for the right rear light;
glove compartment lamps; illumination of the instrument cluster and controls on the instrument panel,
consoles and floor tunnel linings; switch box buzzer
Lamps and indicator for turning on the rear fog lamp
Circuit of heating elements of external rear-view mirrors
Airbag control unit circuit
Tailgate glass cleaner, glass washer, reversing lamp
Lamps for interior and trunk lighting; constant power supply to the head unit of sound reproduction; instrument clusters
Hazard switch; direction indicator switch; intermittent operation of the windshield wiper; central locking control; engine management system diagnostic connector; switching block
Central locking chains; switching block
Power circuit of the K7 relay winding for fog lights
Heated tailgate glass relay power circuit
Heater fan relay K8 power circuit
Electric drive circuits for exterior rear view mirrors
Cigarette lighter, power supply to the head unit for sound reproduction from the ignition switch
Heater fan relay coils K8
To access and replace fuses in the vehicle interior, remove the fuse cover, which is located on the left side of the instrument panel.
On the inside of the mounting block cover there are spare fuses (rated for rated currents of 5, 10, 15 and 30 A), a tweezer puller for removing fuses from the block, and a diagram of the location of the fuses.
Overcoming the resistance of the cover latches, remove it
The cover contains spare fuses and tweezers for removing fuses.
Design and principle of operation
An engine, similar to a living organism, is able to “live” for a long time only on the condition that it consumes pure raw materials for its functioning. In terms of the fuel system, the fuel filter is responsible for organizing the purity of the gasoline entering the car engine. This part, simple in structure, performs functions of great importance for any transport. In particular, this Lada Largus unit allows:
- prevent large fractions from entering the injector and cylinders along with gasoline;
- filter out a considerable amount of small fractions also present in the fuel;
- extend the service life of both the engine and the entire fuel system.
The design of the fuel filter in the Lada Largus is very interesting and unusual for a model from AvtoVAZ. The fact is that fuel filter elements, or rather, two of them, are built into the fuel pump. The last part contains fine and coarse filters. Together with the fuel pump, both filters are a non-separable design that can only be replaced as an assembly. Taking this feature into account, the manufacturer made the fuel filter in the model very high quality and durable in terms of operation.
Structurally, the fuel filter and fuel pump on the Lada Largus are made quite complex, so we will not consider its individual elements. Despite this, following the example of the photograph below, which shows the location of the filter, any motorist will be able to determine the degree of its contamination, but already on his car.
We study the design of motor 11189
In Renault and VAZ 8-valve engines, the oil filter is located differently. But in any case, protection is installed below. In general, it will be easier to reach the filter from above.
Engine Renault K7M
Engine VAZ 11189
If the number of valves is 8, changing the oil in the Lada Largus engine is done as follows: drain the waste, close the drain hole, change the filter and refuel. The filter is replaced from under the hood.
Now let's name the articles indicating the plug and dipstick: 21080-1009156-00 and 21080-1009045-00.
The thread of the plugs is M22*1.5
It looks like the drain plug comes in two versions. The second of them is turnkey “for 17”.