Any car, as you know, requires fuel. She won't go anywhere without him. But in the fuel system of any car, minor but very annoying problems periodically arise, which the car owner can fix on his own. The main thing is to know how to do it. Today we will tell the reader how to independently replace the fuel pump grid on a Lada Kalina. But, before moving on to the practical part, let's try to understand in more detail what a fuel pump is and why it is so important.
- 2 Why might the mesh need to be replaced?
- 3 Tools
- 4 Step-by-step replacement instructions
- 5 Video: Replacing the fuel pump mesh
- 6 Important points
Cleaning and replacing the fuel pump mesh on Lada Granta, Kalina, Priora
On Lada Granta, Kalina and Priora cars, a coarse fuel filter (mesh) is installed in the fuel module.
During operation, dirt is retained in it, which interferes with the normal operation of the fuel system. Let's look at how to remove the fuel pump mesh yourself and clean it of dirt. How to remove the fuel pump strainer
:
- Remove the float with the fuel level sensor (bend the antenna, move the housing down).
- Unfasten the tube from the fuel pump housing.
- Disconnect the lower part of the housing (press the three antennae).
- Remove the mesh (pry it off at the base with a flat screwdriver).
- clean from dirt;
- replace with a new one (price about 50 rubles), the shape of the mesh is different for 8 and 16 valve engines.
The process of replacing the fuel pump mesh is also shown in the video:
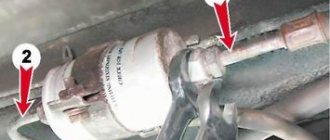
Let us remind you that in the fuel system of Lada Grant, Kalina and Priora cars there is also a fine fuel filter, which is located next to the fuel tank. It is changed every 30 thousand km. mileage (see instructions for Lada Priora and Granta/Kalina). By the way, Lada Vesta, XRAY and Largus cars do not have such a filter; owners of these models only change/clean the fuel pump mesh.
Source
How to disassemble the fuel pump Lada Kalina
- Remove the wires that are connected to the pump, and then remove the fuel level sensor.
- Pry up the intake pipe and throw it off. Do not disconnect the fuel corrugated hoses.
- Bend 4 plastic clips, lower glass. Remove dust from it and other parts of the fuel pump.
Replacing the fuel pump mesh on Kalina
Stable, reliable, uninterrupted operation of the Lada Kalina engine is ensured by a complex of systems, the most significant of which is the fuel system.
It includes many mechanisms that act harmoniously and complement each other, so when even the smallest part fails, it negatively affects the operation of the entire fuel system.
Today we will talk about how to replace the fuel pump mesh on Kalina, and also reveal the most important issues regarding the fuel pump. So, let's go.
How to replace the fuel pump mesh on a VAZ 1117-VAZ 1119?
Removal: 1) Before removing it and replacing it with a new one, the fuel pump will need to be pulled out, this is done very quickly and there should be no problems, just be sure to read our instructions for removing it so that no problems really arise, more details about that how to remove the fuel pump from a car, read the article: “Replacing the fuel pump on cars.”
2) Now that the fuel pump has been removed, proceed to disassemble it, first disconnect the wire block from the intermediate connector (see large photo), and then in a circle press the four latches that secure the module housing to the fuel pump housing and then remove the fuel pump housing from the car, lifting it up, but you won’t be able to completely remove it, because the tubes will get in the way (You don’t need to disconnect them, it will be enough for you that the fuel pump body comes out a little from the body of the fuel pump module and you will replace the mesh with a new one).
Note! When you remove the housing, carefully disconnect the drain tube from the module housing with a screwdriver (see small photo), but when the fuel pump housing is already pulled out, rinse thoroughly (it is best with carburetor cleaning fluid, it is sold in a can) the inside of the module housing, in gasoline is stored in it, and each gasoline contains particles of dirt and this dirt accumulates in the module housing and so that it does not clog the new mesh immediately after installation, it is recommended to wash the housing with anything to remove all dirt!
Installation: The new mesh is installed by snapping it into place, but the old one can be removed very easily by hand or you can use a screwdriver to pry the mesh and remove it from the fuel pump.
Additional video clip: You can see the instructions for replacing the fuel pump mesh in more detail in the video clip that is posted on our website, but just a little lower:
What is a fuel pump
The gasoline pump is a key component of the power system; its job is to ensure an uninterrupted, timely supply of fuel to the system.
In each model, the design and location of the fuel pump is unique; for the Lada Kalina, this device is located on the opposite side of the power unit.
On the one hand, this arrangement allows you to benefit from the technical capabilities of the machine, but on the other hand, the device requires more powerful operation than models in which the fuel pump is located closer to the engine.
In order for Kalina’s fuel pump to cope with its job, it is presented in an electric version. Its advantages are:
- simplicity of design;
- good fuel supply;
- safety.
But, as one might expect, Kalina’s electrics are not yet a strong point; they often break down, which is the main disadvantage.
In addition, the disadvantages of the Lada Kalina gas pump include increased noise levels, sensitivity to the quality of gasoline, and the fact that it requires cooling.
The issue of high-quality gasoline in our country, unfortunately, still remains unresolved; this is one of the reasons why the fuel system of the Lada Kalina fails.
Filters become clogged, which disrupts the operation of the entire mechanism and ultimately leads to pump failure.
This is why filters, or meshes as they are also called, need to be changed regularly.
We’ll talk about this, but first, let’s figure out what malfunctions happen with the Kalina fuel pump?
Types of faults:
- One of the most common pump malfunctions is a rapid decrease in pressure after the engine starts. This fact indicates serious violations that can be caused either by a valve defect or a breakdown of the pressure level regulator; it is quite possible that the injectors are also clogged. A sharp drop in pressure leads to problems in starting the engine , which, if the breakdown is not corrected, can even lead to engine failure.
- It also happens that the engine loses power, or the engine does not start at all, even when cold or hot. All this happens when a membrane or spring breaks, a rod wears out, or filters become clogged, and the latter happens more often than anything else.
- In any case, having discovered that there is something wrong with the fuel system, you should first check the condition of the filters, because, due to low-quality gasoline, they become clogged quite quickly, and it is better to change them in a timely manner, without waiting for problems. Now let’s talk about how to change the mesh from the pump yourself.
Fault diagnosis
The first sign that the fuel system of a Lada Kalina car is faulty is a sluggish response to the gas pedal and difficulty starting the engine. When the pressure in the line is low, the power unit simply does not have enough fuel, hence the weak dynamics. If the pressure is too high, the car drives well, but starts poorly due to the overflow of fuel into the cylinders, especially in the summer. The first step in this situation is to measure the fuel pressure in the system using a pressure gauge with a spool nozzle, which is used to check tires. The sequence of actions is as follows:
- With the engine cold, open the hood and remove the plastic cap from the end of the fuel rail (diagram, item 1).
- Place a small container under the fitting and release the pressure in the network by pressing the spool. Unscrew the spool as shown in the photo.
- Put on the pressure gauge hose and, to start the pump, connect the positive terminal of the battery with a wire to the contact on the diagnostic connector. Contact marking is “11”, test time is 10 seconds. The ignition must be turned off.
Immediately after starting, the pump pressure may drop, and then rise again and stabilize. If the upper pressure threshold is exceeded (3.9 bar), then the fuel pressure regulator is clearly to blame. With low pressure (3.6 bar and below), several options are possible:
- dirty fine filter;
- one or more injectors have lost their tightness;
- the fuel pump itself does not pump well;
- RTD failed.
Further diagnosis is carried out by the method of exclusion. It is quite simple to sweep away leaking injectors: you need to repeat the check and, after stabilizing the pressure, clamp the rubber hose of the fuel line. If the pressure drops, the reason is most likely in the injectors. There is a nuance here: after checking and replacing them, it may turn out that the situation has not changed.
Changing the mesh with your own hands
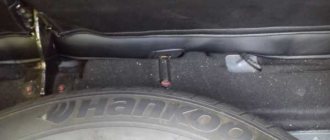
So, the mesh located in the fuel pump is forced to constantly come into contact with dust and dirt, because the pump itself is located between the seats, and dust constantly settles on its body.
That is why experienced motorists are not lazy to wipe the pump body with a damp cloth from time to time to avoid untimely clogging of the system.
Motorists advise carrying out such work every 45,000 - 50,000 km. mileage, this is exactly the time during which the Kalina mesh wears out. Of course, this work is classified as dusty, but, in principle, it is not as difficult as it seems, it can be done alone, in half an hour - an hour.
Source
Replacing the fuel pump mesh – Lada Kalina Blog
So, it all started with the fact that my Kalina began to have trouble starting. Sometimes everything is fine, but several times a week, there are times when you have to drive the starter for 5 seconds, and there is no reaction from the engine. As a result, the car still starts the second time
Also, I noticed one more feature: sometimes when you press the pedal sharply, you feel a sharp dip, as if the car does not have enough fuel, and only then it starts to drive normally.
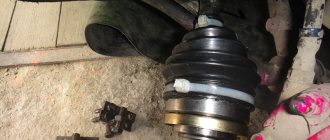
In general, the only thing that could be faulted was the fuel pump grid. And it was decided to replace it. To get to it, the first thing you need to do is remove the pump from the fuel tank. After this, you can begin the procedure with the mesh.
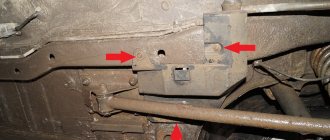
To directly get to the strainer itself, you need to remove the lower part of the fuel module. To do this, move the 3 side latches to the sides, which are visible in the photo below. 2 of them are marked with an arrow.
And at the same time we are trying to lift the pump itself up so that the lower part is separate. We also immediately disconnect the power plug from above by bending the latch to the side.
Also, we disengage the tube by prying it with a screwdriver:
Now the lower part can be released, and this can be clearly shown in the photo below.
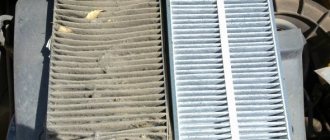
Pay attention to the condition of the mesh. It is worth noting that she has had this condition for 5 years and 70,000 km.
The fuel pump screen can be removed quite simply; to do this, just pry it off with a flat-head screwdriver and remove it.
Be sure to wash the entire pump inside, or rather its body, as well as the pump itself at the place where the strainer is connected to it. To do this, it is best to use liquid to clean the carburetor and the car's power system.
After this, we take a new part and install it in the reverse order. But first you need to remove the rubber plug from the new mesh, which is shown by the arrow in the photo below.
Guide to replacing coarse and fine fuel filters for Lada Kalina cars
The fuel supply system of the VAZ 1118 Lada Kalina car has 2 stages of fuel filtration - coarse and fine cleaning. The first is a fine mesh made of plastic, the second is an “accordion” made of porous paper. Both cleaning elements gradually become clogged during operation and after a certain period of time require replacement. Many car enthusiasts perform this operation on their own, because it is quite simple. You too can take on this work once you have read the instructions for its implementation.
Signs of trouble
There are several signs by which you can determine that the Kalina fuel pump is not working:
- the car does not start or stalls almost immediately;
- “Kalina” twitches when moving;
- the car does not develop maximum speed;
- extraneous noise or grinding noise coming from the fuel tank.
Similar symptoms are also observed when the fuel filter is clogged. Therefore, before removing the fuel pump on the viburnum, first replace the filter element. If the “symptoms” do not disappear, repair or replace the fuel module.
Common fuel pump malfunctions on Kalina:
The types of malfunctions described above require replacement of the fuel pump. The only type of work available to the car owner is cleaning the filter mesh.
Selecting new filter elements
To purchase fuel purification system parts for VAZ 1117-19 models, you need to know what they look like:
- The coarse filter is a flat mesh bag made of chemically resistant plastic that captures large particles of 80-100 microns. In the center of the element there is a plastic fitting that fits onto the counterpart of the gasoline pump.
The mesh element is equipped with a pipe that fits onto the fuel pump fitting
The element is equipped with clamps for fastening fuel line connections
All modifications of the Lada Kalina, including the second generation, are equipped with absolutely identical filter elements - a “barrel” and a mesh catcher. The dimensions of the spare parts are also identical.
There are no tricks in choosing a coarse mesh - the parts are made according to a single sample and cost from 30 to 45 rubles. The only caution: in order not to purchase a low-quality product or a fake, contact well-established stores. Although the fuel pump mesh costs a penny, it plays an important role in the fuel system: it catches large debris that can quickly clog the filter paper of the next cleaning element.
In operation, the plastic case is not inferior to the metal one in terms of reliability.
The material from which secondary filters are made does not play a big role. What is important is the contents of the “barrel”, which cannot be seen or touched. Therefore, there are only 3 selection criteria:
- correspondence between the body dimensions and the diameter of the fittings;
- the presence of plastic clamps;
- brand (manufacturer).
The mounting clamp on the Kalina is designed for a case diameter of 56 mm
In order for the spare part to fit the mounting clamp, the case diameter must be 56 mm. The internal size of the gasoline pipes put on the fittings is 8 mm.
There are many different fuel filters sold in stores, and not all of them are equipped with clamps (in other cars, the hoses can be secured with clamps). The part for “Kalina” must have latches, otherwise the tubes cannot be secured.
A plastic latch secures the hose to the filter fitting
In the countries of the former USSR, the following manufacturers of gasoline filters have proven themselves best:
At the moment, second-generation Kalina machines are equipped with fine filters made of polyamide. But users are not very complimentary about the factory spare parts: after disassembly, it was discovered that the paper “accordion” was poorly glued to the body. As a result, half of the fuel passed through the gas pipeline without filtering. At the same time, based on the practice of isolated cases, it cannot be unequivocally stated that metal filters are better than plastic ones.
Lada Kalina sedan › Logbook › Coarse filter Kalina 1118 - replacement
How I bought the car 2 years ago, I changed the fine filter that is under the car near the gas tank (changes every 30 thousand - change again soon). A year ago I changed the fuel level sensor (the tracks were completely worn out and began to dull) the mesh (coarse filter (hereinafter referred to as FGO) )) at that time, I didn’t think about changing it, I didn’t have a new mesh at hand, and it was too hard to walk to the store. The tank was not dirty. Some time later, when turning the key, at the moment when the pump creates pressure and pumps for the first time, a whistle appeared. And when the internal combustion engine was running, a whistle was heard in the tank area. Previously, there was also a whistle, but not like this - this damn thing is really distinct. Today, a year later, I decided to replace the mesh (FGO).
I removed the fuse in the middle of F2 and started the internal combustion engine, but it did not start. (A year ago, the internal combustion engine started for 5 seconds and stalled), thereby we relieve pressure in the fuel system. You can simply disconnect the wiring harness from the fuel pump, and the same thing will happen.
Raise the seats like this
Having removed the clamps, I was surprised the previous time a lot of gasoline leaked out, this time just 2 drops! Using a hammer and chisel or a pipe, we alternately hit the protrusions so as not to jam the fixing ring. The first time (a year ago) when I was filming it, I was afraid of breaking something. But the trick is that you need to knock the ring out of the fixing lugs and it will go easier with fasting. Well, hit one at a time, and not just at one ledge.
Pulled out the pump. The tank is the same as a year ago (I filled up with Lukoil)
I disconnected the fuel level sensor from 2 clamps, disconnected one plug, but did not remove the second plug
I released the 4 fasteners and disassembled the pump. I removed the mother from the wiring of the pressure sensor (pressure regulator) and disconnected one plug from the FLS. Do not lose the spring that is on one of the 2 pins. Inside the pump is still the same as I left it a year ago - well, there is a bit of a trash bin, of course, but overall it’s clean
The trash can is visible on the filter
I tried to pry it off with a screwdriver, but ended up removing it with my hands.
I found it not so easy to remove. Maybe the second time will be easier))). I pulled up and the mesh came off first at the large hole, and then I also pulled the mesh up and pulled it out from the pin. The filter was held in place by a ring.
Old mesh view 1
Old mesh view 2
Installed a new mesh. It didn’t just fit either, I had to apply force in the area of the fixing ring. The pin on which the ring is put sticks out slightly - this is normal, as I understand it
We adjust the rubber ring on the tank and assemble until the marks (pimples) align
We assemble in reverse order.
We stick 2 clamps and a block of wires into the pump, insert fuse F2 (if removed) and turn off the key in the ignition switch 5 times so that the pump fills with fuel and creates the necessary pressure.
Having started the internal combustion engine, I turned it off
I turned the key to create pressure in the system and started the internal combustion engine again, to my surprise the pump pumped up extremely quietly - there was no WHISTLING! With the engine running, I tightened the hatch cover and noticed that the pump was running very quietly, not like before with a whistle. When you lower the seat, you can hardly hear it at all. After the night, when I turn the key, there is a whistle. I pumped it up 5 times, started it, turned it off again, turned it again, no whistle
When the pump is running, there is practically no whistling as before. In short, the pump will probably have to be changed soon))) I’ll wait until the bitter end
I pumped it up 5 times, started it, turned it off again, turned it, no whistle. When the pump is running, there is practically no whistling as before. In short, the pump will probably have to be changed soon))) I’ll wait until the bitter end.
Price tag: 35 ₽ Mileage 54450 km
Location of Kalina fuel filters
To replace filter elements on VAZ 1117-1119 series cars, you need to know where they are installed. The location of the parts is as follows:
- mesh bag - a trap for large particles is attached to the suction pipe of the gasoline pump, immersed in a tank of fuel;
A screen for catching large particles is located in the fuel tank along with the pump.
The fine cleaning element is hidden in a niche to the right of the tank
The location of the filter elements is the same for all modifications of Kalina and does not depend on the body type. That is, on the “station wagon” and “hatchback” you will find parts in the same places as on the “sedan”.
Briefly about the main thing
It is recommended to change the cleaning element every 10-15 thousand km. The plan for replacing the fuel filter on a Lada Kalina looks like this:
- de-energize the fuel pump power circuit;
- relieve excess pressure in the fuel system and produce residual fuel;
- remove the filter located on the right side of the car tank;
- install a new element, observing the direction of fuel movement (the arrow on the body points towards the engine);
- restore power to the supercharger module and start the engine.
1200 rub. for the photo report
We pay for photo reports on car repairs. Earnings from 10,000 rubles/month.
Write:
The main fuel filter on the Lada Kalina (fine filter) is installed separately from the pump, sensors and mesh filter. The Kalina 1.6 with the VAZ-11186 engine has 8 valves, and the same fuel filter is installed on the 16-valve VAZ-21126 and VAZ-21127.
How to change the coarse mesh
The work package for replacing the first stage filter consists of several stages:
- Buying a new part.
- Preparation of tools and repair site.
- Disassembly, removal of the gasoline pump and replacement of the mesh catcher.
To replace the old dirty mesh, you need to remove the fuel pump
How to choose a Kalina mesh filter is described in the previous section. The location for repair work does not matter, since you do not need a car overpass or inspection ditch - disassembly is carried out from the interior.
Preparatory stage
In warm weather, disassemble the car directly on the street, but in windy weather, find a quiet place, otherwise dust will blow into the interior. In winter, it is more convenient to work in an insulated garage or box.
The tools you need to prepare are:
- a Phillips and flathead screwdriver;
- pliers;
- a small chisel or metal point;
- hammer;
- clean rags.
To disassemble and dismantle the fuel pump you will need a modest set of tools
Before starting work, remove unnecessary objects from the rear row of seats, and then remove the seats themselves. They block access to the technological opening with a hatch leading to the fuel tank. The latter is attached to the bottom of the car from the outside.
To reduce the risk of breathing dust during disassembly, it is recommended to vacuum the body covering under the seat.
Removing the fuel pump and replacing the mesh
The first step is to relieve excess pressure in the fuel line, otherwise when the pipes are removed, a stream of fuel will splash around the trim and the pungent smell of gasoline will “linger” in the cabin for a long time. There are 2 ways to relieve pressure:
- Pull out the 15 A fuse for the fuel pump electrical circuit, located under the cover in the center tunnel. Start the engine and wait until it stalls due to lack of fuel. Repeat the operation 2-3 times.
The fuel pump electrical circuit fuse is located under the cover on the center tunnel.
The pipe with the spool is located behind the engine to the right of the ramp
For the fuse number, see the operating instructions for your car. In cars of different years of production, it can be in the 1st, 2nd or 8th position.
After removing the rear seat, you will have access to a hatch covered by a fold-down trim flap. Place the cover aside and proceed to disassembly, performing the operations in the following order:
- Take a Phillips head screwdriver and remove the 4 screws holding the hatch in place. Remove the cover.
The hatch is screwed to the bottom of the car with 4 screws
To disconnect the connector, you need to pry the plastic tab with your finger.
The pipes leading to the pump are held on by plastic latches
The lock washer is loosened by light blows of a hammer through the adapter
Pull out the pump carefully so as not to damage the float
To remove the pump from the glass, you need to press the plastic latches
The mesh is removed and placed on the pump fitting by hand
It is worth keeping a vacuum cleaner handy during disassembly. When you remove the hatch cover, you will find a thick layer of dust underneath it, which it is advisable to remove.
It is advisable to remove dust with a vacuum cleaner so that it does not fall into the open tank
The new strainer is installed on the fitting until the latch clicks, after which the assembly can be assembled in the reverse order. Before doing this, look inside the glass where the gas pump is located: if you find dirt at the bottom, remove it with a rag or wash it with a brush soaked in gasoline. Before starting the engine, turn the ignition on and off several times, allowing the fuel pump to raise the pressure in the line to normal.
The above-described procedure for replacing the coarse filter element is performed in the same way on Kalinas with different body types. The same technology is used when repairing a Lada Kalina Sport car.
Video: how to change the mesh filter on Kalina
Replacing the fuel pump
To access the Lada Kalina fuel pump, you need to fold back the rear seat, remove the insulation (if any), and then begin dismantling the device.
Tool for the job
- Screwdriver with flat and Phillips blade.
- Hammer.
- Pliers.
Step-by-step work order
- Disconnect the negative terminal from the battery.
- We open access to the protective cover.
Raise the rear airbag up
- Then unscrew the four bolts from the black metal cover located under the rear seat.
To avoid losing, we put the bolts in one place. - When the bolts are unscrewed, remove the cover to the side.
Under the decorative cover you can see the fuel pump and DUST!
- When the cover is removed, you will see a picture where the upper part of the fuel pump is visible, as well as the fittings that are connected to it.
- Now you can begin the dismantling itself, and first of all, disconnect the power wires. To do this, remove the plastic clamp on the block and pull it to the side.
- The next step is to disconnect the fittings; in order to remove them, you need to press on the metal clamp with one hand, and use the other hand to pull the fittings to the side using pliers.
The block is marked with a red arrow, and the fittings with a green arrow. - When dismantling the second tip, note that its retainer is made of green plastic, and in order for the fitting to leave the place of fixation, you need to press on it, and then pull the tip itself to the side with your other hand.
- Before you begin removing the fuel pump, you should thoroughly clean everything of dust and dirt to prevent any debris from getting into the fuel.
- When everything is clean, you can begin to dismantle the retaining ring that secures the fuel pump to the housing. To perform these manipulations, you can use a special puller, or using a flat screwdriver and a hammer, knock it counterclockwise from the mounting points.
- Use a hammer and screwdriver carefully so as not to damage the ring or fuel pump housing.
Strikes should only be made on the ring. - Then, when the ring clip has popped out of its seat, you can take it out.
- Now is the time to start removing the fuel pump itself; to do this, you need to grab it by the top part and pull it up. In this case, you should be extremely careful so as not to bend the structure. Please note that the fuel pump is equipped with a special float indicating the amount of fuel in the gas tank, and in order not to knock it down, the fuel pump should be removed so as not to touch the body of the fuel tank.
- Here is a photo example of when the fuel pump has been successfully dismantled.
Successfully dismantled fuel pump. - All installation work should be carried out in strict reverse order, similar to the removal procedure.
Replacing the fuel pump mesh
Fuel pump mesh close up
When the fuel pump is removed, you can inspect the filter mesh. This is the so-called coarse filter. To do this, you need to disassemble the fuel pump and replace the filter element.
On the left is the new one, on the right is the old fuel pump mesh.
Instructions for replacing the fine filter
To change the second stage filter element, you will need an overpass or inspection hole. It is quite difficult to get to the part by climbing under the car. When entering the overpass, take it as far to the left as possible, this will ensure easy access to the filter (it is located to the right of the tank).
The filter is located to the right of the tank and is held in place by a clamp
From the tool kit you will need a 10 mm wrench and a flat-head screwdriver. The procedure for performing the work is similar to the previous algorithm for replacing the fuel pump grid:
- Relieve pressure in the fuel system in one of two ways (described in the previous section).
- Go under the car and disconnect the gasoline hoses from the filter. The tubes are removed by pressing the levers of the plastic clamps.
The pipe is removed after pressing the lock button
The filter element is removed after loosening the clamp
As a rule, all threaded connections located under the bottom of the machine rust and are difficult to unscrew. Therefore, before dismantling the old part, you should treat the clamp bolt with WD-40 aerosol lubricant.
The new filter is put in place taking into account the direction of fuel movement (indicated by the arrow on the housing) and connected to the system in the reverse order. The replacement technology for a car with a 16-valve engine is generally no different from repairs for an 8V engine. While working, you may encounter minor differences in small details:
- the tube with the gasoline pressure relief valve comes out from the same side, but closer to the cylinder head and slightly at an angle;
- The fine cleaning “barrel” is held in place by a plastic clip rather than a metal clamp.
On the latest Kalina models, the filter element is attached to a plastic clip
If, after dismantling the old part, you find that the fuel pipe clamps are in good condition, you can reuse them.
Video: quick installation of the VAZ 1117 filter element
How to check whether the filter is dirty or not
Clogging of fuel filters can be determined for various indirect reasons. For example, by the unstable operation of the engine, you can measure the pressure in the fuel rail. But all these guesses and manipulations are not necessary, if you figure it out.
Filters are inexpensive, everything can be changed independently, so it’s easier to change the filters right away and then see if the car’s behavior has changed.
If the car drives poorly, then it is quite possible that the problem is not in the filters at all, but in the fuel pump or something else is wrong. So usually it is the filters that are changed right away; repairs are always carried out from simple to complex.
How often is replacement done?
There are clear regulations for replacing consumables, which include fuel filters. According to the requirements of the machine's operating instructions, they must be changed every 30 thousand kilometers. But given the different quality of fuel at gas stations and the operating conditions of the car, experienced auto mechanics recommend reducing the maximum interval to the following values:
- for a fine filter - 20 thousand km;
- for coarse mesh - 70 thousand km;
- when operating in northern regions, the service life is reduced by half from the regulations, that is, it is 15 and 35 thousand km, respectively.
Some motorists who carefully care for their Kalina offer their own replacement intervals. The principle is as follows: all consumables are updated simultaneously, along with the addition of fresh oil. With such a scheme, the interval is reduced to 7-15 thousand km, depending on the quality of the engine lubrication.
Compared to its predecessors, the Lada Kalina has a more modern and complex design. But the gasoline filtration scheme, inherited from the “tenth” VAZ family, remained unchanged. Thanks to this, it remains possible to change the cleaning elements yourself and not pay money for car service services.
Source
Replacement
To replace we need:
- Flat head screwdriver
- Open-end wrenches for 17 and 19 (if you have a filter with a threaded connection)
- New fuel filter
- WD-40 (always useful)
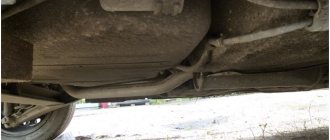
The fuel filter on the Lada Kalina is installed under the bottom of the car, so it is better to carry out the replacement operation in the garage on a pit or on a lift.
The first thing to do is relieve the pressure in the fuel line. There are two ways to do this.
Method one
There is a hatch between the front seats in the floor tunnel. We open it with a flat-head screwdriver and see the fuse block. We need the second one on the left side. Carefully remove it.
Method two
We recline the rear seat and see the access hatch to the fuel pump. Open it and unplug the fuel pump power plug.
Thus we de-energized the circuit. But there is still pressure in the system! To reset it, just start Kalina and wait until it stalls. At this point, the pressure release stage can be considered complete.
Now we need to get under the bottom of the car. The fuel filter on Kalina is located directly below the fuel tank. It is extremely easy to attach - using a plastic clip. Carefully remove it from the retainer.
After this, you need to disconnect the fuel lines from it. They are attached using fittings with metal clamps. We press them on both sides and pull them by the fittings. There may also be a threaded connection. Then we will need open-end wrenches for 17 and 19.
Now we install the new fuel filter in place. Be careful! There is an arrow on the filter indicating the direction of the current. Install the filter so that this arrow is directed in the direction of fuel movement along the line (in other words, towards the engine).
After this, insert the fuse or connect the plug to the fuel pump, depending on which method you chose when relieving pressure.
Filters used in Lada Kalina
Viburnum uses three types of filters that are responsible for cleaning its liquid or air.
Viburnum filter:
These categories include the following filters.
- Fuel pump mesh;
- Fine fuel filter;
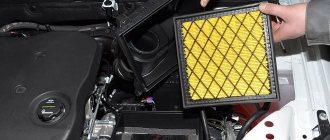
- Engine air filter;
- Cabin filter;
Each of these filters strictly performs its own functions, and contamination of each of them negatively affects the operation of the area in which it is installed.
Where is the gasoline filter of Kalina 1
Each part of the unit is located in its place, calculated to achieve maximum effect and the possibility of normal maintenance.
- The first line of defense is located directly at the gas pump. A coarse mesh traps large particles and debris that can damage the pump impeller.
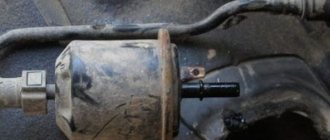
- The main filter is located under the fuel tank on the right side. The device is a metal flask with a drawn arrow.
- The last line of defense is located in the engine compartment and is mounted directly in front of the injector yourself. The cleaning module looks like a transparent plastic flask to which hoses fit.
Replacing the Kalina fuel pump filter
| One of the reasons for low fuel pressure in the fuel rail is a dirty fuel module strainer. Let's look at how you can remove and clean the mesh of the Kalina fuel pump with your own hands. |
Removing the Kalina fuel level sensor
You will need: remove the fuel pump, prepare a flat-head screwdriver and a marker.
To get to the fuel pump grid, you need to remove the fuel level indicator sensor (FLS):
- Slide the cover and disconnect the wire from the fuel pressure regulator.
- Disconnect the block from the fuel module cover by pressing the lock.
- Disconnect the block from the fuel pump, releasing the block retainer using a screwdriver.
- Release the 2 FLS latches and move it along the grooves towards the cover.
- Remove the Kalina FLS.
Replacing the Kalina fuel pump mesh
- Disconnect the drain tube from the intake chamber by prying it off with a screwdriver. Mark with a marker the guide on which the spring is placed.
- Release the four latches on the fuel pump cover.
- Remove the cover along with the fuel pump.
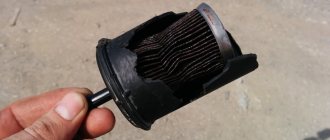
- Remove the Kalina fuel pump filter by prying it off with a screwdriver.
You can clean the fuel pump screen from dirt using clean gasoline.
We wash the mesh filter in nitro paint solvent and blow it with compressed air (from a compressor or foot pump). The fuel pump is assembled in the reverse order. The spring should be installed on the guide marked with a marker. You cannot move the spring to another guide.
By the way, do not forget to change other filters.
Keywords:
- fuel pump Kalina 2
- viburnum fuel pump
- fuel system Kalina 2
- viburnum fuel system
- filters Kalina 2
- viburnum filters
Similar materials
- Replacing the Kalina fuel filter
- Replacing the Priora/Grants fuel pump
- Replacing the cabin filter on Kalina
- Replacing the cabin filter on a Priora
- Replacing the fuel filter on a Priora
- Replacing the cabin filter of Lada Granta
- Replacing the fuel filter Lada Granta
- Replacing the cabin filter Kalina 2 (VAZ 2192, 2194)
- Replacing the air filter on Priora/Kalina1-2/Grant
- Replacing the timing belt of Priora/Kalina
xn—-8sbabr6ahc3e.xn--p1ai
Is it important to change the filter?
According to the maintenance regulations, it needs to be changed every 30,000 kilometers. The figure is calculated taking into account the filling of high-quality, clean gasoline. If the quality factor of the fuel is in doubt, it is recommended to reduce the service interval by 2-3 times.
If you don’t change the consumables at all, the engine will act up and the load on the fuel pump will increase. Naturally with all the ensuing consequences.
The most popular filter brands:
- MANN – 820 rub;
- BOSCH – 450 RUR;
- HOLA – 400 rub;
- UFI – 250 RUR;
- PECAR – 310 rub.
If you go to a service station, the car owner will need to pay at least 1,000 rubles for everything. The final cost may vary in different regions.
Fuel filter on Kalina: where is it located, replacement, how to remove, which one is better to choose, video and photo
Fuel without foreign inclusions is the key to long service life of the injectors and the entire engine. The main “nutritionist” of the engine is the fuel filter. It traps foreign debris, providing the car with clean and healthy “food”.
Fuel filters Kalina
Like many other VAZ cars, the Lada Kalina power system is equipped with two stages of fuel filtration. The coarse cleaning function is assigned to a mesh filter or “mesh”, as it is commonly called. Installed together with the entire fuel module in the gas tank, the mesh protects the electric fuel pump and does not allow large debris to pass through, which can cause a breakdown or clog the fuel line.
The mesh protects the electric fuel pump and does not allow large debris to pass through.
For Lada Kalina you need a mesh with a cut. An inexpensive part costing no more than 50–100 rubles. plays an important role. A clogged filter makes it difficult for fuel to flow into the fuel pump, which is forced to operate at higher speeds in order to maintain the required pressure in the power system. This mode can cause premature failure and replacement of the pump at a cost of about 2,500 rubles.
For Lada Kalina you need a mesh with a cut
Before entering the injectors, gasoline goes through one more stage - a fine fuel filter or simply a fuel filter, as it is called in official descriptions and manuals. The power system of the Lada Kalina uses a conventional gasoline filter for injection cars with fittings for hoses equipped with clamping clips. Parts with threaded connections are not suitable.
The power system of the Lada Kalina uses a conventional gasoline filter for injection cars with fittings for hoses with clamps
The market is saturated with fuel filters from various manufacturers. Their prices range from 150–500 rubles depending on the brand. Some manufacturers and sellers value their goods even more expensive.
While researching the market, experts from the magazine “Behind the Wheel” did not find any significant differences between the products. Among the main parameters of gasoline purification filters are screening fineness and performance at a given pressure.
All filters that have attracted the attention of specialists successfully cope with the retention of pollutants larger than 10 microns in size and easily pass 2 liters of fuel through the filter element every minute.
Choosing a fuel filter of a certain brand does not have a significant impact on the quality of cleaning. Provided that the filter is replaced in a timely manner, price-conscious motorists do not worsen the operating conditions of the engine. The purchase of expensive products is justified if improved parameters are required: minimal screening fineness and a large area of the filter element.
Photo gallery: fuel filters from various manufacturers
BIG is one of the most popular fuel filters. Champion fuel filters have a relatively low price. Bosch fuel filters are known for their optimal price-quality ratio. Motorika fuel filters are produced in Russia.
Kalina was the first VAZ model, the interior of which was designed using mathematical models using the latest equipment. This provided the compact car with surprisingly good ergonomics - in terms of space and ease of seating, this car cannot be compared with previous front-wheel drive vehicles, although the base, in fact, remained the same!
Oleg Polazhinets Wheels
Location of Lada Kalina fuel filters
This element of the Lada Kalina is “hidden” under the bottom of the car next to the gas tank. To get to it, you will need to lift the car or drive into a viewing hole. The filter is clearly visible from below. Its location is to the right (in the direction of travel) of the gas tank.
The Lada Kalina fuel filter is “hidden”, under the bottom of the car next to the gas tank
The fuel pump strainer is installed inside the tank. To get to the neck, you will need to lift or remove the rear seat, unscrew the floor trim flap and unscrew the hatch cover.
The fuel pump strainer is installed inside the tank.
...and their replacement
The Lada Kalina service book recommends changing the filter every 30 thousand kilometers or more often when using low-quality fuel. Unfortunately, it is impossible to check the quality of gasoline after each refueling, but the likelihood of dirty gasoline getting into the tank is high. For this reason, motorists change the element approximately twice as often as the car manufacturer recommends.
There are no recommendations on service intervals for the fuel pump mesh in the regulations. Motorists determine the need to replace or clean it independently. Signs of a dirty coarse filter include low fuel pressure in the power system and excessively loud operation of the fuel pump. It is useful to inspect the screen element each time there is a need to remove the fuel module.
Work on removing and installing fuel filters is carried out by disconnecting the negative terminal of the battery from the car body. The sequence of operations for the Lada Kalina station wagon, sedan or hatchback, as well as for modifications with eight or sixteen-valve engines, is the same.
Replacing the fuel filter
Replacing the Lada Kalina fine fuel purification element will not take much time. To work, you will need a container for remaining fuel, a screwdriver and a 10 mm wrench.
Before removal, relieve pressure in the engine power supply system:
- Use a screwdriver and open the fuse box hatch in front of the gear shift lever.
Using a screwdriver, use a screwdriver to open the fuse box hatch in front of the gear shift lever. - Pull out the middle fuse that powers the fuel pump.
Pull out the middle fuse that powers the fuel pump. - Start the engine, do not turn it off until the gasoline is completely exhausted. After stopping, turn the crankshaft once or twice with the starter.
It is more convenient to change this element on an inspection pit or a lift. Replacement procedure:
- Disconnect the negative terminal of the battery.
- Squeeze the clamps and disconnect the inlet and outlet tubes from the fine filter.
Collect any remaining gasoline that leaks out into a container. Squeeze the clamps, disconnect the inlet and outlet pipes from the fine filter - Loosen the bolt of the metal fastening clamp.
Loosen the bolt of the metal fastening clamp - Remove the filter and drain the fuel into a container.
Remove the filter, drain the fuel from it into a container - If a plastic clamp is installed, simply remove the fuel filter from it.
If a plastic clamp is installed, simply remove the fuel filter from it. - Install the new one, placing the arrow on the housing towards the front of the machine.
Install the new filter with the arrow on the housing facing towards the front of the machine. - Tighten the metal clamp bolt.
- Place the fuel inlet and outlet hoses onto the fittings. Press them against the filter housing until the clamps click.
- Restore power to the fuel pump, connect the battery.
- Start the engine, inspect the fuel line connections, and check for gasoline leaks.
When developing the Kalina, VAZ implemented such modern solutions as the production model, such as LED backlighting of the instrument cluster and keys, electric locking for reverse gear, perfectly illuminating headlights with electric corrector and polycarbonate glass without a lens, a heating and ventilation system with recirculation built into the instrument cluster trip computer... Compared to other VAZ models of the late nineties, Kalina stood out, as they say, to everyone.
Oleg Polazhinets Wheels
Replacing the coarse filter
It is more convenient to change the fuel pump strainer when there is a minimum amount of fuel in the tank.
- Fold back the seat, lift the trim flap, and free access to the fuel pump hatch.
Remove the seat, lift the trim flap, free access to the fuel pump hatch - Unscrew and remove the hatch cover, remove dust and dirt from the fuel module cover.
Unscrew and remove the hatch cover, remove dust and dirt from the fuel module cover - Disconnect the electrical connector from the module.
Disconnect the electrical connector from the module - To relieve pressure in the power system, start the engine and wait for it to stop spontaneously after running out of gasoline. Turn the crankshaft two or three times with the starter.
- Turn off the ignition. Disconnect the battery from the car body.
- Release the clamps and disconnect the fuel hoses from the fittings on the fuel module cover.
Release the clamps, disconnect the fuel hoses from the fittings on the fuel module cover - Turn the module's clamping ring counterclockwise, resting the screwdriver against the protrusion.
Turn the module's pressure ring counterclockwise, resting the screwdriver against the protrusion - Remove the ring.
Remove the retaining ring - Pull the fuel module out.
Drain the fuel from its housing. Pull out the fuel module - Remove the rubber o-ring.
To prevent dust and foreign objects from entering the tank, cover the hatch. Remove the rubber o-ring - Use a screwdriver to press out the latch and disconnect the electrical connector on the inner surface of the fuel module cover.
Use a screwdriver to press out the latch and disconnect the electrical connector on the inner surface of the fuel module cover. - Hook it with a screwdriver and disconnect the drain tube from the module body.
Use a screwdriver to remove the drain pipe from the module body. - Press out the four latches.
Release the four latches - Remove the fuel module cover along with the electric fuel pump.
Remove the fuel module cover along with the electric fuel pump - Use a screwdriver to pry off the strainer from the fuel pump.
Use a screwdriver to remove the strainer from the fuel pump. - Install a new cleaning element. Assemble the module in the reverse order of disassembly.
- Install the hatch rubber gasket and the fuel module, pointing the arrow on the cover towards the car trunk.
Install the fuel module, pointing the arrow on the cover towards the trunk of the car - Secure the module with a clamping ring. Connect the fuel pipes and electrical connector.
- Connect the battery terminal. Start the engine, inspect the connections of the pipes with the fittings, check for fuel leaks.
: replacing the fuel pump strainer
To independently replace the Lada Kalina fuel filters, you do not need honed skills or expensive equipment. Work that is feasible for any motorist and carried out in a timely manner will save the car owner from unexpected failures and will extend the life of the engine.
- Alexey Norkin
Source: https://autozam.ru/remont-i-obsluzhivanie/toplivnyiy-filtr-kalina.html