The use of electric drives in trunk doors is becoming increasingly popular among domestic car enthusiasts. Components are also complex systems that have their own parts. One of these parts is the lock, the features of which for the Lada Granta we will consider further.
Grant's electric trunk lock
The lock is a key component of car doors, because the safety and security of the interior space of the car directly depends on its reliability: the interior, trunk, engine compartment, etc. Electronics are an order of magnitude more reliable than well-known manual locks, which leads to its fairly rapid spread. There are many models of machines on the market that have an electric drive. Today we will look at a trunk lock with a drive for the Lada Granta.
Removing the trunk lid lock and drive
We remove the trunk lock and its drive for replacement. Opening the trunk lid...
...and, squeezing it out with a screwdriver...
...we disconnect the rod from the ball end of the lever of the cylinder mechanism of the lock.
Using a 10mm socket with an extension, unscrew the nut securing the base of the lock drive to the outer panel of the trunk lid. In order to unscrew the other nut, insert the key into the cylinder mechanism and, turning the lever...
... use the same tool to unscrew the nut located under the lever.
Remove the lock drive from the trunk lid.
Functionality and simplicity
This is exactly how we can characterize the operating principle of the lock for the trunk drive model 2190-5606010-10. The design of the device is quite functional, which can be seen by the presence of useful functions, for example, an activator. The component is characterized by rapid operation, activating the electric trunk drive, thereby significantly facilitating the process of operating the car.
The function is convenient, relatively new, and is becoming increasingly widespread among domestic car enthusiasts.
The operating principle of the activator is generally simple: when you press the opening button inside the cabin, a corresponding impulse is sent to the drive, which activates the component. In principle, the function is essentially minor, but it significantly makes life easier for vehicle owners and drivers. The solution is especially useful in the cold season, when the keyhole freezes and opening the trunk lock on your own is very problematic.
Drive model kit
The design of the device allows it to be combined with conventional mechanical locks during operation. This makes it possible to use two methods at once when opening the tailgate, which ensures not only functionality, but also increases resistance to burglary.
Today, there are two key types of drive that drive the trunk lid. The first is a system powered by a small electric motor, the second is driven by magnetic plates.
Among them, the first type is more popular, due to its high endurance, practicality and durability. The magnetic mechanism is characterized by a complex design, which provokes a wide range of problems during operation. This is precisely why the second variety is not in wide demand among domestic car enthusiasts.
When using the trunk lid lock for the Lada Granta liftback (VAZ 2190), opening is also carried out using a remote control key fob or by simply pressing a button on the door lid.
The lock model 2190-5606010-10 for activating the electric trunk drive is one of the most tested on the market, with individual parameters. The characteristics were implemented taking into account the specific features of the VAZ models. In addition to model 2190, locks can be easily mounted on other popular models:
- 2108 (21083);
- 2109;
- 2113, 14, 15.
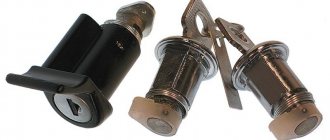
How to dismantle the lock to replace the cylinder?
You can gain access to the lock mechanism by removing the plastic upholstery inside the luggage compartment. This protective component is fixed by means of two bolts, which are located in the places where the special handle is installed. They are also called latch caps. They are pryed off with an ordinary screwdriver.
Structurally, the trunk lock in the Lada Kalina is made of two parts, regardless of the body type, hatchback, station wagon or sedan. They are presented in the form of a cylinder and the unlocking mechanism itself. If it is necessary to replace the trunk lock, then the dismantling of these components is carried out in a separate order.
When you only need to replace the larva, this can be done in a few simple steps. Here you will need a screwdriver and a socket.
- By unscrewing the bolts, we release the necessary part of the body.
- Next, remove the retainer using a screwdriver. It is attached directly to the body of the larva itself.
- It is recommended to remove it very carefully, while holding the spring.
- Installation of a new element is carried out strictly according to the reverse manipulation algorithm.
If there is a need to replace the lock itself, the operation becomes a little more complicated due to the need for additional actions.
- First, the door lock is unscrewed using a screwdriver. This is not difficult since the element is held in place with only two screws.
- Now we pull the trunk lock outward, and it freely comes out of the landing niche.
How is the activator installed?
The only way to get inside the trunk of a Lada Kalina is this manipulation - turn the key and press the button. This action is not always associated with convenience. For example, in bad weather or when your hands are full, this is not easy to do. This circumstance prompts owners to consider purchasing and installing an activator. Installing this useful element is quite simple. Here you will need a self-tapping screw, which will secure the device we are considering. To check the functionality of the activator, you should connect it with the standard connector from the on-board network.
After the current supply to the activator is stopped, the door is locked with the first latch, but remains not completely closed. To get back inside the luggage compartment you will need to use the key.
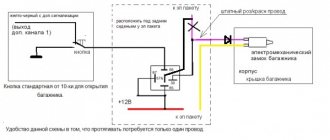
Installing a push-button lock is not a very difficult task. To implement it, you will need to assemble a circuit, which requires wiring. Here you will need to “attract” the programmable channel present in the alarm.
You can connect the device using two options.
- We connect the button with the positive output of the activator (12 V), bypassing the relay. The advantage of this scheme is the absence of unnecessary components and simple connection. As a negative aspect, it should be noted the need to lay additional wire lines.
- The second method is more labor-intensive. Here you will need to use additional components (diodes). You also need to find the ground connection point. The main advantage is the need for a minimum number of wire lines.
Experts prefer the first method because it is simpler. For switching, you can use copper wire type PV-3, the cross-section of which is 1 mm2. Laying should be done on the left side along the thresholds. You can connect by means of a clamp and subsequent wrapping with electrical tape.
The control wire of the activator may be a standard red-pink cable. It is subject to commutation with the relay, followed by winding the contact and placing it under the BUS fixation frame. The entire list of manipulations is performed with the battery disconnected.
Block system in the electrical network
The network is powered by a battery that generates a voltage of 12 V. The device is recharged while the engine is running and directly from the generator unit. Their switching is carried out using a relay regulator, the functionality of which includes the ability to maintain a constant voltage regardless of the engine speed at the moment.
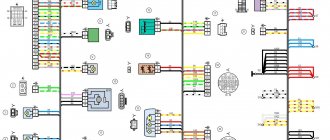
Wiring in a car electrical network involves switching all present collectors. The cables are equipped with copper cores, of which there can be several in one wire. The cores are covered in polyvinyl chloride insulation. The wire responsible for the “ground” of the LADA Granta car is connected directly to the body.
The structure of the on-board network is block-based. To ensure convenience and clarity, the manufacturer’s electrical circuit diagram is divided into the following blocks:
- front part of Lada Granta;
- ignition system;
- dashboard;
- wiring in the rear of the car.
All nodes are electrically connected.
Next, we will specify the diagram responsible for the front part. Here you can find the presence of designations for such consumers (version “Norma”):
- battery;
- starter;
- generator unit;
- front optics;
- direction indicators;
- horn;
- fan built into the cooling system;
- motor of the pump module washing the windshield;
- fuses.
As the electrical diagram shows, the largest number of devices are located in the engine compartment. There is also a circuit board with power safety elements, the number of which is equal to five.
The manufacturer, as expected, placed the mounting block responsible for the functionality of the dashboard in the LADA Granta cabin. It is located at the bottom and has safety elements responsible for the functionality of such receivers:
- external lighting devices;
- power steering;
- electrical components of the interior heating circuit;
- illumination of instruments present on the panel.
The block is equipped with 32 fuses and 12 relays.
The manufacturer also did not forget about the pantographs of the rear of the car, for which he assembled fusible links in a similar block that are responsible for supplying power to the devices, namely:
- rear doors;
- registration number lamps;
- fuel pump;
- rear window heating system.
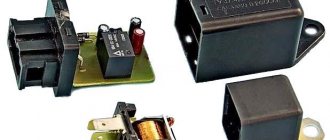
Electric drive: easy installation
The manipulation algorithm is very simple. Here you will need to make the rotary plate together with the rod yourself. The wiring is laid directly to the lock and connected to a special control unit. When the car is “disarmed”, the electric drive of the luggage lock is activated following the unlocking of the button responsible for opening the rear door of the Lada Kalina.
The whole essence of the action comes down to connecting the electric lock to two cable lines. You can buy the product at a specialized retail outlet. The end of the luggage compartment will need to be hidden in order to prevent the risk of moisture getting into it. If this is neglected, then with the penetration of water a short circuit will be observed in the designated area.
Much attention should be paid to the area near the door hinges, because broken wires are a common occurrence here. To prevent this, it is recommended to regularly monitor this section of the highway.
Before starting the procedure for installing the electric drive in a Lada Kalina car, you will need to remove the plastic trim. Here you need to be careful not to damage the specified protective element.
The choice of a lock for LADA Kalina should mean that there is no subsequent need for modifications before installation. This means drilling additional holes.
An important point in the installation procedure is the laying of electrical lines. For these purposes, you will need about 3.5 m of appropriate cable. You can use standard wiring suitable for the rear door. The power source can be a cigarette lighter socket. It is also important to install the fuse correctly.
We do all switching in LADA Kalina in accordance with the diagram.
Important! The main line in this version may include a wire that goes to the courtesy lamp for lighting the space inside the trunk.
How to install a power trunk
For work we will need:
1. Liftback)) 2. Opening button with connector or 2 female wires. 3. Electric drive (installed StarLine SL-2). 4. Cable (approximately 30 cm) and 2 clamps. 5. Electrical tape, wire cutters, wires, flat and Phillips screwdrivers, 8 and 7 wrench.
To install the drive, you need to get rid of the lock rod, probably many people know, it is firmly in place and will not allow the drive to open the lock until you insert the key into the lock, so we install a cable instead, this way you can open the trunk from the outside.
Disassembling the trunk door
We pull off the central plastic (2 pistons and on the edges of the latch)
Unscrew the 2 opened screws and pull them off (on two pistons)
A pair of screws have opened again, unscrew them
We will pull off the main casing from these corners, and before that we unscrew the 2 bolts in the front handles
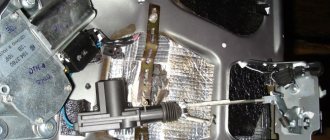
The trim comes off very easily and this is what's underneath
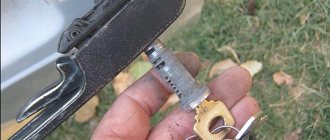
And here is the thrust of the lock (from the cylinder to the lock itself), we will get rid of it.
The drive we will implement
We select a place for it, I found it here, we make notches for the holes
Pulling off the traction from the larva
We drill holes for the self-tapping screws, put the drive together with our rod inward and just attach it to our place to determine the length of the rod. We hooked up the drive, pulled it out to its full length and the door lock should be open. On the top of the lock there is a ring that you need to pull to open it (it will be clear later in the photo), we bring the rod to the ring and make a notch with wire cutters.
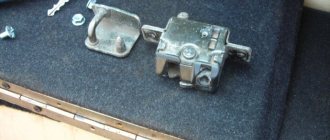
Now we take everything out, the electric drive and the lock itself, by unscrewing 2 bolts with a 8 key. We pull out the right corner of the lock and unhook the second end of the rod, then completely pull out the lock and remove the connector.
Here is the drive rod with a notch, at a distance of 2 cm from the notch we chop off the excess tail with a chisel
Along the notch we bend the rod into the letter “G” and insert it into the lock
Then we bend the end so that the rod does not fly out
We thread the cable onto the second ring of the lock, where the original rod was put on, and clamp it with a bracket (tighten the bracket with a 7 key)
We extend the electric drive wires by CUTTING them off
ends (folders), rather than wrapping wires around them. The blue wire will be connected to ground, and the green wire will go to the interior.
And we install the entire structure in place, insert everything through the lock hole, starting with the drive. We fasten the lock (don’t forget the connector), then the drive and go to install the second end of the cable.
Let's remove the cylinder and turn it 180 degrees, since the key pushed the original rod to open it, but you can't push the cable, you have to pull it, so we turn it around.
While we removed the cylinder, the place where the rod was inserted is not through, we drill a hole through, install the cylinder and thread the cable, pull it and clamp it in the bracket.
We run the wires over the inner door harness, as I said, connect the blue wire to ground, connect right there in the door to the lock harness. There are 2 wires: black and white is the limit switch and black and green is ground, and we put the blue wire on it.
We lead the wire into the roof in the central part, under the ceiling to the rear left window, then we lower it to the floor and along the threshold with the original harness to the fuse box. Like that.
We put the button in its rightful place.
We connect according to this diagram, everything is simple here.
We take a wire with a fuse (5A holder), connect one end to the thick pink-black wire under the fuse block (permanent plus). And we bring the second end to the button. That's all, the fuse block has 2 wires connected to the button, one from the drive, the second from the power supply, we connect them to the mothers or connector (whichever you buy), we use the parallel contacts of the button (normally open contacts).
We check what we have achieved, close the trunk door, it should open with the key and the button!
Let's assemble the car and enjoy the new option!)) I hope everything is accessible and understandable))
Many car enthusiasts who independently “pump” their cars are wondering: how to properly connect the electrics? This question arises in almost any installation. After all, simply screwing on the blocks, locks and strips is not difficult, but only properly connected electricians can make the system work. If we take into account one of the most pressing problems - the installation of remote control locks for the fifth door, then the correct wiring diagram for the electric trunk lock will help us here. You can find it either in the instructions that should be included with the device, or you can take it from a reliable source, but it is better to use proven options and ask friends and acquaintances what scheme they used.
Let's sum it up
Replacing the trunk lock is quite labor-intensive and will require a lot of time to implement. If the owner of LADA Kalina encounters difficulties, we advise you to contact specialists when performing the installation procedure.
| Owners of a Lada Granta car know that the electric drive for the trunk door lock in the middle and top-end configurations is different from those used on older Lada cars. Let's consider what its peculiarity is and whether it makes sense to install such an electric lock on a VAZ of the tenth family. |
What is important to know about silent locks on the Lada Granta Liftback
Not all car owners are satisfied with the ease and noise level when closing the doors of their car. The defect is caused by excessive wear of parts and design flaws at the manufacturer level.
The principle of noise suppression is implemented by an installed noise absorber. In Lada Granta Liftback models, this is a rubber insert or a plastic polymer.
Silent locks are structurally composed of a pin and a shackle with a noise-absorbing insert. Some car owners practice replacing the arms, while leaving the standard locks unchanged. Already in this case, the noise level will be significantly lower, and locking the door will be easier. At the same time, systematic use of the door lock leads to rapid wear of the polymer/rubber material. The owner has to come back for preventative maintenance again and again.