In the event of malfunctions in the operation of the vehicle, the engine electronic control unit (ECU) stores errors in memory. In the future, Kalina ECU errors can be read using an on-board computer or special equipment for car diagnostics. In addition to controller error codes, it is possible to perform Kalina self-diagnosis on the dashboard.
Advice
: To read errors in electronic units, car owners often use the ELM327 adapter (buy on Ali) and the OpenDiag application in their smartphone.
How to reset a check on Priora 2?
How to reset "Check Engine" on Priora
- Turn off the engine, secure the car, and open the hood;
- Find the fuse box, in the yellow group, remove F1 (30 Amperes) and wait about 20-30 seconds;
- Put the fuse back and close the hood. Start the engine and check if the signal disappears.
Interesting materials:
How to set a new password in Contact? How to put a password on a contact on a computer? How to set a password to enter a contact? How to set a login password in contact? How to set a password in contact? How to put your photo on a contact? How to ban messages in a contact? How to attach a file in contact? How to solder contacts to a 2032 battery? How to print contacts from Google?
Decoding errors
Each code consists of five characters: P 1 4. Let's say right away about the fourth and fifth characters - they indicate the serial number of the error. Now it’s worth taking a closer look at what the codes consist of
The first character may vary depending on the vehicle system:
- P – malfunctions in the operation of the power plant; the symbol also indicates defects in the automatic transmission.
- U – you need to look for a fault in the interaction node between the system units.
- B – defects in the operation of body systems, which include electric lifts, airbags, etc.
- C – chassis sensors have detected a malfunction in the chassis system.
How to remove the instrument panel
To remove the instrument panel, you only need one Phillips screwdriver. After which you can start withdrawing.
- Remove the fuse box cover by turning the three fasteners from the bottom and pulling them out;
- Then unscrew the 4 screws securing the decorative cover of the instrument panel;
- Unscrew the two bolts securing the instrument panel to the dashboard;
- Tilt the dashboard and disconnect the connector;
Fuel and air system error codes
| Codes | Description |
| P0030 | The control unit detected an open circuit from the oxygen sensor heating device to the exhaust gas converter. |
| P0031 | A short to ground is reported in the oxygen sensor circuit. |
| P0102 | An incorrect signal level was detected in the electrical circuit of the mass air flow control device. |
| P0116 | An incorrect signal is received from the coolant temperature monitoring device. You should check the electrical circuit and the condition of the device itself. |
| P0122 | The on-board computer receives an incorrect signal from the TPS. |
| P0130 | The oxygen level control sensor has failed. |
| P0171 | The control unit has detected an excessive amount of air in the fuel mixture. |
| P0172 | The on-board computer detected an excessive amount of gasoline in the fuel mixture. |
| P0201 - P0204 | The Lada Priora control unit detected a break in the wire of one of the four injectors. |
| P0217 | This fault code means the motor is overheating. |
| P0230 | A malfunction has been detected in the electrical circuit of the electric fuel pump relay. It is necessary to carry out a complete diagnosis of the electrical circuit to identify breaks and short circuits. |
| P0261 | There is a short circuit in the wiring of the injector of the first cylinder. |
| P0263 | The driver of the first injector has failed. |
| P0266 | There was a breakdown in the operation of the second injector driver. |
| P0269 | The control unit has registered errors in the functioning of the third injector driver. |
| P0272 | The fourth injector driver has failed. |
| P0264, P0267, P0270 | One of these combinations indicates a short circuit in the second, third or fourth injector circuit. |
How to read errors?
In order to read errors, you need to connect a laptop or tablet PC to the car via a special K-line cable. Let's look at what tools will be needed to connect the car to the computer and determine error codes:
- K-line cable.
K-line cable for connecting a laptop to a car
- Laptop or tablet.
- Special software.
In order to connect, you need to find a connector for the cable. It is located under the steering column. Now you need to connect the cable itself and then the USB connector. The following programs are considered optimal for use: VAG-COM USB KKL adapter; VAZ diagnostic program for models, Priora, Kalina, Grant; USB driver Autocom cdp pro cars USB; ScanMaster 2.1 in Russian for ELM327.
How is self-diagnosis performed?
We have sorted out the main errors on the Priora, now it’s worth finding out how self-diagnosis is performed. The VAZ 2170 with 16 valves has a special controller with which diagnostics are performed. If you have an on-board computer installed, then diagnostics are performed on it. There is also special equipment that allows for a more in-depth check of Priora 16 class systems.
How to fix the problem
There are several possible ways to resolve this issue. If one solution does not suit you, move on to the next one. We will also look at what to do if none of the options for eliminating error 4 helps.
Method No. 1 (Software update)
Trying to find out what the essence of the problem might be, many initially undertake to analyze the correct operation of the receiver and its unique ID (as a rule, it is already present on the access card, and if there is no smart card, it is integrated into the system itself). Here it becomes clear that the receiver is not able to recognize its own ID number, which, in turn, makes subsequent decoding of the channel impossible. Accordingly, if error number 4 appears, then you should understand the features of ID recovery.
- If error 4 appears on tricolor TV, you need to go to channel 333. This channel is specially designed for performing service actions. It is after the transition to it that the procedure for updating the standard software is carried out.
- Then check for updates. The receiver will do this on its own. When a new software version is detected, it will prompt the user to confirm the installation. After completing this action, error 4 tricolor should disappear.
What to do next? After the receiver accepts consent, it will initially carry out the installation from the satellite, and then, after reaching the 50% mark on the progress scale, it will begin installing the downloaded files into the device’s memory. This will continue until the progress bar is filled to 100 percent.
Note! If you are connected to a satellite and you have approved the installation of the updated version, do not turn off the receiver under any circumstances! Otherwise, you will not be able to completely fix the problem. In some cases, the receiver no longer displays channels due to insufficient files in the software package or due to their corruption
After all the necessary files have been downloaded and installed, the receiver will reboot itself for the updated files to take effect. After a reboot, the system should completely resolve the problem.
In the case of some models, installation of a software update for the module is additionally required. Remember that its update occurs immediately after the main firmware is loaded into the system. The module updates much faster. Mandatory installation of these files is not always required - much depends on the behavior of the system after the main firmware update is completed. If error 4 disappears, we don’t touch anything else. When saving it, we try to additionally update the module.
Important! Sometimes a software update may not help, since there is a USB flash drive in the slot. Remove it and reboot the receiver, it should help
Method number 2 (Reset settings)
Sometimes eliminating the fourth error requires resetting the receiver to factory settings and searching for channels again. This is done very simply:
- Press the "Menu" button on your receiver's remote control.
- Select "Settings".
- Then scroll to the very end to the “About the receiver” section, “Reset settings”.
After you reset to standard settings, search for Tricolor TV channels again, and in order to watch channels with a broadcast shift relative to Moscow of +2 (+3) hours, select the “Ural” region.
Method number 3 (Contact support)
If the previous two methods of solving the problem did not help you, then you can contact Tricolor technical support. But before you call, collect the following information:
- ID number of the smart card;
- The number of your agreement with the Tricolor company;
After this, you can call online to, or choose any other method of contacting support. We hope that you can easily restore access to viewing your favorite channels by following the tips listed above.
Removal and replacement
So, if you are firmly convinced that the Priora instrument panel is faulty, it must be removed for replacement. This operation must be carried out very carefully so as not to damage the trim housing and the wires running under the instrument cluster. First of all, according to the rules, when performing any work on electrical equipment, the battery must be disconnected. In this
In this case, this action also makes sense, since the instrument panel ECU is under constant load to save the parameters. Therefore, you should first disconnect the battery terminal. After this, in the cabin, begin dismantling the device. First, remove the panel under the steering column covering the fuse box. It is held in place by three decorative plastic locks. By turning them half a turn, you can remove it. After this, remove the four screws holding the instrument panel trim panel. Now the combination is completely open.
Now you need to unscrew two more screws holding it and remove the panel. Carefully turn over. Move the connector latch to the side. With this action, it will partially come out of the groove. Now completely disconnect the part and put it aside. If the panel only needs to replace the lamps, then this is quite simple. They come immediately in special plastic nests when sold. On the device they are located in small wells, with the plastic end facing up. Just grab it and turn it a quarter turn counterclockwise. The lamp will immediately fall out. At the end, you need to insert a new one in its place, and turning it clockwise, fix it.
Replacing the panel
Before you put the new panel in place, you should make sure that power is supplied to it correctly. To do this, you will need a test lamp, with the ability to check both the “+” and “-” contacts. You need to know that on the 19th contact of the block there is a common “minus” of the device. Or as they say - “mass”. On pin 20 there is a constant plus from the battery, and on pin 21, a “plus” appears when the ignition is turned on. These connector sockets should definitely be checked before installing a new combination. And after the contacts have been checked, you can connect a new panel to the connector and check it by turning on the ignition. If everything is fine, you can install it in place. Hers or the old one, if it was only necessary to change the light bulbs. You can install the instrument cluster on the “Priors” panel by doing everything in reverse order.
Priora error codes: complete vehicle diagnostics
All foreign cars currently have various sensors installed that monitor the operation and condition of the car. The modern Lada Priora is no exception to this series. The position and quality of many operating systems in a car depend precisely on how well these sensors perform their duties.
Their main problem is that if some sensors are turned off, the car will not disrupt its operation and can continue to move unhindered. However, the breakdown itself can be detected much later, when the negative consequences of disconnecting the sensors become apparent.
Depending on which sensor fails, fuel consumption may increase sharply, and some malfunctions in the operation of the car’s engine may also occur. In addition, a common “symptom” of sensor disconnection can be accelerated wear and tear of some elements in the car.
In order to check for certain errors on the Priora, you can use a special controller, which is built into the car specifically for this purpose. Thanks to this controller, you don't have to go into the engine compartment with a multimeter to look and identify the problem.
This controller is connected to a special tester, which is connected by manufacturers to the on-board computer. It won’t take much time to perform a full check of the car for any malfunctions in the operation of systems and sensors. You can start the process by pressing two buttons, and then all that remains is to correctly decipher the error codes.
Designation of dashboard indicators Priora 1
- Tachometer (shows the number of crankshaft revolutions per 1 minute at the current moment);
- Electronic brake unit malfunction lamp (if such a lamp lights up on your car, you must move with extreme caution to the nearest service station). During normal operation, it lights up when the ignition is turned on, and goes out when the engine is started;
- Charging the battery. When the ignition is turned on, it lights up, and when the engine starts, it should go out. If the lamp lights up while the engine is running, this indicates a problem with the generator;
- Lamp indicator of the left turn signal on. When the turn is on, it blinks green with a characteristic “squeaking” sound;
- Speedometer, shows the speed of the car in real time;
- Low oil pressure lamp in the internal combustion engine. During normal operation, it lights up when the ignition is turned on; after starting, it should go out within 3 seconds. If the lamp lights up when the engine is running, this indicates a problem with the internal combustion engine;
- Indicator lamp that the right turn signal is on. When the turn is on, it blinks green with a characteristic “squeaking” sound;
- Handbrake indicator. Lights up when the handbrake is pulled;
- Coolant temperature gauge. The operating coolant temperature of the Priora internal combustion engine is 85°C;
- Level sensor for remaining fuel in the tank. The fuel tank of the Priora has a volume of 43 liters;
- Minimum fuel remaining indicator. Lights up when there is less than 10 liters of gasoline in the tank;
- Odometer control button. A short press switches the daily mileage to full, and a long press resets the daily mileage;
- EUR failure indicator. Lights up when the ignition is turned on for 2 seconds, in other cases it indicates a breakdown in the EUR;
- The hazard warning lamp flashes together with the turn signals;
- High beam indicator;
- Low beam and headlight indicator;
- The SRS (airbag) malfunction indicator lights up for a couple of seconds when the ignition is turned on;
- Immobilizer indicator;
- Screen for daily and total vehicle mileage;
- The seat belt not fastened indicator lights up when the driver of the car is not fastened;
- The indicator of low brake fluid level in the system lights up when the car ignition is turned on for a few seconds, after which it goes out;
- Front passenger airbag deactivation indicator;
- ABS fault indicator;
- The “Check Engine” light comes on when the ignition is turned on and goes out when the engine starts. In other cases, it indicates a malfunction in the internal combustion engine;
Malfunctions of auxiliary systems and ignition
P0300 - no spark in all cylinders; P0301 - no spark in cylinder No. 1; P0302 - no spark in cylinder No. 2; P0303 - no spark in cylinder No. 3; P0304 - cylinder No. 4, no spark; P0326 - knock sensor readings are outside the permissible limit; P0327 - poor signal in the circuit of the same device; P0328 - signal too strong in the same circuit; P0335 - crankshaft sensor circuit is faulty; P0336 - crankshaft sensor readings are outside the permissible limit;
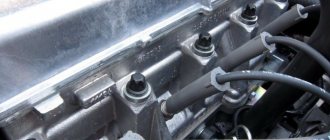
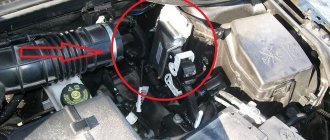
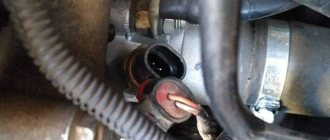
Camshaft sensor location
P0337 - crankshaft sensor shorted to ground;
P0338 - the network of the same device is interrupted; P0342 - weak signal in the phase sensor network; P0343 - the signal in the network of this device is too high; P0346 - the readings of the same device are out of the permissible limit; P0351 - break in the wiring of the ignition coil of cylinder No. 1; P0352 - open circuit of coil No. 2; P0353 - break in the wiring of coil No. 3; P0354 - open circuit of coil No. 4; P0363 - lack of spark and fuel supply in faulty cylinders; P0422 - the converter is broken; P0441 - incorrect air flow through the canister purge valve; P0444 - the canister valve wire is broken; P0445 - it has shorted to ground or BS; P0480 - open circuit in fan relay wiring; P0481 - fault in the same wiring.
Failures in the idle speed system (IAC) and ESC
- P0500 - speed sensor is broken.
- P0506 - very low engine speed at idle.
- P0507 - too high speed at idle.
- P0511 - the XX regulator network is faulty.
- P0560 - BS voltage is below the minimum threshold.
- P0562 - very low voltage in the BS.
- P0563 - very high voltage in the BS.
- P0601 - ROM checksum error.
- P0615 - the wires of the additional starter relay are broken.
- P0616 - the same wires are shorted to ground.
- P0617 - they shorted at the BS.
- P0627 - the fuel pump relay wires are broken.
- P0628 - the same wires are shorted to ground.
- P0629 - they shorted it to the BS.
- P0645 - break in the wiring of the air conditioning compressor clutch relay.
- P0646 - the same wiring has shorted to ground.
- P0647 - she shorted to BS.
- P0650 - Malfunction indicator light circuit does not operate.
- P0654 - Tachometer control circuit is faulty.
- P0685 - the main relay electrical wire is broken.
- P0686 - the same electrical wire has shorted to ground.
- P0687 - he shorted it to the BS.
- P0691 - the electrical wiring of the fan control relay is shorted to ground.
- P0692 - the same wiring has shorted to the BS.
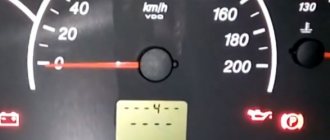
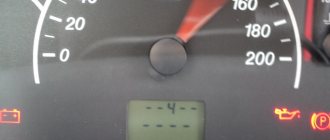
So, when self-diagnosis is carried out and error 4 lights up on the panel, then most likely the car has a problem with the coolant temperature sensor. Many people immediately ask the question “Which sensor should I change?”, but first you need to find out what exactly the problem is.
Note that in order to start self-diagnosis, you need to press and hold the daily mileage reset button + turn on the ignition. After a few seconds, the on-board computer displays an error code.
It is noteworthy that codes in different firmware versions may indicate different problems. Therefore, we recommend that you stock up on an up-to-date reference book. In our case, the software version is 1.0.
How other error codes are deciphered:
- code 2 indicates that there is high voltage in the on-board network;
- code 3 indicates a fuel level sensor error;
- error number 5 indicates incorrect operation of the outside temperature sensor;
- code 6 is engine overheating;
- code 8 - problems with the brake system;
- error number 9 indicates that the battery is discharged;
- P0441 - high or low air flow through the valve;
- P0443 - faulty canister purge valve control circuit;
- P0480 - cooling fan relay failure No. 1;
- P0481 - failure of the cooling fan relay No. 2;
- P0500 - incorrect vehicle speed sensor signal;
- P0503 - intermittent car speed sensor signal;
- P0506 - low idle speed if the idle speed control is blocked;
- P0507 - high idle speed when the idle speed control is locked.
You can get acquainted with all error codes in more detail if you purchase a special book or on the official website of the manufacturer.
Troubleshooting
There are several methods for troubleshooting the problem, but together they constitute a complete diagnosis of the car for faults in the coolant temperature sensor. After all, error number 4 gives a signal about exactly this. You can fix it like this:
- First we check the sensor to see how well it functions. It copes with the assigned tasks, there are no complaints about the speed and clarity of data transmission - let's move on to the next point. Does not respond to signals - most likely, it is completely broken and requires replacement.
- This is followed by checking for contact and absence of plaque. If a problematic connection is identified, the sensor will have to be replaced with a new one. And if the surface is covered with plaque, it is necessary to thoroughly clean the seat.
- Now you can move on to the on-board circuit, make sure that there is contact there.
- The remaining dilemmas usually lie in electronics, for this reason the car is taken to a specialist who can adjust the device. Usually in such a situation the ECU is re-flashed, which means that errors are prudently reset.
The issue of eliminating error 4 can be solved on your own, but not in one hundred percent of cases. Sometimes you have to turn to specialists to perform work that requires specific knowledge and skills. But it would be right to try to prevent a breakdown, since most often it occurs after a long period of parking in the cold in an open area (that is, not in a garage or covered parking).
Diagnostics and decoding of codes on Lada Priora
Like any modern car, the Lada Priora is equipped with dozens of various sensors, the functioning of which determines the condition of the main vehicle systems. Diagnostics of the machine for errors allows you to detect all sensor faults in order to eliminate breakdowns. Now you will learn how Priora error codes are deciphered and how to independently diagnose the on-board computer (hereinafter referred to as BC).
Various breakdowns of sensors and other devices can cause increased gasoline consumption, incorrect engine operation, and increased wear of car system components. Despite the presence of errors, the VAZ Priora will drive until the driver has to make expensive repairs because of them.
VAZ Priora car
So that the motorist does not suddenly have to face the need for repairs, a special controller is installed on the VAZ Priora, with the help of which the driver can diagnose breakdowns. This can be done either using special additional equipment or an on-board computer installed in the car.
In fact, to carry out diagnostics, the car owner will only need to press a few buttons and count combinations of faults.
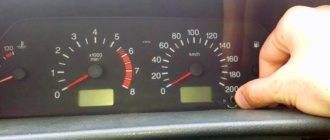
For example, you do not have a special tester, so we will look at diagnosing the vehicle for errors using the on-board computer. The BC is built into the dashboard and can be used to read combinations of faults. To do this, you need to activate the auto test mode.
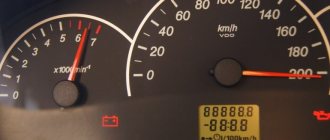
First, turn off the ignition. After this, hold down the daily mileage reset button and turn on the ignition
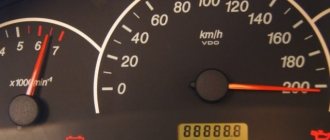
Please note: the button must be held down. There is an LCD indicator on the vehicle's dashboard, keep an eye on it. When you turn on the ignition, all icons will start to light up, and all arrows (speedometer, tachometer, antifreeze temperature sensor, gasoline level status) will begin to move to the maximum values and back
That is, if all the arrows behave as described here, this means that the sensors and indicators are functioning correctly.
Now you need to find the button for switching BC functions - it is located on the right steering column switch. By clicking on it, the software version (1.0 and higher) will be displayed on the screen. Click on this button again. Combinations of faults will begin to appear on the screen. If necessary, you can reset error data here. To do this, press and hold the daily mileage reset button for about three seconds.
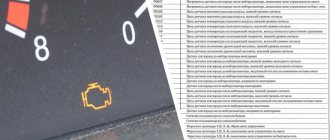
The appearance of a fault combination on the LCD screen during self-diagnosis