Replacing the brake cylinder of a VAZ 2107 rear wheel
If a brake fluid leak occurs, which manifests itself in the form of smudges on the inside of the rear wheels, it is necessary to replace the brake cylinder of the VAZ 2107. The leak could form when the rubber seals are damaged, and the brake cylinder is also replaced when the brake pistons jam.
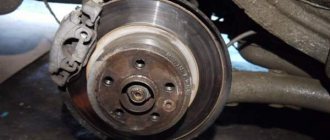
To perform the work, you will need the help of an assistant, a special wrench for the brake pipes, and clean brake fluid to add to the system. To perform the work, it is necessary to jack up the car, remove the wheel from the side being repaired, and also remove the brake drum, thereby providing access to the brake cylinder.
The sequence of work for replacing the brake cylinder of a VAZ 2107 is as follows:
- After removing the brake drum, wash the entire internal surface with clean gasoline to remove dirt and dust from the pad linings.
- On the reverse side of the brake flap, use a special wrench to unscrew the brake pipe mounting fitting. Unscrew the tube and plug its hole with a plug to prevent brake fluid from leaking. If the pipe fitting is tightly stuck and does not come off, it will have to be broken and then replaced with a new brake pipe.
- Next, also on the back side of the brake flap, unscrew the two bolts securing the brake cylinder.
- We disengage the brake cylinder from the brake pads and remove it.
Make the necessary repairs, check the condition of the rubber cuffs, if necessary, replace them with new ones, but as a rule, in most cases, failure of the cuffs and their subsequent replacement with new ones does not help cope with brake fluid leaks, so if they are damaged, it is better to change the entire cylinder on new. Check the condition of the brake pads (the thickness of their linings) and replace if necessary, but do not forget that the brake pads are replaced in pairs on each side. At this point, the repair to replace the brake cylinder of the VAZ 2107 rear wheel is completed. Install all parts in the reverse order of removal.
Source
Basic faults
The brake system itself is quite simple, but some of its elements require special attention. Main types of faults:
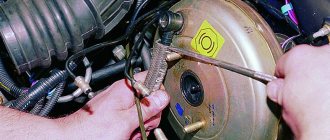
- The brake fluid leaks, resulting in a drop in pressure in the system. If a preliminary inspection does not find a leak, it is necessary to check the brake master cylinder. We bend the noise-insulating mat located under the brake pedal and inspect for streaks in the area of the rubber seal of the master cylinder. The presence of drips will indicate that the cause has been found and requires disassembling the cylinder and then replacing the cuff. If there is a vacuum booster, the brake master cylinder must be removed and inspected.
- When you release the brake pedal, the car drives sluggishly. Reason: the rear or front pads are jammed. Seized pads are identified by checking the heat of the corresponding wheel. We touch each disk - the hottest one will be jammed. In the case when these are the front wheels, you can, after removing the wheel, move the brake cylinder. If this fails, you will have to replace it with a new one. In the case of rear pads, the brake wheel cylinder will need to be replaced.
- When you press the pedal, braking does not occur, but it does when you press it several times in a row. This may indicate the presence of air in the system. The solution to the problem is to bleed the brakes to remove air.
- Problem with the handbrake. Most often this problem occurs in winter. It manifests itself in the fact that after a long period of parking, when the handbrake is released, the wheels remain locked. The reason is that the parking brake cable is frozen. During its operation, moisture gets there and freezes in winter. If the casing is severely damaged, it will have to be replaced.
replacing the rear wheel brake wheel of a VAZ 2107
We replace the working brake cylinder of the rear wheel of a VAZ 2107 car when a brake fluid leak is detected or the pistons are jammed.
To perform the work of replacing the working brake cylinder of a VAZ 2107 car, you will need an assistant, as well as a special 10 mm wrench for brake pipes, a transparent vinyl tube of suitable diameter, a container for draining brake fluid, fresh brake fluid (see “Operating fluids used on VAZ cars 2107").
Removing the rear wheel brake wheel cylinder from a VAZ 2107
1. We prepare the VAZ 2107 car for operations (see “Preparation of the VAZ 2107 car for maintenance and repair”).
2. Remove the brake drum from the VAZ 2107 car (see “Brake pads for the rear wheels of the VAZ 2107 car - replacement”).
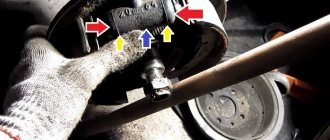
3. We clean the bolts securing the working brake cylinder and the brake pipe fitting from dirt. We apply a penetrating lubricant with a rust converter to them.
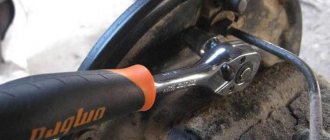
4. Using a special 10 mm wrench for brake pipes, unscrew the brake pipe fitting.
Attention If the fitting is “stuck” to the tube and you cannot unscrew it, try (after performing step 6) to unscrew the working brake cylinder, holding the fitting with a special 10 mm wrench for brake pipes. With this method of removing the brake wheel cylinder, the brake pipe must be replaced.
5. To reduce brake fluid losses, place a protective cap on the end of the tube (from the brake cylinder bleeder fitting).
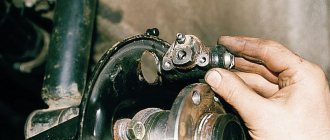
6. Using a 10 mm socket wrench, unscrew the two bolts securing the working brake cylinder and remove the working brake cylinder from the VAZ 2107 car.
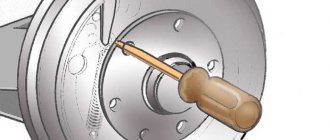
7. By turning the working brake cylinder relative to the hole in the brake shield, we remove the stops of the working brake cylinder from engagement with the brake pads.
8. Remove the rear wheel brake slave cylinder from the brake shield.
Front cylinder location
The front brake cylinder is located on the front wheel hubs, next to the wheel rim. Each front wheel has two brake devices, which, when you press the pedal, press the pads against the brake disc on both sides, which ensures effective braking of the car. For clarity, below is a photo in which both devices are indicated by arrows.
After removing the front wheel of the seven, you can see the device data immediately behind it. Having found them, you need to make sure that they are in good working order, or rather, that they are faulty. After all, why change a working part?
When to change cylinders
The main and most common reason for loss of performance, which entails repair or replacement, is jamming of the brake device. If you notice constant braking of the car, a pull to the side when you release the steering wheel when driving in a straight line, or abnormal heating of one of the wheels after driving, perhaps one of the working cylinders has begun to jam. This happens quite often, since aggressive and improper operation, as well as the quality of parts, leads to such consequences. Jamming of the product can occur in any mode of operation - be it constant driving of the car, or its idle time in the parking lot. If at least one of the cylinders on the VAZ-2107 begins to jam, then you should immediately get to the nearest service station and have it repaired. But a service station is expensive, especially for owners of budget cars, so it’s easier to solve the problem yourself, and at home.
Replacement of the product may also be necessary if liquid begins to leak from under the sealing ring. The sealing ring (boot) is shown below in the photo.
If liquid begins to leak from under the rubber band, it means that this will soon lead to a malfunction of the device. You can avoid consequences by responding in a timely manner.
Replacing the front brake cylinder on a VAZ-2107
Replacement begins directly with the removal of the old mechanism. To do this, you need to jack up the front of the car, then unscrew and remove the wheel, and remove the brake caliper. Details of caliper removal can be found in the corresponding section of this website.
Further actions to replace the working mechanism should be carried out as follows:
- The caliper should be placed in a vice, but it is important not to clamp it too tightly. If you squeeze it, then part of the part may simply break off, as a result, replacing the caliper cannot be avoided.
- Once the caliper is removed and clamped in a vice, it is necessary to remove the steel brake pipe. This tube connects both parts of the mechanism. To remove the tube, you need to unscrew two nuts with a wrench. After unscrewing the nuts, you can remove the steel tube. The photo below shows the caliper in a vice, as well as the tube that needs to be removed.
- After this, you need to find a groove on the side in which the spring locking element is located. To remove the brake cylinder, you will need to press this lock with a screwdriver. The photo below shows the location of the groove with a red arrow.
- To remove the working device, you need to hold the spring mechanism with a screwdriver. After pressing the latch, it is necessary to strike the side of the working mechanism with a rubber hammer. You don’t need to hit it too hard, but be sure not to hit the caliper. If you hit the caliper, it may break off. The photo above shows how the working cylinder is struck with a hammer.
- If the product starts to move, then the process is in progress. To dismantle the part in question, you will need to use a long screwdriver or pry bar. The mount should be placed in the resulting hole between the caliper and the cylinder. Below is a photo of how it looks clearly.
- The second cylinder is removed in a similar way. After removing the devices, you can begin to directly replace them with new ones.
- To install a new product in place of a removed one, you must first press a special latch. When pressed, the mechanism must be installed in the guide grooves until this latch is activated.
If the new part will not be inserted into the guide grooves, you can take a file and remove a few millimeters of the metal layer. The main thing is not to overdo it, otherwise the part simply will not be fixed in the caliper.
This completes the replacement of the working cylinder on the VAZ-2107. When installing a new product, pay attention to the presence of a brake bleeder. If it is missing, then you should remove it from the old cylinder and screw it into the new device.
Do-it-yourself: Replacing the rear brake cylinder of a VAZ-2107
Hi all! Last time, when checking the new rear drums and pads, it turned out that the right side was not worn in well, plus when driving, some rustling noise appeared again on the rear right. Then I sprayed it under the anthers and since only the cylinder could be to blame, I decided to replace it in the fall if it still didn’t work out. I took a stock Lada image as a replacement, it seems to be the original. Also, I bought a special lubricant for the pistons of the brake cylinders to lubricate them under the anthers, an unknown brand Metaco, but produced by the same VMPauto.
The drum came off easily, but the fitting became completely soured to the brake pipe; I had to first unscrew the cylinder mounting bolts, and then the cylinder itself from the soured tube with the fitting. Next, a gas burner with a high-pressure head was used and the fitting was finally developed.
It turned out that the pads on the right were worn in, but since I removed them, I decided to replace the cylinder with a new one.
Before installation, I did not lubricate heavily under the anthers, but generously lubricated all threaded connections with copper grease and graphite.
The grease is very similar to MC-1600, which I used to lubricate under the boots of the front cylinders, but it is a little thinner in consistency, the stated characteristics are the same, apparently, they were just diluted a little.
The fitting and bolts were generously covered with auto plasticine. The brake pipes are very rusty, the car is 15 years old and they are still original, apparently they will have to be changed next year along with the sorcerer, we never got around to it.
But on the other, left side, the pads did not fit in well. It turns out that this side turned sour in the first place, apparently I mixed something up last time and didn’t re-read the previous entry.
Somewhere under the cylinder boot there was dirt and brake fluid, although I didn’t notice it last time.
I had to install the cylinder removed from the right side, also lubricating it under the anthers - everything was dry there, and also replaced the cracked anther on it, removing it from a non-working one. In theory, it would be necessary to change both cylinders, but who knew) if I replace something too. I only bled the rear circuit.
In general, the brakes work well, the extraneous sounds have disappeared.
- Rear brake cylinder Lada - 330r
- Metaco cylinder piston lubricant - 60 RUR
- Brake fluid Liqui Moly Dot4 250ml - 200rub
Source
Replacing the rear brake cylinder on a VAZ 2101-2107
This photo report shows in detail how to replace the rear brake cylinder on a VAZ car with your own hands, starting from a penny to a seven (2101-2107). There are not so many reasons for replacement, namely: the rear drum is jammed, or it does not perform its function effectively. The replacement procedure itself is simple. The only thing you will need before replacing the brake cylinder is:
So, the first step is to perform some preparatory procedures, which are listed below:
- Raise the rear of the car with a jack;
- Remove the wheel;
- Remove the rear wheel brake pads;
- After this, the rear brake cylinder becomes free and its location.
Design and purpose of the brake caliper on the VAZ 2107
To understand why the “seven” needs a brake caliper, you should clearly understand how the brake system of this car is designed. First of all, it should be said that the VAZ 2107 has two brake systems: parking and working. The parking system allows you to lock the rear wheels after stopping the car. The working system allows you to smoothly block the rotation of the front wheels while the machine is moving, changing its speed until it comes to a complete stop. A hydraulic braking system consisting of four cylinders, two brake discs, four pads and two brake calipers allows you to achieve smooth blocking of the front wheels.
The brake caliper is a housing with a pair of holes, made of light alloy. Hydraulic cylinders with pistons are installed in the holes. When the driver presses the pedal, brake fluid is pumped into the cylinders. The pistons from the cylinders extend and press on the brake pads, which in turn compress the brake disc, preventing it from rotating. This changes the speed of the car. Thus, the caliper body is the basis of the VAZ 2107 working brake system, without which the installation of brake cylinders and discs would be impossible. It should also be noted here that brake calipers are installed only on the front axle of the VAZ 2107.
As for the parking system of the VAZ 2107, it is designed differently. Its basis is large brake drums with internal pads installed on the rear axle of the car. When the driver, after stopping the car, pulls the handbrake lever, the brake pads move apart and rest against the inner walls of the drum, completely blocking the rotation of the rear wheels.
Signs of a faulty brake caliper
There are not many signs of malfunction in the VAZ 2107 brake caliper. Here they are:
- The car does not brake fast enough. This usually occurs due to a brake fluid leak. It can escape either through worn hoses or through hydraulic cylinders that have lost their tightness due to wear. The first version of the problem is solved by replacing the brake hoses, the second - by replacing the damaged cylinder;
- constant braking. It looks like this: the driver, pressing the brakes, stopped the car, and when he released the brake pedal, he discovered that the front wheels remained blocked. This happens because the cylinder pistons are stuck in the open position and the brake pads are still pressing on the brake disc, holding it in place. In such a situation, they usually change the entire caliper, since finding new hydraulic cylinders for the “seven” on sale becomes more and more difficult every year;
- squeaking noise when braking. The driver, pressing the brake pedal, hears a quiet squeak, which can intensify with increasing pressure. If you have to brake sharply and at high speed, the creaking turns into a piercing howl. All this suggests that the brake pads in the caliper have completely worn out, or rather, the coating of these pads. The material that covers the front part of the block has increased wear resistance, however, it eventually becomes unusable, being worn down to the ground. As a result, the brake disc is compressed by two steel plates without a protective coating, which leads not only to a loud squeaking sound, but also to increased heating of the caliper.
The device of the "seven" brake mechanism
The system is designed for smooth or emergency stopping. As we have already determined, it is the main security system, and operation of the car is prohibited even if the slightest malfunction is detected.
In a classic braking system, the pedal is mounted on the same axis as the clutch pedal and is equipped with a return spring. This mechanism has a built-in sensor for turning on the rear brake light lamps.
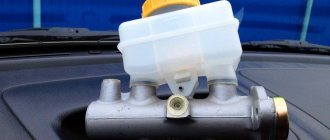
Next comes the brake master cylinder. It is attached to the body in the engine compartment with two bolts and has working braking circuits for the front and rear wheels.
Now you can find vacuum boosters to reduce the effort applied to the pedal. The drive of such an amplifier is a fitting . It is mounted in the intake manifold, connected by a rubberized pipe. For reliability purposes, the front circuit has two fittings per wheel, and the rear circuit has one fitting.
Piston disc brakes are used on the front wheels. They are installed for greater braking efficiency, since a greater load is placed on the front wheels than on the rear ones.
The rear wheels are equipped with drum brakes. Structurally, they are much simpler than disk ones. As is known, their efficiency is extremely low, but is quite sufficient for rear-wheel drive vehicles. In addition, it is not profitable for the manufacturer to install more expensive disk mechanisms. A parking brake mechanism is also built into the rear wheel brakes.
An important mechanism of the system is hidden under the bottom of the car in the rear - this is the pressure drop regulator in the system. This mechanism distributes the pressure that is created during braking between the front and rear circuits.
Replacing a brake caliper on a VAZ 2107
To replace the brake caliper on a VAZ 2107, we will need a number of tools. Let's list them:
- open-end wrenches, set;
- new brake caliper for VAZ 2107;
- flat screwdriver;
- a piece of rubber hose with a diameter of 8 mm and a length of 5 cm;
- jack;
- goatee
Sequencing
Before removing the caliper, the wheel behind which it is located will have to be jacked up and removed. Without this preparatory operation, further work will be impossible. After removing the wheel, access to the caliper opens, and you can proceed to the main work.
- The brake hose is connected to the caliper. It is mounted on a bracket that is attached to the caliper with a bolt. The bolt is unscrewed with a 10mm open-end wrench, the bracket is slightly raised and removed.
Video: changing the caliper on a VAZ 2107
Here it is impossible not to tell one case related to the prevention of brake fluid leakage from the “seven” hose. One driver I know, who did not have the above-mentioned rubber plug on hand, found a simple way out of the situation: he pushed an ordinary 19mm bolt that was lying nearby into the eye of the brake hose. As it turned out, the bolt fits the hole in the eye perfectly, and the brake fluid does not leak. There is only one problem: you can only get such a bolt out of the eye using pliers. The same person assured me that another ideal brake hose plug was a stub from an old Constructor pencil. This is a thick Soviet pencil with a round section, and the driver has been carrying it in the glove compartment ever since.
↑ Disassembly and assembly of wheel cylinders
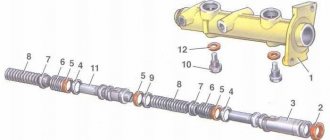
↑ Wheel cylinder design
1 — block stop; 2 — protective cap; 3 - cylinder body; 4 - piston; 5 - seal; 6 — support cup; 7 - spring; 8 - crackers; 9 — thrust ring; 10 - thrust screw; 11 - fitting; A - slot on the thrust ring
- Remove the protective caps 2, then press the pistons 4 assembled with the parts of the device for automatically adjusting the gap between the brake pads and the drum out of the cylinder body.
- Install the piston assembly with the automatic device on a special device so that the projections of the device cover the head of the thrust screw 3.
- Using a special screwdriver, turning piston 9, unscrew the stop screw 3 from the piston.
- Remove seal 8 with support cup 7 and crackers 5 from the screw.
- Disconnect the thrust ring 4 and the thrust screw 3.
Assemble the automatic device for adjusting the gap between the shoes and the drum and the wheel cylinder itself in the reverse order, taking into account the following:
- tighten the piston thrust screws with a torque of 3.9–6.9 N·m (0.4–0.7 kgf·m);
- Slot A on the rings should be directed vertically upward; deviation from the vertical is allowed no more than 30°. This arrangement of the slot ensures more complete removal of air from the wheel brake drive when bleeding the brake;
- To pre-compress the thrust rings, press the pistons into the cylinder body using a special device shaped like a cylinder with a conical internal hole;
- the force of pressing the piston into the cylinder must be at least 343 N (35 kgf); if the force is less than 343 N (35 kgf), replace the thrust ring;
- when pressing the piston into the cylinder, it is necessary to maintain dimensions of 4.5–4.8 mm and 67 mm (maximum) (see figure) for a free fit of the brake drum;
- Before installing parts into the cylinder body, lubricate them generously with brake fluid.
After assembly, check the movement of each piston in the cylinder body. They should move easily within 1.25–1.65 mm. Replace the protective caps 2 last.
Important points
When repairing the brake system of a VAZ 2107, you should remember several very important nuances. Without mentioning them, this article would be incomplete. So:
- On later VAZ 2107 models, spring washers began to be installed under the fastening bolts of the brake brackets. They are thin and very easy to lose when removing the bracket. To prevent this from happening, it is advisable to spread some newspaper or rag under the caliper. If the puck does pop out, it will be much easier to find it;
- If the driver does not plan to change the brake pads when replacing the caliper, then before removing them they should be marked with a marker or chalk so that they can be installed in the same place during reassembly. If you change the original location of the pads, they will become unusable much faster;
- If the driver decides to leave the caliper in place and plans to change only the brake pads, then he will have to buy not one, but two sets of pads, since these parts are always changed on two wheels, and not on one. If you leave old pads on one of the wheels, this will inevitably lead to rapid wear and new problems in the operation of the brake system;
So, replacing a brake caliper is not at all as difficult a task as it might seem at first glance. The main thing that the driver should remember when changing this part is its extreme importance. If a mistake is made when installing the caliper or pads, this does not bode well for either the driver or the car. It is for this reason that the article described in as much detail as possible all the nuances of installing a brake caliper. And it is strongly recommended to pay close attention to these nuances.
Source
↑ Checking wheel cylinder parts
↑ Wheel cylinders
Check the cleanliness of the working surfaces of the cylinder, pistons and thrust rings. The surfaces must be completely smooth, without roughness, to prevent fluid leakage and premature wear of seals and pistons. Eliminate defects on the cylinder surface by lapping or grinding. However, increasing the internal diameter of the cylinder is not allowed.
↑ Wheel cylinder parts
1 — piston assembly; 2 — cylinder body; 3 - thrust screw; 4 - thrust ring; 5 - crackers; 6 - spring; 7 — support cup; 8 - seal; 9 - piston; 10 - protective cap
Check the condition of the thrust screw 3, spring 6, support cup 7 and cotters 5. If necessary, replace damaged parts with new ones.
Replace the seals 8 with new ones. Check the condition of the protective caps 10 and replace them if necessary.
↑ Pads
Carefully check the pads for damage or deformation.
Check the elasticity of the tension springs, both upper and lower; if necessary, replace them with new ones.
The springs must not have residual deformations when stretched with a force of 343 N (35 kgf) for the lower springs and 411 N (42 kgf) for the upper ones.