Sometimes with cars of the 14th model such a nuisance happens that the low beam of the VAZ 2114 does not light up, but the high beam works perfectly. Such “selective” light failure can be quite puzzling for a motorist. Today we will talk about why this happens and how to correct this situation.
The low beam of the VAZ 2114 does not light up
Circuit breakers:
F1 (5 A) - license plate lamps, instrument panel lamps, indicator light on the dashboard, engine compartment lamp, additional brake light lamp, left side marker lamps.
If any of the listed lamps do not work, check this fuse and the lamps themselves, their connectors and wiring.
F2 (7.5 A) - low beam in the left headlight. Similar to relay K4.
F3 (10 A) - high beam in the left headlight, indicator lamp for turning on the high beam headlights on the dashboard. Similar to relay K5.
F4 (10 A) - backup fuse.
F5 (30 A) - front door electric windows and their relays. If, when operating the power window, the window goes down but not up (or vice versa), check the button on the door. When lowering and raising, the polarity and direction of rotation of the motor are different. It could also be a problem with the window lift mechanism.
To get to it, you need to remove the door trim. Check that the mechanism does not bite anywhere and that the gears are intact, without broken teeth. If there are problems, you can replace the entire power window drive with a new one.
F6 (15 A) - door lock control unit. If one or more doors stop opening, check this fuse. The issue may be in the central locking, control unit, as well as the mechanisms themselves, rods and door locks. If you have no experience, it is better to contact a car service.
F7 (20 A) - sound signal and its relay, cigarette lighter. If the horn does not work, check this fuse, the steering column contacts and the wiring; the contacts may have oxidized and the wiring may have become frayed. Also check the horn itself, you can replace it with another one, for example, a two-tone one from Volga.
If the cigarette lighter does not work, check the wiring and its contacts. The white wire is responsible for the backlight, the red and black wires go to the cigarette lighter contacts.
Do not insert non-standard connectors into the cigarette lighter, they may cause a short circuit. If the connector in the cigarette lighter moves to the sides, it is better to use a splitter and insert this connector there.
F8 (20 A) - rear window heating element and relay (contacts).
Similar to relay K7.
F9 (20 A) - rear window heating relay winding, additional relay, rear window wiper motor, windshield wiper and washer switch.
F10 (20 A) - backup fuse.
F11 (5 A) - right side lamps.
F12 (7.5 A) - low beam in the right headlight, gear motors for headlight range control. Similar to relay K4.
F13 (10 A) - high beam in the right headlight. Similar to relay K5.
F14 (10 A) - backup fuse. F15 (20 A) - backup fuse
F16 (10 A) - turn signal and hazard warning light switch (in emergency mode). Similar to relay K3.
F17 (7.5 A) - interior lighting, individual backlight lamp, brake lamps, check lamp for malfunction of the engine management system. If the brake lights do not work, check this fuse, the lamps themselves, their connectors, usually the problem is bad or oxidized contacts. Also check the operation of the brake light switch located near the brake pedal.
F18 (25 A) - heater electric motor and its switch. If the stove blows cold air, the problem may be in the hot air damper, the cable to which comes from the regulator under the casing not far from the gas pedal. The coolant level must be within acceptable limits.
If the heater doesn't work or blow at all, it could be the heater motor. Also check the heater switch and its contacts.
F19 (10 A) - turn signal and hazard warning light switch (in turning mode), indicator light in the light switch, turn signal lamps, turn signal indicator lamps on the dashboard, differential indicator lamp. If the turn signals or hazard lights do not work, read the information about relay K3.
F20 (7.5 A) - reserve.
Burnt fuse
Another fairly common reason for low beam headlights not working is a blown fuse. In order to eliminate this problem, it is enough to check all the fuses and replace the faulty element.
However, if burnout occurs with enviable frequency, then the problem lies in the breakdown of the wiring. In order to determine this, “ring” all elements of the electrical circuit or contact a service center.
Important! This problem should not be ignored, as in the event of a short circuit a fire may occur.
How to change the low beam light bulb on a Priora
Why might one low beam headlight not light?
The Priora is an extremely interesting car. The car, with its appearance, shows interest in all living things, and the same happens inside. Not as clearly expressed as in her gaze, but you will also have to feel all the delights of the structure. We won’t go far, we’ll just change the light bulb. What's easier?
Replacing a low beam lamp on a Lada Priora
Light bulb is different. Several changes were made to the electrical circuit of the Priora compared to its predecessor. But we’ll talk about them later, but for now we’ll just change the regular lamp. How to change the low beam light bulb on a Priora is very clearly described in the operating instructions. It’s simple: open the lid, take out one lamp, and put a new one in. All things. But it's in the manual. In practice, things are somewhat different.
The reference conditions for replacing a low beam lamp are a table, a removed headlight unit and ideal lighting. Then it will turn out as in the instructions. In fact, the situation is somewhat different. But first, let's take a look at the manufacturer's recommendations.
- To replace the left low beam lamp, it is necessary to remove the battery, otherwise there will be no access to the base. Some recommend moving the battery towards the windshield, but if you are not a philharmonic pianist, then it is better not to be lazy and remove the battery. Nerves are more expensive.
- The left low beam lamp is closer to the fender, so you need to remove the rubber cover on the far left.
- Power is supplied to the lamp through a block with contacts that need to be disconnected and the harness taken to the side.
- The lamp itself is attached to the reflector using a spring clamp, which must be pressed from top to bottom, after which it will disengage with the hooks of the reflector.
- Now you can remove the halogen and carefully insert the new H7 lamp into the headlight housing.
- Having fastened the lamp to the reflector, you can put the block on the contacts and close the cover.
Replacing the right low beam lamp is similar, but you do not need to remove the battery
One more important note. All halogen lamps have a bulb that is very sensitive to dust and grease, so it is highly undesirable to touch the bulb with your hands
If you do touch it with your fingers, be sure to wipe the flask with a soft, clean rag soaked in alcohol.
Selecting a low beam lamp
If everything is more or less clear with replacing the lamp, you just need to have composure and flexibility of a boa constrictor, then with the low beam lamp itself on the Priora things are not as rosy as we would like. Firstly, a huge number of fakes littered the market, and with the same impudence as Priora looks at humanity, they replaced human lamps. It's simple - they are much cheaper.
In appearance, such a lamp is almost impossible to distinguish from a real one, and sellers in car dealerships show professional solidarity, striking in their incompetence. It is in their interests to sell us a cheap fake, and not to provide us with a good spare part, so all questions regarding the choice of lamps fell on the fragile shoulders of the car enthusiast.
There is a series of tests that is conducted from time to time by a reputable organization. During the tests, it turned out that those lamps that sell for 50 rubles apiece can have any inscription - Philips, Osram, Bosch, whatever. But these are not real H7 lamps, and their use is not only useless, but even harmful.
Low beam lamp models
Each halogen lamp has its own characteristics and necessary parameters in order to be used as a source of low beam, and this must be indicated on the packaging. In particular, according to GOST, the luminous flux of the lamp is standardized and should be within the range of 1350 - 1650 lumens. If this parameter is not indicated on the packaging, or is indicated but does not comply with the standards, then such a lamp should not be installed. The lamp power should not exceed 58 W, otherwise the wiring will be overloaded and may melt, which will lead to obvious consequences. Also, the light spot must comply with the standards in area and shape.
The best lamps for these parameters turned out to be
Philips Vision Plus +30% - if the headlight is correctly adjusted, then this lamp is quite suitable for use, provided that it is not a fake. The most ordinary good halogen.
OSRAM H7 - the most common counterfeits of this model are found. This lamp meets all standards and parameters.
H7 MEGAPOWER+30% - there is no European certification on the packaging, there is only a Russian certificate. The light spot does not comply with GOST, the base is of poor quality, and the luminous flux is 1050 lm, which is slightly below the norm. Not recommended for long-term use.
In short, this is all that can be said about the low beam headlight lamps in Priora and their replacement. Do not bring the lamp to a critical state, so as not to change it later in the cold. Choose good lamps, and good luck on your journey!
Replacing lamps
The process of replacing lamps on a VAZ 2110 is extremely simple. However, before you begin this operation, you must purchase new lighting elements.
This vehicle is factory equipped with H7 standard halogen bulbs. Today there is a large selection of lamps on sale, not only halogen, but also other types - xenon and LED.
The photo shows a H7 standard halogen lamp
Their features, advantages and disadvantages have been discussed many times on car enthusiast forums, so below we provide only a comparative table with the main characteristics of these lamps:
Similar articles
How to change the low beam light bulb on a Priora
Note! The most optimal color temperature of the light flux is in the range of 4300 - 5000 K. It must be said that in addition to the data from the table, when choosing, you should also take into account the penetrating ability of the light flux
Halogen lamps are the leaders in this parameter - they illuminate the road much better in rain, fog or snow.
It must be said that in addition to the data from the table, when choosing, you should also take into account the penetrating ability of the light flux. Halogen lamps are the leaders in this parameter - they illuminate the road much better in rain, fog or snow.
In addition, installing xenon or LEDs in the fog lights of the VAZ 2110 will require electrical intervention, in particular the installation of additional equipment (ignition units). Therefore, it will not be possible to perform their high-quality and safe installation with your own hands.
Note! Experts recommend changing light bulbs in pairs so that both headlights shine equally. In addition, their service life is approximately the same, so if one of them burns out, the second one will soon fail.
Each car owner must choose for himself which light for the VAZ 2110 will be better based on his own financial capabilities, weather conditions of the car, etc.
How to replace the lamp
Instructions for replacing light bulbs look like this:
- First of all, you need to open the hood and disconnect the terminal from the battery.
- Then you need to remove the plug. located closer to the wing.
- Next you need to unfasten the spring clip. which presses the light bulb to the headlight housing.
Disconnecting the block from the contacts
- After this, you should carefully disconnect the block from the contacts and remove the light bulb itself. since nothing else bothers her.
- Now you need to insert new light bulbs in the same position in which the old ones were located, connect the block to the contacts and secure everything with a bracket.
- At the end of the work, you should install the plug in place.
Note! When replacing lamps, it is important not to touch the glass with your fingers. Otherwise, grease stains will remain on the surface, which will lead to overheating and failure of the lighting element.
Similar articles
Adjusting headlights yourself
The lamp replacement is now complete. As a rule, this operation takes several minutes even for beginners.
Advice! Many car owners are interested in how to improve headlights? The easiest way is to disassemble the headlights, wash them, replace the glass if necessary and adjust the light beams. As a rule, these simple procedures give good results.
Tips for motorists
Replacing low and high beam lamps on Renault Logan
Drivers have a special attitude towards the head lighting of a Chevrolet Lacetti passenger car, because it must be in working order both day and night. Therefore, they need to know how to troubleshoot problems that arise in the electrical circuit of low and high beam headlights.
The lamps of all headlights are powered through an Ef12 (25A) fuse. Therefore, if it is impossible to turn on the headlights in either low beam or high beam mode, troubleshooting should begin by checking this fuse. It is located in the mounting block of the engine compartment, which is located between the expansion tank of the cooling system and the battery. We replace the blown fuse, and if it burns out again, then it will be necessary to find the location of the short circuit due to which it fails.
The low beam headlights turn on only after the contacts of relay K4, also located in the mounting block of the engine compartment, are closed. If both low beam lamps do not light, check fuse F6 (10A), through which power is supplied to the coil of relay K4. This fuse is located in the mounting block located in the car interior on the left side of the front panel, the cover of which is accessible only when the driver's door is open.
If fuse F6 is intact, then pull out relay K4 and, using a jumper, close contacts 30 and 87 in its block and check whether the low beam turns on. If the light turns on, then relay K4 must be replaced due to its malfunction. But if the low beam does not turn on, then troubleshooting can be continued by checking two ten-amp fuses, Ef20 (low beam of the left headlight) and Ef27 (low beam of the right headlight). They are located in the mounting block of the engine compartment.
And if these fuses have not blown, then you will have to look at the condition of the filaments of the H7 low beam lamps (55W), which are only found in Chevrolet Lacetti sedan and station wagon cars. On hatchbacks, the headlights use double-filament H4U (55W) lamps, in which the low beam filament is located above the reflector. But, in order to do this, you will have to remove the headlights by unscrewing a couple of bolts of the upper fastening and a nut of the lower one. There is no other way to get to the lamps. If the lamp filaments turn out to be intact, then to find the problem you will have to remove the left steering switch.
If there is no high beam in both headlights, first check the condition of fuse Ef15 (15A), located in the mounting block of the engine compartment. If it is safe and sound, then you will have to look at the condition of the H1 high beam lamps (55W). And if they turn out to be serviceable, then again you will have to deal with the left switch under the steering wheel. In addition, the high beam may not light due to lack of contact at the terminals of connectors S201, C101, C102, C202, C104. On connector S201 there is only a high beam contact, and on the other connectors there are also low beam contacts.
Malfunctions of fuses, wires and switches
Another, no less common reason is a blown fuse. It is located in the corresponding block located under the hood, on the left side (along the direction of the car) closer to the windshield. Open the black cover and find the required fuse - in the VAZ2114 it is F12 (right headlight) and F13 (left headlight). Both fuses are 7.5 amps. To ensure their integrity, hold the parts up to the light: whole threads should be visible. If they are missing, the fuse(s) must be replaced. If these elements are intact, but there is still no light, it makes sense to check the relay along the way; it is designated as K9. You need to pull it out and install a known good part (you can use the K8 high beam relay to check).
Settings
How to replace low/high beam bulbs on a Lada Granta, step-by-step instructions
If it is not possible to set up the system at a car service center, you can do it yourself. To do this, you will need a flat area with a wall or a solid fence opposite it. This is a prerequisite for any adjustment option.
Low beam
In this case, it is easier to use a universal method, which is almost the same for all cars. Only the distance from the wall to the car can differ, most often it is 7.5 meters, but some models are placed 5 meters away; it is better to clarify this point separately in order to correctly adjust the light. Next you need to prepare the markup.
- The car is driven close to a wall or fence, then marks are made on the surface clearly in the middle of the low beam headlights and opposite them. These will be the main guidelines.
- Then you can drive the car away and start drawing. Two more marks are placed 5 cm below the center of the headlights and connected by a horizontal line. Vertical lines are also drawn through the points to provide a clear reference point.
- The central axis of the machine is determined and also marked on the wall. The end result should look something like the diagram below.
All parameters are determined individually, since the size of the cars and the location of the headlights are always different.
Next you can start setting up
It is important that at least half a tank of gasoline is filled in the car, and that a person is sitting in the driver’s seat or there is a load approximately equal in weight to the driver. The easiest way to adjust headlights near a wall is this:
The car is located at a distance of 5 or 7.5 meters, and the center line should coincide with the middle of the hood
It is important to position the car correctly. The hood is opened and a screwdriver or other tool is prepared for adjustment. The light is turned on and one headlight is covered with cardboard or any other opaque element. The upper edge of the light flux (it is clearly visible) should be located along the line
If it is displaced, adjustment is made with the corresponding screw that regulates the light in the vertical plane. Adjustment in the horizontal plane must be done so that the place where the luminous flux begins to rise is at the vertical mark opposite the headlight.
This is what the adjusted light output looks like.
The second method is in many ways similar to the first, but in this case you will need to place the machine at a distance of 10 meters from the wall. In this case, the horizontal line is drawn 12 cm below the center. Some argue that increasing the distance allows for greater tuning accuracy, so if you have the space, you can try this option.
Video: A visual example of setting up the headlight.
High beam
The high beam headlights do not have clear lines, they distribute the light evenly, so the adjustment will be much easier. The preparation process is almost the same as with low beam, the main guideline will be a horizontal line 5 cm below the center of the headlights and vertical lines opposite the bulbs.
In this case, you need to adjust the light so that the center of the beam falls at the intersection of the vertical and horizontal lines of the corresponding headlight. Here accuracy is not so important, since long-range lighting is used only when there is no oncoming traffic. If the low and high beam are combined in one bulb, then adjusting one option is enough for the headlight to work as it should.
High beam is distributed differently than low beam.
In the video they set the high beams on a Hyundai Tucson.
Fog lights
In this case, there are no screws for adjustment and the position of the light flux can only be changed in the vertical plane. Before you begin, you should loosen the fog lights. They often oxidize, so it is advisable to treat them with a penetrating lubricant in advance.
A line is drawn on the wall; its height should be 10 cm below the location of the fog lights. After this, the car needs to be driven 7.6 meters, positioned opposite the markings and the headlights turned on. In this case, the upper limit of the light flux should coincide with the line; only this position will ensure normal visibility in fog.
Fog lights also require adjustment to function properly.
Do-it-yourself headlight adjustment
The headlight adjustment must be carried out in accordance with the vehicle's operating manual. Before starting the adjustment, it is necessary to perform a number of preparatory work. To adjust the headlights yourself, you need a wall with an adjacent flat area or a special stand (board). The wall (stand) must be strictly vertical, without the slightest protrusions, slopes or other irregularities. Alternatively, you can use the area near the garage if it fits the parameters described above.
Preparatory work
You need to draw a horizontal line on the wall, at a distance from the center of the headlight to the floor. It is best to use chalk for drawing. To simplify this procedure, you can drive the car close to the wall and turn on the optics. This will help you quickly determine the center of the headlights. It is also necessary to add another horizontal line to the marking, below the first 50-75 mm (for domestic 50 mm, for foreign, luxury class 75 mm).
After this, draw three vertical lines: the axis of the car and two in the center of the headlights. If the optics are represented by separate elements of high and low beam, you need to draw vertical lines for each headlight. The distance of the car from the wall is determined by the car model. As a rule, for domestic cars - 5 m; for foreign countries - 7 meters.
Wiring
First of all, when the low beam stops working, check the reliability of the connections in all the blocks involved in the low beam electrical circuit. Their contacts often simply oxidize and after cleaning the problem is eliminated. Sometimes also due to vibration the connectors come loose and the circuit breaks. The contact groups need to be cleaned of oxides - a needle file or a school eraser is suitable for this. A nail file will also work (this tool will probably be found in any car lady’s purse).
Sometimes the light does not come on because the button that turns it on fails. There are contacts inside it, which, in turn, can also be damaged by corrosion. It is not difficult to verify that the starting device has failed - just disconnect the wires from it and short-circuit them. If this is the reason, then the light will come on. There is no point in repairing a button that has become unusable - it is easier to replace it with a new one.
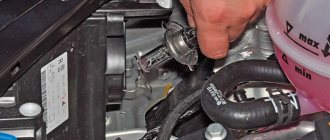
Lamp failure and replacement
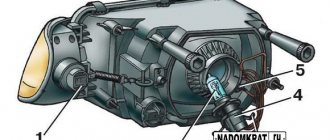
The car is equipped with halogen lamps with two filaments located in one housing.
One of them is responsible for the high beam, the other for the low beam. To make sure that the reason for the lack of light lies precisely in the lamp, it is enough to replace it with a known good one. To do this, find the cover under the hood that covers the headlight unit. Turn it clockwise to open it. Next you will see a three-pin connector that needs to be removed. Now all that remains is to remove the lamp by moving the spring clips to the side. Do not forget that the new lighting element should not be held by the glass - greasy marks will impair heat transfer and the lamp will quickly fail. Therefore, take it by the contacts, insert it into the grooves, put on the spring clips and close the cover by turning it counterclockwise. When replacing the lamp, pay attention to the contacts in the connector - they should not be oxidized
When can a motorist receive a fine?
In the event of an accident, both drivers will be found at fault
There are several reasons that can lead to a fine for using low beams. It should be noted the most common cases in which a motorist can receive penalties:
- Driving a vehicle in a populated area with high beams on. This means that the driver will receive penalties if, when entering a populated area, he does not switch the high beam to the low beam;
- Incorrect use of the rear fog lamp. It should be remembered that the rear fog lamp is a lighting device that should be used by the driver in cases where there are rather difficult conditions associated with poor visibility. Using it in other cases may result in an administrative penalty;
- The use of running lights when driving a car at night. It should be remembered that when darkness falls, the driver must use low beam. Daytime running lights must be installed in accordance with all existing rules and standards;
- Driving a vehicle in the daytime with the low beams turned off. In general, this problem is almost always closely related to the inattention of motorists. The fact is that there are cases when motorists simply forget to turn on the low beams during the day. It is recommended not to forget about this, otherwise you may receive a fine for this offense.
Having problems with the wires
the headlight doesn't come on
It would also be useful to check the button with which the headlights are turned on, since its contacts are also subject to oxidation and they may also have a poor-quality connection. Practical experience suggests that it is from this button that you should start troubleshooting, and only after making sure that it is fully operational, continue searching for the reason why the low beam does not work.
Low beam does not work: reasons
So, proper lighting of the road while the car is moving is a very important factor that ensures the safety of the driver, his passengers and other road users.
While driving a vehicle, the driver needs to clearly see the road along which the car is moving.
High/low beam headlights are very important because they provide good visibility both at night and in cloudy weather conditions. Today there are several types of car headlights, which can be divided into the following categories:
- Main headlights using halogen, xenon, high-intensity discharge lamps, diodes, etc.;
- Fog lights - the main purpose is additional illumination of the road while driving in thick fog (most often, the manufacturer already supplies cars with a set of fog lights);
- Spotlight headlights - powerful headlights provide the driver with good visibility, especially when driving on unfamiliar roads (headlights are not intended for city driving, as they can blind other drivers);
At the same time, for low and high beams, as well as for fog lights, halogen lamps are most often used, designated by the type of base as R2, H1, H3, H4, H7, HB3, HB4.
As for the problem itself, if the low beam does not work, the reasons may be different. It is important that the cause of the malfunction of the low beam or high beam headlights is accurately determined. Here are some of the main reasons why the low beams do not light up:
- low beam lamps have burned out;
- the fuse threads have melted (since basically the power circuits of the left and right headlights are not interconnected and are protected by separate fuses, a failed one of the fuse elements can lead to the failure of one headlight), the malfunction is diagnosed visually. In case of difficult access to the mounting block, check the operation of devices receiving power from circuits protected by the same fuses;
- faulty headlight relay (lighting systems stop working, there is either low or high beam). The malfunction can be detected by ear, by turning on the headlights and listening to the sounds that arise; if short, loud clicks are heard, the relay is working properly; if there are no clicks, the relay is faulty;
The connectors of the electrical wires going to the headlights are not connected correctly or are not connected at all (for example, they forgot to connect them after repairs). In this case, only one of the two headlights does not light up.
- water entering the engine compartment of the car (oxidation of the “chips” at the junctions of the wires, as a result of which the “chips” cease to perform a conductive function). Diagnose the malfunction by checking all the named wires and connections suitable for the headlights;
- voltage surge in the on-board network (both lamps burn out at the same time);
- other non-standard reasons (for example, a crack in the headlight through which water gets in and moisture condenses).
Please note that if a malfunction is not identified, additional diagnostics of the electrical wiring are carried out using the procedure of “testing” the electrical circuits of the car with a multimeter. By the way, to quickly determine the cause, you need to make sure that there is power at the terminals. Of course, the lack of current at the terminals supplying the low beam headlight bulbs will result in no low beam
Of course, the lack of current at the terminals supplying the low beam headlight bulbs will result in no low beam.
By the way, to quickly determine the cause, you need to make sure that there is power at the terminals. Of course, the lack of current at the terminals supplying the low beam headlight bulbs will result in no low beam.
To diagnose such a malfunction, you must do the following:
- insert a working lamp into the socket and “strike” the plus wire against the minus wire;
- a spark jumping between the wires or the lamp turning on indicates the presence of current in the network and, accordingly, indicates a malfunction in the headlights or lamps themselves;
- if there is no spark or the lamp does not light up, there is a break in the headlight power supply.
Please note that this method of checking is only suitable for simple cars where the ECM system is not complex. In turn, an attempt to short-circuit the plus and minus wires on many modern cars can lead to serious failures, errors in the ECU memory, etc.
Replacement Tips
Speaking about replacing failed components of an electrical circuit, it is worth saying a few words about the correct replacement of light bulbs.
It must be done in the following order:
- Turn off the ignition and remove the key from the lock.
- Open the hood.
- Unscrew the headlight unit (to do this, unscrew the bolts on both sides) and remove it.
- Dismantle the contact group by disconnecting it from the reflector (this procedure should be done extremely carefully).
- Once you find the spring clips, release them.
- Remove the non-working light bulb.
- Insert a new light bulb into the vacated socket.
Reassembly and installation of the headlight unit is carried out in the same sequence, but in reverse order. If necessary, a similar procedure can be performed with the second block. It is worth noting that it is highly advisable to replace lamps not with bare hands, but with light gloves - the glass of the bulbs is quite thin, and with strong pressure it can burst right in your hands.
Why the car's low beam light doesn't light up: 4 reasons!
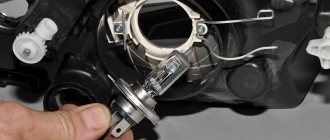
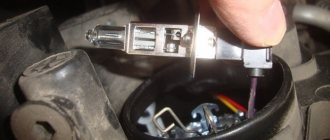
Firstly, if the low beam bulb does not light up when the high beam is working, you need to check whether it has burnt out. In this case, the lamp may have two separate filaments, one of which lights the high beam, and the other lights the low beam. Therefore, there is nothing surprising in the fact that they can turn on autonomously from each other.
Replacing a halogen lamp on a headlight is not difficult, even if you are not an auto electrician. Let's consider a simple algorithm for this procedure:
- the hood of the car must be opened and secured;
- the protective cover must be removed from both sides of the headlight;
- disable contact group;
- remove the spring clips;
- remove the burnt out light bulb;
- put a new one in its place;
- return all removed elements to their place.
It is important to know a few rules for working with lamps:
- it is necessary to degrease the surface of the bulb before installation, otherwise there is a high risk that the lamp will immediately burn out due to contamination;
- It is not recommended to work with a glass flask with bare hands. This may leave traces of grease on it that cannot be removed and the lamp will be damaged. The best option is to use cotton gloves, and if you don’t have them on hand, you can wrap the flask in a cloth or napkin.
The fuse is broken
This is the second common reason why the low beam light of one of the car headlights does not light up. Let's look at how to fix it yourself:
- the fuse box for electrical circuits must be opened;
- if one of the fuses has blown, it needs to be identified (usually this is not difficult) using a diagram;
- The faulty fuse must be replaced with a new one.
Let us clarify that if fuses on your car often burn out, you need to look for a breakdown in the wiring. Then, using a special device, it is necessary to ring the wires to determine where their integrity is compromised. If it is impossible to do this yourself, you need to contact an electrician who can find the cause of frequent breakdowns. In fact, this is a rather serious problem, in which repairs cannot be put off for a long time, since breakdowns in the wiring can lead to a short circuit and fire of the machine.
Wiring is damaged
What if the low beam light doesn't come on because of a wiring problem? Then you need to check the blocks through which the relay and fuse box are connected. The reason may be a poor connection, or the contacts may oxidize, which leads to increased current, overheating of the wiring and failure of the lamp. To repair this damage, you need to tighten all the pad fastenings, but before doing this, do not forget to clean all contacts with an abrasive material.
In addition to the pads, you need to check the headlight switch, since the contacts on it may also be oxidized, or there may be a poor connection in this place. Any experienced technician will start searching for the cause of non-working headlights from the button to turn them on, and only after making sure that it works properly will he continue to search for the answer to the question: “Why don’t the low beam lights light up?”
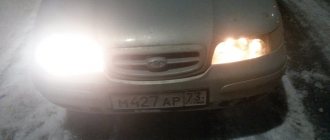
The high beams on the VAZ-2114 do not light up
Why don't the high beam headlights light up?
How to replace the steering column switch? Video
Fact: every third car owner encounters a situation where the low beam headlights are not on, but the high beam is on. Straightforward logic on the topic that if the optics are covered, then there should be no light at all does not work here.
This also happens, for example, to many VAZ owners: on Tolyatti models, for some reason, the right headlight is susceptible to the disease described, even on almost new cars; with the left, this incident happens much less often.
However, you should not blame exclusively domestic, so much-maligned, manufacturers: optics can sooner or later start to act up on any car. And here the point is no longer about the reliability of this or that brand, but rather about the deterioration or fatigue of some parts.
The easiest way, without a doubt, is to entrust everything to the reliable hands of a trusted auto electrician, but it is not too difficult to cope with some problems on your own - if you have the smallest amount of free time and a primitive acquaintance with the basics of electrical circuits.
The low beam of the headlights does not light up, but the high beam is on - this phenomenon can be due to several reasons. And most of them are quite easy to fix. Moreover, this can happen to your car at a completely inopportune moment: on the highway, for example, when you need to switch to low beam so as not to blind oncoming drivers with headlights. Let's try to deal with all the flaws one by one, and consider: what might be the most common options for repairing and troubleshooting such an important segment as low-beam lighting.
Troubleshooting and repair.
1. Check and replace the light bulb. You can check the light bulb; a) visually (see the burnt out thread) b) with a device (for lack of resistance) c) replacing it with a known good one.
Advice: - when replacing a light bulb, you should not touch the glass with your hands, this will reduce the life of the lamp to 1 day (oil from your hands getting on the glass leads to an increase in temperature and, as a result, the lamp burns out on the first day) If you touch it with your hands, just wipe the lamp with alcohol , that is, degrease. — use lamps recommended by the manufacturer.
2. Find and replace the fuse. The high beam fuse in all cars is designated as in Fig. 2
Rice. 2 Or the inscription in English: fuse beam Tip: Always when replacing or checking fuses, use the pliers that are located in the fuse box and look like this:
When searching for a fuse box, use the instruction manual; it will indicate the location of the box, the designation and rating of the fuses.
3. Search and check the high beam relay. Finding the high beam relay is similar to finding a fuse: -take the operating instructions and look for the relay block. - we look for the designation or marking of the high beam relay (or beam relay) - we check or change it to a known working one.
Tip: To replace, you can use the low beam relay (on 99% of cars they are interchangeable).
If there is not a separate relay, but a light control unit, then the entire unit must be replaced.
4. Steering light switch. This is where I advise you to go straight to the service station (or study the manufacturer’s manuals for a long time and carefully). The fact is that checking or replacing the switch on some cars with an airbag is associated with a risk to life and health (the airbag is triggered abnormally, the face is usually at the level of the steering wheel, you can imagine the effect, especially since there have already been cases).
5. Checking the mass. This applies primarily to old machines with a long service life. We take the connector from the headlight and use the device to measure the resistance to ground (usually a brown or black wire), it should not exceed 3-5 Ohms, if we look for the ground attachment point according to the diagram and clean it or use a paint sprayer.
6. The cause of electrical wiring malfunction may be: - wear (break); — oxidation (poor contact); — abnormal intervention of “crooked hands” (“specialists” in installing alarms, fog lights, car radios and other “special extras”). Finding faulty wiring, as a rule, is associated with the availability of manuals for a given car, which may not be freely available. Therefore, if you are not confident in your abilities, I strongly recommend turning to specialists (it will be cheaper). That's all. Good luck on the roads!
Also see other articles from the category
Some owners of VAZ-2106 cars have encountered such an unpleasant problem as non-working high beams. This problem, although not critical and allows you to use the car almost without problems, still needs to be eliminated. We will talk about the reasons for this malfunction and how to eliminate it in our article.
The peculiarity of the structure of the headlights of the VAZ-2106 is that the low and high beam lamps are located in different headlight housings, which greatly simplifies the search and solution of the problem.
One of the main reasons for this malfunction is considered to be problems with relays and fuses. In addition, sometimes situations arise when, when switching to high beam, your low beam is completely turned off or the headlights on one side (low and high) go out. This problem in most cases occurs due to oxidation of the ground contact on some headlight.