Checking the tightness of the valves is an important undertaking, since the correct operation of the power unit largely depends on the tightness of the intake and exhaust valves to the seats. Today you will learn how to check the tightness of valves, as well as how to grind valves at home using special probes and a set of accessories. Without the correct and coordinated operation of the timing mechanism (gas distribution mechanism), uninterrupted operation of the engine is impossible; this must be understood and all existing problems in the operation of this system must be identified in a timely manner. The key role in the timing is played by the intake and exhaust valves, as is already clear from the name, some release and others let in... The tightness of the valves is an important point, on which, as mentioned above, a lot depends, otherwise there will be no combustion in the combustion chamber the necessary pressure will be created and the operation of the internal combustion engine will be ineffective, and possibly even impossible.
In order to check the tightness of the valves you must have:
- Set of flat probes;
- A wide bench ruler or a special template;
- Lapping paste;
- Kerosene;
- A special “device” for grinding in valves.
What is EGR
USR sensors can be found in almost any modern car - this is a small device that performs a number of tasks related to reducing toxicity. The EGR valve has a simple and reliable design. The main task performed by EGR is to reduce the level of nitrogen oxide contained in exhaust gases. It is installed on both diesel and gasoline cars, except for vehicles with turbocharged engines (although there are exceptions here too).
Reducing the formation of nitrogen oxide (N2O3) is achieved by diverting part of the exhaust gases back into the combustion chamber. This happens because the exhaust recirculation valve maintains the throttle valve in the open position due to the pressure created by the gases returning to the engine. This leads to a decrease in cylinder temperatures, the exhaust becomes less toxic, fuel consumption is reduced and detonation is reduced due to a change in the ignition timing.
This achieves two goals:
- displace some of the excess air;
- absorb excess thermal energy inside the cylinders.
Thanks to this, the emission of nitrogen oxides, which is one of the most toxic substances present in exhaust gases, is reduced. It is formed under the influence of high temperatures and endothermic reactions of oxygen with nitrogen.
Considering all the factors, we can say that EGR is a mechanism that contributes to the following:
- reduces harm to the environment;
- reduces fuel consumption;
- retains engine power.
It is also worth noting that recirculation is only possible in partial load mode. The first USR systems were pneumatic and complied with the environmental standards EURO-2 and EURO-3. Tighter regulations have led to almost all of them becoming electronic.
Is it possible to drive with a broken gasket?
A broken cylinder head gasket causes the following problems:
- engine overheating;
- decrease in oil pressure when antifreeze gets into it;
- lack of necessary lubrication of the piston group;
- violation of the tightness of cooling, exhaust, compression systems.
With such malfunctions, operation of the vehicle is prohibited, even for a short time. After these symptoms appear, the engine must be turned off immediately and the car taken to a specialized service center.
How the device works
The EGR sensor is controlled using vacuum. The EGR valve connects the intake and exhaust manifolds, and it opens under the influence of the vacuum zone. In order for the engine to operate stably at idle, the recirculation valve is disabled by the ECU.
The valve exhaust is adjusted so that they remain open for some time at the beginning of the stroke. Thus, part of the exhaust gases returns to the combustion chamber.
USR diesel engine
It's also worth noting that this is not the only system for reusing exhaust gases. An internal system is found on some car brands. It does not provide for the use of additional equipment, since it is built into the design of the engine itself.
When using additional cooling devices, the list of things that are affected by EGR expands. The operation of such units is to cool gases using antifreeze. This has a significant impact on the combustion temperature, leading to a reduction in the amount of nitrogen oxide produced.
Valve disc grinding machine — logbook Ford Sierra 1984 on DRIVE2
I don’t trust anyone, so I decided to edit the valve plates myself.
I bought a suitable bracket and bearings from the store. A start.
At the market I bought a motor from a Soviet video recorder to drive the valve rotation.
I attached the motor to the back. I used a piece of inner tube from a bicycle as a belt.
The belt presses the valve well against the rollers.
Test of valve rotation from the built-in motor -
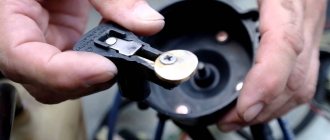
Using a metal plate, I built a valve movement limiter.
Using another metal plate, I pressed the valve from above.
Now the valve has nowhere to go. Just rotate.
I organized the valve grinding itself in two ways.
The first method is a drill with a grinding attachment. The advantage is adjustable rotation speed. Since the revolutions of the drill almost completely coincide with the revolutions of the valve drive motor, I chose this option as the final one.
The second option is an electric sharpener. The advantage is noiselessness, the ability to spin it from a rotating valve without connecting to a 220 V network.
The electric sharpener was specially tilted slightly in order to grind at a slight angle to the plane of rotation of the valve.
Here is the result. There is no longer a deep groove.
View of the valve after finer grinding.
The grinding works well.
And this is an experimental valve with a large chamfer roughness after grinding.
Exhaust gas recirculation sensor in a microprocessor system
In principle, the EGR system consists of a poppet valve with a special valve. The device performs only two functions - it releases or prevents exhaust gas from getting back into the intake tract area of the power plant.
In microprocessor-based (electronic) engine control systems, the EGR valve operates not at the moment of vacuum in the intake manifold. For this purpose, electric or electro-pneumatic methods are used to move the valve through a servo drive. The operation of the USR is controlled through the ECU, which calculates the required amount of exhaust gases for recirculation, and then sends a command to open or close the valve.
The functionality of the EGR is greatly influenced by various sensors (for example, oxygen). Using signals from these devices, the electronic control unit carries out the necessary calculations and issues commands to open or close the valve.
Advantages of solenoid valves for water
The main advantage of the device is the ability to remotely and quickly regulate the flow of the working environment. Without electromagnetic shutters, the operation of complex technological installations and simple household appliances, such as a coffee maker and washing machine, becomes impossible.
In addition, the electric drive allows:
- Connect the solenoid valve to a centralized and automated control system. This greatly increases the accuracy and efficiency of parameter adjustments compared to manual control.
- Reduce labor costs for managing technological processes.
- Increase production safety and eliminate the operator’s exposure to harmful factors in the production environment.
- Increase the efficiency of household appliances and production plants through precise and fast control of the flow of working media and their parameters.
An important advantage of a solenoid drive compared to an electric motor and gearbox is the absence of gears and worm gears, exceptional simplicity of the device and a minimum of moving parts.
This ensures high equipment reliability, minimal wear and a long service life.
The disadvantage of this type of device is the inability to smoothly adjust the degree of shutter opening. Only two positions are provided: “open” and “closed”.
Symptoms of EGR malfunction
There are a huge number of signs that indicate a defect in the operation of the entire EGR system and its sensor, in particular. However, these symptoms can be caused by disturbances in the operation of other elements and components of the power plant, therefore, if they are identified, additional diagnostics must be carried out.
The main signs of problems with the exhaust gas recirculation valve include the following:
- A drop in the power of the power plant and a deterioration in the dynamic characteristics of the car. In other words, the car accelerates hard at the start and drives poorly when loaded while driving uphill.
- Unstable engine operation, especially at idle. When idling, the engine may simply stall.
- The power plant stalls immediately after starting. May occur due to the EGR valve being stuck in the open position. As a result, exhaust gases freely enter the intake manifold.
- Increased fuel consumption. Due to the vacuum in the intake, the fuel mixture begins to become over-enriched with fuel.
- Errors appear on the car dashboard. More often, the “Check Engine” signal comes on, and after diagnostic measures, defects are identified that are caused by incorrect operation of the EGR. This includes errors p0404, p0401, p1406, etc.
If any of the above symptoms are detected, it is recommended to diagnose the car using a special scanning device. Thanks to it, you can make sure that the defects are in the EGR valve. Scan Tool Pro Black Edition is perfect for these purposes; it perfectly reads errors, displays readings from different sensors in real time and corrects individual parameters.
The device is used by many auto repair shops, but if desired, it can also be purchased for personal use. It is compatible with the protocols of domestic, Asian, European and American cars. By connecting it to a mobile device using Bluetooth or Wi-Fi with special software, you will get access to information about the power plant, gearbox, transmission, and all auxiliary systems ABS, ESP, etc.
Lapping process
The valve is dried out and removed, after which a thin layer of lapping paste is applied to the edge of its plate, where it rests on the seat. The valve treated in this way is inserted into the guide and completely recessed into the seat.
On the reverse side, its shank is clamped with a fixing device or tube and the grinding process begins. To do this, it turns approximately half a turn, then rises up, with a slight effort lowers itself into the saddle again, while a light slap should be heard, and turns half a turn in the opposite direction. This process lasts about 2 minutes, after which you need to check the grinding. It should be noted that the paste has a specially selected consistency, which ideally manifests itself when the surface is processed for at least 2 minutes; its elements are broken, providing a higher quality of grinding.
Checking the degree of lapping is quite simple. First, the device holding the valve shank is removed, it is removed, washed and carefully inspected. The chamfered plate should not have any visible flaws - scratches or shells. If such damage is visible, the operation must be repeated until a smooth, smooth surface appears.
After a visual inspection, a leak test must be performed. To do this, the valve is thoroughly washed with gasoline, and the seat is washed in the same way so that the plate can be seated in it as tightly as possible. Next, liquid is again poured into the exhaust well; a properly lapped valve will not let it through, no streaks will appear on the surface, it must remain completely dry for at least 2 minutes.
When working with a rubber tube, the process is carried out in the same way, but this makes it difficult for the valve to slam against the seat, so grinding is done with rotational movements while tensioning the tube. More experienced car enthusiasts may be advised to connect the end of the tube to a drill and turn the valve in the seat at reduced speed. In this case, every 10 seconds you need to turn on the reverse so that the production of metal on the plate occurs evenly.
If the seat is damaged, its restoration requires a special tool - cutters. It is made according to its shape and is put on a drill, with the help of which the entire area is processed. This work requires certain qualifications, and destruction of the seat surface most often occurs when the valve burns out, which is better not to let this happen.
Video: how to grind a valve and check the quality of grinding
Conclusion
To grind the valve head, an experienced car enthusiast will not have to go to a specialized service station. When working, you will need a simple device with which the valve shank is securely clamped. This allows you to simultaneously lap and tap it to the saddle, which increases the efficiency of the procedure. You need to know that the lapping procedure will be required when installing a new part and when overhauling the engine.
Correctly carried out lapping will increase the dynamic characteristics of the engine, save fuel, while hot gases will not damage the valve system and the engine will last much longer.
Seal
Causes of EGR system malfunction
There are only two reasons why the EGR valve fails. The first is that an insufficient amount of exhaust gases is supplied through it. The second is that an excessively large flow of exhaust gases passes through the valve. But the following problems can serve as a sign of one or another defect:
- Carbon deposits have formed on the EGR valve stem. May occur as a result of natural causes. Since a large amount of exhaust gases passes through it, soot can settle on the walls and rod. Especially when the car is operated in aggressive conditions - the engine is worn out, the amount of crankcase gases is increased, low-quality fuel is poured, etc. Upon completion of the diagnosis, you should always clean the stem with carbocleaner or a similar degreasing cleaning composition. More often, various types of solvents or acetone are used for these purposes; pure gasoline and diesel fuel are also suitable.
- EGR valve membrane leakage. As a result, the system cannot be closed or opened completely, and, accordingly, exhaust gases constantly pass through it.
- Coked EGR channels. Leads to obstruction of exhaust and air passage. It appears due to the deposition of carbon deposits on the walls of the valve and the channels through which gases pass.
- Incorrectly muted EGR system. Many car enthusiasts, faced with a loss of engine power due to defects in the system, turn off its valve. But after making such a decision, the plug must be installed correctly, otherwise the air flow sensor will record excessive air consumption. Owners of used cars especially often encounter this; in this case, the new owner may not even know that the EGR valve on the car is plugged. If the vehicle model is equipped with such a system, then be sure to ask its former owner about the condition of the unit and find out whether it is muffled or not.
- The EGR valve gets stuck when closing and/or opening. This can happen for two reasons. The first is that the sensor itself has failed and therefore does not transmit correct data to the ECU. The second is a defect in the valve. It may not open completely or partially close. More often it occurs due to a large amount of carbon deposits on the mechanisms, which was formed as a result of fuel combustion.
- The EGR valve moves jerkily. If the solenoid is working properly, the rod moves smoothly, and the sensor records a gradual change in the position of the damper. In case of jerky movement, incorrect information is transmitted to the electronic control unit, which leads to the consequences described above.
Coked Opel USR system
On car models in which the valve movement is provided by a stepper electric drive, the cause of the breakdown may lie in it. In this case, the electric motor or drive gear may break.
Why are hands bad?
The disadvantage of such processing is quality, which significantly affects reliability. Usually, after this type of treatment, the engine travels 10-20,000 km, and then it needs to be repaired again. But even during this mileage the engine will operate unstably; gas breakthrough is inevitable. This is due to the fact that it is impossible to correctly center the valve relative to the seat during lapping. Therefore, if you have the opportunity to process a part using professional equipment, you should not look for freebies and do mechanical processing “on your knees”, do not forget - “Krailovo leads to padalovo” (c).
How to check the EGR system
Depending on the make and model of the car, the EGR sensor may be located in different places, but in any case it will be located next to the intake manifold. Sometimes it can be installed on the intake tract or on the throttle body. Self-checking should always begin with a visual inspection.
There are two methods for identifying defects in the operation of the USR - without removing it from the seat and with dismantling the unit. However, more accurate data can only be obtained using the second method. And if carbon deposits and soot are detected on the EGR valve, it can be immediately cleaned and then replaced. Let's start with the method of checking without removal.
Important! After installing a new EGR valve, it will need to be adapted and configured using a special program. Only after this will it work normally in conjunction with the ECU.
How to check if EGR is working properly
First, you should check the EGR valve itself and make sure that it works at all. This is very simple to do - a visual inspection is carried out.
To do this, you need to observe a little the reaction of the rod during gas releases. In this case, you will need an assistant. One watches, the second presses the gas pedal. Or you can try to press on the membrane - in this case the speed should drop.
The solenoid valve is checked by supplying power to the connector contacts directly from the battery. At the moment of connection, characteristic clicks should appear. Once you have verified that the EGR valve is working properly, you can begin to carry out more detailed checks.
Pressing the EGR valve
Start the car, leave it idling and try to press on the membrane. Depending on the make of the car and the year of manufacture of the model, the valve may be located in different places. So, the Daewoo Lanos, which is very common on our roads, needs to be pressed under the plate. It has a special cutout in the body through which you can get to the membrane. As a result, you do not press on the membrane itself, since it is located under the body, but on the part of the structure under which it is located.
While pressing, the speed should drop and the engine should “suffocate”. This indicates normal operation of the assembly and indicates good condition of the valve seat. In this case, there is no particular need to repair anything, except perhaps dismantle, clean and carry out diagnostics after installation as preventive measures.
But if nothing happens when you press and the motor continues to operate at the same speed, then you can judge that the unit is depressurized. This means that the EGR membrane is leaking gases and the system does not work. Therefore, it is necessary to remove it from its seat and carry out additional diagnostics of the USR valve and other elements of the assembly.
Checking the EGR valve
As already mentioned, the valve may be located in different places on different vehicles. More often it is mounted next to the intake manifold. In the Ford Escape 3.0 V6, it is embedded in a metal tube that comes from the intake. The valve opens due to the formation of vacuum coming from the solenoid.
To check the correct functioning of the USR system, the engine must be started and left to idle. Then disconnect the vacuum hose (through which the vacuum is transmitted). If you have a vacuum pump at hand, then it is connected to the valve inlet and a vacuum zone is created. If the unit is working properly, the car will “chop” and jerk, at which point the speed will begin to drop. If there is no pump at hand, connect a regular hose of a suitable diameter and simply extract the air. The same thing should happen as in the case of the pump.
If the car continues to operate without interruptions and the number of revolutions has not changed, most likely the valve is damaged. It needs to be removed and further diagnostics carried out. For repairs, it will still need to be dismantled, and the work is carried out in a car repair shop or garage.
Solenoid check
A solenoid is an inductor through which electric current is passed. It changes the voltage passing through it, thanks to pulse width modulation or PWM. This is the signal to supply vacuum to the EGR valve.
The first step in diagnostics is to check the presence of vacuum and how strong the vacuum is. To do this, all the small tubes under the solenoid are disconnected, and then the engine is started.
Important! Disconnect all elements very carefully so as not to break the fitting on which they are attached.
If the vacuum created is sufficient, it will be audible. You can put your finger on the edge of the tube. If it is absent, further diagnostics will be required. The EGR valve is also carefully removed from its seat for further inspection.
Then the electrical part is checked, or more precisely, the power supply to the solenoid. To do this, you need to disconnect the connector from the element being tested. On it you will find three contacts - signal, power and ground. Using a multimeter in voltage test mode or a voltmeter, the power is checked. The red probe is applied to the power wire, the black one to ground. If there is power, the multimeter display will show a value of 12 V.
You can also check the pulse wire for integrity. To do this, you will need a multimeter in resistance measurement mode or an ohmmeter. The wire we need is often colored purple, and when connected to the computer, it has the number 47. Upon visual inspection, all conductors should not have kinks or damage to the insulation. If the wire is broken, it must be replaced with a new one. If the insulating layer is damaged, you can try to restore it using electrical tape or heat shrink. This can only be done in case of minor insulation violations.
Then the wires on the solenoid itself are checked. The multimeter is switched to resistance measurement mode or an ohmmeter is used. The probes of the device are connected to each of the two terminals of the solenoid. The resistance value on different devices may differ, but in any case it should not be near zero (this may indicate that the coil is shorted) or tend to infinity (indicate an open circuit).
Checking the USR sensor
The main task of the EGR sensor is to record the difference between the pressure in two different parts of the valve and transmit the resulting data to the vehicle's electronic control unit. And the ECU sends a signal to open or close the USR valve.
First you need to check the power to the sensor. The multimeter is switched to the DC voltage measurement mode at a value of 20 V. The red probe is applied to wire No. 3, and the black one to ground. After this, the car engine starts. If the sensor is working properly, the multimeter display will show a value of 5 V.
Then the presence of voltage on impulse wire No. 1 is checked. Under normal conditions and a non-overheated engine (USR system is disabled), the indicator should be around 0.9 volts. It is measured in the same way as in the previous version. That is, the red probe is to wire 1, and the black probe is to ground.
If the sensor is working properly, the output voltage on the pulse wire will gradually increase. When it reaches approximately 10 volts, the valve will open. If during testing the voltage does not increase or changes intermittently, then we can judge that the sensor may have failed and additional diagnostics are required.
If the engine stalls shortly after starting, you can try removing the EGR valve, and then leaning and removing it to look at the reaction of the power plant. If, after removing the valve from the crankcase, a lot of smoke comes out and the engine runs more stable, it means the ventilation system or the valve has failed. In this case, additional diagnostics are required.
Tools and materials for lapping
There is specialized equipment for grinding valves, but to do the work yourself, use simple available equipment. One such method is to grind the valve with a drill while the valve is rotated in the seat using this tool. The advantage of this method is that it saves time, but it requires skill and is not suitable for car enthusiasts who do not have sufficient experience.
For manual grinding, use a regular thick-walled rubber tube, which fits tightly onto the bottom of the valve. For example, with a valve shank diameter of 7 mm, it is recommended to take a tube with a diameter of 6 mm. This will allow you to hold it tightly while doing work.
A more reliable method is a special device that heals the valve stem by tightening the nut. In this case, it will hold well and not slip, and the grinding process will speed up. It is important to know that using hand tools will avoid damaging the engine valve system.
The main material used in the work is lapping paste, which is applied to the edge of the valve disc. It is a plastic composition with fine diamond abrasive. During operation, it removes thin layers of metal, ensuring tight installation in the seat.
Check with removal
It is more convenient to diagnose the EGR valve after removing it. This way you can more accurately assess their condition visually and using special devices.
Clogged USR channels Opel
The first step is to check its performance. The valve design contains a solenoid, which is supplied with a constant voltage of 12 V, as in the main electrical network of the car.
It is worth remembering that the design of the valve may differ, and, therefore, the numbers of contacts to which voltage is supplied will be different. That is, there is no universal solution here. So the Volkswagen Golf valve has three outputs, numbered 2, 4 and 6. Voltage is supplied to terminals 2 and 6.
When checking, it is desirable to have a constant voltage source, since in a car it is constantly changing. Under normal conditions, a fully operational USR valve opens when the voltage reaches 10 volts on the impulse wire. If the 12V supply is interrupted, the rod will fall and close the valve.
You also need to check the resistance on the sensor. A multimeter in ohmmeter mode is suitable for these purposes. On a fully functional sensor with the valve open, the value at pins 2 and 6 should be about 4 kOhm, and between 4 and 6 about 1.7 kOhm. With the closed position on pins 2 and 6, the multimeter will show a value of 1.4 kOhm, and between 4 and 6 it should be 3.2 kOhm. Naturally, the values may differ on different cars. You need to look at the technical data sheet for exact data.
When diagnosing the performance of the solenoid, you should check the condition of the valve. As already mentioned, a coating of soot may form on it, which settles on the walls and rod of the device. This leads to jerks in the operation of the valve and malfunctions in the functioning of the entire system. Even if there is a small amount of dirt, as a preventive measure, it is recommended to remove it with a cleaner both on the outside and inside.
Valve chamfer grinding machine PT 823
Attached images
I had one like this. Clamp the valve with a collet of suitable rod diameter. I didn't notice the beating. The disadvantage of this machine is that the valve chamfers are burned due to the lack of water cooling. But once you get used to working on this machine, you can get simply excellent results. An indispensable item when repairing valves.
I had one without a cabinet, I don’t know what was there. No spare parts are required for it except standard grinding stones; check the completeness of the collets of the main sizes. There were about 10 different ones in a set. Specific collets may cause problems with the manufacture of new ones. It’s better to take the cabinet away because placing it on the table is inconvenient and takes up a lot of space. Inside the machine, check whether the drive to the collet chuck spindle is working and that the drive belt is intact.
Valve chamfer grinding machine PT 823
I look at the photo and can’t understand, is there no belt or is it not visible from this angle?
Valve chamfer grinding machine PT 823
It turns out there is no belt there. I just watched a video on YouTube
Valve chamfer grinding machine PT 823
two belts, one drives the stone, the other under the swing head drives the valve
Valve chamfer grinding machine PT 823
Valve chamfer grinding machine PT 823
My version had two engines, one of them under the frame is small. The valve turned slowly.
Machine for grinding valve chamfer PT 823 Thank you, tomorrow a person will connect it and tell me the result. It will be sad if the headstock with a chuck is without a drive Machine for grinding valve chamfer PT 823
I repeat without collets it is scrap metal
Valve chamfer grinding machine PT 823
Valve chamfer grinding machine PT 823
Has anyone seen or heard anything about this machine? Can you provide links or photos? Thank you
In an internal combustion engine, valves regulate the flow of the fuel-air mixture into the cylinder at a certain point in time. For proper engine operation, it is necessary that each valve fits tightly against its seat. This prevents gas leakage and ensures the necessary compression in the engine during the compression stroke. Also, the correct mating of the valve and seat ensures reliable operation of the engine, because exhaust gases break through the gaps between the valve and the seat at high temperatures, and since heat from the valves is mainly removed through the valve-seat mating, if the mating is poor, burnout of the valves and melting of the seats is possible .
Checking with special programs
The most accurate and convenient methods for diagnosing the performance of the USR include checking using special software that is installed on a portable device (laptop, tablet, smartphone, etc.). For cars manufactured by VAG, the VCDS diagnostic application (in Russian “Vasya Diagnost”) is suitable. Below we will briefly consider the test algorithm for this program:
- First, a laptop is connected to the ECU of the vehicle being tested and the corresponding program is launched.
- Then you need to go to the section called “Engine Electronics” and the “Custom Groups” menu.
- We scroll to the very bottom of the list and find channels with numbers 343 and 344. The first has the name “EGR Vacuum Regulator Solenoid Valve; actuation", and the second - "EGR Solenoid Valve; actual value".
Based on the data in channel 343, you can find out at what values the car’s electronic control unit commands the opening or closing of the EGR valve in theory. Channel 344 will indicate the actual values at which the system is triggered. The difference between the values should be minimal. Therefore, if the theoretical and actual readings are very different, this indicates partial valve failure. Accordingly, the greater the difference, the more damaged the node is. There can be many reasons for this - these are the same contaminations, violations in the design, etc. That is, with the help of such software you can quite easily assess the general condition of the USR valve without removing it from the car.
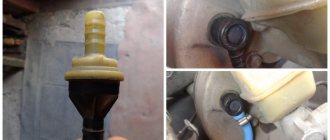
PCV Valve Design
Now we have gradually approached the design of the PCV valve to clearly see that it is not as simple as it seems at first glance and that there is not a spring with a ball, as many claim
After removing the threaded part
What becomes available to us is a plunger, then a large spring, and a small spring complements all this
The plunger, as you can see, is made to look like a cone and has traces of wear
It would seem that this is all. But no. If you shake the valve body, you can clearly hear that something is making distinct sounds there. Let's look further
And we find a washer there, which rattles when we shake the PCV valve
Our plunger is inserted into this washer and traces of work are also visible on it
This is what the PCV valve consists of
Consequences of failure of the EGR system
The principle of operation of the EGR system on diesel and gasoline engines is identical if we consider them from the point of view of design features and the method of exhaust gas recirculation. In any case, the following can happen to the valve:
- jamming of the EGR mechanism due to soot deposits;
- burnout of parts;
- formation of blockages in the system lines;
- problems with the electronic control of the EGR valve.
At the same time, the EGR sensor is not always replaced with a new one when it breaks; many car enthusiasts simply turn it off. The question of the correctness of such actions is controversial, and discussions are still ongoing. Some argue that this element does not have a significant effect on the engine, others say that due to rising temperatures, the power unit is subject to faster wear.
If short-term and infrequent malfunctions in the operation of the USR valve are detected, there is no need to be afraid of the appearance of more serious defects. But the situation can change dramatically if the “Check Engine” indicator appears on the dashboard. At this moment, the power plant switches to emergency operation. In this case, a complete computer diagnostic of the exhaust gas recirculation system and appropriate repairs will be required.
If the mechanism is in a constantly open position, then exhaust gases will continuously flow into the combustion chamber, and not only at partial load. As a result, continuous fuel injection begins, which leads to incomplete combustion. In the best case, the diesel particulate filter will quickly become clogged, in the worst case, the turbocharger will fail.
In any case, an EGR system is needed in a car to reduce the emission of harmful compounds into the atmosphere. That is, it is primarily intended to protect the nature around us.
Why does the cylinder head gasket blow out?
Cylinder head gaskets are made of steel, aluminum, and paronite. This part has certain characteristics of resistance to temperature, pressure, and rupture. Element breakdown may occur due to poor quality repairs or improper operation of the engine. The consequences lead to leakage and costly repairs.
Burnout due to engine overheating
The cylinder head gasket material is designed for a certain operating temperature. When the rate increases, the gasket burns out. It is under pressure from the tightened bolts; an increase in temperature leads to expansion of the material. As it expands, the gasket material adheres to the seat, affecting the metal of the head. Unevenness, roughness, and deflections occur. The tightness of the joint is broken. After overheating, the surface of the head must be ground to remove chips and irregularities.
Incorrect bolt tightening
The cylinder head is attached to the block with bolts or studs. They are located around the entire perimeter of the part. A strong, uniform connection and sealing is achieved by tightening the bolts in a certain sequence and under the required force. Violation of the tightening sequence leads to misalignment of the head. Weak force does not sufficiently compress the gasket material, pressing it against the surface of the block or head.
Important! Reusing bolts is acceptable, but it is better to replace them with new ones. During the tightening process, previously used fastening elements may break or damage the threads in the block.
Low quality material
Low-quality repair components are very easy to identify visually: they are thinner. Paronite repair kits with metal edges often do not match in size, have inaccurately punched holes, and curved edges. Such parts cannot be used. Metal gaskets must be perfectly smooth, with accurately punched holes, without cracks or scratches on the surface. For replacement, it is better to use original repair kits. Counterfeits are much cheaper, but cause expensive repairs.
In what cases does the operation of the EGR system harm the car?
Sometimes there are situations when the valve is blocked in order to prevent serious breakdowns in the car. This is usually required in the following cases:
- When the piston group is severely worn or when particles of engine oil enter the exhaust gases. This will prevent plug fouling and ignition problems.
- If low quality fuel is used and there is no other choice. In this case, the EGR valve will become dirty too quickly, and replacing it is not a cheap procedure.
The valve is also blocked when violations of the EGR system operating algorithm are detected. This is necessary to minimize the risk of other engine problems. But before turning off the system, it is still recommended to clean it and diagnose it. After all, malfunctions in the operation of the USR valve can be caused by completely different components and mechanisms, although the symptoms are the same.
Preparatory work and valve testing
To properly grind the valves, you will need to perform a number of preparatory work, which will require certain tools and skills:
- The cylinder head is dismantled.
- The valve is thoroughly cleaned of oil, carbon deposits, soot and other contaminants.
- All elements of the BC head are checked for integrity against mechanical damage and deformation.
- The valves are checked for tightness.
To check the degree of fit, gasoline, kerosene, acetone or any other liquid with high penetrating ability is carefully poured into the exhaust well, with the valve completely closed, from a syringe. If, despite this, a wet spot appears on its surface, it means that the seal is broken and lapping is required.
When the valve is dry and can be removed from the guide to check the lapping, it is removed and inspected; if shells are visible at the point of contact with the seat, this clearly indicates the need for lapping. When the valve burns out completely, when liquid is poured in, it immediately pours out from under the seat, and serious potholes are visible on the surface of the plate.
Before performing work, it would be a good idea to insert the valve into the guide channel and check if there is any play when it moves; if there is any play, the valve will need to be replaced or the guide channel repaired.
Myth about the EGR system
There is an opinion that the exhaust gas recirculation system redirects the exhaust to burn unburned fuel. However, this is nonsense.
On gasoline engines, it cannot burn in principle, since this would require increasing the oxygen supply. No fuel supply system provides for these mythical portions of fuel redirected from the exhaust system.
In diesel engines, if something has not burned out, the composition will instantly decompose into its main components - carbon and oxides, as a result of pyrolysis. This is the process of decomposition of complex compounds into simple ones as a result of exposure to high temperatures in the absence of oxygen. Black exhaust from a diesel engine is not unburnt fuel, but decomposed fuel. More precisely, soot is carbon in its pure form.
Cylinder head grinding options
Cylinder head grinding is a delicate and time-consuming process. The best grinding is carried out in service centers at service stations, but as an option you can do it at home. Special instruments and devices are very expensive. If we take remote settlements, then it is not always possible to find a simple service station.
Basically, it can be divided into manual and mechanical grinding. Mechanical work is performed on special machines. Manual grinding of the cylinder head, although a longer procedure, requires a lot of patience and perseverance.
How to diagnose valve burnout without dismantling the cylinder head
In principle, the procedure for determining valve burnout without resorting to removing the cylinder head was described above.
Note that for engines that require periodic adjustment of the valve mechanism, failure to do so in a timely manner also risks burning out the valves. Modern power units are equipped with an automatic thermal clearance adjustment system, however, even in this case, any problems associated with the operation of hydraulic compensators can also lead to partial deformation of the valve surface.
Please note that when carrying out the adjustment procedure, valves that are too clamped can have more serious consequences than valves that are not tightened enough. In particular, this leads to premature wear of the rod and guide bushing. And this is a deformation of the mechanism, a change in its geometry with all the ensuing consequences, which we will talk about later.
The same troubles can arise from running a CPG on a lean mixture. Engines with installed gas equipment suffer especially in this case, and this is a recent trend associated with the high cost of gasoline compared to liquefied gas.
Most often, motorists, having measured the compression level and determined that it does not meet the standard indicators, rush to diagnose the malfunction in order to clarify the diagnosis, grabbing a set of keys and starting to dismantle the BC head. In principle, there is nothing reprehensible in this, since eliminating the malfunction still risks disassembling the power unit.
But there is a way to determine the cause of deterioration in engine performance without disassembling it. And if you know in advance why the motor started to fail, you will fix the problem faster. The method itself is quite simple and requires minimal knowledge of motor design.
So, the verification procedure is as follows:
- start the engine and let it reach operating mode;
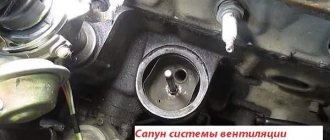
- disconnect the breather hose and observe the results;
- if warm air is simply blowing from the hole without smoke or with minimal, almost invisible smoke, then the problem is that the valves are burnt out;
- in cases where clearly visible smoke of a dense consistency with a gray tint comes out of the hole, and with a pronounced exhaust smell, we are dealing with problems with the piston group. Most likely - due to the occurrence of rings or burnout of the piston itself;
- Next, without regard to the presence/absence of smoke, we unscrew the spark plug from the cylinder identified as problematic. If the piston group is damaged, it will be oily; if it is dry, then this is another argument in favor of problems with the valve mechanism.
If you determine that a certain valve has burned out, you can rest assured that the condition of others is also not ideal. You can verify this by disassembling the cylinder head. But if the condition of the other valves is normal, you can only change the burnt one, but with the obligatory replacement of all valve stem seals. And, of course, we should not forget about grinding in the new valve.
Solving the problem of valve burnout
If a fairly accurate diagnosis can be performed without removing the cylinder head, then repair will require replacement, which is impossible without partial disassembly of the power unit.
So, what to do if a valve burns out, but the engine stalls in all modes and refuses to work?
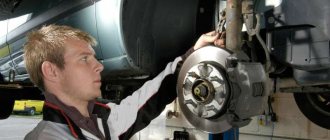
Disassembly of the gas distribution mechanism may vary depending on the vehicle model, but in general the dismantling/assembly process is approximately the same. First, we will need to disconnect the negative terminal from the battery, the tubes and hoses supplying technical fluids to the power unit, dismantle the attachments (the carburetor can be touched in this case), and unscrew the spark plugs. After this, you can begin to remove the GB cover by unscrewing the corresponding mounting bolts.
Subsequently, the procedure is carried out in the following sequence:
- the drive belt is removed;
- the pulley is dismantled;
- the bolts holding the camshaft housing are unscrewed;
- the cover is dismantled along with the seals;
- The camshaft itself is removed from the cylinder head.
The valves are desiccated either using a special tool, or, in the absence of one, using the old proven method. Its essence is as follows:
- in order not to lose the cracker, place a rag or a small rubber mat under the hole;
- We place a tube with a diameter smaller than that of the washer on the end of the rod;
- We make a sharp and powerful blow with a hammer on the plate to completely compress the spring, which will cause the crackers to fall out.
Without experience, such a method can result in such troubles as a bent valve stem, so it is better for beginners to get a desiccant - it is relatively inexpensive. As a last resort, you can simply borrow the tool.
Industrial Standards Society (MSS)
The MSS standard MSS-SP-61: Valves Pressure Test was originally adopted in 1961. It was designed to provide a uniform means of testing valves commonly used in the "fully open" and "fully closed" service types. It is not intended for use with control valves. Refer to ANSI/FCI Standard 70-2 for control valves.
Section 5 of Pressure Testing of Steel Valves deals with seat closure tests and specifies the following leak rates:
- Shut-off, straight-through, ball valves: 10 cubic meters. cm/hour per inch of nominal pipe diameter. (Example: 6" ball valve allows 60 cc/h leakage during test)
- Check valves: 40 cc cm/hr per inch of nominal pipe diameter
All shut-off valves specified in MSS-SP-61 must comply with the above standards. The seat closure test must be performed at a fluid pressure (liquid or gas) that is not less than 1.1 times the nominal value of 1000°F (380°C), rounded to the next 5 psi. Inch (0.5 bar).
American Petroleum Institute (API)
API Standard 598: Valve Inspection and Testing covers the testing and inspection requirements for gate valves, ball valves, check valves, ball valves, plug valves, and butterfly valves.
It has acceptable leak control rates for liquid and gas environments. All valves manufactured to various API standards must meet API-598 leakage criteria before shipment from the manufacturer or supplier. API 598 specifies tests for shell and top seat, no visible leakage allowed. If the fluid is a liquid, there should be no visible signs of dropping or wetting of external surfaces (no visible leakage through the housing, housing lining, if any, and the connection between housing and cover, and no structural damage).
If the test medium is air or gas, the leak shall not be detected by the specified detection method. For both the low pressure closure test and the high pressure closure test, visual evidence of leakage through the disc, behind the seat rings or behind the shaft seals (valves having this function) is not allowed (plastic deformation of seat elasticity and seals are not considered structural damage). The permissible rate of leakage of test fluid through the seats during testing is indicated in the following table:
| NPS Valve Size | All elastic closed valves | All metal closed valves (except check valves) | |
| Liquid analysis (drops min) | Gas analysis (bubbles min) | ||
| <2 | 0 | 0 (1) | 0 (1) |
| 2 — 6 | 0 | 12 | 24 |
| 8 — 12 | 0 | 20 | 40 |
| >12 | 0 | 28 | 56 |
| NPS Valve Size | All elastic closed valves | Metal closed check valves | |
| Liquid analysis (drops min) | Gas analysis (bubbles min) | ||
| <2 | 0 | (2) | (3) |
| 2 — 6 | 0 | (2) | (3) |
| 8 — 12 | 0 | (2) | (3) |
| >12 | 0 | (2) | (3) |
General remarks:
- 1 milliliter is considered equivalent to 16 drops;
- For check valves exceeding NPS 24, the permissible leak rate shall be as agreed between the purchaser and manufacturer.
Notes:
- There shall be no leakage for the minimum specified test duration. For a batter, 0 drop indicates no visible leakage for the minimum specified test duration. For a gas test, 0 bubbles means less than 1 bubble for the minimum specified test duration.
- The maximum permissible leak rate shall be 0.18 cubic inches (3 cc) per minute per inch of nominal pipe size.
- The maximum permissible leak rate shall be 1.5 standard cubic feet (0.042 cubic meters) of gas per hour per inch of nominal pipe size.