Checking the VAZ 2108, 2109, 21099 generator without removing it
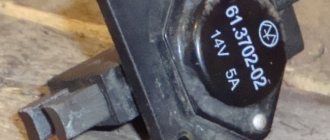
A working generator for VAZ 2108, 2109, 21099 cars produces a charging current of a certain voltage (for generator 37.3701 it is 13.6 - 14.6 V, for 9402.3701 it is 13.2-14.7 V).
The voltage is measured at the battery terminals with the engine running. Let's consider the procedure for checking generators of VAZ 2108, 2109, 21099 cars without removal and disassembly.
Required Tools
— Tester (multimeter or similar device) in voltmeter mode
Preparatory work
— Place the car on a level surface, raise the handbrake
— Warm up the engine to operating temperature
Checking the serviceability of the generator of VAZ 2108, 2109, 21099 cars
— Start the engine
— Turn on the high beam headlights, heater, heated rear window
— An assistant inside the car presses the gas pedal and raises the engine speed to 3000 - 3500 rpm
— We measure the voltage at the battery terminals with a tester
should be at least 13 V. If it is below 13 V, the generator drive belt may be loose, the voltage regulator is faulty, the brushes in the generator are worn out or oily, there is an open circuit in the generator electrical circuit, the diode bridge, rotor or stator is faulty.
— Turn off all switched on consumers, the engine continues to run
— We measure the voltage at the battery terminals
It should be 14.6 - 14.7 V.
Thus, a working generator for VAZ 2108, 2109, 21099 cars should produce at least 13 V at 3000-3500 engine rpm under load, and at the same speed, but without load, 14.6 - 14.7 V.
Notes and additions
— If the voltage at the battery terminals at idle exceeds 14.7 V, then the voltage regulator is most likely faulty.
— In addition to the output voltage in the operation of the generator, it is worth assessing the degree of noise from its bearings. Strongly humming ones should be replaced. The front bearing most often fails.
— Slippage of a weakly tensioned alternator drive belt of VAZ 2108, 2109, 21099 cars can be determined by the dim light of the headlights at night and by the characteristic whistle it emits in the front part of the engine when its speed increases.
Source
Reasons why the VAZ 2109 generator does not charge
Good day, dear reader. In this article, I will tell you as simply as possible about the operating principle of the VAZ 2109 - 2114 generator and about the reasons why the generator does not charge. So that everything is clear to an ordinary person who has not studied electrical engineering, I will not delve into the physics of what is happening and use scientific terms, but I will explain everything, as they say, “on the fingers.” So, let's begin!
The principle of operation of the VAZ 2109 generator
In order to understand why on the VAZ 2109 - 2114 the generator gives little charge or does not charge at all, you need to understand how it works and know the principle of its operation.
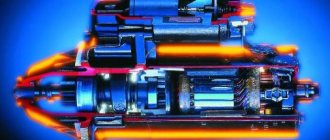
The generator consists of five main parts shown in the figure below: armature - 5, stator - 6, relay-regulator paired with brushes - 10, diode bridge - 9, housing - 3.7.
The operating principle is as follows:
- a positive wire goes from the battery to the diode bridge (9) and the diode bridge (9) is connected to ground through the housing (3.7) of the generator
- voltage through the diode bridge (9) is supplied to the stator (6) of the generator and a magnetic field appears in the stator
- when the car starts, the engine, using a belt drive, turns the generator rotor (5)
- in the rotor (5), rotating in the magnetic field of the generator (6), a current appears
- The current is removed from the rotor by brushes (10) and through a relay-controller (10) is supplied to the car battery.
Failure to comply with any of the points leads to a malfunction of the VAZ 2109 - 2114 generator.
To find the reason why the VAZ 2109 2114 generator does not work or does not charge well, you need to check for serviceability each of the points above that describe the operation of the generator.
Point one: the diode bridge does not receive positive voltage from the battery.
The cause of the malfunction in this case may be the wire itself or its connection to the diode bridge or battery. Try cleaning the connection terminals, and if that doesn’t help, test the wire.
Poor contact with the negative wire is not considered, since in this case the engine would not start at all.
Point two: diode bridge and generator stator.
If voltage comes to the diode bridge, but charging does not occur, then it should be checked for functionality. To find out how this is done, read the article “Checking the diode bridge of VAZ 2109 - 2114”.
After checking the diode bridge, if it is working properly, we ring the stator winding. To do this, select the continuity mode on the multimeter and apply the probes to the first and second contacts of the stator, and then to the first and third.
If there are no cliffs anywhere, we move on.
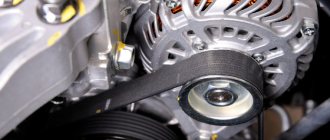
Point three: VAZ 2109 - 2114 alternator belt.
The carburetor version of the VAZ had a thin V-belt, and the injection models have a wide belt with cores, but this does not change the operating principle. Charging may not go well due to belt slippage. This malfunction is manifested by a strong belt whistle. The belt may also start to whistle when you turn on energy consumers such as headlights, heated glass, stove fan, etc. If you hear a belt whistle, try to replace it as soon as possible. This is one of the reasons why the VAZ 2109 -2114 generator does not charge well.
Point four: generator armature VAZ 2109 -2114.
There should be no breaks in the armature, as well as in the stator. Test it by placing the multimeter probes on the brush tracks.
If the anchor does not ring, it should be replaced.
Point five: brushes with a relay-controller.
The brushes of the VAZ 2109 -2114 generator wear off over time on the armature tracks. If their length is less than 5 millimeters, then they are not able to press tightly against the anchor, thereby not charging the vase battery.
But it happens that the relay-regulator fails before the brushes are worn out. To check it you will need:
- 12 volt light bulb
- car battery
- two 1.5 volt batteries
- several wires
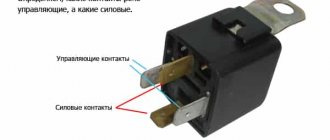
We connect the light bulb and battery to the relay regulator as shown in the figure below. In this case, the lamp should be on.
Now we add two batteries to the circuit, as in the figure below. The light should not be on now.
If the light comes on in both cases - the relay - the regulator needs to be changed.
Reasons for generator failure
Without specialized equipment, it is not always possible to determine the exact cause of a unit failure. But most often the problem is caused by:
- Bearing jamming . Due to drying out of the lubricant and gradual wear, the bearings jam. First, the belt usually breaks, which necessitates rebuilding the assembly.
- Winding burnout . Most often, the winding burns out due to the penetration of chemicals and salts used to sprinkle the road in winter.
- Brush wear . Graphite brushes wear out gradually, so they need to be replaced periodically. If they are not replaced in time, the unit may fail completely.
- Relay malfunction . The device is designed to prevent battery overcharging. If it malfunctions, the generator does not start.
To prevent breakdowns, scheduled vehicle maintenance should be carried out in a timely manner.
Generator repair kits
To eliminate these generator malfunctions, you will need to carry out repairs. When you start searching for a generator repair kit on the Internet, you should prepare for disappointment - the kits offered usually contain washers, bolts and nuts. And sometimes the generator can only be restored to functionality by replacing brushes, a diode bridge, a regulator... Therefore, the brave person who decides to repair it makes an individual repair kit from those parts that fit his generator. It looks something like this, as shown in the table below, using the example of a pair of generators for a VAZ 2110 and a Ford Focus 2.
| Generator KZATE 9402.3701-03 | ||
| Detail | Catalog number | Price, rub.) |
| Brushes | 1127014022 | 105 |
| Voltage regulator | 844.3702 | 580 |
| Diode bridge | BVO4-105-01 | 500 |
| Bearings | 6303 and 6203 | 345 |
Check Features
When checking the generator of a VAZ 2110, 2107 and others for serviceability, the following conditions must be met:
- An accurate multimeter should be used for diagnosis.
- The normal voltage is 12 V.
- If it is necessary to replace the wiring, you must use wires with the same cross-section as the original.
- Before checking, you should check that all fasteners are connected correctly and the belt tension is correct. If necessary, the connections should be adjusted to normal, the belt should be loosened or tightened.
How to correctly diagnose a car generator
First, it’s worth identifying the cause of the breakdown:
- if the electric generator is noisy, it means the bearings are worn out;
- reduced output voltage – the brushes are worn out or the drive belt is loose;
- The output voltage has increased or decreased - possibly a faulty diode bridge.
Possible causes of low voltage:
- the alternator belt is not tensioned enough;
- there is damage to the generator circuit;
- faulty voltage relay (regulator);
- brushes are worn out;
- The general condition of the electric generator is wear and tear and the need for replacement.
Diagnostics of the VAZ generator without removal and special tools
This is not the most reliable and reliable method, but it allows you to determine whether the generator is functioning or there are malfunctions. The use of any specialized tools, including a multimeter, is not required. There is no need to remove the generator.
To diagnose, start the engine and turn on the low beams. In operating condition, the negative terminal must be disconnected from the engine. The uniform light of the headlights and the stability of the engine stroke indicate normal operation of the generator. If malfunctions are observed or the brightness of the light changes, the VAZ generator is probably faulty; in-depth diagnostics need to be carried out.
Reasons for replacement
Replacing generator brushes VAZ 2109
Generator brushes need to be changed in the following cases:
- They have worn out so much that they have ceased to perform their main function - to maintain battery charge.
- The battery drains quickly.
Note: there are many reasons why the battery discharges quickly. Therefore, this does not always signal bad brushes. But just in case, it is better to check them, since perhaps the reason is hidden precisely in them.
Voltage Regulator Diagnostics
To check the voltage regulator on a VAZ 2114, 2106 car, you should perform the following steps:
- Start and warm up the engine by turning on the headlights. Warm up the engine for about 15 minutes. For diagnostics, a multimeter or voltmeter capable of taking measurements in the voltage range 0-15 V is used.
- Measure the voltage between ground and terminal 30. For most cars in normal condition, the reading will be within 13.5-14.6 V. A value less than 13 V means the unit needs to be replaced.
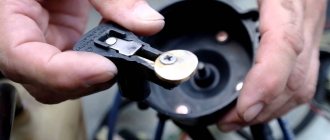
Replacing generator brushes without removing the generator
This method is used when the problem is definitely in the brushes and removal and inspection of the generator is not required.
- Disassemble the car's generator. But do not remove it completely (do not unscrew the generator mounting bolts).
- Clean the brush holder socket. It is better to do this by blowing with compressed air.
- Clean the brush holder with a cloth.
- Remove the brushes.
- Clean all contacts.
- Check the elasticity of the spring. If it is insufficient, replace the spring.
- Polish the slip ring if it has visible defects.
- Install the brushes and reassemble the generator in reverse order.
Replacing alternator brushes on a VAZ 21099 car is not at all difficult. Any car owner who prefers not to take their vehicle to a service center, but to carry out the maintenance themselves, can handle this.
For proper repairs, you only need detailed instructions given in this article and a tool that every car owner has.
Generator brushes can fail from time to time and require replacement. If this happens, you can independently carry out work in this area and restore the functionality of your vehicle.
Before starting work, it is very important to prepare in advance all the necessary details that may be needed to complete the action.
Disassemble the car and remove the alternator to make work easier. Having removed the generator, you can proceed directly to repairs. After completing all the work, install everything in its place and secure it as it should.
If you have a question about how to properly repair brushes, it is best to study the video material, which explains in detail how to quickly get the job done quickly and efficiently. The specialist also explains the main nuances that you need to pay attention to when carrying out the work. That is why, as statistics show, there are no problems after the work is completed.
The popular VAZ 21099 car in Russia has a short service life, but at the same time a simple design. A fairly common malfunction on this vehicle is excessive wear of the brushes in the generator. They definitely need to be replaced, because otherwise the generator will stop working normally and the engine will stop starting.
Checking the return current
Diagnostics is carried out with the engine running at high speeds. It is necessary to measure the current consumed by the vehicle components. The probe is pressed against the wire from terminal 30 or B+.
It is necessary to turn on the electrical appliances of the car one by one and record the indicators. The resulting values should be summed. Then you need to turn on all the devices and measure the current indicator. The resulting indicator should be compared with the summed value of previous measurements. The final value should be approximately 5 A below the summed value. A higher value confirms that the node is faulty.
Repair and troubleshooting
All mechanical problems are eliminated by replacing faulty components and parts (brushes, belt, bearings, etc.) with new or serviceable ones. Older generator models often require grinding of slip rings. Drive belts are replaced due to wear, maximum stretching or expiration of service life. Damaged rotor or stator windings are currently being replaced with new assembled ones. Although rewinding is common among auto repair services, it is becoming less and less common - it is expensive and impractical.
But all electrical problems with the generator need to be solved by checking both other elements of the circuit (in particular the battery), and directly its parts and output voltage. One of the common problems that car owners have to deal with is overcharging , or, conversely, low voltage of the generator . Checking and replacing the voltage regulator or diode bridge will help eliminate the first malfunction, but low voltage output will be a little more difficult to deal with. There may be several reasons why the generator produces low voltage:
- increased load on the on-board network by consumers;
- breakdown of one of the diodes on the diode bridge;
- failure of the voltage regulator;
- slipping of the poly V-belt (due to low tension)
- poor contact of the ground wire on the generator;
- short circuit;
- drained battery.
The generator in the car provides the generation of electricity through the power plant. If it breaks, then first of all the battery runs out, and as a result the car simply cannot move.
This article tells you how to check with your own hands the generator installed on a VAZ-2109 car.
It is worth noting that it makes no difference which engine is installed on the car - an injector or a carburetor. In both cases, diagnosis is made using the same algorithm.
Diagnostics of a removed generator
To check the generator removed from the VAZ 21, you should use a multimeter in ohmmeter mode. The probes are pressed against terminal 30 and the body of the unit. If there are contaminants and strong oxides on the case, they should be removed first, as they can affect the readings of the device.
You need to measure the resistance of each generator unit in turn. Parts that do not have the required resistance have become unusable. Most of them can be replaced at home using a minimal set of tools. To replace, you need to buy the same parts as those originally installed in the generator.
If you find an error, please select a piece of text and press Ctrl+Enter.
Source
Generator disassembly
Let's start by de-energizing the machine.
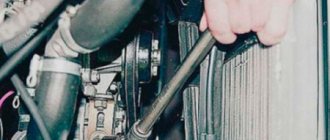
- If there is a problem with the belt, then remove it. We put on a new belt and screw the generator back on.
- To get to the non-working brushes, remove the charging relay. We inspect the brushes. If they are very worn, we replace them. The optimal length is no less than four centimeters.
If this is not the case, then remove and disassemble the generator.
- remove the crankcase protection;
- disconnect the wires;
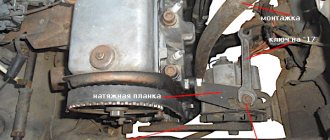
- loosen the upper and lower adjustment bars;
- remove the belt;
- unscrew the fastening bolts, there are three of them;
- take out the generator.
Examination
In order to determine the nature of the breakdown at home, you first need to know how to diagnose the generator.
The first stage is carried out without removing the device from the machine. There are several options, but the best quality is a multimeter. True, for this it is best to involve someone you know.
First of all, you need to find out whether the voltage regulator is capable of doing its job. Experts note that most often it is because of this that the generator may not function properly. The problem with it arises due to excessive voltage in the electrical network.
The generator itself is tested like this:
- set the multimeter to volts;
- start the power unit;
- measure the voltage at the battery and at the generator terminals.
Normally, the device will show from 14 to 14.2 volts. After this, you will need to depress the gas pedal - the voltage increase should not exceed half a volt in this case.
An increase in this indicator indicates that the generator’s performance is impaired. Most likely, the voltage relay will need to be replaced.
Alternatively, you can also do this:
- start the engine and let it run for a while;
- press the gas and bring the crankshaft to 3 thousand revolutions;
- turn on the headlights (high beam);
- heated rear window;
- stove fan.
With such a load, the battery voltage should be more than:
- 13.2 volts (generator type – 9402.3701);
- 13,6 (37.3701).
Indicators different from normative ones indicate:
- winding faults;
- failure of the voltage regulator;
- brush breakage.
To exclude the regulator from the list, you need to de-energize all devices except the headlights and measure the voltage again. If the specified node is serviceable, then the indicators will be as follows:
- for 37.3701 – up to 14.6;
- for 9402.3701 – up to 14.7.
Replacement and repair of generator for VAZ 2109
If any problems are detected, it is imperative to carry out only high-quality work to replace or repair the device. Remembering to connect everything correctly during assembly. Since this is a good guarantee of good performance of the repaired or replaced generator.
How to remove a generator on a VAZ 2109
Moreover, you can replace or repair the generator not only at a service station, but also with your own hands.
1. Disconnect the block with the wire from the generator terminal.
2. Slide the rubber boot, unscrew the nut and disconnect the wires from the “ZO” terminal of the generator.
3. Loosen the adjusting nut and the lower generator mounting nut.
4. Move the generator to the engine and remove the belt.
5. Unscrew the bolt securing the adjusting bar.
6. From the bottom of the engine compartment, unscrew the two bolts securing the bracket, holding the generator.
7. Remove the generator from the vehicle.
8. Install the generator in reverse order. When attaching the generator bracket, the longer bolt is installed closer to the generator drive! After installation, adjust the belt tension.
But at the same time you should always adhere to the necessary stages:
- disassembly,
- troubleshooting,
- replacement of broken elements,
- installation,
- connection.
Replacing a generator on a VAZ 2109 takes approximately 30 minutes. And for this you will definitely need to take spanners for 10, 13 and 17, as well as screwdrivers and a vice.
- The battery is turned off to de-energize the entire on-board system,
- All existing wires that are connected to the generator are disconnected,
- The top nut is completely unscrewed,
- The generator is held at the bottom thanks to a long bolt, which should be held with one key, and the nut should be tightened with the second,
- The generator is carefully removed,
- All broken elements are removed and replaced with new ones,
- Then everything is reassembled and installed. Moreover, the work is done in the opposite direction.
And the final touch is a mandatory check of the generator belt tension. To do this, you need to charge the battery and start it to understand that everything is working as it should again.
Generator repair for VAZ 2109
Repair of the generator on the VAZ 2109 is carried out only when faults have been discovered inside the device. In such a difficult situation, it is definitely worth doing a special diagnosis with a multimeter.
Thanks to the basic principles of operation, it is possible to very successfully replace or repair the device. But sometimes there is only one way out - installing a new one.
The main thing to remember is that timely detection and identification of breakdowns will help you avoid all of the above problems. Plus, you can extend the life of the generator itself for a long time.
Generator check
The main elements of the generator are as follows:
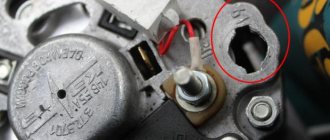
The stator is a steel cylinder that hides the winding. To check whether it has broken, you will first need to remove the diode bridge.
First of all, it needs to be inspected for external damage. The removed generator is disassembled and examined. The stator should not show any signs of overheating or other mechanical defects. Here the tester switches to measuring resistance. Then check whether there is insulation between the generator housing and the winding. The higher the results, the better - this indicates the absence of a breakdown. When the indicators reach only 50 kOhm, the unit will have to be replaced.
Using the tester, you can also verify that the armature is working properly. At its ends there are rings that contact the graphite brushes. The armature needs to be removed from the generator and checked to see if the bearings or windings are damaged. The latter is tested with a tester, installing probes between the rings - the indicator should not exceed several Ohms.
If the brushes have noticeable wear, they are replaced with new ones.
How to test a generator with a multimeter
The diode bridge of the generator can be checked with a multimeter, but you can also use the stand that was used to check the regulator.
But before that, first of all, without removing the rectifier bridge from the generator, connect the red wire of the tester to terminal 30 of the generator, and the black wire to the housing. Set the tester operating mode to dial (diode icon). If it is not there, then set it to 1-2 kOhm. The multimeter should show infinity. If the readings are different, the diode bridge is faulty.
Then check the current rectifiers for breakdown. Leave the positive (red) probe on terminal 30, touch the negative one to the bridge mounting bolts one by one. The multimeter display should show infinity in all cases; any others mean a breakdown.
Next, connect the positive probe to the axle mounting bolts, and the negative probe to the generator housing. In this case, the tester should also output infinity.
But in practice, such verification is most often not enough. In most cases, it is necessary to ring the generator in more detail.
Basic faults
Quite often the following picture is observed - the ignition is on, but the generator light on the panel does not light up. This usually indicates that:
- there was a wiring break;
- The fuse has blown.
In this case, check all cables coming from the generator. If damaged wiring is found, it is replaced.
- the light does not light;
- the battery drains quickly, even if it has just been charged;
- however, the remaining control devices operate normally.
All these signs clearly indicate a malfunction of the generator. Here it is possible that:
- the diode is shorted;
- contact on the winding was lost;
- the traction relay is broken;
- The brush holders have become unusable.
However, quite often all that happens is a wire break between the generator and the dashboard or a light bulb burns out.
If the lamp lights up when the ignition is on and the battery is charged, then you should pay attention to the serviceability of the voltage regulator.
When the engine is running, the display lights up too brightly or, conversely, too dimly. Here, perhaps, the problem lies in the low tension of the drive belt. Normally, it should not give in when pressed with a finger more than 10 millimeters. It will also have to be replaced if signs of significant wear are visible on the surface with the naked eye.
Sometimes the generator does not work because the stator winding is shorted to ground or the electrical circuit is broken.
In addition, at the anchor, sometimes the terminals of the contact rings move away from the winding. They can be soldered in place.
Loud noise from the alternator most likely indicates bearing failure.
How to determine generator malfunctions
Signs of a faulty generator diode bridge. A car generator and a generator, a household power station are similar. Accordingly, the principles of troubleshooting and repair are the same. The only difference is that the car generator contains a rectifier and a voltage regulator, so the car network is designed for 12 Volts. The article discusses generator malfunctions and how you can fix them yourself. Your vehicle is equipped with a warning light that can alert you that the alternator has lost power. If this happens, you need to make sure that the sensor is working and the lamp is connected correctly.
It often happens that these lamps use a bad connector or the control relay fails. It is also possible that your battery, charging terminals are faulty, or it is simply discharged. When there is a lot of energy consumption, for example, when using lighting devices to the maximum, charging, or leaving the radio on overnight. Generator malfunctions may occur due to increased energy production when the voltage is above 14-15 Volts. The numbers vary depending on the model.
Therefore, if the battery breaks down, you should always check the generator too. Sometimes the generator begins to deliver current below the required limit of 13.2 Volts, then it is urgently necessary to check it for damage.
Before removing the generator, it is necessary to check the tension of the drive belt. Lack of electrically conductive connections between the battery or generator and the car body; voltage may be lost “on the way” to the battery. Also check the bearings for clearances and the integrity of the fuses.
For some types of faults there is no need to remove the generator. If there are knocks or noise during work, it is necessary to disconnect the wires: the noise will disappear - but a short circuit will form, unfortunately, these are expensive repairs, their cost exceeds the price of new equipment.
The noise remains - replace the bearings, they have worn out during use. Check the brushes, maybe it's time to replace them too. The contact brushes and rings may not be pressed well, then the spring should be adjusted. Get rid of dirt and burnt marks on the rings, if any. Sandpaper is the best way to remove scorch marks. If the rings become unusable, the rotor must be replaced. Check the rotor contacts with a multimeter.
Generator malfunctions in the form of a damaged rotor must be removed in the following order. Since a faulty rotor cannot be replaced, it must be completely replaced if it fails. The same applies to the stator. Remember that the rotor and stator must not have electrical contact with the body or other parts of the vehicle. A faulty stator must be replaced. Voltage rectifier diodes should not conduct current in both directions.