Crankshaft oil seals
It is known that replacing the crankshaft oil seal on VAZ 2101 and 2103 is a topical and popular topic among motorists. Of course, there are parts and elements that work properly for quite a long time, but still, there is a limit to everything. As for oil seals, these are types of parts that generally require regular intervals. In this article, look at how to replace the crankshaft oil seal on a VAZ.
Why do you need to replace cuffs?
First, let's figure out why you need to change the cuffs. It will probably be superfluous to say that oil seals are a very important part of the car. If any cuff wears out or moves slightly out of place, a gap will appear through which oil will flow - a lubricant, without which not a single part of the car will function normally. It is for this reason that most experts insist on replacing the part at least once every three years, or even more often. In addition, in the case of cuffs, you should never exclude the possibility of unscheduled repairs. For example, if the engine overheats, then the probability of replacing the seals is reduced to 100%. Replacing crankshaft oil seals on a VAZ 2103 or another model requires having a set of certain tools and materials on hand. There is no need to have specific equipment here and therefore you can handle this matter yourself. It will be enough to find cuffs of the appropriate size. But let's not forget that they are different.
Types of oil seals
Let's find out what types of cuffs are presented on Russian car markets today. Basically, these are reinforced components with and without anther. The former prevent leakage of the sealing medium and provide good protection against the penetration of dirt and moisture.
Reinforced oil seals
As for the second type of seals, they simply prevent oil from leaking out.
Note. Do not forget that the seals can also be single-lip.
Cuffs, as they are also called, are ideal and indispensable for sealing gaps between stationary or even rotating car parts. They prevent lubricant leakage very well and, in fact, this is why they were invented by man. Replacing the oil seals on the crankshaft of a vase, as was said, can be done by yourself. It is only beginners who believe that it is supposedly difficult to do this and only qualified specialists are capable of it. This opinion is erroneous, since today there are a million examples of how a driver who is not very well versed in details, but who received the correct information, does everything correctly.
Why might oil leak?
First, let's try to understand how to determine the time to replace the oil seal. If you believe the manufacturers, a high-quality cuff should last more than 60-70 thousand kilometers. But is this really so? Of course not. Under conditions of constant load, bad roads, dirt falling on parts, and poor quality oil, the oil seal cannot withstand and needs to be replaced quickly. A visual inspection of the rear axle will help identify the need for replacement. It is clear that for a better inspection it is recommended to put the car in a pit. It is often possible to eliminate a leak from the gearbox by tightening loose fastening bolts or replacing the washers with softer options. In this case, copper washers are considered ideal. Often, instead of a washer, a sealant in the form of a thread or ordinary gel is used on threaded connections.
Sealant for threaded connections
In addition, the cause of an oil leak may be an insufficiently tightened drain or fill plug. Careful attention should also be paid to this. If everything is in order with the plugs, then it would be a good idea to pay attention to the connection of the gearbox to the crankcase.
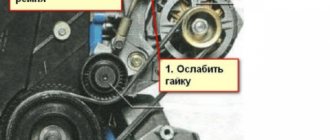
Changing the front oil seal
Replacing the front crankshaft oil seal of a VAZ 2101 is sometimes necessary when the driver discovers the front part of the engine contaminated with oil. This indicates that the oil seal has become unusable and is leaking oil.
Don't forget to check the engine oil level. If something is wrong, top up and, if necessary, change the oil. The replacement process is again simple and will not cause any difficulties. Begin:
- Again, we lift the car onto an overpass or inspection hole.
Note. Due to the fact that the distance between the engine and the radiator is close and does not allow the oil seal to be installed without distortion, it is recommended to remove the camshaft chain cover.
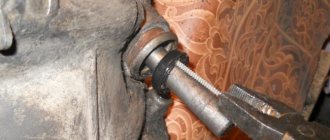
- take a suitable metal rod with a diameter of 7 mm and a length of 10 cm;
- We place it on the inside of the cover and hit the rod with a hammer, trying to knock out the oil seal.
Replacing the front crankshaft oil seal on a VAZ 2101
Note. Actually, it should come out without difficulty. But there are also times when you need to be a little patient.
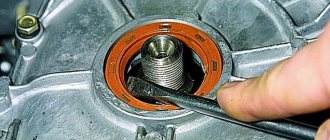
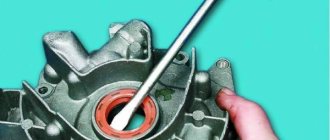
Before installing a new cuff, you need to carefully inspect it for defects. So, it should not be too hard or, on the contrary, soft. Also, there should be no external damage on it, and there should be a spring on the working edge. On a VAZ 2101, replacing the front crankshaft oil seal requires lubrication of the new cuff. Only after this is the oil seal installed with the working edge facing inward, where the centering protrusions point.
Crankshaft loose
The crankshaft driller may make a mistake and loosen the crankshaft, then the engine will not have good oil pressure, and also because of this the engine may knock quickly.
Photo. This way you can turn the crankshaft on a VAZ engine with a key.
You can check for weakness in the crankshaft like this. Tighten the cushion and spin the crankshaft; if it spins very easily, it doesn’t hurt to check whether the crankshaft is loose or not.
Usually, after a good boring, the crankshaft does not clamp and turns easily. Remove the cushion, take out the liner and place chocolate foil under the liner, tighten the liner, if the crankshaft gets tight or starts to turn noticeably more difficult, it means that this crankshaft journal is bored perfectly, pull out the foil from under the liner and check the next pillow.
Photo. It is shown how to place foil under the liner, and be sure to cut off the excess foil with the tip of a knife; it is shown here that the foil is cut off on one side and not on the other.
If, after placing foil under the liner, the crankshaft does not turn more difficult, it means that this crankshaft journal is weakened, place more foil under this cushion between the liner until the crankshaft begins to turn more difficult. After all the pillows have been checked and found to be loose, and if more than one foil had to be placed under the liner, then you will have to completely remove the crankshaft and under those journals that had to be placed more than one foil, you will need to divide the foil strips into two and place half of the foil under the liner in the block. Install the crankshaft, tighten it, that's it, you have perfectly adjusted the liners, and the crankshaft will work perfectly in the engine.
Be sure to put a nail in the foil under the liner and make a hole through the holes in the liner for the oil to pass through.
Some nuances that are important to know
So:
- In addition, it is important to know that the cuff should be hammered all the way. To do this, you will have to use a hammer, which you need to strike lightly. As for the mandrel, you can even use a suitable wooden block instead.
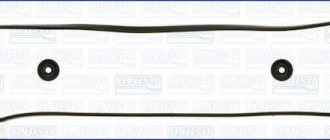
- In addition, you need to carefully inspect the gasket and if there are tears or any defects on it, then it must be replaced with a new one. It must be remembered that before installing the gasket, it should be lubricated on both sides with silicone-based sealant.
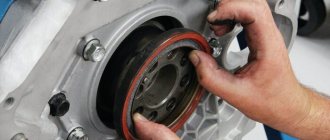
- You also need to know how to install the cover. So, you cannot immediately tighten the bolts, but only tighten them. Then use a special mandrel to center it and then tighten the cover.
- The remaining parts and assemblies are assembled in reverse order.
This video describes everything in detail. After watching it, you can learn how to change oil seals much faster.
- In addition, when changing the seals on the crankshaft, you should not ignore photos and pictures that depict various processes of dismantling and installing a new oil seal. It is useful to study the diagrams, design and generally necessary information stored on paper publications.
Replacing oil seals with your own hands is not difficult. Just be sure to carry out all operations as the instructions advise. And the price for services of this type in car repair shops and garages is quite high. So, by doing the replacement yourself, you can kill two birds with one stone - learn a lot and save a lot of money.
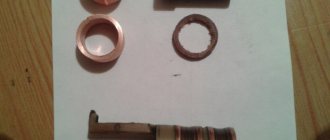
Installing thrust rings on the rear support
Markings on the main bearing caps (supports are counted from the front of the engine) and the conventional number of the cylinder block
Place the crankshaft in the main bearings and insert two thrust half-rings into the sockets of the rear support, selected in thickness according to the instructions in the chapter “Crankshaft and flywheel of the VAZ 2107”. Install the main bearing caps according to the marks.
WARNING Install the main bearing caps in the same block. For this purpose, the cylinder block and the covers belonging to it are marked with the same reference number. Install the thrust half-rings with the recesses to the thrust surfaces of the crankshaft, and place a steel-aluminum half-ring on the front side of the rear support, and a metal-ceramic half-ring (yellow) on the rear side.
Rear crankshaft oil seal holder. The arrows indicate projections for centering the holder relative to the crankshaft flange
Place the oil seal holder gasket on the crankshaft flange, and insert the bolts securing the front clutch housing cover into the holder sockets. Place the holder with the oil seal on the mandrel 41.7853.4011 and, moving it from the mandrel to the crankshaft flange, attach it to the cylinder block.
Removing the flywheel: 1 - key; 2 - flywheel; 3 — flywheel mounting bolt; 4 — washer; 5 — clamp A.60330/R to keep the flywheel from turning; 6 — front cover of the clutch housing
Install the front cover 6 of the clutch housing using two centering bushings. Install the flywheel on the crankshaft so that the mark (cone-shaped hole) near the rim is opposite the axis of the connecting rod journal of the fourth cylinder VAZ 2104, VAZ 2105, VAZ 2107, lock the flywheel with lock A.60330/R and bolt it to the crankshaft flange.
Installing the piston with piston rings into the cylinder using the mounting sleeve from set A.60604. The arrows indicate bushings for centering the head on the cylinder block
Using the bushing from set A.60604, insert the pistons with connecting rods of the Lada Classic into the cylinders. The set contains bushings of nominal and repair sizes of pistons.
WARNING The pin hole on the piston is offset by 2 mm, so when installing the pistons into the cylinders, the “P” mark on the pistons must face the front of the engine.
Therefore, you should select a sleeve suitable for the given size of the piston being installed. You can also use an adjustable bushing 67.7854.9517. Install the bushings into the connecting rods and connecting rod caps. Connect the connecting rods to the crankshaft journals, install the caps and tighten the connecting rod bolts.
Install the sprocket on the crankshaft. Install the VAZ 2104 oil pump drive shaft and secure with a thrust flange.
- Cylinder head bolt tightening order
- Install the cylinder head of a VAZ 2104, VAZ 2105, VAZ 2107 with a gasket, with an exhaust manifold and an intake pipe using two centering bushings on the block. Tighten the fastening bolts in a certain sequence in two steps:
- - preliminary torque 33.3–41.16 Nm (3.4–4.2 kgf m) bolts 1–10; final torque 95.94–118.38 Nm (9.79–12, 08 kgf m) bolts 1–10 and a torque of 30.67–39.1 N m (3.13–3.99 kgf m) bolt 11.
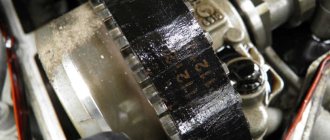
Checking the alignment mark on the crankshaft sprocket with the mark on the cylinder block
Turn the flywheel so that the mark on the crankshaft sprocket of the VAZ 2105 coincides with the mark on the cylinder block.
Procedure for tightening the camshaft bearing housing nuts
Checking the alignment of the installation mark on the camshaft sprocket with the mark on the bearing housing: 1 — mark on the sprocket; 2 - mark on the bearing housing
Install the sprocket on the camshaft assembled with the bearing housing and rotate the shaft so that the mark on the sprocket is opposite the mark on the bearing housing. Remove the sprocket and, without changing the position of the shaft, install the bearing housing on the cylinder head of the VAZ 2107 and secure it by tightening the nuts in a certain sequence.
Install the chain guide on the cylinder head. Install the camshaft drive chain in the following order: