Adjusting the valve mechanism of the 16-valve VAZ-2112 engine is a rather complicated operation, but can be done with your own hands. Thus, many motorists have come across the concept of hearing valves ringing, especially when moving from low to medium speeds. In this article, we will look at how to properly adjust the valves on a car, and also talk about some of the nuances of the process.
Video about adjusting valves on the front-wheel drive family of VAZ cars (2110-2112)
The video will tell you how to properly adjust the valves on a 16-valve engine, as well as give some tips and tricks.
We adjust valves on a VAZ-2112 16 valves with our own hands
Adjusting the valve mechanism of the 16-valve VAZ-2112 engine is a rather complicated operation, but can be done with your own hands. Thus, many motorists have come across the concept of hearing valves ringing, especially when moving from low to medium speeds. In this article, we will look at how to properly adjust the valves on a car, and also talk about some of the nuances of the process.
Video about adjusting valves on the front-wheel drive family of VAZ cars (2110-2112)
The video will tell you how to properly adjust the valves on a 16-valve engine, as well as give some tips and tricks.
Valve adjustment process
The process of adjusting valves on an engine
Before moving directly to the adjustment process, it is worth noting that this operation is carried out only on a completely cooled engine. Experienced VAZ drivers recommend waiting at least one night.
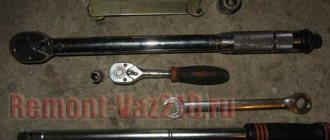
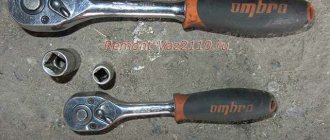
To make the adjustment, you will need a few tools, namely a set of keys and sockets, as well as a valve cover gasket and a special feeler gauge.
So, let's proceed directly to the operation:
- We disconnect and move to the side the tip of the throttle valve drive.
We dismantle the cable and bracket for fastening the throttle position
Unscrew the clamps and remove the crankcase ventilation hoses.
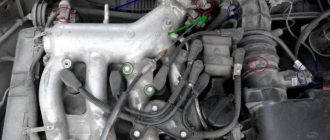
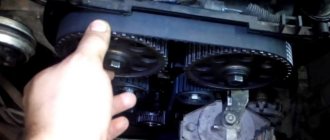
Remove the valve cover and bearing caps to adjust the valves
We dismantle the timing belt protective cover to get to the crankshaft pulley
Turn the crankshaft clockwise
We adjust the gaps using feeler gauges
Special tool for adjusting valves and replacing shims
Using tweezers, remove the adjusting washer
What types of shims are there?
A set of adjusting washers for all occasions
For cars of the VAZ family there are 125 sizes of shims, but not all are used.
Therefore, let’s consider the most popular sizes of spare parts that are installed on these engines (if you don’t want to run to the auto store again later): 3.30, 3.35, 3.40, 3.45, 3.50, 3.55, 3.60, 3.65, 3.70, 3.75, 3.80, 3.85, 3.90, 3.95, 4.00, 4.05, 4.10, 4.15, 4.20, 4.25, 4.30, 4.35, 4.40, 4.45, 4.50;
Adjusting washers in two sizes: 3.95 and 3.30
What are the consequences of untimely valve adjustment?
When the entire replacement process is considered, it is worth recalling what the consequences of untimely adjustment of the valve mechanism may be:
- . Thus, incorrect clearance can lead to premature wear of the camshaft cams.
- Damage to valve tappets when adjusting washers hit them.
- General wear of all elements of the head and timing mechanisms.
- In some cases, it may happen that the timing belt breaks and bends the valves.
conclusions
The valve adjustment of the 16-valve VAZ-2112 engine should be carried out once every 12-15 thousand kilometers or when the engine noise increases. Often, a metallic knock is heard at low speeds. Adjustments must be made on a cold engine and with all the tools available. If a car enthusiast is not sure that he is able to do this on his own, then it is recommended to contact a car service center, where everything will be done quickly and efficiently.
Tool for work
In addition to the everyday set of sockets and spanners, which the owner of a VAZ 10 should already have, a few more tools will be required:
- A device that presses out pushers for removing adjusting washers from them. You can get by with a couple of powerful screwdrivers, but the price issue here is not so great that you pay for the savings with less convenience. You can completely remove the camshaft - but then you will have to remove the timing belt as well, again there is no gain in time.
- A set of feeler gauges - we will use them to measure the gaps.
- Micrometer - This is not necessary, but is very useful. When adjusting, the thickness of the new washer is calculated based on the thickness of the old one and the measured gap, but what to do if the thickness marking on the washer is erased (and no one has canceled the wear?). You can borrow a 0-25 mm micrometer, fortunately you can trust it by simple mixing without calibers.
Something else useful for you:
VAZ 2110: 16 or 8 valves - that is the question!
If you are on this page, then you are one of those people who decided to buy a VAZ 2110 8 or 16 valve car and don’t know which is best for you. This article will show you all the advantages and disadvantages of each car option and help you choose what really suits you.
- A short list of disadvantages and advantages
- Eight valves
- Sixteen valves
- Review of engine technical characteristics
- Comparison from different points of view
- Favorable cost
- Maintenance - repair difficulties
- Tuning and the opportunity to participate in racing
- Results
A short list of disadvantages and advantages
So, let's first figure out what the pros and cons of 8 and 16 valve engines are relative to each other.
Let's compare which is better - VAZ 2110 8 valve or 16
Eight valves
Advantages of this engine:
- If the timing belt breaks, the valves do not bend
- You can fill in motor oils that are not of very good quality
- Takes up little space in the engine compartment - good access to other components
- Torque is concentrated at low revs
- Easier and cheaper to maintain
Negative aspects of the engine:
- Has higher noise and vibration levels than a 16-valve engine
- Requires regular engine tuning (valve adjustment)
- Timing belt tension needs to be adjusted
What to pay attention to when reassembling the mechanism
Before installation, the new valve should be lubricated with clean engine oil to improve assembly quality. Assembly must be carried out in reverse order; after you have assembled the valve system, you will need to install the cylinder head back
Please note that the gasket between the head and the cylinder block is a disposable component - you will need to install a new one. Take the option that immediately comes complete with heat-resistant sealant
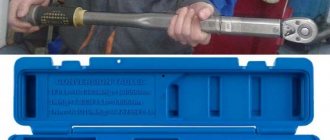
Before installing the head on the block, it is necessary to place the shafts (crankshaft and camshaft) in the TDC position, at which the valves of the first cylinder are closed. To fix the cylinder head bolts, you need to use a torque wrench to control the force. They are tightened in 4 stages:
- broaching with a moment of 20 N*m;
- then repeated force with a moment from 69.4 to 85.7 N*m;
- turning 90 degrees;
- final tightening another 90 degrees.
Only with this approach will the fixation be strong and the screws will withstand use. This wrench and step-by-step approach can also be used to secure the bearing block.
In general, replacing valves is not a difficult task; you can do it yourself, but it requires a scrupulous approach and extreme care. To carry out such repairs less often, monitor the condition of the timing belt and the quality of the fuel being poured. With constant use of bad gasoline, the valves quickly burn out.
Adjusting valve clearances
With a fairly high mileage of your VAZ 2110-2112, you sometimes have to adjust the valves to avoid pinched or, conversely, knocking valves. Of course, this only applies to 8-valve engines, since 16-valve engines are equipped with hydraulic compensators, which eliminate any adjustment of thermal clearances.
If you decide to adjust the thermal clearances between the camshaft cams and valve lifters with your own hands, then you will need at least the following tool:
- rack for adjusting valves of VAZ 2110 (model for 2108) with a stop;
- tweezers or long-nose pliers;
- thin flat screwdriver;
- 10 mm head and knob;
- a set of probes from 0.05 to 1 mm.
Since this procedure is quite capacious in terms of presenting information, I decided to make a detailed video report on the work done and post everything in this article. You can view it below.
Video on adjusting valve clearances on a VAZ 2110-2112
This review was provided by me specifically for this material and embedded from the YouTube channel. If you have questions about this video, you can ask them under the video on the channel.
It is worth noting several important points regarding adjustment.
Location of intake and exhaust valves
If you look from left to right, when you are facing the engine, the arrangement of the valves will be as follows: exhaust-intake, intake-exhaust, etc., I talked about this in detail in the video review. If you have the instructions for repairing and operating the car at hand, the location is also explained there.
Nominal clearances
As for the installed clearances between the camshaft cams and valve tappets, they should be as follows:
- For intake valve = 0.2 mm (+- 0.05)
- For graduation (0.35 mm) (+- 0.05)
Checked at engine temperature close to 20 °C. That is, the engine must be cold.
Calculation and selection of the thickness of new adjusting washers
If, when measuring the gap, it turns out that some of the adjusting washers need to be replaced with new ones, with greater or less thickness, then you need to know the following simple formula:
H=B+AC— where A is the value of the measured gap, B is the thickness of the old washer, C is the nominal gap, H is the thickness of the new washer
Again, the instructions above explain all this in more understandable language.
After adjusting the valves on a VAZ 2110-2112, you must install all the removed parts in the reverse order of removal and start the engine. Listen for knocking noises while the engine is running, both when the engine is cold and when it is hot. Also, pay attention to starting the engine so that there are no problems with this. If there is still a knock or other symptoms, it is necessary to re-measure the gaps of the non-problem valves.
Detailed diagnostics of hydraulic compensators on Lada Priora
Sometimes, to determine the causes of knocking hydraulic compensators on a 16-valve Lada Priora engine, the thermal state of the engine alone is not enough. A set of tests makes it possible to more accurately determine the factor that causes extraneous noise.
Diagnosing the condition
One of the common complaints is knocking noise both cold and hot. However, as the speed increases, the symptom disappears. One of the following options is relevant:
- Worn or damaged ball valve. You can't do without replacing the hydraulic compensator.
- Contamination of the internals of the hydraulic fluid with wear products due to the choice of incorrect lubricant or untimely replacement. Washing the internals and changing the oil composition to a standard one eliminates the problem.
If the clatter appears only on a hot power unit and disappears at high speeds, and on a cooled unit no extraneous sounds are observed in any mode, the plunger pair has worn out. The hydraulic compensator must be replaced as an assembly.
The knocking is observed only at high speeds in any thermal state, and at idle there is silence, a problem with the oil level or in the low emulsion suction system. It is not recommended to go beyond the extreme marks on the dipstick; driving with a damaged oil receiver is also not recommended. Restoring the acceptable level resolves the problem.
For your information
- New hydraulic compensators can also tap. This usually happens after capitalization and is observed within a short period of time after the first start-up. It is not a malfunction if it does not recur during subsequent starts.
- If the hydraulic modules knock after changing the oil, the reason is the quality of the lubricant or the filter.
- The knocking of hydraulic pushers during startup should not be considered a malfunction. Over a long period of parking, the oil is drained from the working chambers and at the beginning of work the containers are filled.
What are the consequences of ignoring the fact that the hydraulic compensators on the Lada Priora 16-valve engine are knocking or neglecting to investigate the causes of the noise? At a minimum, acoustic discomfort. At the most, the camshaft cams will wear out and will have to be replaced.
Adjusting valves VAZ 2110 16 valves
If your engine valves are knocking, it's time to adjust them. Do not rush to go to a service station for this; try to perform this simple procedure on your own. If you learn to adjust the valves yourself, then you will save from 500 to 1000 rubles on this procedure, this is exactly the amount the service station asks for. Adjusting engine valves (VAZ 2110-12 engine 8 valves): 1. Open the valve cover and remove the timing belt cover (instructions).2. We install a device for adjusting the valves. You can buy it at any Auto store for 500 rubles. 3. Place marks on the crankshaft and camshaft. Then check the timing belt tension, if necessary, tighten and turn the camshaft 2.5 teeth clockwise. Place your mark. Then we count the teeth 11-mark, 10.5-mark, 11-mark and proceed to adjustment starting from the first mark 5. Determine the gap using a feeler gauge.6. We take out the puck and look at what is written on it. Next, we take a special kit, or we count and write down which washer is needed. There is nothing complicated, and the whole process took no more than 30 minutes.
Replacing expansion joints
After checking how many pushers in the system are malfunctioning, you can go to a car store and purchase new parts for the Priora 16 and some consumables: oil seals, camshaft plugs, anaerobic sealant.
After such repair of expansion joints, the knock may remain. If a lot of time has passed and the defect does not go away, then it is worth checking the cylinder head itself. Perhaps the hydraulic compensators are knocking due to the lack of the required amount of lubricant. Check the oil channels in the cylinder head. If they are clogged, you will have to clean them.
Engine operation after replacing the main engine:
Engine lubrication system design
Let's look at the purpose and operation of individual nodes.
- The oil pump builds up pressure in the lines, with its help the liquid enters the oil filter from the sump, and is distributed throughout the system in a purified form. The pump is connected to the engine crankshaft and runs immediately after starting.
- Drain hole for draining the crankcase when changing the oil.
- The oil intake is a socket through which liquid is sucked into the pump. Located in the lower part of the crankcase to prevent oil starvation when the level drops.
- The bypass valve returns lubricant to the oil pan if the passage of a dirty filter interferes with normal circulation.
- Spray points on working units (original nozzles for creating oil mist). When the spray points become clogged, the lubrication regime is disrupted, so there should be no insoluble debris in the liquid (it remains in the filter cartridge).
- Oil line. It can be made in the form of tubes or special channels in the engine housing. Slag deposits interfere with the patency of the channels, so detergent additives are added to the lubricant.
- Filler neck (shown conditionally). It is used to top up or replace fluid.
- Oil radiator valve (tap). In summer it opens for additional cooling.
- Lubricant cooling radiator. Not present in all car models.
- Oil filter. It is a metal cylinder that can withstand high pressure. Inside there is a filter cartridge made of special paper or synthetic materials.
To monitor the state of the system, a number of sensors are integrated into it:
- temperature;
- pressure;
- in some designs - level;
- filter cleanliness (the same pressure sensor, only located directly on the flange of the filter element).
During normal operation, the engine maintains constant pressure. Malfunction of the system leads to a sharp increase in wear, temperature of parts, and engine jamming.
Please note As can be seen from the operating diagram, replacing oil with “magic” additives, which supposedly allow you to work “dry”, cannot provide all the functionality of the fluid. Therefore, you should not experiment with such chemistry
Setting procedure
The first step is to put the adjusting device in place, then by turning the crankshaft, align the mark on its pulley with the protrusion on the cylinder block. In this case, the mark on the camshaft gear should also align with its protrusion. In this position, the piston of the first cylinder is at the very top (TDC), which can be easily checked with a screwdriver through the spark plug hole.
Then proceed in the following sequence:
- Check the tension of the timing belt by turning it around its axis as far as possible. A well-tensioned belt will not turn more than 90°. If you find any slack, tighten the belt using a pulley, otherwise further adjustment will be difficult.
- Using a wrench, turn the camshaft slightly clockwise so that the gear moves 2.5 teeth relative to the protrusion. Scratch your own mark on the gear with a sharp metal object - it will be useful to you in the future.
- Use feeler gauges to check the clearances in valves No. 1 and 3; they should be 0.35 and 0.2 mm, respectively. When the gap is set correctly, the feeler gauge moves in it with some effort.
- The size of the gap is adjusted with washers. If it is too small or large, remove the installed washer with tweezers and look at the markings where the thickness is electrographically applied. To be sure, it can be measured with a micrometer.
- Select the total thickness of the washers to maintain the specified gaps, check them with feeler gauges.
- Counting 11 teeth from the first mark, place the second, after 10.5 teeth - the third, and after another 11 - the fourth.
- Turning the camshaft clockwise and aligning your marks with the protrusion, repeat the valve adjustment in accordance with the table:
Technical specifications
Let's consider the technical characteristics of 8 and 16 valve engines using the example of VAZ models.
Related article Beams 1G FE Engine Specifications
| Technical specifications | VAZ 21116 | VAZ 21126 |
| Number of cylinders | 4 | 4 |
| Number of valves | 8 | 16 |
| Volume, cm3 | 1596 | 1597 |
| Cylinder diameter, mm | 82 | |
| Piston stroke, mm | 75,6 | |
| Compression ratio | 10,5 | 11,0 |
| Power, hp at rpm | 87/5100 | 98/5600 |
| Torque, Nm at rpm | 140/3800 | 145/4000 |
| Petrol | AI-95 | |
| Mixed consumption, l/100 km | 7,3 | 7,0 |
What is better, an 8 or 16 valve engine? According to technical indicators, the 16-valve engine wins in power and efficiency, but it is worth taking into account the costs that will have to be incurred for using dynamics and comfort.
When buying a car aftermarket, you can distinguish a 16-valve engine by its appearance. The engine's wide intake manifold resembles a snail, and is usually covered by a shroud with the company logo and the inscription 16Valve.
Possible malfunctions in the electric generator drive and ways to eliminate them
Malfunctions in the belt drive of an electric generator during use, of course, manifest themselves in different ways:
- you will like the whistle of the unfamiliar drive layout;
- This is a weak generator voltage, due to weak tension and repeated slipping of the belt drive. Slippage occurs even with normal, standard belt tension due to water, antifreeze or oil getting on the working elements of the drive;
- more unsafe for the motor and very strong tension in the drive. Due to excessively huge loads, bearings are destroyed (how to change a bearing on a VAZ 2114 generator?), gears or shafts are damaged, and in addition, sometimes the belt breaks. Here the upcoming movement will be unrealistic until it is replaced with a new, working one. The worst situation is when a gust occurs on the highway, in a deserted place. Driver practice suggests that this does not happen very occasionally.
We carry out what remains to be done for our client without panic and in no hurry. What remains for our client to do is trivial, weakly tightened, strongly weakened. Roller when moving
This is my personal method for tensioning the timing belt.
, I think many people will need this. And if you need it, there will be belts.
Attention! Experts and experienced car enthusiasts advise having a new belt in a spare set in the trunk, although a driver can learn how to correctly tighten the alternator belt on a VAZ 2114 in 10 minutes. And they recommend reading how to remove the alternator belt, so that you can be “savvy” for any occasion. Since the condition of the belt drive
Since the condition of the belt drive
Since the generator is a fundamental problem, monitoring it is the responsibility of the driver. Checking the belt is quite simple - you just need to simply press it with a force of 10 kg to check the deflection. For an electric generator of brand 9402.3701 it is 0.6 - 0.9 cm, for brand 37.3701 - 1.0 - 1.5 cm. Today, you need to inspect the cleanliness of all parts of the drive.
If the driver hears that the generator belt is whistling, then immediately, immediately, you need to check the condition of the belt drive. It exists that if the belt is really loose, it can twist and break at high speeds.
When, if during inspection it is determined that weakening occurs, then it is necessary to tighten the generator belt. For this purpose, you need to perform a number of easy steps and keys from “10” to “13”.
- Place the car on a level surface and set it to speed and handbrake.
- Open the hood and before tightening the
alternator belt on the VAZ 2114, use a key set to “13” to loosen the nut securing
the alternator housing
to the adjusting rail.
Loosening the lower bolt of the VAZ 2114 generator
Using a key set to “10”, tighten the adjusting screw of the tensioner mechanism, while the body of the electric generator should move along the rail towards the front of the machine.
Alternator belt tension
- As the tensioner screw rotates, the belt deflection must be kept under control. If it is within the norm for the type of electric generator installed on the machine, you need to use a “13” key to firmly tighten the nut on the adjusting rail
. - When the fastening nut is tightened, you need to turn the crankshaft twice by hand and check the deflection again. If it turns out to be within the normal range, then, after starting the engine, you need to check the operation of the belt drive in operating mode. During this check, there is no extraneous noise; the belt should spin without bending and without moving to the side.
Preparing and disassembling the mechanism
To carry out the work, you will have to purchase a special device for pressing the pushers and a set of adjusting washers of various thicknesses - you will not be able to do without them. If you constantly plan to make adjustments yourself, then this purchase will help you save money on car service costs. With a one-time promotion, purchasing devices is impractical; it is better to immediately contact the specialists.
To disassemble and adjust the clearances under the cams, you will need the following tools:
Since during the adjustment process you will have to repeatedly turn the crankshaft, to facilitate rotation it is recommended to unscrew all the spark plugs, having first removed and put the high-voltage wires aside. Further disassembly includes:
After wiping off any oil stains on the cylinder head flange where the gasket was located with a rag, you can begin tuning.
Remember that adjustment is carried out only on a cold engine.
Sponsor of the life of the forum https://www.bhperformance.kz
kardanS View profile
Group: NISMO-CLUB Posts: 626 Registration: 27.5.2010 From: Moscow North-Eastern Administrative District User No.: 17785 Car: Nissan B14
100nx View Profile
Group: Moderators Messages: 900 Registration: 6/20/2008 From: Moscow User No.: 10441 Car: Nissan 100nx 1.6 MT 93″. GAZ-3102 2.4 MT 07″. Honda Legend KA9 3.5 A/T 99″
Everything is! I brought washers from Ikhzist. Adjustment in two stages - 1. Measure and order the necessary washers 2. Install these same washers and measure again I recommend immediately buying a valve cover gasket. To replace it, I removed the shafts.
There may already be a chain on the way, first measure the gaps - you can see the bottle there.
Post edited by 100nx
— 10/19/2010, 1:55 pm
kardanS View profile
Group: NISMO-CLUB Messages: 626 Registration: 5/27/2010 From: Moscow North-Eastern Administrative District User No.: 17785 Car: Nissan B14
Everything is! I brought washers from Ikhzist. Adjustment in two stages - 1. Measure and order the necessary washers 2. Install these same washers and measure again I recommend immediately buying a valve cover gasket. To replace it, I removed the shafts.
There may already be a chain on the way, first measure the gaps - you can see the bottle there.
100nx View Profile
Group: Moderators Messages: 900 Registration: 6/20/2008 From: Moscow User No.: 10441 Car: Nissan 100nx 1.6 MT 93″. GAZ-3102 2.4 MT 07″. Honda Legend KA9 3.5 A/T 99″
That’s exactly what it is, but for some reason it often doesn’t reach 200,000.
Devices 2 - hands)), and a special curved fork, with the distance between the “teeth” slightly larger than the diameter of the washer. There was no fork, I had to rip out the shafts - I didn’t want to screw the pushers with a screwdriver.
kardanS
Symptoms
To understand that the valves on the VAZ 2110 engine need adjustment, it is enough to know the behavior of the engine. After prolonged use, the car owner may notice that the engine has begun to work somehow differently. This fact should alert you, because the consequences can be serious.
The main symptoms of a faulty valve mechanism adjustment on a VAZ 2110 look like this:
The listed signs can be diagnosed independently, without resorting to the services of a car service. Before you put the VAZ 2110 in for repairs and begin adjusting the valves, you should prepare a mechanic’s tool: a micrometer, a rack for pressing the pushers and a multi-part feeler gauge. The last thing to measure is the thermal gap between the camshaft cam and the adjusting washer. Instead of a rack, it is possible to use two powerful slotted screwdrivers.
The installation kit (fixture and probe) is sold in most Auto Parts stores. Its cost varies from 200 to 500 rubles. Correct installation of valves on a VAZ 2110 8 valve injector or carburetor is the key to success.
Why do you need customization?
All models of the “tenth” family, starting from 2110, where power units with 8 valves are installed, require adjustment of the latter. It is not the valves themselves that are adjusted, but the thermal clearances between their pushers and the camshaft cams. It is well known that metal expands significantly when heated, which also manifests itself in the cam-pusher pair. If there are large gaps between them, the valves will not open completely, and the injector will supply less fuel to the cylinders.
If there are no gaps after thermal expansion, the round part of the cam will press on the pusher, causing most valves to be open constantly. This leads to a sharp decrease in compression and engine inoperability.
There are signs by which you can determine that it is time to adjust the VAZ-2110 valves:
- the appearance of loud clicking sounds coming from the top of the cylinder head;
- failure of one or more cylinders due to lack of compression;
- carrying out repairs related to disassembling the power unit and dismantling the camshaft.
Clicks when the engine is running are heard under the valve cover when the thermal gaps are too large. These sounds cannot be confused with anything; in addition, they are accompanied by a decrease in engine power and a drop in the dynamics of the rather “high-spirited” VAZ-2110 car. When there are no gaps, there is no knocking, but the engine is unstable, “troubles” or refuses to start at all. The diagnosis is confirmed by measuring compression in all cylinders.
In VAZ-2110 - VAZ-2112 cars (16 valves), there is no need to adjust the thermal clearances. These more advanced motors are equipped with devices that automatically provide optimal settings: hydraulic compensators. When one of the problems described above appears, the hydraulic compensators are replaced with new ones, and they last quite a long time, at least 100 thousand kilometers.