The main symptoms that you will have to dismantle the cylinder head will be an oil leak, which is observed at the junction of the “head” with the cylinder block, or when it has mechanical damage and simply needs to be replaced. Also, similar work is provided to you when you find traces of an emulsion mixture of antifreeze and oil on the cap of the expansion tank, which will indicate the presence of oil in the cooling system.
Video with disassembling and removing the cylinder head on a VAZ-2112 - everything is simple, do it yourself:
The work of removing the cylinder head on a VAZ-2112 can be done with your own hands, you just need to follow our instructions.
Removal
1. Drain the coolant from the engine (see “Coolant - replacement”).
If disassembling the cylinder head is not required
(for example, to replace the cylinder head gasket), it should be removed as an assembly with the camshafts, bearing housing, fuel rail, oil pressure and camshaft position sensors.
4. Disconnect the upper mounting rod of the power unit from the cylinder head bracket (see “Upper mounting rod of engines 2112 and 21124 (16v)”).
13 mm socket wrench
Unscrew the three nuts securing the rod bracket.
6. Remove the bracket from the studs.
8. 10 mm
Unscrew the bolt securing the ground wire tip and disconnect it from the block head.
9. 13 mm
Unscrew the nut securing the tip of the negative terminal wire of the battery and remove the tip from the stud.
10. To avoid damaging the sensor connectors, disconnect the wires from the coolant temperature sensors of the engine management system (see “Coolant temperature sensor - check and replacement”) and from the temperature indicator (see “Coolant temperature sensor - check and replacement” ), as well as from the camshaft position sensor, if we remove the cylinder head assembly (see “Camshaft position sensor - check and replacement”).
13 mm socket wrench
Unscrew the two nuts securing the thermostat housing.
12. Remove the thermostat housing from the cylinder head studs and, without disconnecting the hoses, move it to the side.
13. Remove the sealing gasket.
10mm hex wrench
unscrew the ten bolts securing the head to the cylinder block in the specified sequence.
Sequence of loosening the head bolts
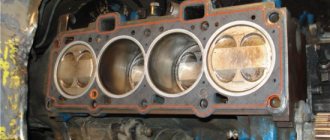
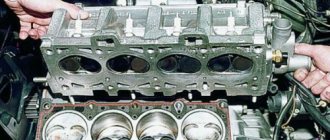
15. Remove the head from the cylinder block assembly.
. or with the camshafts removed.
16. Remove the cylinder head gasket.
17. In order not to lose it, we remove the two guide bushings from their seats in the cylinder block.
What cars was it used in?
Only three VAZ models using the 2112 engine left the assembly line of the manufacturer's plant:
- 21103 – sedan;
- 21113 – station wagon;
- 2112 – sedan, GLI luxury and Standard versions.
Since the characteristics of the engine 21124 and internal combustion engine 21128 are not too different from the original, it was mounted on the same VAZ Lada. The modification of the 21126 engine was equipped exclusively with Prioras.
Installation
1. Wash the cylinder head from dirt and deposits with kerosene or diesel fuel.
2. Remove any remaining oil and coolant from the threaded holes of the cylinder block (under the cylinder head bolts).
3. We clean the mating surfaces of the head and cylinder block from the remains of the old gasket, and degrease the surfaces with a solvent.
Warning! Always use a new gasket when installing the cylinder head. Oil contact with the gasket surface is unacceptable.
4. Install the head guide bushings into the seats of the cylinder block. We place the gasket on the cylinder block, and the guide bushings should fit into the corresponding holes in the gasket.
5. Install the head on the cylinder block. By slightly moving the head from side to side, we ensure that the guide bushings fit into the corresponding recesses of the head.
Warning! Reuse of cylinder head bolts is only permitted if their length does not exceed 100 mm
6. Using a caliper or a bench ruler, measure the length of the bolts. Bolts longer than 100 mm are replaced.
7. Before installation, dip the threaded part of the bolts into engine oil and let the oil drain, waiting for about half an hour.
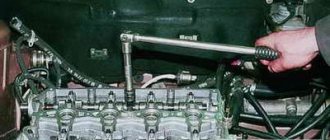
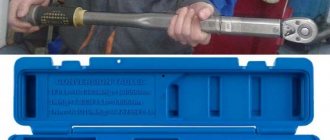
8. Install the head mounting bolts into the holes of the head. Using a torque wrench, tighten the head mounting bolts in three steps - first with a torque of 20 N m (2 kgf m), then turn the bolts by 90° and then turn the bolts again by 90°. In this case, we follow the order indicated in the photo.
Head bolt tightening sequence
Engine tuning
Before tuning, you should take into account the design nuances that the 2112 engine has:
- chipping in this case is useless;
- install a Stolnikov 8.9, STI-2 or STI-3.1 camshaft;
- replace the throttle with 54 - 56 mm;
- mount the exhaust tract with spider 4/2/1.
Thus, ICE 2112 is the 5th generation of AvtoVAZ engines with a four-stroke cycle. In the basic version, the design is flawed (the valves bend); this error is corrected in the modifications.
The tightening torque of the VAZ 2112 cylinder head (16 valves) is very important, since deformation occurs if the head is unevenly installed. This leads to the fact that after disassembly it will be necessary to grind off at least 2 mm from the surface of the block head. If all tightening torques are observed, then you will not have to sharpen the head, and if you do need to do this, then no more than a quarter of a millimeter.
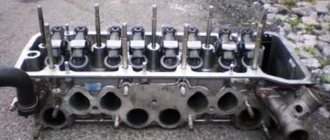
Dismantling the cylinder head
First of all, to get to the cylinder head, you need to remove the cylinder head cover. For different 16-valve engines, this operation is different, and the cover part numbers also look different: 2112-1003260 (-10) and 21124-1003260.
Engine cover VAZ-21124 (1.6 l)
You will also need to remove the timing belt - there are no differences between different engines.
Let's look at how the exhaust manifold can be detached from the cylinder head. On engine 21120:
- Remove the exhaust pipe of the muffler: unscrew two nuts 1 (key “13”), remove the clamping bar, unscrew six nuts 2 (key “14”) and dismantle, not forgetting to turn off the oxygen sensor. The photo shows three of the six nuts.
Elements of the exhaust pipe
Everything important is under the screen
Now we will talk about engine 21124:
- Disable both oxygen sensors. We unscrew the three nuts securing the protective screen (with a 10mm wrench) and disassemble the bracket by unscrewing the four nuts with a 13mm wrench.
How to disassemble the mounting bracket
Operation with additional muffler
Here we believed that the VUT hose was disconnected from the intake module. Finally, the spark plugs are unscrewed on any of the engines (a “16” tubular wrench).
The tightening torques for the mounting screws are given in another text. In general, on VAZ-2112 hatchbacks, cylinder head repairs begin by replacing the “extended” screws with new ones. The length should be 95mm or less.
The order of unscrewing (left) and tightening the mounting screws
Engine modifications
Due to the presence of free space inside the block and cylinder head, immediately after the creation of the basic version of the two-shaft 16-valve engine 2112, its versions began to appear:
- 21124 – boosting the internal combustion engine to 89 hp. With. due to the volume of 1.6 l;
- 21126 – modernization of the engine to a power of 98 hp. pp., volume 1.6 l;
- 21128 – maximum combustion chamber volumes 1.8 liters, power increase to 105 liters. With.
In these versions, the valves do not bend; overhauls are needed much less frequently. The first version was created solely to increase volume and comply with Euro-3 standards. Factory tuning was carried out by increasing the block height to 197.1 mm and increasing the piston stroke.
In the second version, the designers tried to ensure the maximum operational life of the units. For this purpose, special cylinder honing is used using the Federal Mogul method. Block 21126 is gray in color, and the number of classes of repair kits for pistons and cylinder liners has been reduced to three in increments of 0.01 mm.
Version 21128 is not manufactured by AvtoVAZ, but by a third-party manufacturer, ZAO Super-Avto. Engine characteristics have been significantly improved:
- volume 1.8 l;
- torque 162 Nm;
- power 75 kW.
The cylinders are bored by 0.5 mm (diameter 82.5 mm), an original crankshaft has been developed that provides a piston stroke of 84 mm, the width of the rings has been changed to 2 mm (oil scraper), 1.5 mm (lower compression) and 1 mm (upper compression) . The throttle flow area has been increased to 51 mm, Siemens injectors with increased performance have been installed.
There are two more modifications of the ICE 2112:
- 21127 - created in 2013, torque increased to 148 Nm, volume to 1.6 liters, power to 106 hp. With.;
- 21179 is the first option in the manufacturer’s line with a volume of 1.8 liters for Largus and Vesta.
In the first version, the problem of floating speed is solved by replacing one MAF (mass air flow) with two sensors DTV (air temperature) and DBP (absolute pressure).
The 21179 motor used a phase shifter for the first time; it was created on the basis of the 21126, therefore it is conventionally considered a modernization of the 2112 generation.
Cleaning valve channels
To remove any valve, you will need to remove the camshaft. All screws on the bearing housing must be unscrewed evenly and tightened with a force of 10 N*m. The hydraulic compensator can be removed with a magnet, and then the valve is desiccated by compressing the spring with a puller (see photo).
How to remove the valve
There may be carbon deposits in the valve channels. It is cleared:
- Flat screwdriver;
- Sanding felt.
Grinding is carried out as follows: a rubber pipe is placed on the valve, a paste with diamond chips is applied (one drop), then the valve is pressed into the channel and scrolled. It will also be possible to change the valve stem seals (2112-1007026). You can’t do this without a special puller.
Cap puller
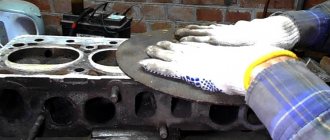
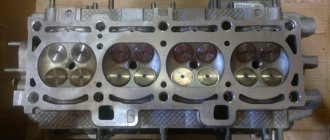
On any car, including the VAZ-2112, cylinder head repair comes down to cleaning and checking, as well as correcting geometry defects. In the latter case we are talking about milling. The presence of cracks and chips is a reason for replacement, not repair.
A small photo report
A burnt valve is immediately visible.
One valve burned out in cylinder 2
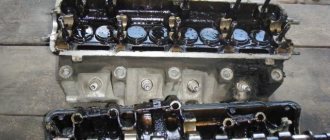
Carbon deposits were found in each valve channel.
Carbon layer in the cylinder head channels
Repair : cleaning all channels, replacing the valve with lapping. Direct repair of the VAZ 2112 cylinder head will require several operations that require some special equipment. Of course, this is not possible at home, and car enthusiasts simply replace worn parts. Next, we will consider the process of repairing the block head, as well as some of the nuances associated with this work.
Stages of block head repair
Before proceeding directly to the cylinder head repair process, it is worth noting that the head must be completely disassembled and all the necessary spare parts purchased. Let's consider the process of complete overhaul of the cylinder head.
Advantages and disadvantages
The cooling system is not fully developed, and the engine’s capabilities are not used, even half:
- experts recognize that the 2112 cylinder head has an impeccable design of the intake and exhaust tract;
- however, the manufacturer equips it with small-diameter valves from previous versions of the internal combustion engine, using the engine’s capabilities by 35 - 40% maximum.
Read also: Mikhail Nesterov traffic rules complete video course 2022
At the same time, you can increase the power on your own - you need to carefully bore the holes without damaging the partition, and then select springs and lightweight valves and arrange them inside the cylinder head.
Conclusion
Thus, a major overhaul of the cylinder head of the 16-valve VAZ 2112 engine is being carried out. This process at a car service center will take 1-2 days, but in his garage a car enthusiast can spend much more time, since the lack of tools will affect him. Thus, it is recommended to carry out cylinder head repairs at car repair shops, where everything will be done much faster and with better quality. Of course, this will hit your pocket, since high-quality and major repairs of this part will cost on average about 7,000-10,000 rubles. along with spare parts.
Design Features
Since AvtoVAZ management involved specialists from General Motors (timing) and Porsche (layout) in the design of the 16-valve internal combustion engine, the 2112 engine has the following design solutions:
- the intake valves are controlled by the cams of their own camshaft, the exhaust valves have a separate camshaft;
- oil channels are laid inside the cylinder head;
- floating piston pin fit;
- holes in the block for additional attachments;
- forged steel connecting rods 121 mm long.
A pleasant feature for the owners of these engines are hydraulic pushers, which eliminate the need for periodic valve adjustments with your own hands or at a service station.
Video showing cylinder head repair (1.5 l engine)
The procedure is carried out when replacing the head gasket, repairing the valve mechanism and the head itself, as well as when completely disassembling the VAZ 2110 engine.
Disconnect the negative cable from the battery and drain the coolant.
We disconnect the throttle drive cable, the exhaust pipe, the ground wires from the left end of the head, the connectors of the coolant temperature and oil pressure sensors, and the hoses of the cooling system outlet pipe.
We remove the receiver with the VAZ 2110 throttle assembly, the intake manifold, the fuel rail with the VAZ 2112 injectors and tubes, the cylinder head cover, the rear support bracket of the power unit, the camshaft pulleys and the rear timing belt cover of the VAZ 2112.
You can dismantle the head without removing the intake and exhaust manifolds. In the disassembly version shown, the collectors have been removed for clarity. For all of the above dismantling operations, see the relevant sections.
Using a 10mm hexagon, unscrew the ten bolts securing the cylinder head. We take out the bolts and washers.
Remove the cylinder head.
. and its gasket.
We carry out further disassembly of the head on a workbench.
We dismantle the camshaft bearing housing, remove the camshafts and take out the hydraulic tappets (see Replacing the hydraulic valve tappets of the VAZ-2112 engine).
Using a “13” wrench, unscrew the two nuts securing the outlet pipe of the VAZ 2111 cooling system.
Remove the pipe from the studs.
Using a 21 key, unscrew the coolant temperature gauge sensor.
We dry out the valves, remove the springs with plates (see Replacing oil seals for VAZ-2112 engine valves).
To support the valves of the VAZ 2112 when compressing the springs, we place a wooden block under their plates (from the bottom of the head).
We remove the valves from the guide bushings of the VAZ 2110 cylinder head.
- – Remove the oil seals from the guide bushings and the spring support washers.
- – We assemble and install the cylinder head in the reverse order.
- – Before installation, clean the surfaces of the cylinder block and head 2112 from the remains of the old gasket, dirt and oil.
- – Lubricate the valve stems of the VAZ 2111, the holes of the guide bushings, the holes for the hydraulic pushers and the new oil seals with engine oil.
- – Remove oil and coolant from the threaded mounting holes of the cylinder block.
- – We install the new gasket and cylinder head onto the block using two centering bushings.
We install the fastening bolts and tighten them in three steps according to the diagram (see Fig. “Procedure for tightening the bolts of the VAZ 2112 cylinder head”):
- – first move – tightening 20 N•m (2 kgf.m)
- – second move – turn 90°
- – third move – turn 90°
The head fastening bolts may only be reused if they have been extended to a length of no more than 95 mm. If it is larger, replace the bolt with a new one.
Maintenance
The ergonomic design of the internal combustion engine allows you to service the 2112 engine with the following frequency:
| Pistons | groove 3.5 mm deep |
| Rings | steel 21083-1004029 or cast iron 21083-1000100-10 |
| Piston diameter | A class –81.94 – 81.95 mm |
| Crankshaft | base from 21083, added torsional vibration damper |
| Number of main bearings | 5 |
| Piston stroke | 71 mm |
| Fuel | AI-95 |
| Environmental standards | Euro-3 |
| Fuel consumption | highway – 5.9 l/100 km |
| Oil consumption | maximum 0.5 l/1000 km |
| Engine oil for 2112 | 5W-30, 5W-40, 10W-40, 15W-40 |
| Engine oil volume | 3.5 l |
| Operating temperature | 90° |
| Motor life | declared 150,000 km, |
| Adjustment of valves | hydraulic pushers |
| Cooling system | forced, antifreeze |
| Coolant quantity | 7.8 l |
| water pump | with polymer impeller |
| Candles for 2112 | BCPR6ES or AU17DRVM, thread length 19 mm, diameter 14 mm, key 16 mm |
| Gap between spark plug electrodes | 1.1 mm |
| timing belt | DOHC |
| Timing belt | 136 teeth, belt width 25.4 mm |
| Cylinder operating order | 1-3-4-2 |
| Air filter | Nitto, Knecht, Fram, WIX, Hengst |
| Oil filter | with check valve |
| Flywheel | 128 teeth 10.1 mm high, clutch surface size 256.7 mm |
| Flywheel mounting bolts | M10x1.25 mm, length 26 mm |
| Valve stem seals | code 90913-02090 light inlet, |
| Compression | cylinder pressure from 12 bar nominal, pressure difference in individual cylinders within 1 bar |
| XX speed | 800 – 850 min -1 |
| Tightening force of threaded connections | spark plug – 30.7 – 39 Nm |
| Maintenance object | Time, year or mileage, 10,000 km (whichever comes first) |
| Timing belt | replacement after 100,000 km |
| Battery | 1/20000 km |
| Valve clearance | 2 /20000 km |
| Crankcase ventilation | 2 /20000 km |
| Belts that drive attachments | 2 /20000 km |
| Fuel line and tank cap | 2 /40000 km |
| Motor oil | 1/10000 km |
| Oil filter | 1/10000 km |
| Air filter | 1 – 2/40000 km |
| Fuel filter | 4 /20000 km |
| Heating/Cooling Fittings and Hoses | 2 /40000 |
| Coolant | 2 /20000 km |
| Oxygen sensor | 1.5/100000 km |
| Spark plug | 1 – 2 /20000 km |
| Exhaust manifold | 2/40000 km |
Unlike coolant, oil partially settles on the walls of the lubrication channels, so with a volume of 3.5 liters, 3.2 liters of a semi-synthetic product is actually required.
Tool for the job
Before proceeding directly with the replacement, you need to collect all the necessary tools and materials:
- A set of keys of various diameters “10”, “13”, “17”, “21”.
- Screwdriver.
- Pliers.
- New coolant.
- Container for coolant.
- Clean rags.
- New consumables (depending on the purpose of the work being performed - approx.).
- Anti-recoil shoes.
For ease of work, it is best to use an inspection hole or a lift.
Please note that upon completion of the work, it is necessary to install a new cylinder block gasket, carry out all work in strictly the same order as removal, and also pour new coolant into the system and check all connections for leaks.
Despite the fact that this work is quite difficult due to the dismantling of numerous pipes, pads and threaded connections, it is very doable with your own hands, you just need to read our article very carefully and you can get to work without fear.
Sources:
https://avto-ladyrb.ru/remont-avto/gbts-vaz-2112-16-klapanov.html https://fb.ru/article/351649/moment-zatyajki-gbts-vazklapanov-shema https:// carfrance.ru/demontazh-golovki-bloka-cilindrov-svoimi-na-vaz-2112-svoimi-rukami/
About some common mistakes
Although manufacturers of domestic cars equipped with engines with different numbers of valves indicate in the technical documentation all the tightening rules and its main nuances, many owners often do not comply with them.
So, the following mistake is very common - pouring lubricant directly into the threaded holes of the cylinder head. As noted earlier, this is unacceptable. The liquid essentially acts as a plug and prevents the bolts from being screwed in properly.
The second problem is dragging. Many people believe that the tighter the cylinder head fasteners are tightened, the better it will be, but this is a misconception. This approach can lead to damage to the head itself, the gasket and the bolts themselves.
Often, owners also use old, knocked-down keys. This tool tears off the edges of the fastener heads. After this, they can neither be tightened nor unscrewed. Sometimes, instead of the recommended bolts, others are used that are suitable only in diameter and thread type. This is also unacceptable. Too short ones will not hold the head well, and too long ones will not be able to be tightened properly.
And finally, the main mistake is trying to carry out repairs by persons without proper training and experience. If there are doubts about the ability to dismantle and install the cylinder head, then it is better to entrust the task to specialists - their services will cost less than a new part.
How to carry out repairs
In order to repair the block voice, you will need the following tools:
- Device for compressing valve springs. You can use both “store-bought” and homemade. The main thing is that it is convenient to work.
- Device for pressing out oil seals.
- A tube-shaped mandrel for installing caps.
- "10" keys, hexagons, tweezers and screwdrivers.
Perform the following manipulations:
- Carry out all the steps to remove the head and camshafts.
- Remove all valves using a special device.
- Remove the valve stem seals.
- Replace and grind the valves. Valves need to be replaced if there is damage - burnouts, geometry violations. Be sure to sign which seats you are lapping the valve on - otherwise the tightness will be broken.
- Assemble all the valve drive mechanisms - hydraulic pushers, springs, secure them with bread crumbs.
All steps for assembling the unit are carried out in the reverse order, only you need to take into account one feature: adhere to the recommended tightening torque values for the VAZ-2112 cylinder head (16 valves). The photo shows the tightening sequence.
see also
Comments 19
To prevent the channels from clogging, you need to use Loctite and not ordinary sealants. And don’t smear it, but apply it from a spitz, let’s say, a 2mm sausage
Personally, I smeared it like this www.drive2.ru/l/6876946/, left the old plugs, and first applied a thin layer of gray sealant to them. So far everything is holding up great.
Did you drain the antifreeze to replace the pump? What material are the plugs made of? It’s confusing that the instructions don’t say a word about sealant, but everyone seems to use it
The antifreeze was drained. The plugs in the cylinder head, in my opinion, are made like oil seals, i.e. rubberized metal base. I applied sealant to ensure a reliable seal.
Do you need to lubricate the cover on the 8 valve?
I don’t know, but most likely the gaskets are bought there or cut from paranit.
Do you need to lubricate the cover on the 8 valve?
This kind of nonsense should only happen in 16th grade.
the one that “or” requires great care in operation and theoretically stops leakage from the oil lines. the other is simpler and made from the factory. I made it “simpler” using Reinz. plugs are used in other cases. I left the old plugs and put them again on the Reinz technology, you need to use Loctite, the main thing is moderation and not to snivel
“plugs are used in other cases.” what kind of plugs?
Are the plugs rubber or metal or rubberized metal?
According to the instructions, they seem to need to be pressed in like camshaft seals without any sealant. Probably won't be able to be pulled out with sealant later?
A spare part is called without indicating the material from which it is made, but only for its intended purpose. sealant will not hurt in the right amount. but whether to use it or not is a personal matter, and the “gags” are taken from your text
Shouldn't it be coated with anaerobic sealant?
Of course, I don’t know the exact properties of this miracle, but it seems like it shouldn’t harden upon contact with oxygen, i.e. oil channels should not be clogged
The question here is not the properties of the sealant, but the correct application. When the engine heats up and comes into contact with hot oil, it will in any case get into the oil and the narrow channels will still become clogged, even if not completely. He won't dissolve. Hot oil is not oxygen.
Anaerobic sealants and adhesives are a special class of acrylic adhesives, which are liquid compositions of varying viscosity that can be stored for a long time (≥1 year) in thin-walled oxygen-permeable polyethylene containers without changing their properties and cure at a temperature of 15 - 25 ° C in narrow metal gaps
(in pores, threaded, flanged and cylindrical connections) with the formation of a durable polymer layer.
those. judging by the definition, it will harden only in the gap between the metal. And judging by its properties, it hardens only upon contact with metal... “Contact of the initiating system with metal promotes the formation of active particles - radicals, which are responsible for the depletion of oxygen and the occurrence of the polymerization (hardening) process. Therefore, the metal is a necessary component due to which the anaerobic composition is transformed from a stable liquid state into a transparent solid polymer.”
those. it will not dry out in oil, everything will settle in the filter.
It's more likely that the oil pan will clog
theory is theory, but in practice it is a little different, it depends on the amount of sealant in the lubrication system - I found examples on the Internet with clogged oil channels in the head, smeared in the second way using anaerobic sealant.
Of course, I don’t know the exact properties of this miracle, but it seems like it shouldn’t harden upon contact with oxygen, i.e. oil channels should not be clogged
I wish I could understand how they apply it at the factory.
Ask on the AvtoVAZ website. Or on a hundred official. Well, or look for those who assemble these internal combustion engines
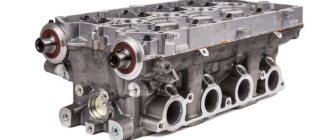
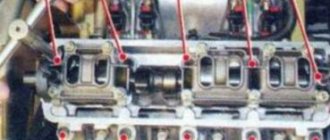
Head design
The 16-valve engine uses a cylinder head containing the following elements:
- Two camshafts. They have five supports, cast iron, each with 8 cams. It is impossible to install an exhaust camshaft instead of an intake camshaft (and vice versa).
- 16 valves. They are installed on guide bushings.
- Seats are installed directly on the block head, which come into contact with the valve plates.
- Hydraulic compensators in the amount of 16 pieces.
Camshafts are mounted on cylinder head supports. Compliance with the tightening torque of the VAZ-2112 cylinder head (16 valves, 1.5 liters) ensures normal engine operation. This will also allow you to avoid expensive surface milling after the next dismantling of the head.
Welcome to the website https://lada110atricom.ru
Many people have their own cars, of various brands, configurations, tuned and simply “gray” cars for everyday driving.
Some make various gadgets for cars with their own hands, some send them to special services, and others simply admire how people do it. Actually, this is what I would like to talk about – tuning! I didn’t have a car before and somehow didn’t need one, but in my heart I always wanted to sit, steer and enjoy the speed. The first step to buying a car was getting a driver's license, which I also went to study for spontaneously. In general, I studied for 3 months in DOSAAF and on February 29, 2008 I received my driver’s license. From time to time there was a desire to buy a car, but there was no money to buy it, and I began to think about it – “where should I go?”, it’s a 15-minute walk to work, the dacha has long been abandoned and it turns out that the car is not needed.
Time passed, years flew by, rumors circulated about a crisis. By that time, we had managed to save up a little cash, which we finally decided to invest in some kind of automobile before it disappeared. One wonderful morning, we got ready and went to the car market in Saratov to choose a car for me. I had to borrow a considerable additional amount of cash from friends, otherwise my savings were not enough.
We set off on the road, drove and drove, and finally arrived. Let's go to the market.
There were a lot of cars in Saratov, some not for our money, others too dead, in general, we wandered and wandered and saw a red VAZ2110 (my favorite color). After some time, after a lot of walking, it was finally decided to buy the first car I liked and finally go home.
The path to home was not close, about 200 km. At first, I thought that my friend would drive and drive my car to my native Kamyshin, but I still drove it back myself. This is my very first time when I drove for so long, because the last time I held it in my hands was back in February and that was for about 10 minutes. For the first 10-20 minutes I couldn’t come to my senses that I was sitting behind my own car, My hands were shaking a little and I still couldn’t believe that I was going. Literally, after driving 50 kilometers, I already began to feel much more confident, fell back on the seat and began to enjoy the trip.
Everything would be fine, but in Krasnoarmeysk at the traffic police checkpoint we were stopped to check our documents. And I stupidly took only my license with me, and the rest of the documents remained with my mother, who drove ahead in another car with a driver. Luckily they stopped about 300 meters from us. The inspector had to wait for some time, to which he made a menacing expression on his face. They brought the documents, checked everything, but still got to the bottom of the fact that there was no first aid kit, fire extinguisher and sign. And the fact that the car even had transit license plates and had just been purchased did not bother him; he had to pay some fine to the Inspector’s fund. We got into the car, refueled and hit the road.
We got home quickly, we drove for about 3 hours in total, although it could have been longer, but I was still a beginner at that time, and the car was not tested, you never know what would break down, so I kept the speed around 100-110 km/h . But still there was a desire to experience the drive and therefore I accelerated once to 155 km/h, the car behaved amazingly on the road, I remained satisfied throughout the journey.
Here is a short story about the steps to buying my first car, which is with me to this day and makes me happy. From time to time I do something for the soul in it, a little tuning, etc. what I will tell you about in my Logbook
.
Express your opinions about my work, and just like that, we can discuss something, further work, plans.
Hydraulic tappets
The valves are driven by cams on camshafts and hydraulic pushers. These elements are located inside the guide holes. With the help of hydraulic pushers, it is possible to automatically eliminate gaps in the valve mechanism. Therefore, when operating a vehicle, there is no need to adjust the thermal clearances of the valves.
In order for the hydraulic pushers to operate in normal mode, oil is supplied to them from the lubrication system. It is supplied through special channels in the engine block and cylinder head. Oil passes through these channels to lubricate the journals on the camshafts. There is a valve in the channel that prevents oil from draining from above after the engine is turned off. This allows you to maintain the system in normal mode until it stops completely.
Read also: Forscan extended version license key
Tightening process and diagram (on a 16 valve car)
16 valve engine of the VAZ 2112 car
But while you have not yet begun the procedure for tightening the cylinder head pins, you need to emphasize that each engine has its own torque and tightening pattern. As you might have guessed, this point will be different for each vehicle. In addition, several factors directly influence the torque indicator, and if you decide to engage in this process yourself, then it will be useful for you to learn about them:
- The tightening torque of the head is affected by the lubrication of the holes for the pins, as well as their condition, and, of course, the quality of the bolts themselves. In order for the torque to be set correctly, both the pins and the holes for them must be lubricated, and regular motor oil will do for this.
- If the thread of the hole or the pin itself is deformed, then it is better to refrain from the tensioning procedure. One way or another, over time this will lead to negative consequences.
Have you ever tightened cylinder head bolts?
Survey
- Yes
- No
Loading …
Required Tools
And, although this procedure requires a certain approach, its preparation will not take much time. The bottom line is that a large set of tools is not required directly to tighten the head pins. The only thing you need is some motor fluid and a special torque wrench.
Torque wrench for work on a 16-valve engine
If you do not have such a key, then you need to buy it in advance or borrow it from a car service center. You need just such a tool, since it allows you to determine exactly the tension moment. Currently, a more budget version of this tool costs about 200-250 hryvnia (600-800 rubles).
Stages
If you removed the head of the 16-valve VAZ 2112 engine, then first of all you need to install it in place.
- Before the actual process of tightening the head pins of a 16-valve engine, their length should be measured. The standard screw length is 135.5 mm. Be sure to check it out. If the length of the pin differs from the above, that is, either more or less, then the pin must be replaced with a new one.
- Take engine fluid and apply it to the bolt threads. This can be done using a brush.
- After this, you can begin installing screws on the 16-valve engine. Tighten them by hand first, then use a torque wrench. The tension torque should be 20 Nm + (69.4 - 85.7 Nm) + 90°+ 90°. That is, tighten the pins, observing the indicators 20 Nm + (69.4 - 85.7 Nm) in accordance with the data on the torque wrench, then turn each screw twice by 90 degrees. As for the tightening order, it is as follows. First you need to tighten the two middle pins starting with the bottom one. Then tighten the two screws on either side of the bottom pin in order. After this, the screws located on the sides of the upper middle pin are tightened. And then, in order, you need to tighten the bolts located at the corners of the cylinder head. The tightening torque procedure is shown in more detail in the photo.
1. After installing the cylinder head in place, lubricate the threaded part of the screws with engine oil.
2. Then, using a torque wrench, you need to tighten all the cylinder head bolts...
3...while observing the order of the bolt tension.
Remember that this component of the VAZ 2112 vehicle is one of the main mechanisms that determine the operation of the engine. Therefore, this issue of repairing the cylinder block should be approached with special care. If you do not have experience in carrying out such work, then it is better to entrust the matter to a qualified professional. After all, very often inexperienced motorists try to save money on repairs, which ultimately leads to even more disastrous consequences.
For example, if the screws are not tightened, this can lead to engine oil leakage and, as a result, condensation. And the appearance of moisture in the internal combustion engine will not lead to anything good. If the screws are overtightened, this may cause cracks to appear, which will necessitate repair of the unit.
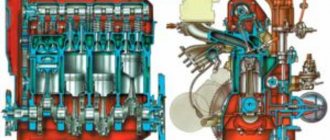
Schematic sketch of the VAZ-2112 engine
Detailed diagram of the VAZ-2112 engine.
1 – engine sump. 2 – front crankshaft oil seal. 3 – crankshaft. 4 – crankshaft pulley. 5 – oil pump. 6 – generator drive pulley. 7 – timing belt. 8 – front cover of the timing mechanism drive. 9 – coolant pump pulley (pump). 10 – tension roller. 11 – camshaft toothed pulley. 12 – rear cover of the timing mechanism drive. 13 – camshaft oil seal. 14 – exhaust camshaft. 15 – hydraulic pusher. 16 – valve spring. 17 – valve guide sleeve. 18 – exhaust valve. 19 – receiver. 20 – camshaft bearing cover. 21 – guide pipe. 22 – cylinder head cover. 23 – plastic cover. 24 – spark plug. 25 – intake camshaft. 26 – inlet valve. 27 – cylinder head. 28 – coupling. 29 – fuel rail. 30 – crankcase ventilation hose. 31 – nozzle. 32 – intake manifold. 33 – flywheel. 34 – crankshaft rear oil seal holder. 35 – rear crankshaft oil seal. 36 – cylinder block. 37 – oil dipstick. 38 – piston. 39 – connecting rod. 40 – connecting rod cover. 41 – crankshaft main bearing cover.
Camshafts
When repairing the head, it is imperative to check the condition of the camshafts. When assembling, follow the instructions and maintain the tightening torque of the VAZ-2112 cylinder head (16 valves). The Priora is equipped with such a motor - it is quite powerful, has excellent characteristics and does not require frequent maintenance. Two camshafts drive the intake and exhaust valves.
The camshafts rotate in special sockets, which are located directly in the head. The difference between camshafts is that there is a small belt on the intake. It is located near the very first support. To prevent axial movement, there are thrust collars - they are located on both sides of the support in front. At the front of both camshafts there are self-clamping type oil seals.
Valve System Features
On the VAZ-2112 car, the valve design is very similar to that used in the engines of the VAZ-2110 modification. Only their diameter of rods and plates is slightly smaller. Dimensions:
- The inlet valve is a plate with a diameter of 29 mm, a rod of 6.975 mm.
- The exhaust valve is a plate with a diameter of 25.5 mm, a rod of 6965 mm.
A spring is installed on each valve; its unloaded length is 38.19 mm. If there is a load of 240 Newton, it decreases to 32 mm. If a spring is subjected to a load of 550 Newton, its length is reduced to 24 mm.
16-valve 2008
16-valve 2008
Tightening torque of the VAZ-2112 cylinder head 16 valves: diagram, force The “smallest” of the 16-valve engines of the Volga Automobile Plant is the VAZ-11194 with a displacement of 1.4 liters.
Two 1.6-liter models are also being produced - the already somewhat outdated VAZ-21124 and its more modern and powerful version VAZ-21126, which is gradually displacing its predecessor on the assembly line. Note the graph with engine characteristics: at crankshaft speeds close to maximum, the characteristics The power and torque of the VAZ-11194 and VAZ-21124 are practically the same - and only at lower speeds is the “baby” inferior to its older brother. But engine 21126 is significantly - about 10% - more powerful and high-torque than the other two. Let's get acquainted with their filling
Let's get acquainted with their filling.
Cylinder blocks 21124 and 21126 are cast from cast iron. Compared to the previous one and a half liter analogue 2112, they are 2.3 mm higher (distance from the axis of the main bearings to the upper plane of the block). The cylinder diameter of engines 21124 and 21126 is the same - 82 mm. For selective engine assembly, 21124 blocks according to cylinder diameter are divided into five classes every 0.01 mm (A, B, C, D, E). Block 21126 has three classes separated by the same 0.01 mm (A, B, C). The cylinder class mark is located on the bottom plane of the block.
Other block sizes are identical. But there are differences in the requirements for processing the cylinder walls. Honing of cylinders 21124 is carried out according to the technology and requirements of AVTOVAZ, and 21126 - in accordance with the more stringent requirements of the Federal Mogul company, which have led to stricter requirements for the roughness of working surfaces. In order not to mix up the blocks, in addition to the markings made in the casting on the left wall of the block, the serial number is printed on the rear wall next to the fourth cylinder. Block 21124 is painted blue, and block 21126 is gray.
The cylinder block of the 11194 engine is similar in design to the 21126 block, but the cylinder diameter is smaller - 76.5 mm versus 82 mm. The processing of the cylinder walls is also in accordance with the requirements of Federal Mogul. Markings are in the same places, the block is painted blue. In addition, in block 11194 there are cooling jacket ducts between the cylinders, but 1.6 liter engines do not have them. For selective engine assembly, 11194 blocks are divided into three classes by cylinder diameter at 0.01 mm intervals (A, B, C).
The 21124 engine uses a 2110 connecting rod - steel, I-section, with a steel-bronze bushing in the upper head and axial fixation along the lower head (pictured above). The connecting rod cover is secured with two bolts pressed into the connecting rod. Based on the diameter of the bushing hole for the piston pin, connecting rods are divided into three classes every 0.004 mm. The hole class number is marked on the upper end of the connecting rod.
Engines 11194 and 21126 use connecting rod 11194, which is not interchangeable with connecting rod 2110. The new connecting rod, although it has grown from 121 mm to 133.5 mm, has become lighter - on average, it has “lost weight” from 683 to 412 g, which has seriously reduced inertial loads . Its axial fixation is ensured by the upper(!) head - along the piston. In this case, the steel part is in contact with the aluminum part, which reduces friction losses compared to the 21124 engine, where the steel connecting rod rubs against the cast iron surfaces of the crankshaft, and the friction speed is lower. The lower head, made using breaking technology, has become more elegant. Its cover is attached to the connecting rod with two bolts. Lengthening the connecting rod reduced the force of lateral pressure of the piston on the cylinder.
The new connecting rod is not divided into classes based on the diameter of the upper head hole - and there are no markings on it. But connecting rods are divided into classes based on weight. For connecting rod 2110 there are 9 classes, with a tolerance within the class of ± 5 g. The marking is lettered, stamped on the upper head of the connecting rod (F, L, B, X, M, V, C, N, G). Connecting rod 11194 has three classes, based on the number of black marks on the bottom cover. The difference between classes is ± 7 grams. On engine 11194 it is allowed to install connecting rods with one or two marks, for 21126 - with two or three.
The tightening torque of the connecting rod nuts 2110 of engine 21124 is 50.9 +2.6 N.m. The connecting rod bolts 11194 (engines 11194/21126) are tightened in two steps according to the method: 20 N.m + 135°. Connecting rod bolts 11194 are guaranteed to withstand three disassembly and reassembly. The first disassembly of the connecting rod was carried out during engine assembly at AVTOVAZ. A second disassembly at AVTOVAZ is also possible - for example, during selective engine quality control. Since in practice it is difficult to take into account the actual number of previous repairs, each time the connecting rod 11194 is disassembled, it is recommended to replace its bolts with new ones.