1. Drain the coolant from the engine.
2. We remove the tips of the high-voltage wires from the spark plugs.
3. Remove the cylinder head cover.
4. Remove the camshaft pulley.
The cylinder head bolts are accessible with the camshaft installed, but a socket wrench with a special head is required. The cylinder head can be removed complete with the receiver and exhaust manifold. But if the head is removed to repair it, then it is better to first disassemble it.
5. Removing the thermostat housing from the cylinder head studs.
6. Unscrew the nut and bolt of the upper fastening of the rear timing belt cover.
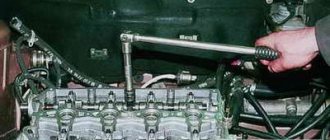
7. Using the Torx E14 wrench, evenly, in several steps, unscrew the 10 bolts securing the cylinder head.
8. Pull the rear drive belt cover slightly to the side
Timing belt, remove the cylinder head.
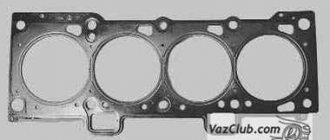
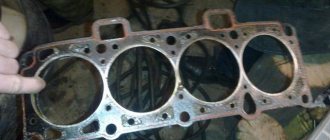
9. Remove the cylinder head gasket and remove the two guide bushings from their seats.
Installation
1. We wash the cylinder head from dirt and deposits with kerosene or diesel fuel.
2. Using a medical syringe or bulb, remove any remaining oil and coolant from the threaded holes of the cylinder block (under the cylinder head bolts).
3. We clean the mating surfaces of the head and cylinder block from the remains of the old gasket, and degrease the surfaces with a solvent.
When installing the cylinder head, always use a new gasket. Oil should not come into contact with the surface of the gasket.
4. We install the head guide bushings into the seats of the cylinder block.
5. We place the gasket on the cylinder block, and the guide bushings should fit into the corresponding holes in the gasket.
6. We install the head on the cylinder block. By slightly moving the head from side to side, we ensure that the guide bushings fit into the corresponding holes in the head.
Reuse of cylinder head bolts is permitted only if their length does not exceed 135.5 mm.
7. Using a caliper or a mechanic's ruler, measure the length of the bolts. Bolts longer than 135.5 mm are replaced.
8. Before screwing, dip the threaded part of the bolts into engine oil, then let the oil drain, waiting for about half an hour.
9. Install bolts and washers into the holes in the head.
10. Using a torque wrench, tighten the head bolts (in the sequence shown in the photo) in four steps:
— tighten the bolts to a torque of 20 Nm (2 kgfm);
— tighten the bolts to a torque of 69.4 – 85.7 Nm (7.1 – 8.7 kgf-m);
— turn the bolts 90°;
— turn the bolts again by 90°.
11. Further assembly is carried out in the reverse order of removal.
Frequency and signs of replacement
There is no specific time frame for replacing the cylinder head gasket on the Lada Kalina. Over time, it can become unusable under the influence of various factors. The gasket can break through in different places and, depending on the location of the crack, the signs of damage will be different. The symptoms will be the same for both 8-valve and 16-valve engines.
Symptoms of gasket damage:
- When the gasket breaks along the side of the cylinder circumference, gases begin to escape outward. At the same time, the noise level of the VAZ Kalina engine increases sharply, which will be immediately noticeable to the driver.
- A hole between the cylinders disrupts the operating mode and the engine begins to operate unevenly and triple.
- Destruction of the gasket with a rupture entering the coolant supply channels. At the same time, gases begin to enter the cooling system. One of the external signs of such a problem will be a decrease in the fluid level and the appearance of white steam in the exhaust gases. Gas bubbles may appear in the expansion tank. Another sign is the appearance of an emulsion in the oil, accompanied by an increase in the level of lubricant in the crankcase. Oil can also go into the cooling system, which is easy to detect by its presence on the surface of the liquid in the expansion tank.
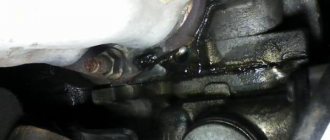
- Another indirect symptom of a gasket burnout is the appearance of stains or leaks of oil or coolant on the parting line of parts and on the side surface of the engine crankcase.
Countersinking saddles
When repairing the cylinder head yourself, be prepared for the most monotonous and lengthy process - countersinking. A lot depends on its quality:
- tight fit of the valve to the seat;
- compression ratio in the combustion chamber.
The seat grinding work is carried out with a special tool - a roller cutter (less often - a countersink). With its help, a not quite finished seat can be given the desired shape so that the valve fits more tightly. Start work with a countersink at 60 degrees.
As soon as metal removal has begun in a circle, change the nozzle - take a countersink with a cone angle of 120 degrees. Work with it until a clear round edge appears. The final stage of countersinking is done with a 90-degree cone - it should go through the working chamfer of no more than 1.5 mm. Further grinding of the valve will increase it to the required value.
Gasket selection
When purchasing a gasket, you need to know the type of engine installed on Kalina. There are two versions of 8-valve engines - VAZ 11183 and VAZ 11186. These engines have different piston groups and differ in many external elements. On the older version 11183, a thickness of 1.2 mm is used (article 21080-1003020-12, manufacturer ZAO Lada-Image), and the new 11186 requires a gasket with a thickness of only 0.43 mm. This nuance must be taken into account when choosing new parts. For a 1.4-liter 16 valve engine, a gasket 11194-1003020-00 manufactured by Federal-Mogul Corporation is required, or you can get a cheaper option from Trialli (GZ1015001).
Photo gallery
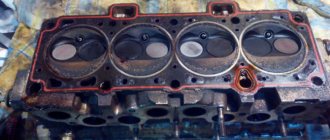
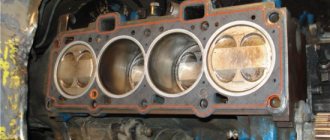
The photo below shows some stages of replacing the gasket on an 8-valve VAZ engine.
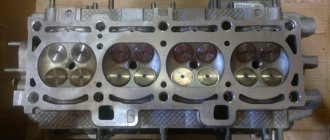
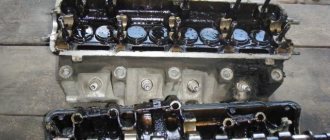
Engine with the valve cover removed Unscrewing the exhaust pipe from the converter Internal part of the engine cylinders with a damaged gasket The gasket itself Place where the gasket was punched Cylinders washed with gasoline Head removed from the engine Carbon deposits on valves and combustion chambers
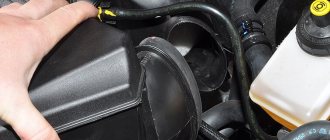
The photo below shows some of the stages of disassembling a 1.4 liter engine.
Removing the washer reservoir Removing the rail with injectors Dipstick guide Timing drive removed Camshaft gears removed Removing the camshaft supports Internal parts of the cylinders 16-valve head
How to replace it yourself?
Replacing a burnt gasket requires a large amount of work. Self-repair and replacement of the Kalina cylinder head gasket can only be carried out by an experienced car owner who has the skills to disassemble and reassemble engines. For novice drivers and people who are not confident in their capabilities, contacting a specialized service would be an advisable step.
Tools and materials
Before starting work, you need to find a room for the replacement and check the availability of the necessary tools and equipment.
The minimum set of tools and spare parts is as follows:
- new cylinder head gasket;
- 10 bolts for cylinder head with size M12 (article 026707, for motor 11183) and M10 (article 256632, for engine 11186);
- gasket for the junction of the catalytic converter and resonator housings;
- torque wrench up to 100 Nm;
- a set of hex keys and sockets (at least sizes 10, 13, 17 and 19);
- pliers;
- screwdrivers with different types of blades;
- rags for wiping;
- container for draining coolant.
It is not recommended to use old cylinder head bolts.
Step by step instructions (8 valves)
After preparing the tools, you can begin replacing. The gasket replacement procedure is quite lengthy and takes about 8-9 hours even for experienced craftsmen.
Below is an approximate sequence of actions when replacing the cylinder head gasket of a Kalina with a 1.6-liter 8-valve engine:
- Place the car over the inspection hole.
- Remove the fuse box cover located on the center console and remove the fuel pump fuse.
- Start the engine and drain fuel from the ramp. Turn off the engine.
- Disconnect the battery and remove it from the vehicle.
- Replace the fuse and cover.
- Unfasten the decorative plastic casing from the motor. To do this, you need to pull it up and pull off the rubber caps from the studs. Inspect these caps; damaged parts should be replaced.
- Remove the three bolts securing the upper part of the camshaft drive belt housing.
- Separate the cover and manually turn the engine crankshaft to TDC (top dead center) in the first cylinder. The guideline will be the coincidence of the notch on the camshaft gear with the notch on the rear of the housing.
- Remove the plug located on the clutch housing and check the location of the mark on the flywheel and housing. The marks must match.
- Secure the engine flywheel with a screwdriver through the hole in the crankcase and unscrew the camshaft gear.
- Remove the timing belt drive.
- Remove the ignition coil attached to the bracket with four screws.
- Remove the engine sump protective shield. Drain the coolant from the cylinder block. To do this, you need to open the expansion tank cap and unscrew the screw plug on the side of the crankcase. Pour the liquid into a prepared container.
- Disconnect the lines from the thermostat and throttle valve assembly.
- Separate the air duct from the throttle body and remove the air filter housing.
- Step by step disconnect the electrical wiring connectors for the idle speed (IAC), throttle position (TPS), fluid temperature and oil pressure sensors.
- Disconnect the ground wire from the engine.
- Disconnect the injector connectors.
- Remove the fitting and separate the fuel supply pipe from the ramp.
- Remove the two bolts securing the ramp to the intake manifold housing.
- Carefully move the ramp along the axis of the injectors and remove them from their seats on the manifold.
- Remove the brake booster hose attached to the throttle body fitting.
- Unfasten the intake pipe spacer mounted on the nuts.
- Remove the lambda probe connectors on the catalytic converter.
- Unscrew the receiving pipe going to the muffler from the flange of the gas neutralizer.
- Remove the neutralizer support bracket.
- Loosen the head bolts according to the diagram and unscrew them completely. When removing bolts, they must be removed along with washers.
- Remove the head from the engine.
- Remove the old gasket.
- It is advisable to send the removed head for surface milling, since it may have microcracks that arose when the engine was running with a broken gasket.
- After checking, you can put the head back, having first checked the presence and completeness of installation of the guide bushings.
- Thoroughly wipe the mating surfaces of the block and head from oil and coolant. Clean the bolt wells from liquids.
- Carefully wash the cylinders with gasoline to remove deposits.
- Place a new gasket on the block, centering it along the guide bushings. The channel for the passage of oil through the gasket is located between the third and fourth cylinders - it is important not to miss this moment.
- When reinstalling the head, it is necessary to set the position of the shafts corresponding to TDC in the first cylinder (according to the marks).
- Tighten the bolts according to the scheme in several passes - initial tightening with a force of 20 Nm, tightening with a torque of 70–85 Nm, the first turn by 90 degrees and the second turn by another 90 degrees. When installing the head, use only new bolts and lubricate them with a thin layer of engine oil, which will facilitate tightening.
- Reinstall all removed parts.
- During assembly, it is recommended to check and adjust the valve clearances, as well as check the tension of the drive belt and the correct timing of the gas distribution mechanism.
- Turn the assembled engine over by hand several times and re-check the timing timing.
- Start the engine, make sure there are no leaks or extraneous sounds. Warm it up, visually monitoring its condition.
- Remove the coolant pipes from the throttle body assembly. Release the air from them, gradually increasing engine speed. Put the tubes back on and add fluid to the tank to the normal level.
Sequence of loosening bolts
Bolt tightening procedure
Video from the Sdelaj Sam channel! Pljus interesting! Demonstrates basic methods for identifying faults and replacing worn parts.
Step by step instructions (16 valves)
Removing the head for replacement on such motors has its own characteristics that must be taken into account during disassembly and reassembly. The engine design is much more complex than the 8-valve version and requires careful assembly and subsequent adjustment of the valve timing.
How to remove the head from a 1.4-liter 16-valve engine with an injector, model VAZ 11194:
- By analogy with an 8-valve engine, it is necessary to drain the fuel from the line, remove the battery, decorative casing, and air filter. And also drain the coolant and disconnect all sensor connectors.
- Remove the breather pipe and vacuum booster hose.
- Disconnect the hoses from the throttle body and the throttle position sensor.
- Remove the ignition coils.
- Disconnect the wiring harnesses and fluid supply pipes from the windshield washer reservoir. Remove the tank itself.
- Loosen the tension on the accessory drive belt and remove it.
- Remove the camshaft drive belt guard and fuel rail. The injectors are removed using a scheme similar to the 8-valve engine.
- Move the generator towards the radiator and remove the oil level dipstick guide.
- Remove the receiver mount to the block head.
- Unscrew the lower timing belt cover.
- Unscrew the fastenings of the timing belt tension rollers and the crankshaft pulley and remove them together with the belt.
- Remove the camshaft gears.
- Unscrew the 15 bolts and remove the camshaft cover.
- Unscrew the 20 bolts that secure the camshaft supports.
- Remove the shafts.
- Remove the hydraulic compensators.
- Unscrew the attachment points of the neutralizer to the head.
- Disconnect all hoses from the thermostat.
- Unscrew the 10 head mounting bolts (according to the diagram).
- Remove the head and replace the gasket.
- Reassemble, taking into account the recommendations for the 8-valve engine.
Head removal procedure
Bolt tightening order
Rear suspension Lada Kalina / Lada Kalina (VAZ 1118, 117, 1119)
Tightening torques for threaded connections
Names of components and parts
Rear wheel bearing nut
Bolt nut for the lower shock absorber mounting to the rear suspension arm
Nut securing the rear suspension shock absorber rod to the body
Nuts of bolts securing the rear suspension arm to the bracket
Nuts securing the rear suspension arm bracket to the body
The rear suspension of the car is semi-independent, made on an “elastic” beam with trailing arms, coil springs and double-acting telescopic shock absorbers.
The rear suspension beam consists of two trailing arms connected by a U-shaped cross member. This cross-section provides the connector (cross member) with greater bending rigidity and less torsional rigidity. The connector allows the levers to move relative to each other within small limits. The levers are made of pipes of variable cross-section, which gives them the necessary rigidity. Brackets are welded to the rear end of each lever for attaching the shock absorber, rear brake assembly and wheel hub axle. At the front, the beam arms are bolted to removable brackets for the body side members. The mobility of the levers is ensured by rubber-metal hinges (silent blocks) pressed into the front ends of the levers.
The lower shock absorber eye is attached to the beam arm bracket. The shock absorber is attached to the body by a rod with a nut. The elasticity of the upper and lower connections of the shock absorber is provided by a rod cushion and a rubber-metal bushing pressed into the eye. The shock absorber rod is covered with a corrugated casing that protects it from dirt and moisture. In the event of suspension breakdowns, the shock absorber rod stroke is limited by a compression stroke buffer made of elastic plastic.
The suspension spring with its lower coil rests on the support cup (a stamped steel plate welded to the shock absorber body), and with its upper coil it rests against the body through a rubber gasket.
The rear wheel hub axle is installed on the flange of the beam arm bracket (it is secured with four bolts). The hub with a double-row roller bearing pressed into it is held on the axle by a special nut. The nut has an annular collar that securely locks the nut by jamming it into the groove of the axle. The hub bearing is a closed type and does not require adjustment or lubrication during vehicle operation.-
Rear suspension shock absorber spring: 1 - spring; 2 — rubber gasket; 3 — casing cover; 4, 10 — shock absorber rod cushion; 5 — spacer sleeve; 6 — shock absorber casing; 7 - nut; 8 — spring washer; 9 — support washer; 11 — shock absorber rod; 12 — shock absorber body; 13 — lower spring support plate; 14 — nut of the shock absorber lower mounting bolt; 15 - eye; 16 — bolt of the lower shock absorber mounting; 17 - compression progress buffer
Price issue
Changing the head gasket yourself will be quite inexpensive, since its cost ranges from 220 (for 8-valve engines) to 550 rubles (for 16-valve engines). In addition to it, you will need a gasket between the exhaust pipe and the catalyst, which costs no more than 100 rubles, and 10 new head bolts, costing 40–50 rubles each. Often the manifold gasket is damaged, which in this case must be replaced. A new part costs about 750 rubles. The total cost of spare parts will not exceed 1,500 rubles. It must be remembered that when disassembling and troubleshooting the engine, other parts may appear that need to be replaced.
Performing such work at a service station depends on the territorial location and ranges from 4 thousand rubles in small cities (Tula, Bryansk) and up to 10 thousand rubles in large cities (Moscow, St. Petersburg).
Loading …
Video
The video shows the identification of the malfunction and the process of changing a broken gasket on Kalina (by Sdelaj Sam! Pljus interesnoe!)
Good afternoon or evening everyone))
It’s clear from the title what kind of repair this is,
but a little background
)) Two days ago I noticed that the stove was blowing cold, well, I thought that the system was just airy, I removed the plug and everything seemed fine.
The day before yesterday the same picture happened again, I immediately thought it was the RB cover or the head gasket was broken, well, so as not to get too upset, I first decided to change the cover. Since the topic is familiar and the symptoms
were eerily familiar, the car gets hot, the large circle does not open and when you press the gas, antifreeze runs into the barrel, heat begins to flow into the cabin after 2000 rpm. But, as always, I hoped for the best)) At the same time, I saw that antifreeze was leaking on the block, and the thermostat gasket was leaking. We go to the store with Noun174 and buy a thermostat cover, a thermostat gasket and a new thermostat, I bought the thermostat because of a cold bottom hem (there were hopes). I changed the RB cover right away, while I was driving home the car returned to normal, it stopped heating up and heat began to flow into the cabin)) I thought about a miracle, but in the garage everything worked fine, since it was necessary to fix the leak. New Old
Do-it-yourself cylinder head repair for Kalina 8 cl.
Yarik, sorry, I fixed everything. This is just me, out of sadness and melancholy.
Added after 9 hours 27 minutes 19 seconds:
ZZZ, ADADAD, The valves knocked. I contacted the service station. – crack in the cylinder head. Now I'm waiting for a new one.((((
Mareman, Welding the 50ue head + the rest of the work on replacing the guide valves, etc. In short, this can be discussed, there is nothing irreparable.
Added after 14 minutes 36 seconds:
Don’t give them the old one, you can fix it and keep it in hot reserve. I already have another one, and by the way, my head is also welding and then it will go to figure eight, the cycle of nature