Regular and timely checking of the thermostat helps eliminate engine “boiling,” reduce its warm-up time, and also increase the efficiency of the stove. In addition, the temperature regime of the cooling system depends on its serviceability, which directly affects the life of the motor. From this article you will learn literally everything about this unit - why it is needed, what functions it performs, how it is structured and how it works. And most importantly, how to check the thermostat at home in several ways.
Purpose and functions of the thermostat
The thermostat is a valve that separates the small and large circuits of the engine cooling system. When the temperature of the coolant in the small circuit (engine jacket and heater radiator) reaches 85-90°C, the thermostat begins to open smoothly, allowing some of the liquid to pass from the small circuit to the large circuit (main radiator with fan and expansion tank). When the cooled liquid in the radiator flows back into the small circuit, the valve reacts to the decrease in temperature by gradually closing.
In general, a thermostat performs the following functions:
- Due to the fact that the coolant can only circulate through a small circuit when “cold”, the engine warms up to operating temperature as quickly as possible after the first start. This is achieved due to the fact that there is a relatively small volume of antifreeze in the small circuit, and at the same time it is not cooled in the main radiator.
- For the same reason, the stove, which is a radiator included in a small circuit of the system, warms up as quickly as possible.
- When the temperature of the liquid in the small circuit begins to exceed the norm (for VAZ cars this is approximately 85-90°C), the thermostat passes part of it into the main radiator, from which cooled liquid simultaneously flows. Thanks to this, the engine does not overheat.
- When the coolant temperature in the small circuit decreases, the thermostat gradually closes. Due to this, the normal operating temperature is automatically maintained at a given level.
This is the main purpose of the thermostat. Accelerated warming up of the engine and stove are secondary functions, although no less important.
Adviсe
The thermostat is a necessary part in any car. The choice of a new mechanism and proper operation are very important.
- When choosing a thermostat, you need to pay attention to the manufacturer. It is worth buying devices only from trusted companies.
- The body of the device must be made of brass or copper. Only these metals are heated evenly with antifreeze.
- After the vehicle has been idle for a long time, scale deposits or oxidation may occur in the element. It is necessary to disassemble and clean the locking mechanism.
- It is prohibited to dilute antifreeze with water in any, even small proportions.
- It is prohibited to operate the cooling system with ordinary, even distilled water. Water forms scale and it is very difficult to get rid of it.
- Also, do not operate the car with an empty thermostat. The absence of a valve will affect the operation of the engine, as it will be operated at insufficient temperatures.
Any problems with the thermostat must be corrected in a timely manner.
The design and principle of operation of the thermostat
In its simplest design, the thermostat consists of the following main parts:
- Frame.
- Poppet valve.
- Return spring.
- Valve stem.
- Capsule with temperature-sensitive filler.
In the cooling system, the thermostat is installed in such a way that when it is completely closed, the coolant circulates only through the small circuit, and when it opens, it flows into the large circuit. Thermostats with two valves are installed so that when the main valve opens, the liquid cooled in the radiator flows into the small circuit.
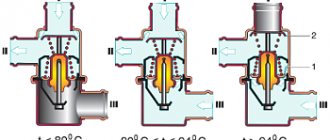
The thermostat works as follows. When the coolant temperature is between 85-90°C, the return spring presses the poppet valve against the base of the housing. Thermostat is closed. Liquid does not pass through it.
As the temperature rises, the filler in the capsule expands, increasing in volume. Due to this, the rod shifts, which, overcoming the force of the return spring, moves the poppet valve away from the seat. The thermostat opens slightly. Liquid begins to flow into a large circuit to (or from) the radiator.
When the temperature reaches 105°C (for VAZ cars), the filler in the capsule expands to its maximum, pulling (or pushing) the rod all the way. In this mode, the thermostat is fully open, that is, it allows the maximum volume of coolant to pass through.
Accordingly, as the temperature of the coolant decreases, the temperature-dependent filler in the capsule decreases in volume. Thanks to the force of the return spring, the poppet valve returns to its original position, covering or completely blocking the line. In the temperature range from 85°C to 105°C, the valve is in an intermediate position, smoothly changing the throughput of the line up or down.
Typical thermostat malfunctions and their symptoms
Despite its simple design, the thermostat can have several malfunctions, each of which leads to disruption of the thermal conditions of the running engine. Let's look at the main defects and their symptoms:
- Thermostat is stuck open . The main symptoms are that a cold engine takes a long time to warm up and does not reach operating temperature in winter. The stove doesn't heat well.
- The thermostat is stuck in the closed position . Symptoms - the engine overheats (the arrow on the dashboard goes off scale), although the radiator is almost cold and the fan does not turn on.
- The thermostat starts opening too early . Symptoms - the engine temperature does not reach normal, the heater is not working at 100%.
- The thermostat opens too late . The engine runs in overheating mode, the arrow goes off scale, and only after that the radiator and its fan come into operation.
Let's briefly go through the possible reasons why the described troubles arise.
In the open position, the thermostat jams, as a rule, for two reasons. Firstly, due to damage or wear of the return spring. Secondly, due to a violation of the capsule with a temperature-sensitive filler. There are also cases when solid debris (for example, scale) gets between the rod and its stop, and it cannot return to its original position.
In the closed position, the thermostat jams most often due to depressurization of the capsule with the temperature-dependent material. As a result, the poppet valve is pressed to the base by the return spring, and the force of the expanding substance is not enough to move it from its place.
If the thermostat opens too early, then either the return spring or the temperature-dependent filler are to blame. When the spring loses its original properties, it holds the poppet valve with less force. As a result, it begins to open slightly before the desired temperature is reached.
The reasons for a valve opening late are approximately the same as in the case of a valve jamming in the closed position. Sooner or later, such a thermostat will inevitably jam.
Without removing it from the car: how to check the thermostat for serviceability using the engine radiator pipes
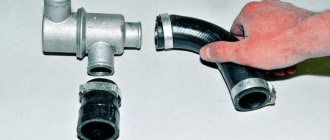
The main heat exchanger is connected to the engine cooling system by two hoses: inlet and outlet. The direct function of the thermostat is to connect/disconnect the heat exchange device by opening/closing one of the tubes at a temperature of 82-87°C. Which one is decided by the engine manufacturer.
Which hose should I touch?
Before you check the thermostat without removing it from the engine, you need to find out where it is installed: before the radiator or after it. This affects which pipe will be used to assess the regulator’s performance:
- Upper - in systems with a thermal switch located in front of the heat exchanger (for example, Lada Granta).
- Lower - in designs with a thermostat after the radiator (for example, VAZ 2110, Hyundai Solaris, Peugeot 308).
Norm and deviations
The diagnosis is made by the temperature of the hose. There are two methods for assessing it: approximate (by touch of the hand) and accurate (with a pyrometer). It is necessary to start diagnostics immediately after a cold start of the engine, examining the degree of heating of the upper or lower tube (depending on the thermostat layout):
- The tested hose was cold for some time, and the rest were hot, then became warm. If a pyrometer is used, at this moment the temperature of the pipe rises sharply to the point at which the thermostat opens. The thermostat switched the flow to a large circle. OK.
- The blocked tube immediately began to slowly warm up. The thermal switch is constantly open, and antifreeze circulates through the radiator when the engine is cold. Defective - stuck in an open, intermediate position or does not close completely.
- The hose being examined is constantly cold; according to the sensor on the dashboard, the temperature of the power unit has reached operating temperature. The thermostat is stuck in the closed position, the coolant constantly moves in a small circle. Defective.
Ways to check the functionality of the thermostat
From all of the above, we can conclude that the performance of the thermostat is a very important factor influencing the temperature regime and engine life. Failures are especially dangerous when the thermostat opens late or does not do so at all. Such a defect threatens not only a decrease in the engine’s service life, but also its immediate failure. When the thermostat opens early, or freezes in the open position forever, this is not a critical failure. But because of it, the engine will take longer to warm up, and in winter it will not be possible to warm it up to normal temperature at all. Accordingly, you won’t have to wait for heat from the stove either.
That is why it is important to monitor the condition of the thermostat, promptly identify its malfunctions, and eliminate them. Unfortunately, this part is not repairable, so such breakdowns can only be repaired by replacement.
Now about how to check the operation of the thermostat. There are several ways to do this, and below are the five simplest and most accessible ones. At the same time, four of them allow you to check the thermostat without removing it, that is, without draining the coolant and disassembling the cooling system.
Method number 1. Time to warm up the engine to operating temperature
This method is only suitable for those car owners who more or less “know” their car and its “habits”. If the day before the engine reached operating temperature an order of magnitude faster than now, then most likely the thermostat is to blame.
This method works especially well in winter, when the temperature outside is below freezing. Under such conditions, if the thermostat is stuck in the open position, it will never be possible to warm up the engine to operating temperature. The coolant will constantly pass through the radiator, and will have time to cool faster than the engine will heat it up in the jacket.
If the thermostat is working properly, then the coolant temperature needle begins to rise vigorously within the first minutes of warming up the engine, even in cold weather.
This diagnostic method allows you to identify only one of the thermostat breakdowns described above. If, for example, it is jammed in the closed position, or it begins to open late, it is not possible to determine these defects by the time the engine warms up.
Method number 2. Behavior of the coolant temperature indicator during engine operation
To identify thermostat defects using this method, it is enough to know how the coolant temperature behaves when it is working properly. The method consists of monitoring changes in engine temperature conditions while driving (or parking with the engine running).
When the thermostat is working properly, looking at the arrow on the dashboard (or at the digital temperature display), you can see the following picture. After the engine warms up, the needle will reach a certain maximum value, and without special loads it will not change its position sharply.
If you put an increased load on the engine - go up a long hill, or on a bad road in first/second gear, you will notice the moment when the needle (or digital thermometer readings) sharply changes its position downward. This indicates that the thermostat, due to a sharp increase in the temperature of the coolant, opened completely, and the cooled liquid in the radiator “gushed” into the small circuit.
If the thermostat is faulty, then such sharp drops in temperature will never be observed. If the thermostat is stuck in the open position (or it opens too early), then the needle will smoothly move in the lower zone of the scale, usually not up to half the norm. During sudden loads, the temperature will rise steadily, and you will not notice any sudden drops. A smooth decline will be observed only when the radiator fan turns on or the load on the motor decreases.
Method No. 3. Approximate measurement of actual coolant temperature
The check is carried out only on a completely cooled engine. An approximate measurement of coolant temperature involves tactile probing of the rubber pipes of the cooling system.
Attention! Do not touch any metal parts of the engine (thermostat housing, radiator, etc.) as this may cause serious burns.
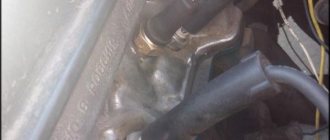
First we need to find the pipes we need. The first one must be part of a small circuit. Ideally, find the one that is the thermostat input. The second pipe, which is needed for testing, is the inlet to the main radiator. As a rule, it is easy to calculate - it approaches the radiator closer to its upper part.
Start the engine. Go to the required pipes, and (if the design of the engine compartment allows it) and grab them with your hands - one with your right, the other with your left. If the small circuit pipe becomes noticeably warmer, but the one that goes to the radiator remains cold, then the thermostat is definitely not stuck in the open (or slightly open) position.
Unfortunately, this simple method cannot determine whether the thermostat opens in a timely manner or whether it is stuck in the closed position.
Method number 4. Accurate measurement of actual coolant temperature
This method is the best of all those described, as it allows you to identify almost all typical thermostat failures. And very accurately. But to implement it, you will need a device that can accurately measure temperature in the range from 20°C to 150°C. There are two types of devices available for home use that have this ability.
- The first is a multimeter with a temperature measurement mode. In addition to standard probes, such devices include a so-called thermocouple. These are two wires that connect to a multimeter, and at the other end there is a sensor that “measures” temperature (measuring in quotes because this sensor does not measure temperature, but changes its electrical resistance depending on the temperature). The advantage of this device is its low price (a couple of dollars for a fully functional version). However, there are also disadvantages. The first of them is not very high accuracy. Second, the thermocouple must be fixed to the measurement object, and in such a way that the ambient temperature does not affect the measurements.
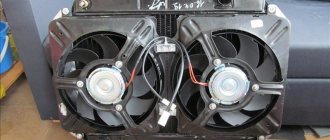
- The second device is called a pyrometer . Nowadays, thanks to the Chinese, such a device can also be bought at a very reasonable price. The accuracy of cheap pyrometers, of course, is inferior to professional models (which cost a thousand dollars), but for the task considered here, it is more than enough. The advantage of the device is that it can be used to measure the temperature of the cooling system pipes anywhere from a short distance (and even in several places almost at once, and compare the readings).
Let's start with a cheaper option - a multimeter with a thermometer function. Its sensor must be taped with electrical tape or tape to the thermostat inlet pipe (small circuit). Next, the engine is started and observations are made. If the thermostat is working properly, the readings of the device will increase to 80-90°C, after which they will begin to “float” in this area. At the same time, while the specified temperature is reached, the pipe going to the radiator will remain cold.
In this way, you can determine the approximate opening temperature of the thermostat, and also determine whether it opens too early, or whether it is stuck in any of the positions.
Using a pyrometer, the test is carried out in a similar way, but due to its ease of use, the temperature can be simultaneously monitored both on a small circuit and beyond.
Method No. 5. Thermostat test in a container of water
To perform this test, the thermostat must be removed. This method is also good for testing a new thermostat you just purchased. To implement it, you will need metal utensils and an immersion thermometer capable of measuring water temperature up to 120°C.
The thermostat is suspended in a container of water so that it is completely in the liquid, but does not touch the bottom or walls of the dish. This is necessary so that the thermostat works precisely from the heating of the water, and not from the heat of the container (its temperature is much higher). A thermometer is lowered into the same dish and the water is heated on the stove.
A working thermostat will begin to open exactly at the temperature that is engraved on its body. For VAZ models this is 85-90°C. Foreign cars may have more.
In total, this method will allow you to determine at what temperatures the thermostat begins to open, opens completely and closes.