Our next job, this time we designed a box for two Ural Molot 12 subwoofers. These speakers are reluctant to reproduce low bass, of course, you can greatly increase the net volume as we did here. But as a result, for stable operation it is necessary to limit the supplied power.
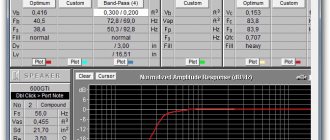
This time we did not make a large volume. The subwoofer has a hard and fast bass, which is perfect for fans of rhythmic music with high bass, for example, rock, dnb, pop. Due to the clamped volume, the frequency response shows that a small hump appears in the region of 45 Hz.
But it’s difficult to say that the subwoofer only plays high bass.
Preparation
To make a subwoofer enclosure yourself you will need:
- Drawing;
- Materials: plywood or MDF, glue, screws, terminal block, wire for connection;
- Tools - jigsaw, screwdriver, pencil, template for mounting hole or compass.
Drawing
Having the housing parameters for the subwoofer in hand (volume, area and length of the port), you can make a drawing yourself using special programs (in my opinion, SketchUp from Google is the most convenient for this). But if you make the box for yourself, then there is no point in wasting time learning the software and doing everything the old fashioned way - by hand.
If you do not know how to calculate the enclosure, then read the material “How to calculate the enclosure for a subwoofer.” You can also order a paid estimate on the Internet; as a rule, it is accompanied by a clear drawing for manufacturing.
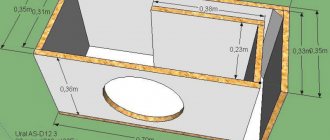
An example of a drawing of a housing with a bass reflex (FI)
Materials and fasteners
Housing material
In order to make a box for a subwoofer, you need a material that should vibrate as little as possible. From experience, it is best to use MDF (not painted, not laminated, etc.)
MDF (MDF - Medium Density Fiberboard). In Russian - medium density fiberboard.
MDF is easy to process, has good density, due to its structure it has no resonances and does not delaminate - the bass in such a box is soft and dense. MDF is more expensive than plywood and is “afraid” of moisture.
Plywood is the most common option and costs less than MDF.
Do not use chipboard or old furniture to make subwoofer boxes. A plywood or MDF body will always sound better.
If the walls are thick enough, there is no need to cover the inside of the body with vibration insulation, etc.!
Do not use material thinner than 18 mm. and the larger the volume of your case, the thicker the walls should be.
Many large stores that sell sheet material offer a cutting service to your dimensions, where they will cut the perfect parts for you on a machine, all that remains is to assemble the body.
Fasteners
For fastening, it is best to use yellow self-tapping screws with a length at least 2 times the wall thickness. The heads of black ones often break off; they are thinner and not as strong. An advanced solution is furniture bolts, but if this is your first sub, then it will be easier with self-tapping screws.
Yellow screws, black screws, furniture bolts.
Cage nuts for attaching the subwoofer to the cabinet are cool! The sub can also be secured with self-tapping screws, but with bolts in the mountings, the speaker is attracted as tightly as possible, and if necessary, it can be removed and installed as many times as necessary without damage. And the polished hex bolts look really cool.
Bolt with cage nut
If you are sawing the walls with a jigsaw or a hand-held circular saw, then the glue will additionally act as a sealant between the uneven edges; any liquid wood nails will do for this. If you unraveled the material on the machine and the edges of the body walls are perfect, then you do not need to use glue; it will be enough to coat the joints from the inside.
Terminal block
You can route the wires directly, but it is better to make a box for the subwoofer with a terminal block.
Terminal block for housing
Use threaded options - they are more reliable. For round seats, it is convenient to cut a hole using a nozzle.
Wires
You will need a piece of wire to connect the subwoofer coil to the output terminal block. Take any copper wire no thinner than 4 mm. in most cases this will be sufficient.
Tools
- Circular saw - for cutting material, it can be either manual or stationary, it all depends on your capabilities. It is better not to cut with a jigsaw, the edges will be too uneven, even if you attach a guide bar, since the file can still wander.
- A jigsaw is for cutting out holes for the speaker and for the terminal block, it can also be a router, with its help the holes will be smooth and neat. To cut out the wall for a round terminal block, you can use a saw attachment. Select the right jigsaw blade for the job at hand.
- Screwdriver - for tightening screws and drilling holes.
Connection
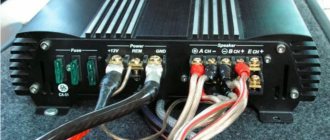
To connect a passive subwoofer to an amplifier, the same types of wires are used as acoustic ones as for powering the amplifier.
A subwoofer is a very energy-intensive component of the system, and also has a low resistance of no more than 4 ohms. The current at the amplifier output can reach tens and even hundreds of amperes. In this case, losses in the wiring increase significantly, affecting the volume and sound quality. The greater the resistance of the wire, the more of the amplifier's power is spent on heating it and does not reach the speaker.
The subwoofer connection diagram depends on the amplifier. To a single-channel, the low-frequency speaker is connected in the same way as all the others, to the positive and negative terminals. To two-channel - via a bridge circuit, using the positive terminals of each channel.
Bridge circuit for connecting a subwoofer to the output of a two-channel amplifier
All work on connecting the subwoofer should be done after first disconnecting the car battery.
Cutting parts
So, you have decided on the shape for the sub box and you have a drawing.
Mark the sheet according to the parts and cut according to the marked dimensions. Use a disk with a large number of teeth; the smaller the tooth size of a circular saw blade, the fewer chips you will get, and their size will be insignificant.
If you use a manual circular saw and your hand is not full, it is better to use a guide so as not to accidentally “fill up” the cut.
It is better to do this work together, since it is quite inconvenient for one person to turn large sheets and hold them while working.
Below is a good video from Rockford Fosgate, albeit in English, but everything is clear here without translation - choosing the shape of the body, lining up the parts, cutting.
Subwoofer enclosure assembly
To properly make a box for a subwoofer, before screwing in a self-tapping screw, drill a hole for it with a thin drill, this will increase the strength of the fastening and protect the plywood from delamination. Distribute the number of screws evenly along the length of the side and make sure that they do not meet at the corners.
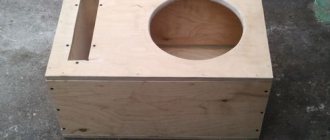
Almost always a template for cutting out the mounting hole comes with the sub; it can be part of the box or be a separate attachment. Cut out the template, transfer it to the front side of the box and cut it out with a jigsaw or router.
Template for mounting hole (cut from box)
If you don’t have such a template, you’ll have to arm yourself with a compass. When marking and cutting out the hole for the speaker, be very careful! The basket shelf is almost always narrow. If you cut less than required, the subwoofer basket will not fit into the hole; if you cut a little more or not exactly, the sub will not fit tightly or the mounting screws will hang in the air.
For heavy subwoofers, it is recommended to make the front wall of the housing double to eliminate vibrations during speaker operation.
Double front wall
With large dimensions of the case, double walls may not be enough and in some cases it will be useful to use spacers.
Options for struts and stiffeners
Please note that all wire entry channels, terminal blocks, etc. must be sealed, internal partitions (port walls) must not have any gaps.
Features of accommodation
In the confined space of a car, the human brain is not able to determine the direction to the source of low-frequency sound. Therefore, unlike mid- and high-frequency speakers, the location of the subwoofer does not affect the naturalness of the sound and can be anywhere. But you can’t attach an impressive column just anywhere. To save limited space, it is usually hidden in the trunk.
There are not many options for placing a subwoofer in the trunk of a sedan or hatchback:
Installing a subwoofer behind the back of the seats with a diffuser in the trunk is a common solution. When choosing this option for a sedan, it is necessary to ensure an acoustic connection between the trunk and the interior.
Installing a subwoofer behind the back of the seats with a diffuser in the trunk is a common solution
The total area of the holes between them must be no less than the area of the diffuser. To fulfill the condition, you may need to “clarify” the shelf: cut an additional hole in it and disguise it with a mesh or lattice. The same applies to the option of placing a subwoofer in the rear wing of the sedan.
The total area of the openings between the trunk and the sedan interior must be no less than the diffuser area
In a hatchback and station wagon, where the trunk is not isolated from the passenger compartment, installing a diffuser towards the rear works better and can even create an additional increase in sound pressure. The wing subwoofer provides deeper bass.
The low-frequency speaker in the armrest of the sedan's reclining seat reproduces sound more accurately, since the speaker works directly into the cabin.
The low-frequency speaker in the armrest of the sedan's reclining seat reproduces sound more accurately
The size of the “window” for the speaker should not be less than the area of the diffuser. The subwoofer body is installed as close as possible to the back of the seat; sound “leakage” through the cracks affects the quality of its reproduction.
Placing the subwoofer in the rear shelf with the diffuser facing up is the most advantageous solution. The speaker, as in the case of the armrest, works in the interior. In addition, the rear glass acts as an acoustic load, providing additional bass boost.
Placing the subwoofer in the rear shelf with the diffuser up is the most advantageous solution
The subwoofer speaker in the trunk floor (in the spare tire niche) of the hatchback and station wagon is actually installed in a large flat surface, which has a positive effect on the reproduction of low frequencies. In this case, you should take care of protecting the head and figure out where to attach the spare wheel.
The subwoofer speaker in the trunk floor of hatchback and station wagon is actually installed in a large flat surface, which has a positive effect on the reproduction of low frequencies
How to make a subwoofer box
When figuring out how to make a subwoofer with your own hands, you need to choose the body material, perform some calculations and drawings, and also follow step-by-step assembly instructions.
What to make from
Different materials are used in the manufacture of subwoofer boxes. But most often, craftsmen create boxes from chipboard or MDF, since such boards are quite reliable and affordable.
However, today transparent plastic or plexiglass is in demand, allowing you to recreate a special effect in the hi-tech style. However, wood products have better sound quality than options made from other materials.
When assembling a subwoofer box, you cannot use simple wood or plank panels. These must be structures with special dispersion, i.e. plywood, chipboard or MDF. When choosing plywood sheets, preference should be given to multilayer options, which are characterized by the following advantages:
- High quality sound in the cabin.
- No rattling or interference problem.
- Vibration resistance.
Other materials do not have such properties, so experienced craftsmen choose only plywood. But in addition to plywood or chipboard, you will need to prepare related elements, including fabric for sound insulation. It is sold in specialized audio equipment stores or on the market. You also need to prepare a construction stapler with staples, glue 88 and metal corners to increase the strength of the structure at the corners.
If you choose the right manufacturing materials, making a subwoofer enclosure with your own hands will be quite simple.
How to calculate a box
To calculate the box, you can use special computer calculators such as WinISD or JBL Speakershop.
In the empty fields you need to enter the initial data for calculating the boxes, including the parameters of the speakers from the database or other sources. You can also use the software to find the best option for accompanying components for the best sound.
It is not difficult to carry out calculations for a closed-type subwoofer enclosure, since such a system is the simplest to implement and does not require high accuracy of values. To determine what volume of the box is needed, you can use special formulas based on 3 speaker parameters to select the internal volume.
If the nameplate value of the resonant frequency to quality factor is less than 100, such a speaker is not suitable for closed boxes.
When using formulas for calculations, you must adhere to the following requirements: the resonant frequency cannot exceed 50 Hz, and the quality factor cannot exceed 0.7.
If you need to calculate the volume of a bass reflex box, it is better to give preference to speakers with a quality factor of 0.3-0.5 and a ratio of resonant frequency to quality factor of 50. You will also need to determine the dimensions, cross-sectional area and length of the pipe.
Calculation of the body of a car with your own hands is carried out according to the same principles as when arranging a closed structure, but taking into account the permissible quality factor of no more than 0.6-0.65.
The length of the bass reflex is calculated so that it corresponds to the recommended value.
A 12-inch subwoofer box should have a volume of 47-78 liters. A box for an 8-inch device can have a volume of 20-33 liters. If you need to organize a box under 15 inches, a calculation of 79-120 liters is taken.
How to assemble
When starting to assemble a cabinet for an 8, 10 or 12-inch speaker, you need to study each step of the work ahead and follow the step-by-step guide. First of all, you need to create a beautiful box:
- The outer surfaces where the head is located are made double. Therefore, it is better to use 2 sheets of plywood. If the thickness of 1 material is 18 mm, when assembled it should be 36 mm, which will increase the degree of rigidity. You can also make a small hole in the first sheet, and a larger one in the second, so that the head is recessed into the body.
- Next, you need to glue the sheets together with a special adhesive base and secure them with self-tapping screws. Fasteners must be placed on every 1 cm² of surface, i.e. every 3-5 cm.
- To connect the walls of a box for 2 or more speakers, furniture screws, rather than self-tapping screws, are used. This type of work will require the use of an electric drill and glue. The presence of screws contributes to better fixation, since they do not deform even with prolonged use.
- The triangular strip is glued inside the box at the corners. It is necessary to increase rigidity and prevent deformation. Similar actions are necessary for a 10-inch or 15-inch subwoofer, since they have increased dimensions.
When constructing a homemade car box, it is important to take care of good protection for the body. For this, craftsmen use different materials and methods:
- In order to increase the moisture protection of the box for an 8-inch subwoofer (10, 12 or 15 subwoofer), the surfaces are coated with a special varnish impregnation.
- The internal parts are glued with vibration-isolating material, which protects the structure from negative influences and increases the degree of rigidity. Someone applies such a coating to the outer parts, which gives good low frequencies.
- The joints and connections require special attention, since the crossover wires and other elements of the audio system are located there.
What's the result?
As you can see, the decision to make a housing for a subwoofer in a car with your own hands will require certain skills and tools. However, if you do everything correctly and use good quality materials, you can get a fairly powerful sub with good sound.
Finally, we note that after connecting the subwoofer, you also need to configure it. Only after proper adjustment and tuning of the subwoofer will the sound “reveal” to its fullest, which will allow you to fully customize the car’s acoustic system in the future.
How to set up a subwoofer in a car. Amplifier settings: frequency, phase, Gain, subsonic, etc. What to look for when setting up a subwoofer, recommendations.
Installing a subwoofer in a car: how to choose a subwoofer, installation diagram for a subwoofer in a car. Connecting a subwoofer through an amplifier or without an amplifier, recommendations.
How to connect a radio in a car yourself: sizes of radios, adapter frames. Features of connecting the radio if the connector does not fit. Recommendations.
Selecting PTF for VAZ 2114 and 2115: how to choose VAZ fog lights (housing, type of lamp, standard or universal, etc.). Installation of fog lights VAZ 2114, 2115.
How to connect PTF in a car yourself: do-it-yourself fog light connection diagram. Subtleties and nuances, what to pay attention to when connecting.
How to install a child car seat or infant carrier in a car: choosing a child seat, mounting features, installation location of the seat. Tips and tricks.
After preparing all the tools and materials, work on the construction of the structure can begin. Making a box for a 12-inch subwoofer with a diameter of 30 cm is quite simple. First of all, you should make a hole for the future speaker, maintaining a distance of 20 cm from the center to the walls.
Next you need to follow the following instructions:
- We are preparing the main elements of the future homemade building. Their parameters are calculated in advance on a trusted resource with online calculators.
- We make a hole in the front of the plywood sheet or MDF, chipboard.
- We cut a slot above the hole for the bass reflex tube and screw the compartment.
- We glue the side elements with PVA glue and fasten them with self-tapping screws. It is important to tighten the fasteners all the way, as any voids will negatively affect the sound quality.
- We cut out places for the wires at the back of the case.
- Before connecting all the components, we place the speaker in the box.
- The final stage involves finishing the interior space. Joints and crevices should be sealed with caulk or epoxy to improve sealing.
- External finishing consists of covering the body with carapet fabric. The carapet is stretched and secured with epoxy or a furniture stapler.
After completion of all stages, final assembly is carried out with connection to the standard car radio.
Since the closed bass reflex box (FI) is large in size, car owners prefer to install a compact “Stealth” subwoofer made by themselves. The mini model provides clear sound over a wide range of frequencies and takes up less space in the car.
In most cases, the box for the 10th subwoofer is placed in the trunk, but some people practice mounting it in the fender or spare tire niche.
The optimal volume for uninterrupted and high-quality operation of the device is 18 liters if 12-inch subs are used.
To properly make a box for a subwoofer, you can consider a simplified option by creating a closed box. It is created according to the same principles as the bass reflex model, but without making a gap. The ZYA has a hole for the speaker, so its design looks quite simple.
All kinds of bandpasses represent a full-fledged bass reflex, but in a modified format. Therefore, assembling a homemade sub is quite simple.
The most complex design is considered to be a subwoofer in the form of a horn. Due to the complexity of manufacturing, novice craftsmen abandon this option, preferring more simplified models. However, the horn is distinguished by volumetric lows and provides deep sound at all frequencies. But any deviation from the drawings will make all efforts useless, because... The sub won't sound right.
Therefore, experts recommend choosing the option of a closed box or bass reflex box for the subwoofer. The bandpass is also characterized by its simple design.
When assembling a box for a subwoofer, it is important to follow all safety rules and be careful. The work involves the use of piercing and cutting objects, as well as electric tools. The use of faulty devices is prohibited.
DIY repair
If the audio system fails, you may need to repair it yourself. The reasons for this problem are:
- Mechanical damage.
- An unacceptable sound frequency reaches the head, which leads to its burnout.
- Diffuser wear.
- Loudspeaker failure. You can repair the speaker yourself, without resorting to the help of specialists.
First you need to dismantle the head, being careful and clean. Otherwise, the coil sleeve may be damaged.
Having gained access to the sleeve, you need to unwind the old wiring and determine the number of turns in the layer and coil. The more accurate the calculations are, the faster and better the repair will be completed. Next, you need to evaluate the diameter of the wires using a micrometer. A caliper is also used for such purposes, but the accuracy of its measurements is low.
Repairing a passive speaker by rewinding is not difficult. To do this, strips of paper are prepared, which are inserted in a circle in the places of the body and coil. If the rules are followed, the gap will be uniform.