In this publication we will tell you why the rear view camera sometimes does not work in a car. By the way, this is a very capricious gadget! There are many reasons why it may stop functioning, from weather influences to internal problems. We will try to give all existing explanations, and also, of course, indicate ways to solve each problem.
Ready? Then let's go!
First, a little advice! If you are the owner of a new rear view camera with a warranty period that has not expired, but it has stopped working, it is better to entrust the search for the cause of the malfunction to the service center specialists.
After all, it's their job!
But, it’s better to first try to find the malfunction of an old rear view camera yourself. It is quite possible that you will be able to solve the problem yourself, without expense or much hassle.
Typical malfunctions of the rear view camera
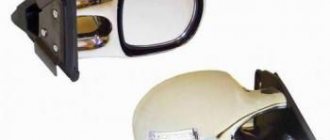
Most often, this device is located in three places in the car. This is either a trunk lock (handle), or a frame for the license plate light, or it can be installed in the passenger compartment (in station wagons).
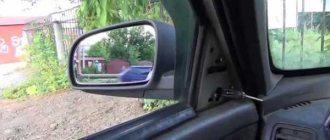
As practice shows, cameras that are installed directly in the cabin suffer the least from any problems. After all, they are not exposed to aggressive environmental influences. This impact primarily refers to moisture entering the device.
Water getting inside the device can lead not only to its complete failure to work. Image defects may occur. Often, car owners complain that the camera does not show an image or the picture looks cloudy. Most likely, the reason for this is moisture getting into the rear view camera.
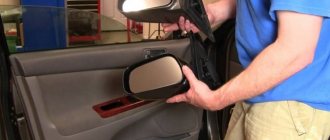
Troubleshooting methods and dismantling the device
Every car owner has two ways to repair a rear view camera. The first and simplest one is to send it for repair. You can contact your manufacturer's service center. If the car is still under warranty, this must be done. Repairing it yourself will void your warranty.
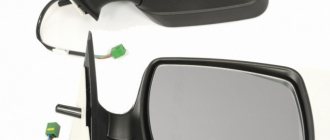
Main board and contacts
But it is often cheaper and easier to carry out simple repairs yourself. If the rear view camera stops working or there are malfunctions, you can try to repair it.
The instructions will be given using KIA cars as an example.
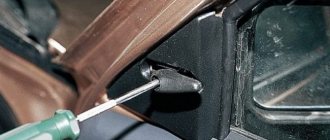
- If the rear view camera does not turn on automatically or at all, to remove it, you need to remove the entire trim.
- To do this, first remove a small panel at the top, under which the bolts are hidden. Remove them to remove the bulk of the trim.
- Underneath you will find four nuts that secure the trunk handle. The camera itself is secured with two self-tapping screws, and two more secure its connector.
- You may encounter traces of corrosion. Remove it first, and then you can disassemble the device.
- The body is secured with four self-tapping screws. When you disassemble the device, be careful - they may oxidize.
- If there is moisture inside the chamber, it will need to be dried. Clean with a brush and then coat the boards with varnish to protect them from moisture.
- There are usually two gaskets in the chamber. One is located on the camera eyepiece, and the other is located at the junction between the plastic parts of the camera and the metal body. Both could become unusable after a certain period of use. Replace them if necessary.
- Reassemble the camera, proceed in the reverse order, having previously treated all joints with sealant. It is better to use butyl rubber.
Restoration on Hyundai IX35
The crossover is powerful and stylish, but when the Hyundai rear view camera does not work, there is no need to talk about the normal functioning of the road beauty. The device is mounted in a plastic molding close to the license plate lights. The bottom of the molding is a landing pad for a video camera. Wet weather and dirt do their job - moisture collects and causes problems, remaining in the case for a long time.
Another reason why the rear view camera does not work on the IX35 can be considered corrosion and oxides. A good half of the part is made from aluminum alloy. It is highly oxidized. Most often this happens through and through. The electrical board becomes unusable, so there is no point in trying to repair anything. All that remains is replacement.
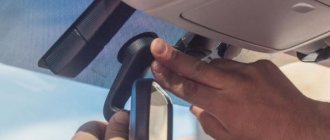
Instructions for adjusting the device yourself
When you installed the camera, it works fine, the clouding has disappeared, it is important to adjust it correctly. Not all car owners know how to do this. Because of this, they cannot do everything themselves and check the functionality of the device.
The main task is to set up parking lines. This enabled mode makes parking much easier.
- Take an ordinary wooden block, 2 meters long. Its sides should be 2-3 centimeters.
- Place it about a meter away from the center of the rear bumper. The edges of the block should protrude from the sides of the car at approximately the same distance.
- Then, get into the car and go to the service menu. You may need to perform additional steps, such as turning the side lights on and off several times.
- After this, you will need to go to the camera settings and select the car brand.
- When the rear view camera is activated, you will need to turn the steering wheel first to the right all the way, and then to the left - this is done to adjust it. Then click "next". A rectangular outline will appear on the screen.
- Using the up, right, down and left keys you will need to place it so that the block is exactly in the center. Then click on confirm.
This, in fact, is all the steps you need to perform to configure the devices. Now, when you turn it on, yellow lines will begin to appear, making parking easier. Please note that any subsequent disassembly may require subsequent reconfiguration of the device.
Price issue
Video “Repairing and replacing a rear view camera”
This video shows the disassembly and repair of the device using the example of a standard Kia Sorento camera (by PCAVTO).
Like most owners of Hyundai Sonata, which is equipped with the Navi package, they encountered the problem that after washing or driving in rainy weather the rear view camera does not turn on (the secret of the black screen)
. Symptoms began to appear when I bought the car. At first the black screen simply blinked, but the picture eventually appeared, this appeared mainly after washing. Then this began to repeat itself more and more often, but after some time the picture appeared. But at one point the picture blinked and disappeared completely, as I understand it, the protective circuit worked and, in order not to burn the camera, it simply turned off. As a result, I found on the Internet that many people had this problem and it was solved by simply cleaning the microcircuits. To get to the camera you need to remove the rear headlights (those that are on the trunk lid) by unscrewing 2 nuts with a 10 head and two nuts with a 8 head inside the trunk (1 nut holds the headlight itself, the second nut holds the plastic chrome trim) and first remove the trunk trim (everything is there elementrano, Watson), after all the manipulations, remove the chrome trim, which, among other things, is held on by the pistons. We remove it carefully due to the fact that it is very flimsy. Having removed the chrome trim, a gray strip falls out into our hands
Why does not it work
When choosing a location for mounting a rear view camera, three options are considered:
- Trunk handle.
- Number plate illumination frame.
- Interior of the car.
According to statistics, many camera malfunctions are noticed when it is installed inside a car. This is due to intense exposure to environmental factors causing an increase in moisture levels. There are also mechanical loads and other influences in the cabin.
Any contact of the device with liquid leads not only to system failure, but also to significant picture defects. Car owners often contact the service center due to poor quality images or spots on the screen. This problem is explained by moisture getting on the lens of the device.
If the camera stops working, the possibility of a power failure cannot be ruled out. When installing the system yourself, mistakes are often made in connecting it to the energy source, which lead to failure of the device.
About the principles of purchase
Experts advise taking into account the following features of different types of cameras:
The picture must be transmitted in mirror reflection. The standard viewing angle is 10 degrees, but in practice it is better to use models with an angle of 150 º or 170 º. The device must be resistant to weather conditions. It's important to shop at a reputable store so you don't have to wonder why your rearview camera isn't working and then end up wasting money on repair services. Resolution matters: it affects the quality of the transmitted image.
Dismantling and disassembly
There are several possible scenarios if the rear view camera stops working. The first involves contacting a car repair shop or an official service center, the second means eliminating the problem with your own efforts. If the device was purchased recently and its warranty period has not yet expired, it is advisable to take it to professional technicians. In the absence of a warranty, it is much cheaper and easier to restore the system yourself.
Even an inexperienced driver can get rid of breakdowns and errors in the camera’s operation. To do this, you need to know the basic principles of the system’s operation, the specifics of breakdowns and dismantling. Most models are analyzed according to the following principles:
- If the device is not able to start automatically or does not work at all, you will have to dismantle the entire casing.
- The first step is to remove the small panel at the top where the fasteners are located. They are removed to remove the main part of the skin. Under the skin layer there are nuts that secure the trunk handle. Four self-tapping screws are used to mount the camera. Two are for the device itself, and two more are for fixing the connector.
- If there are traces of corrosion on the surface of the radar, it is necessary to get rid of them, and only then proceed to the next stage.
- Self-tapping screws are used to connect the body. When dismantling you need to be careful, because... they undergo oxidation.
- If moisture gets under the housing, you will have to dry it. To do this, just clean the surface with a brush and then cover it with varnish to protect it from moisture.
- Many cameras have two gaskets. One of them is located on the camera eyepiece, the second is at the joints between the plastic parts and the body. If the gaskets are deformed, they will have to be replaced.
- Assembly of a working camera is carried out using the reverse principle. Before this, you need to treat the joints with a hermetic compound.
Repair
Before starting repairs, you need to make sure that the basic rules and sequence of actions were followed during the camera installation stage. First of all, it is worth checking the functionality of the device in the store. Any malfunctions should alert the buyer.
If malfunctions appear after installation, you should evaluate the reliability of the cable connection. The basic cable length is 3-5 meters. This means that when laying it it may become deformed or damaged.
If the picture quality is lost when reverse gear is engaged, it is possible that the device's power was connected to the pulsating signal from the lamps. To eliminate the defect, you need to level it by separating the capacitor from the device using a diode.
If the camera was connected using a video interface, and the picture shows poor quality, just reconsider the settings mode.
If there are visible distortions in the picture, you should look for the problem in the incompatibility of multimedia system standards. If they do not match, you need to choose a different camera model or use a converter.
By adhering to these rules, you can avoid many problems with the operation of the rear view camera. If after performing the above steps the problem does not disappear, you will need the help of a specialist.
But when choosing a specialist, it is better to give preference to trusted auto repair shops that enjoy the trust of many buyers. Otherwise, the dubious installer will not solve the defect and will only cause you to waste time and money.
How is video information transmitted?
Let's talk in simple terms about the principles of the camera's operation. Before determining the reason why the rear view camera does not work, it is worth knowing the principles of its operation. Video transmission is possible in two ways:
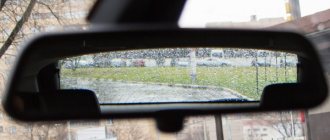
The video cable runs to the monitor on the dashboard. The wire is routed through the interior. In this case, the signal is transmitted with high accuracy, without being subject to radio interference. The only negative point is the need to disassemble the interior trim. There is a more convenient wireless installation method. Information is transmitted via radio wave, but the transmission range is only possible at a distance of 15 meters.
Installing the system is quite expensive, so some car enthusiasts prefer to carry out the procedure themselves. Let's consider why there is a problem when the rear view camera does not work? How to solve it quickly?
Adjustment
Sometimes the picture quality is lost after driving in rainy or snowy weather, visiting a car wash, or changing the operating mode of the parking system. But not all drivers know how to adjust the device and check its functionality. When adjusting the camera, you need to follow these instructions:
- To begin with, you should take a block 2 meters long, with sides 2-3 cm.
- Then it needs to be placed at a distance of a meter from the center of the rear bumper, making sure that the edges of the structure protrude from the sides of the car.
- Next, you should get into the vehicle and open the settings menu. It may be necessary to carry out other manipulations by turning the side lights on and off.
- Then you need to open the camera settings and select your car model. After activating the camera, all you have to do is turn the steering wheel to the right and then to the left - such manipulations will allow you to adjust the camera. Then click on the “next” item, after which a rectangular outline will appear on the display.
- Using the up, right, down and left keys you can position the outline in the desired part of the screen.
The listed recommendations allow you to quickly restore the system and get rid of poor picture quality, clouding and other defects. The subsequent launch of the system will lead to the appearance of yellow lines on the screen, which will greatly facilitate the parking process.
What they say
Alex: if the camera glitched, the head would show a black screen, i.e. I still switched to it, which means the problem is in my head - either the “rear view camera” setting fails, or the signal to engage reverse does not reach.
Spetsok: how does the camera know it’s on? the appearance of a plus in the background? pick this wire and pick it up
Nathan: I also think it's in the head. Just what exactly is not clear.
FenixS: check the signal cable. The camera only works when the reverse lights are turned on, so there was a constant + on it when you connect the tulip to the AUX, you are either supplying power to the wrong place or not from the light. turn to the power of Tyrnet, in the search engine I think there is a description of your problem and its solution)))) well, if this is not a GU defect, of course)
Spetsok: What's the difference from a flashlight or not from a flashlight + 12V in the car is the same.
Adjuster: I’ll try to explain, the signal is taken from the reverse light on the control unit, so that the control unit understands that the car has gone backwards and it is necessary to: turn down the music/turn on the camera. a signal from the flashlight to the camera so that it works only when necessary, and not in constant mode. In theory, if you connect a constant + to the input of the GU, then all other functions of the GU will not work, because The GU will think that the car has been driving backwards all this time and the camera needs to be turned on. so in your case, either you haven’t figured out how to configure the GI, or there’s really a defect there. but I still advise you to read the instructions)