A tachometer is not a necessary element of a car, but at the same time it is very useful. The device significantly extends the life of the engine and eliminates expensive repairs. Anyone who cares about their car should know how to connect a tachometer. This is what we will talk about.
Method of connecting a tachometer to a car.
What kind of device is this
First you need to understand what the device is and what its main functions are. A tachometer is a measuring device that determines the engine speed. The unit of measurement is revolutions per minute (rpm). Almost every modern car is equipped with a device, as it helps to correctly use the engine's capabilities. If the basic package does not include a tachometer, you can buy it separately and install it on both a diesel engine and a gasoline engine.
Testing, tachometer adjustment
If the car is equipped with a distributorless or individual ignition system, the tachometer can be connected to any coil. In this case, the readings of the engine rotation speed (rpm) will be inadequate, since an impulse is supplied to the trammel ignition every stroke, while the individual ignition is four times less likely. However, it is possible to calibrate the measuring scale in a new way.
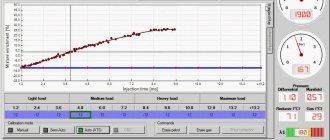
At the first stage of testing, start the engine and check the performance of the system (arrow deflection at idle speed). As a rule, the speed in this mode is in the range of 800 – 1000 rpm.
Next, adjust the reading level. If the tachometer needle deviates slightly, you can connect an additional capacitor with a capacity of about 1 μF between the signal wire and the vehicle ground. On the contrary, if the arrow goes off scale, connect a variable resistance of about 1 kOhm to the open signal circuit and scale the signal.
The next stage is sea trials. With the engine running, the maximum speed is reached. The tachometer needle should not go into the red zone. Otherwise, the adjustment is carried out again. Before starting operation, check the reliability of connections and insulation again. And remember, additional equipment means new problems.
How the device works
According to the principle of operation, tachometers are divided into magnetic and electric.
How magnetic models work
Magnetic tachometers operate on the basis of eddy current induction. They occur when a metal disk is placed in a rotating magnetic field. The currents and magnetic field begin to interact with each other, causing the non-magnetic disk to rotate. The tachometer needle is connected to this disk. There is a return spring on its shaft, and the magnet is connected to the crankshaft using a flexible shaft. Increasing the motor speed causes the magnet to move faster, deflecting the non-magnetic disk. This whole process is demonstrated by the arrow.
How electric models work
Such tachometers measure electrical signals and impulses. The ignition system and generator of a gasoline engine generate electrical signals according to the crankshaft speed. Thus, the required signal comes from the electronic control unit.
How to connect a tachometer to a VAZ
A tachometer is a device designed to display information about the number of revolutions of the crankshaft. Modern digital tachometers also have other useful functions, such as: calculation of fuel consumption, recommendations for the optimal speed limit. Due to the fact that VAZ produces both injection and carburetor car models, connecting a tachometer to representatives of this family has its own characteristics.
How to connect a tachometer to a VAZ.
We take a mechanical cable. We connect one end to the tachometer, the other to the car engine. The tachometer will show engine speed. We connect the tachometer to a carburetor type car as follows: the plus of the tachometer to the ignition plus, the ground to the ground (body), the minus to the ignition coil.
With this connection, the device converts the pulse frequency into an electric field. A special electronic device processes this signal and displays its value on the screen. The operation of the tachometer also depends on the engine speed. For example, on a four-cylinder, four-stroke engine, one revolution corresponds to two electrical impulses.
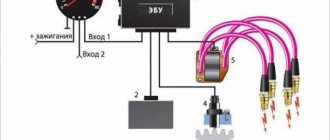
Connecting a tachometer to an injection engine
In an injection engine, the tachometer is connected to the engine control unit, not to the ignition, unlike carburetor engines. The connection is as follows: ground - to ground (body), plus to ignition positive, input 1 to the engine control unit, input 2 to the crankshaft position sensor. Thus, the device reads pulses directly from the controller, which receives data from the crankshaft position sensor.
Types of devices
Tachometers are divided according to the method of displaying information and the connection method. In the first case, there are two types of devices:
- Digital (data is displayed on a small screen);
- Analog (the driver receives information using a moving arrow).
According to the connection principle, tachometers are:
- Regular ones. These are the models that are equipped with modern car brands. They are built into the dashboard.
- Remote. Often such devices serve as a replacement for missing standard tachometers. Their main advantage is that they control idle speed well and have a lower error rate.
How to connect a tachometer to an injector
The tachometer is one of the important instruments installed on the car. Thanks to it, you can constantly monitor the speed of the power unit. However, almost every vehicle configuration is equipped with a standard tachometer. That is why many car enthusiasts are interested in connecting this device to an injection engine.
First, you need to study the operating manual of the vehicle on which the tachometer will be installed. It should contain instructions for removing and installing the standard tachometer on a fuel-injected car model. You need to find out if there are standard dashboards with a tachometer for your car. If they exist, then the simplest and ideal option is to purchase and install such a dashboard instead of the one installed on the vehicle.
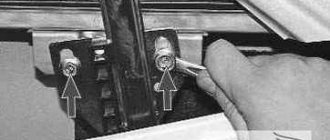
To install a new instrument panel, which has a built-in tachometer, the torpedo must be partially or completely disassembled. Each vehicle has its own characteristics when removing the board. In some cars the entire dashboard must be disconnected, on others it is only necessary to remove the protective visor above the board with instruments, for which the screws that secure the fasteners are unscrewed.
To connect a new dashboard, you need to use the diagram shown in the instructions for it. Also, before installing it, you must remove the negative terminal from the battery. Next, you need to buy and install an external tachometer, which operates from the cigarette lighter. Thanks to this device, it is possible to measure the number of revolutions using the magnitude of the change in the current strength of the on-board power system. The convenience of a remote tachometer that operates from a cigarette lighter is that its installation requires minimal effort. But it has a small drawback, which is measurement errors. This is due to the fact that each metal has its own resistance value.
It is necessary to connect the tachometer directly to the cigarette lighter wires to obtain the minimum error. To do this, you need to remove the cigarette lighter socket from the connector and solder the tachometer wires to the wires of the car's power system. In this case, they need to match in color. To measure engine speed as accurately as possible, a remote tachometer is connected to the ignition coil. To do this, remove the protective cover from the steering column to gain access to the wires, among which you need to separate the wires going to the coil. There should be only four of them. One needs to be soldered to the “plus”, and the others according to the color of the wire.
If you have any doubts about your abilities, it is best to contact a car service specialist. You also need to remember that for each car you need to install the corresponding tachometer model. When installing third-party devices, the system will give incorrect readings.
Connection for petrol engine
Now we’ll tell you how to connect an external tachometer. To install the device correctly, you will need a connection diagram for the purchased tachometer, which is included with the device. If there are no instructions included in the kit, then installation will not be difficult for you. Do the following:
- Place the device in a place convenient for you. An appropriate location on the dashboard or its surface is best suited.
- Understand the wires from the tachometer. There should be 3 of them: black, red and one more wire of any other color, depending on the device model.
- The black wire is connected to the body (body) of the car.
- The red wire connects to the ignition switch terminal, which supplies 12 volts when the ignition system is activated.
- The last wire is connected according to the ignition circuit (contact or non-contact). In the contact circuit, the wire is connected to the distributor breaker, in the contactless version - to the voltage switch.
- Many tachometers have a backlit dial or display. If it is provided for by the technical specifications, then connect the device to the side lights of the car using the corresponding terminal on the ignition switch.
Connecting the device yourself
Not everyone understands electronics, but it is still desirable to be able to connect a measuring device. This will not cause any difficulties, because there are only three wires. The first thing to do is take the wire from the tachometer into the engine compartment. The easiest way to do this is through the hole in the speedometer cable. Next you will need a piece of wire. It should be about one meter long, thin and tough. At one end, use electrical tape to secure the wire from the device. Try to work carefully. Carefully insert the other end of the wire into the holes in the cable and push. Connecting an electronic tachometer can be done as follows. The positive wire is connected to the ignition coil (pin B). Connect the signal wire to contact K of the same coil. Connect the minus to ground. Work as carefully as possible, the wires are very thin and very unreliable.
A device for measuring engine speed.
Tachometer
Recently, the problem of controlling car engine speed has become very relevant. Previously proposed schemes have a number of disadvantages associated with a large number of elements, high current consumption and the ability to control engine speed only in digital form.
Tachometer-2 or DIY Tachometer
You can assemble the tachometer offered below with your own hands; the device is very simple in design, but has good technical characteristics, and is assembled using available components. A tachometer can be very useful when adjusting operations with electronic ignition units of a car engine, when accurately setting economizer response thresholds, etc.
Tachometer-3
I offer a simple but reliable electronic tachometer that works on my Ford Escort. The device has a two-digit digital indicator showing the number of thousands and hundreds of revolutions per minute. The tachometer is powered from the vehicle's on-board network and consumes a current of 0.45A.
Electronic tachometer for car
The driver is sometimes interested in knowing how many revolutions the car engine develops. This can be determined using a simple electronic tachometer (Fig. 1), a measuring device whose scale is graduated in engine speed. It is conveniently located near the steering wheel.
Electronic tachometer for motorcycle
Many motorcycles, mopeds, scooters and other motorcycle equipment do not have such an important device as a tachometer. I offer a simple and reliable electronic tachometer. It is designed to work with a single-cylinder two-stroke internal combustion engine with a contact or contactless ignition system and can measure crankshaft speed up to 10,000 rpm.
Tachometer on Arduino
A tachometer is a useful tool for counting the RPM (revolutions per minute) of a wheel or anything that spins. The easiest way to make a tachometer is to use an IR transmitter and receiver. In this article, we will look at how to use an IR transmitter and receiver to make a tachometer using Arduino. The result is displayed on a 16x2 LCD display.
Simple tachometer with large numbers on ATmega8 and LCD 16×2
I propose a version of a tachometer on an AVR microcontroller with large numbers on a character display. The numbers are arranged from separate segments over the entire height of the display, which makes the device readings more readable. Designed for a measurement range from 300 to 9999 rpm. But it turned out that at higher (from 10,000) rpm, the least significant digit moves off the screen and the device displays the number of revolutions per minute divided by 10.
Let's start with definitions. What is a tachometer in a car? This is a device that records the crankshaft speed in a car.
Of course, its use is not limited to vehicles. Determining the number of revolutions per minute is necessary when working with various mechanisms:
- airplane turbine
- ship propulsion shaft
- power station generators
- high precision milling and lathes
- drilling rigs
- electricity and water metering devices.
In addition, instruments for measuring rotation speed are used in research work. Any tachometer consists of two parts:
- The rotation sensor takes readings from the shaft - the object of measurement
- The signaling device either sends a command to the control circuit of the mechanism, or simply displays data on a pointer device (digital display).
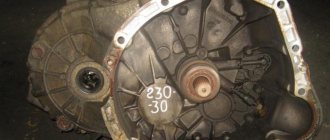
Diesel engine connection
Let's look at how to connect an electronic tachometer to a diesel engine. Installing a tachometer is quite simple.
- First, you need a trestle or inspection hole in order to remove the protection from the generator and clean it.
- You will find terminals on the coil that control various processes. You need a terminal marked "W".
Note: if you do not find the terminal you need, use the contact output to the generator rectifier on the winding. Select any of the three contacts and solder it to the end of the device cable. Insulate the connection point.
- We connect the contact from the tachometer to it.
- We close the contact of the oil pump. This is necessary for a more accurate measurement, since otherwise, upon reaching 2500 rpm, a light indicating the oil pressure level will light up on the dashboard.
- We check that the electronic tachometer is connected correctly and reinstall the generator cover.
Important: check that the wires do not come into contact with moving parts.
Checking the tachometer functionality
With the above tips for assembling a tachometer, everything is clear. It remains to find the reasons for the meter malfunction. Sometimes drivers can observe a situation where the arrow begins to sway from side to side.
There may be several reasons for the malfunction:
- When the engine is running for a long time, the resulting vibrations may damage the sensor;
- Wiring faults: terminals may become loose, contacts may oxidize, or insulation may be damaged.
These damages can be detected by visual inspection and repaired. If the sensor is damaged, it must be replaced.
Simple speed metronome
Tachometer comes from two Greek words: “tacho” meaning “speed” and “metronome” meaning “to measure”. It works on the principle of a generator and determines the voltage corresponding to the speed of the shaft. It is also known as a revolution counter. Principle of operation:
- induction;
- electromagnetic;
- electronic;
- optic.
Historically, the first mechanical tachometer was developed based on the measurement of centrifugal force. In 1817 they were used to measure the speed of traction machines, but after 1840 they were used primarily to measure the speed of vehicles. A digital tachometer is an optical sensor designed to determine the angular velocity of a rotating element. Areas of use:
- Cars, planes, tractors, trains, light rail vehicles and their repair.
- Laser tools.
- Medical use. A hematachometer is a device placed in an artery or vein that measures the speed of blood movement through a rotating turbine. The indications are used to diagnose circulatory problems such as thrombophlebitis.
- Analog audio recording that measures the speed of an audio tape.
- Estimation of traffic speed and volume.
Microelectric Voltage Generated Machine
The tachometer generator converts the shaft rotation indicator into an electrical signal. Its operation uses the properties of the angular velocity of the rotor, the excitation flow, which is proportional to the generated EMF. Most modern tachogenerators are the permanent magnet type. These devices use a rotating joint, one end of which is connected to the machine shaft, inducing an electromotive force (voltage) proportional to the speed of the shaft. The armature contacts are connected to the voltmeter circuit, converting the voltage into a speed value.
Recommendations
- An electronic tachometer is recommended for use by inexperienced drivers
who do not know how to navigate by engine sounds; - When purchasing, pay attention to the back of the package, where it is written for which brands of cars it can be used. Otherwise, the readings will be false or prepare for problems in the electrical circuit (this applies more to injectors);
- Install the module itself somewhere in a visible place so that you can always see its readings without any problems. As practice shows, installation is carried out on the central panel of the torpedo. Some people manage to place an oblong module in the instrument panel in place of the “STOP” indicator; this is for models 2108, 2109, 21099
.
Connecting the device to a diesel engine
Diesel owners should know how to install a tachometer on a diesel engine, since its connection has nuances. To do this, you need to understand the principle of its operation. In the case of a gasoline power unit, it reads the pulses arriving at the ignition coil, and in the case of a diesel engine, from the “W” terminal of the generator.
It is better to install the device on a diesel engine by placing the car on an inspection hole or a lift. Connecting the electronic tachometer is carried out in stages. The first step is to remove the protective cover, avoiding contamination.
Next, on the generator you should find the terminal marked with the letter “W” and connect the wire from the tachometer to it. If you cannot find the terminal, you will have to disassemble the generator.
After disassembly, you need to connect one of the three wires that go from the winding to the built-in rectifier with a wire prepared in advance. The connection point must be insulated and the wire brought out. Next, the generator should be assembled in reverse order. The output wire from the generator must be connected to the meter.
For accurate readings, it is necessary to close the contact that comes from the oil pump.
Video
The procedure for installing a tachometer from a VAZ 2106 to a VAZ 2105:
A car enthusiast who cares about his car should have, among other devices, a tachometer, which helps to operate the car correctly. If there is no standard device, then it should be installed. The article describes their types and gives instructions on how to correctly connect the tachometer to a diesel engine and to a gasoline engine.
Self-production
The remote tachometer is needed for the same thing as the one integrated into the panel - to display the crankshaft speed. It can be made for both four-stroke and two-stroke engines. The latter is relevant for old mopeds or motorcycles. There are two ways to get yourself a remote tachometer:
- Buy ready.
- Do it yourself.
Any of the selected options is beneficial, however, there is still a difference. This difference is in price and time spent. Of course, if you buy a ready-made one, you will spend more money, but it will simply be connected.
Having done it yourself, you can be confident in its performance and the accuracy of its readings. The fact is that very cheap remote tachometers, as a rule, lie very much. But more expensive ones are not affordable for everyone. It is in this case that it will be convenient to make a homemade tachometer.
Manufacturing process
As we already understood, it happens that the tachometer is simply missing. In this case, you will have to do your own production. You can find a lot of instructions on the Internet, but we have developed the most optimal one and described in detail how to do everything correctly and accurately.
So, let's start by collecting the necessary tools and parts. We will need:
- Engine tachometer mechanism from a suitable car (for example, from the same car, but the version where the tachometer was installed).
- A tin can or any suitable size case.
- Metal scissors.
- Glue, polyurethane foam and paint.
- Spatula, putty and tape.
- Hairdryer and sharp knife.
First we need to fit the housing tightly to the engine tachometer mechanism so that there are no backlashes. If the mechanism is deeply recessed into the body, then you will have to cut off all the excess with scissors to make it look beautiful. It will be necessary to cut so that there are no jagged edges or sharp edges. If a sharp edge accidentally comes out, you will have to grind it to a smooth surface.
Now we fill the inner cavity of the body of the future engine tachometer and the outer surface in the place where it will be attached to the panel with polyurethane foam. After the foam has dried, you can use a knife to give the body any beautiful shape. Inside, you need to make the space so that the mechanism sits tightly and does not move. You also need to remember about the holes for the wires. Try the case on the panel in advance and think about how the wires will be laid and where it will be more convenient to make these same holes.
Now let's move on to external work. Using sandpaper, sand all surfaces until they are perfectly smooth. Now we need to make sure that the housing of the future engine tachometer is strong enough.
To do this, we cover it with fiberglass and fill it all with epoxy glue. The glue must be allowed to dry for at least a day; further work cannot be started yet - the workpiece may be damaged. Now you need to putty the engine tachometer blank. You need to devote maximum time to this stage, since painting will come next and the workpiece should be as even and smooth as possible so that everything looks decent. In principle, you can paint it any color, but preferably the color of the car panel on which the engine tachometer will be located.
If the tachometer for a two-stroke motorcycle will always be on the street, then the paint will have to be chosen as resistant as possible so that it can withstand all possible weather changes and the characteristics of the motorcycle’s operation. That's it, now you need to place the mechanism inside the case, remove the wires and connect them to the machine. After checking, if everything is fine, then glue the body to the selected location on the panel.
Ways to turn on the tachometer
Information about the rotational speed of an internal combustion engine can be read from:
- generator;
- crankshaft speed sensor;
- camshaft speed sensor;
- ignition coil control pulse.
It is irrational to change the generator just to install a tachometer.
The crankshaft and camshaft speed sensors operate on the electromagnetic principle. Earlier cars had sensors using the Hall effect. In any case, the electrical pulse generated by these devices has an amplitude of no more than 5V, and their internal resistance is at least 200 Ohms.
Gasoline devices also differ in the number of cylinders
While operating a car, you need to know how to check the tachometer at home. Most cars are equipped with a speedometer, pressure gauge, coolant temperature sensor and tachometer. They are installed differently depending on the make and model of the car. Sequencing:
- Check the tachometer before driving, carefully inspect the sensors. The dial usually shows single or double digit numbers, which are limited by the red stripe of the permitted operating limit.
- Start the car. Press the brake pedal with your right foot and turn on the ignition key. The tachometer reading should rise before stopping at the engine idle speed.
- Press the gas pedal and pay attention to the behavior of the tachometer.
- Monitor the readings while driving in each gear and when switching to the next.
- Avoid excessive motor overload. The red line on the scale represents the highest number of revolutions the engine can safely handle.
- If you need to further measure the vehicle's RPM to help diagnose the problem, use a handheld tachometer that measures the RPM while running.
Models of electronic tachometers
Helios 148/360/361/500
They have a standard appearance. Designed for use on cars with carburetor engines, number of cylinders from 1 to 16. Mounted on top of the instrument panel.
The advantages of this series are the low price, as well as the maximum range of additional functions - almost all of the above, as well as a car parking timer and alarm simulation. The stated measurement error of the devices is quite low: up to 5 rpm. The models of the line differ in the control scheme (one or two buttons), the number of display segments (3–5), and the ability to change the brightness of the indicator.
Multitronics
Multironics DD5/DM10/DM20 tachometers are less versatile. Of these, only the first model has a clock and timer, automatic adjustment of display brightness as additional functions, the rest have only a voltmeter. The measurement error is slightly higher - at 2000 rpm it is 10 rpm, and at high speeds it is up to 3%. DD5 is also different in that it can be used for a wide range of engines - with 2, 4, 5, 6 and 8 cylinders, both gasoline and diesel. DM10/DM20 are intended for four-cylinder petrol engines only. For diesel engines, models DM11/DM12/DM20D are offered. These tachometers are also secured with double-sided tape.
Amphiton-219/250
These models are distinguished by their impressive appearance and display with color zones depending on the engine load. They are intended only for carburetor four-cylinder engines. Additional functions include a voltmeter, a battery charge level meter and monitoring the operation of the voltage regulator. Amfiton-250 is also equipped with a timer and UZSK. These models are larger than previous ones. Another disadvantage of this series is the limited measurement range: 400 – 5990 rpm.
Technical solution
Before connecting the tachometer, it is necessary to draw up an electrical connection diagram in order to mentally determine the starting and ending switching points and trace the conductor. Any ignition coil has a terminal (terminal) +15 (ignition on), to which battery voltage is supplied when the key is turned to the first (for some cars, second) position. Under no circumstances should you connect the tachometer to this point; the first time you turn it on, it may fail. High-voltage wires also pose a danger, even to humans. The signal input to which the tachometer should be connected must be precisely determined. In older coils it is designated by the letter "K", it is better to find the exact circuit diagram of the car.
The next, more difficult task is the electrical connection of the nodes. As a conductor, you should take a stranded copper wire with a cross-section of at least 2 sq. mm. with polyvinyl chloride insulation.
The connection points of the wire to the ignition coil are cleaned, mechanically twisted, soldered and carefully insulated. Lay the wire along any electrical harnesses, using plastic clamps, towards the engine compartment bulkhead near the dashboard. You can insert the conductor into the passenger compartment next to any electrical wiring harness. To do this, it is easier to use an elastic string. Finally, connect the conductor to the tachometer signal terminal. In some cars that include modifications with or without a tachometer, you can simply change the dashboard, find the stock wire and connect it to the ignition coil.