Wing repair
The cost of replacing the rear left or right wing is, on average, 3200–3300 rubles. You can do everything yourself, you just need to act carefully and have the necessary equipment on hand. So, if there is a defect on the rear wing, it is easy to repair it in this way:
- Raise the car on a jack.
- Squeeze out the affected element.
- Apply a tool with a flat but sharp end to the back of the dent on the fender. Using a heavy hammer to hit the flat part of the bit, smooth out the imperfection step by step.
- Do not hit the rear fender too hard - you risk stretching the iron, resulting in its deformation and an increase in area.
- Knock out the edges sequentially, as if walking along one line.
- Straighten the outside of the dent using a flat object.
It is not recommended to use aluminum tools for straightening - they are soft. It is better to use an iron object.
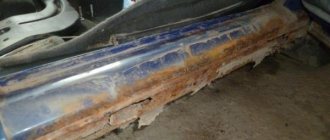
If the rear wing arch begins to rot
Rear right wing for VAZ 2110
Iron very quickly undergoes corrosion, which, as it grows, can harm the entire car. It is advisable to start repairs when the rust has not yet seeped into the solon, as the consequences will be much worse. The arch of the front or rear wing is most often affected by this problem. To fix this problem you need to do the following:
- Disconnect the ground so that any welding work can be carried out without difficulty.
- The damaged part must be cut off, and the remaining parts must be cleaned properly.
- To seal the resulting hole, you need to attach a patch on the “wrong” side. This must be done by welding.
Note: before this, you need to treat the damaged area with acid to get rid of corrosion. And in order to make it easier to process this part in the future, you need to drill a small hole in it (preferably from the inside).
- The patch must be cut from stainless steel to prevent rust from appearing in the future.
Note: to make it easier to cut out the patch, you need to take a piece of cardboard, place it on the damaged part and press it so that its dimensions are transferred to the cardboard. You will get a “fingerprint”. You need to cut a patch along it, slightly larger than it. Transfer it to the metal and cut it out.
- Now the edges of the patch need to be welded to the wing so that it holds well.
Complete rear fender replacement
You will have to completely replace the rear wing if the old one is not suitable for use: it is deformed, corroded or simply rotted. You can start replacing if you know how to remove the rear wing of a VAZ 2110, have plumbing skills and can handle a spotter. Otherwise, it is recommended to take the car to a workshop. Replacement process step by step:
- Clear the luggage compartment of carpet, flammable items, and unnecessary items.
- Using a screwdriver, unscrew the bumper and set it aside.
- Remove the headlights.
- Remove the fuel tank.
- Using a thin chisel, without damaging the body part, press out the worn fender.
- Drill out the rivets connecting the wing and cross frame.
- Remove the wing.
- Remove any strips of metal remaining on it using a chisel and wire cutters.
- Straighten and sand the wing edges.
- Prime first with reactive primer, then with regular primer.
- Clean welding points thoroughly.
- Attach the finished wing by welding.
- Paint the part the same color as the rest of the body.
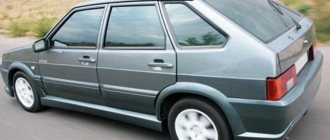
Replacing the wing of a VAZ 2110
The instructions will tell you how to replace the wing on a VAZ 2110 yourself. The wings of a car can be called the strongest elements of a car. Why do many people decide to replace car fenders without the help of specialists? The answer is simple - it is very expensive. Replacing the front fender at a service station costs up to 500 rubles, but the rear fender costs about 3,300 rubles. We will tell you how to save money and cope on your own. By what signs can you recognize the need to replace the wing on your car? — Wings very often suffer from corrosion, after which they very often begin to collapse from rust. Of course, external factors such as moisture, as well as road salt and chemicals have a very strong influence. Arches are also subject to great impact and suffer; most car enthusiasts face this problem. In some cases, even straightening with putty does not help. We recommend that you play it safe and replace it. — There is an option when replacement is required after a serious accident. If, for example, the damage is minor, then perhaps straightening with putty will help you, but in more serious cases, of course, change it immediately. — We don’t exclude mechanical damage, such as scratches, the next stage of dents and chips, and then rust. Of course, quality is also very important to consider. What do we need for the procedure? - Key, head for “eight”, “thirteen”. - extension cord with ratchet. — Screwdrivers: flat, Phillips. - Left wing. The cost of the wing from the original manufacturer (cat. no. 21100840301500) is 1,500 thousand rubles. The cost of the rear wing (cat. no. 2100840401400) costs about 3100. About the replacement procedure: I would like to warn you right away that doing this yourself is not so easy. You need a lot of desire and tools. To replace the wing, you need to be able to work with welding and plumbing tools. If you are encountering this for the first time, then most likely you will not be able to cope perfectly. - So, the first thing we need to do is get everything out of the trunk, especially remove things that can be easily flammable. — We release the bumper from its fastenings and dismantle it. — We need to remove the headlights. — Next, we move extremely carefully and begin to squeeze out the rear wing, making sure that the teeth remain undamaged. — You need to pull out the rivets where the wing connects to the frame. — Remove the rear fender. — We’ll use wire cutters and use a chisel to pull out the metal strips. — Carefully straighten and sand the wing. — We need to prime it using reactive primer. — Afterwards we prime with regular primer. — Clean the welding points down to the metal itself. — Now you can attach the new wing, welding will help. — Next comes painting the wing, take new paint to match the color of the car.
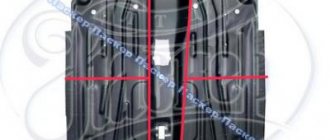
We need to dismantle the front bumper, if there is an arch liner, remove it too
Using a ten key, you need to unscrew the self-tapping screw that secures the wing from below.
Now let’s take the “ten” head and unscrew the self-tapping screw that secures it to the bracket.
The pointer on the side carefully move it forward and pull out the rear part of the car.
Using a ten-point socket, we need to unscrew the screws that hold the stand.
In the photo, look where they are approximately located.
Using a ten key, unscrew the screws that secure the wing and body.
You need to remove the turn signal. Pull the socket and disconnect it with the light bulb from the lampshade.
Lead out from behind the headlights
Dismantle the wing
Now install the wing and reassemble in reverse order.
How to remove rust from a fender
To remove rust stains from car fenders you will need:
- sandblaster or sander;
- anti-corrosion primer;
- degreaser;
- rust converter;
- putty;
- gloves.
Restoring the fenders begins with a thorough washing of the car. After this, the car is driven to a remote area so that when the sandblaster works, sand does not scatter throughout the garage and surrounding buildings.
Removing the old wing
We make neat cuts along the cut line. At the same time, we try to avoid damage to the internal elements of the pillar and threshold. Next, we drill out all the welding points connecting the wing to other body elements. We begin careful dismantling. You may need a hair dryer to heat up the adhesive joints that hold the fender and mudguard in place.
After dismantling the old wing, it is necessary to adjust the new one. There are two ways to do this.
- Applying markings to each element followed by cutting.
- Simultaneous cutting of both joined parts.
Applying markings to each element followed by cutting
We apply markings to the rear wing and make cuts. We apply it to the surface of the body. The wing should slightly overlap the cut lines of the old wing. At the future joint we place marks on the new wing. We remove the wing and make cuts on the body. We reattach the wing, check the gaps, and, if necessary, make adjustments by processing the joints.
Simultaneous cutting of both joined parts
We install a new wing, while it overlaps the cut lines of the old wing. We set the gaps along the door and fix the wing with clamps. Approximately in the center of the floor lines, we cut two elements at once. In this case, we select a thin disk for cutting. When using this method, the joints are very smooth. The distance between the joined parts must correspond to the thickness of the metal being welded.
vendor code
Part markings on the VAZ-2110 are divided into right and left parts. To select the correct wing, you must have the catalog number, as it can be confused with another model. Part numbers look like this:
- 2110-8404014 – rear right wing of VAZ-2110;
- 2110-8404015 – rear left fender of VAZ-2110.
There are also markings in which a zero is placed instead of a hyphen, and numbers are added at the end: -10 or 77.
VAZ 2110 rear right fender
If the rear right wing of a 2110 VAZ car is damaged, it will either have to be replaced or repaired. The second option is, of course, cheaper, but it is more difficult to implement. Still, on a VAZ 2110, the rear right wing can be repaired without any problems if you know certain secrets, which will be discussed in this article.