All this stuff rusts very quickly because of our roads and arch designs which is made in the form of a shelf on which the swamp collects and blooms successfully.
In a bent or rolled out arch, the swamp collects in a smaller volume and is easier to clean. It also allows you to install wheels with a shorter offset.
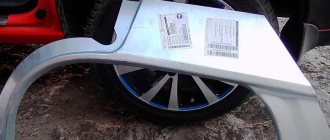
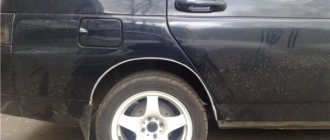
In the photo below we see the factory arch, albeit without any corrosion spots yet. the arch was regularly processed as needed, as evidenced by the black gamule along the edge:
Arch repair prices
Local painting of the inside of the arch per day 1000–1500 rubles. Local painting of the front arch per day 1000–1500 rubles. Local painting of the rear arch per day 1000–1500 rubles. Complete painting of the wing arch 1 day 1500–2000 rub. Full painting of the front arch 1 day 1500–2000 rub. Complete painting of the rear arch 1 day 1500–2000 rub.
Scratches and scuffs
Shallow (superficial) 15 min 400 rub. Average per day 1000–2000 rubles. Deep 2 hours – day 1000–2500 rub.
up to 5–10% of the part area 1 day 1000–1500 rub. over 10–15% of the part area 1 day 1000–2000 rub.
up to 5 cm 2–4 h 500–1000 rub. up to 10 cm per day 1000–1500 rub. up to 15 cm per day 1500–2500 rub. up to 20 cm 1-2 days 1500–3000 rub. over 20–25 cm 1-2 days 2000–3500 rub.
Removing and installing the wheel arch trim (extender) 15–30 minutes from 300 rub.
Trunk repair from RUB 3,000. Bumper repair from 2000 rub. Door repair from RUB 3,000. Wing repair from 2000 rub. Mudguard repair from 1000 rubles. Spar repair from 1000 rubles. Threshold repair from 2000 rub.
Car body soldering
This method is used to seal small and large holes without welding. To work, you will need flux, which will protect the metal from rapid oxidation. Soldering acid, sold in radio stores, can successfully cope with this task. To achieve the required temperature, you will need a soldering iron with a power of 1 kW or more, or a version heated with a blowtorch, but it is better to use a gas torch. The solder is chosen to be refractory, since it can be used to repair a hole in the car body more reliably.
Small holes are simply filled with solder, starting from the edges and gradually fusing to the center. A large hole in the body is covered with a patch cut from tin from a tin can. It provides:
- strong connection, almost like welding;
- significantly longer service life than putty, but less than welding;
- possibility of sealing large holes;
- ease of implementation, repairs are accessible even to beginners.
The work is performed in the following sequence:
- A patch is cut to fit the size of the hole. The larger the area of contact with the body, the more reliable the connection.
- The soldered edges of the patch and the damaged areas are cleaned with sandpaper until shiny.
- Using flux and solder, the cleaned surfaces are tinned.
- After applying the patch to the repaired area of the car, it is heated to the melting temperature of the solder. In this case, you need to ensure the continuity of the seam so that there are no missing sections.
- After cooling, the remaining flux is removed, and the soldering area is washed with hot water and soda.
The disadvantage of this method is that the patch swells due to heating. If checking with a ruler confirms this, the bubble is removed with light blows of a hammer.
The resulting depression is leveled with putty:
- Marks are applied to the surface of the patch, plus a few millimeters from each edge, with 120-grit sandpaper. This is necessary for reliable adhesion of the putty to the metal.
- The cleaned surface is cleaned of dust and degreased with a solvent.
- To prevent the metal from becoming rusty, the primer is applied no later than an hour after preparation.
- The first 2 layers are applied with a phosphate or acid primer with an interval of 15 minutes.
- After waiting another quarter of an hour, apply 2 - 3 layers of acrylic primer at intervals of 5 minutes.
- It takes 3 - 4 hours to dry completely. The drying process can be accelerated using an infrared heater.
Applying a patch with a soldering iron
The second method is no less popular among motorists - using a soldering iron.
Just as in the first case, the area where the patch is applied should be thoroughly cleaned of rust. You can cut a patch from an ordinary aluminum tin can.
The quality of the repair can be increased by applying a layer of a compound with anti-corrosion properties to the edges of the hole and the surface of the patch.
After this, use a soldering iron to walk along the edges of the patch. The seam should be uniform and not very thick.
It is possible that the patch will protrude beyond the edges of the body. In this case, you should trim it with a hammer.
When finished, coat the patch with a ball of primer. This step is considered necessary in order to avoid further development of corrosion. The primer is applied in 2-3 layers at intervals of 3-4 minutes.
You can speed up the drying time of the primer by using infrared heating.
Work plan:
1) First, we clean off the rust so that there is none left, AT ALL! Otherwise, in a year everything may fall off (although it holds very tightly). To do this, use sandpaper, a file or a grinder, but ideally, sandblast
2) Thoroughly degrease the surface and take extra
3) We dilute the epoxy resin with the hardener in accordance with the instructions; when working with epoxy, you must avoid inhaling its vapors and getting it on your skin! (I assumed both while I was alive, but I’m not sure that my body thinks the same way)). You don’t have to rush, its polymerization time allows!
4) We cut the fiberglass into small pieces - it’s more convenient to work with it, but still, if the hole is large, it’s more convenient to cover the first layer with a large piece
5) We soak the fiberglass in epoxy resin with a thinner and place it all on the degreased surface of the arch being repaired; if possible, we do this procedure from the inside (through the trunk). This composition dries in about a day
6) The next day we sand the resulting surface and level it with putty and sand it even to the plane of the body
7) The renovation is almost complete! All that remains is to prime, paint and treat with anti-corrosion agent! You can carry out this procedure yourself if the painting element is not large, but it is still better to entrust the car to professionals because the risk of ruining everything at this stage is great
How to remove the rear wing
The rear wing on the VAZ 2114 is attached to the load-bearing parts of the body by spot welding. Dismantling and replacement require skills in welding and the presence of a semi-automatic welding machine to install a new element. If the rear fender has a significant dent from an impact, the metal will need to be pulled out before dismantling and cutting. Dismantling process step by step:
- Prepare the car: remove the battery, bend the carpet.
- Empty the trunk.
- Unscrew the rear bumper and disconnect the headlight unit. If the right rear is to be replaced, then the fuel tank must be removed.
- Remove the seal.
- Using a thin chisel or machine, cut out the old part, retreating 1-1.5 cm from the joint.
- Drill out the welding points with the frame cross member.
- Disconnect the part.
- Cut off the remaining metal, grind it, straighten the edge.
- Attach a new part, secure with spot welding, check the gaps.
- Weld by contact welding, in increments of 4-5 cm.
At the final stage, the part is primed, treated with anti-corrosion agent and painted to match the body color.
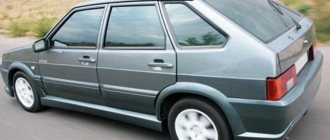
Subaru Impreza 1999, 125 l. With. — body repair
Subaru Impreza, 2005
I have blog posts on this car about the life of the repaired arches. The biggest problem is to properly sandblast the inside. When sandblasting, the person did not remove the wheels in order to crawl up properly, so he could not process the arches properly. the second reason is the wrong soil. I was told epoxy. in fact, there was some kind of simple problem (I already found out about this later when, a few weeks later, I came to the painters and drove the car in wet weather with the arches primed). third - the arches were not completely processed. in places where the molding was not sandblasted. therefore, after a year, dots (small) appeared in places where they had not sandblasted from below near the moldings. and after 2 years a bubble appeared in the sandblasted area. Every year a little swelling was added around the holes. As far as I know, the next owner opened the arches last summer because he was welding the rear side members and took the arches for company because they had lost their presentation.
Replacing a car wheel arch with your own hands
Let's consider step by step how to replace the wheel arches of a car with your own hands:
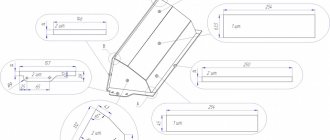
- We order the production of a new arch from any turner. The material you can choose is some light alloy like aluminum.
Replacing a car arch with your own hands
Using a jack, we lift the car from the side where we plan to work. We remove the wheel so that there is no interference. We disconnect the arch from the suspension, floor, partition and trunk. We clean the surface from the paint layer to bare metal. We try on a new product and make a mark along which we will cut off the one that requires replacement. After the cut, we install a new product, securing it by welding. We start cooking in the center, then move to the edges. It is important to pay attention to the fastening in the threshold area, where the main loads will occur. We grind the welding seams and apply a special primer. After priming, use putty to level all surfaces. We sand the putty and apply acrylic primer. At the end we paint the installed product.
At this point we can consider the work completed if you have the skills to operate a welding machine. It won't cause you any particular difficulties.
The arch is welded over the wing with an overlap
The most vulnerable places
The first things that suffer from rust are: the bottom of the car, arches, sills, fenders, exhaust system, upper edges, bottom and internal cavities of doors, suspension parts. Further (depending on the quality of the metal itself and the presence of at least a minimal galvanic coating), the following are covered with “saffron milk caps”: the edges of the doors, the space under the bumpers, near the rear-view mirrors, under the fastening of the roof rails, or the top trunk, the spare wheel, the “well” of the neck fuel tank, trunk and hood lid, interior floor.
Rusty car Rusty sills and bottom
“Spiders” of rust inhabit all difficult-to-ventilate folds in which dirt accumulates, where water from glass or condensation drains, as well as the edges and “ribs” of body parts, which are regularly hit by stones, tinder branches, sand, shoe or clothing fittings, hard brushes. Chips on the paintwork appear from a jack, in places of laps from other cars, at fastening points weakened by vibration.
Where does rust come from on an entire car body?
There are two types of rust: self-rust - when the metal of the body rots under a layer of paint if it has been damaged, and introduced. Own - appears on any uncovered parts: the steel of the car body rusts (oxidizes) in air. In a humid coastal climate it is faster, in a dry climate it is slower, but the process is unstoppable. In winter, sand and salt road reagents help destroy the destructive effects of moisture.
Introduced is when metallized specks get stuck into the paint from the outside, which then begin to corrode, destroying the coating. Dust and pieces of metal from brake discs, pads, rusty bodies, suspensions, exhausts fly from under the wheels all year round, leaving “black spots” not only on metal, but also on plastic parts. If such a steely speck penetrates the car's paintwork down to the metal, then the rust cone will gradually spread over its surface, loosening it, separating it from the primer. Later, the paint on this place will be revealed.
Salvage car Salvage rusty car with peeling paint
How to restore a rotten arch
Before working with the welding machine, you need to disconnect the power supply, that is, the battery. The problem we have is this: we need to heal the corroded arch.
First of all, we clean everything with an emery machine and cut out the damaged area with a grinder.
After we cut out the damaged area, we treat everything with acid so that there is no more corrosion. We make blanks, cut out patches. Made from food grade stainless steel 0.8 thickness.
We scald it from the inside and cover it with baxite soil. Carefully, even under the seams.
If it is not convenient or difficult for you to make a patch according to the diameter, you can use cardboard for this. Apply and press along the perimeter of the cutout. You will be left with a mark, cut it out and apply it to the metal to cut out a patch according to your cardboard model. For in-depth processing, you will also need a Movil, a hose with a spray nozzle in all directions.
After all the processing, take the first patch and insert its hole where the cutout was. In order to be able to safely operate the patch, it is necessary to weld an unnecessary screwdriver or a metal rod.
Thanks to the fact that you weld it to the patch, you will have the advantage of not only adjusting it, but also pressing it tightly to the metal. And so we weld all the patches.
Wheel arch extensions - how to make them yourself + Video
Surely, many have seen wheel arch extensions or linings on various cars, more often SUVs. Many people think that these details serve as some kind of decorative element, however, the function of arch extensions is not limited to this. Let's try to figure out what widened wheel arches are, what is their main function and how to make them yourself?
Why are wheel arch extensions needed?
Off-road driving or frequent visits to rural areas necessarily requires further car washing. The fact is that wide-profile tires, most suitable for driving on such terrain, protrude significantly beyond the car’s arches. All the dirt collected on the tire treads, when the wheel rotates, flies towards the body, as a result of which it becomes quite dirty. To combat this problem, many SUV designers have made the vehicle body significantly wider by increasing the protrusion of the wheel arches.
This improvement did not apply to all cars. Many models are produced on ordinary narrow tires, which insatiable drivers are sure to replace with wide-profile ones. The wheel arches, in turn, remain the same size, which makes it necessary to increase them.
Increasing the width of the wheel arches is now possible with special linings that attach to the car body and make it a little wider. Wheel arch extensions are produced as car accessories and are installed outside the factory.
Ways to widen wheel arches
There are two ways to increase the width of the wheel arches. The first is to install special car linings, and the second involves making these parts yourself, based on the driver’s taste preferences.
Wheel arch extensions found on sale can be of three main types:
Universal. For universal extenders, there is no clear restriction on the make and model of the car. They are sold in the form of special rubber rolls, which are adjusted to the arch of the car and attached to the arch from the reverse side. This extender allows you to protect the car body from the ejection of small pebbles or dirt, but it has a rather significant drawback for drivers - an ugly design. Their execution worsens the appearance of the car, which is why such arches are used only by SUV drivers. However, the ugliness of these parts is offset by the low cost.
Universal plastic pads. They have a more advanced design and look good on many cars. There is already a limitation on the make and model of the car, since they are manufactured only in special sizes. Installing an extender from one car to another model is not possible. Fastening to the body is carried out using self-tapping screws. For all their aesthetic advantages, these arches do not protect the body well from dirt and are best used as decoration.
Fiberglass arch extensions. They are a perfect addition to the body and have some installation difficulties. They are made from rough material, the appearance of which is far from comparable to the commercial one. Such expanders are also fastened using self-tapping screws, but the surface of the linings is cleaned and a layer of putty is applied to them. After which, the part is aligned with the body and painted in the color of the car body. Thus, the result is a wheel arch extension that becomes one with the body and invisible to the naked eye. Installing such an overlay will require additional painting experience.
Popular manufacturers
Foreign and Russian companies are engaged in the production of specialized car fender flares. The most famous and reputable manufacturer is Bushwacker (USA). The plant produces a wide variety of additional accessories for cars. Bushwacker products are of high quality and resist the destructive effects of salts and acids, as well as ultraviolet rays. A distinctive point: the company includes fastening elements with its products.
Final stage
Regardless of how the car body was repaired, they all end with putty. However, it absorbs moisture, which leads to rapid destruction. Therefore, it must be coated on top with an anti-corrosion or epoxy primer. Body repairs are completed without welding by painting. To do this, use a spray gun or aerosol cans, after covering the adjacent surface of the car with plastic film. You should not use a brush, as drips are possible.
The proposed methods will help to repair a car without welding in case of single damage. However, if a large area is affected by corrosion, it will be easier and more reliable to contact a car repair shop to replace the rusted area by welding. Most often this happens to the floor, so it is recommended to regularly check it from underneath the car using an inspection hole or lift.
Fiberglass patch
You can also repair a hole in a car body using fiberglass and epoxy glue. Professionals recommend following the following sequence of repair work:
- Clean the edges of the hole using a grinder or a suitable tool.
- Treat the cleaned areas with an anti-corrosion agent or a rust converter.
- Cut 2-3 patches from fiberglass. It should be noted that the dimensions of each patch should be 30-40 mm larger than the dimensions of the hole and the previous patch.
- Saturate the surface of each patch with epoxy glue. Thanks to this, it will be possible to glue them tightly, preventing the possibility of liquid and moisture leaking from the outside.
- Glued patches are attached from the inside of the body using epoxy glue.
- After the glue has completely dried, cover the surface of the patches with primer or putty.
- At the last stage of repair work, the primer (putty) must be carefully cleaned with sandpaper.
By using one of these methods, you can get rid of holes in the body quickly and inexpensively.
Algorithm of actions
Dismantling and subsequent insertion of the front wing takes up to 1 hour, even for inexperienced craftsmen
It is important to perform the entire sequence of actions correctly:
- Unscrew the two nuts in the bumper fasteners and lower the edge of the bumper down.
- Remove the outer part of the sill trim.
- Remove the headlight cover.
- Remove the turn signal from the headlight.
- Remove the side turn signal.
- Using a 10mm wrench, unscrew the self-tapping screw that secures the part to the bracket.
- Unscrew the screws under the threshold, two bolts that secure the part to the rack, they are located on the inside.
- Unscrew the 4 bolts that connect the element and the front part of the body.
- Using a knife, cut off the sealant on which the wing is mounted on its top shelf on the body.
Do-it-yourself wheel arch replacement technology
During operation, car arches are constantly exposed to precipitation, dust, dirt, water, and crushed stone, which leads to their corrosion and subsequent destruction. This especially applies to the rear wheel arch. It is made up of two planes connected by welding - the outer wing and the arch above the wheel, where corrosion occurs. Minor damage can be repaired in a timely manner with cosmetic repairs. If they are deep and extensive enough, a complete replacement of the arch will be required.
This process does not require special preparation. Any experienced driver who knows how to operate a car can do it. At the same time, when replacing an arch on your own, you must adhere to a certain technology. In addition, in order to correctly replace a wheel arch, you must have the appropriate tools, equipment and materials. These include:
- Arch repair kit;
- Electric arc welding semi-automatic;
- Equipment for cleaning and grinding seams;
- Drill with metal drill;
- Pneumatic hammer and chisel set;
- Bench hammer;
- Finely ground hand chisel;
- Pincers and wire cutters;
- Screwdriver;
- Knife, ruler and gloves;
- Glasses;
- Metal sheet;
- Primer, paint;
- Anti-corrosion coating agent.
First of all, a visual assessment of the degree of corrosion of the metal is made. The necessary measurements are taken. Depending on the level of damage, arches are replaced partially or completely. Everything will depend on how worn it is. For the most minor damage, you can get by by coating the inside of the arch with a protective anti-corrosion agent.
Stages of partial arch replacement
- Disconnect the wheel arch from the trunk floor, the bulkhead frame and the suspension spring support using a drill, pneumatic hammer, plumber's hammer, and chisels.
- Identify and mark the damaged area.
- Remove damaged metal according to the markings. This should be done using protective gloves and goggles.
- Cut an identical blank from a metal sheet.
- Prepare the surfaces for welding, remove the remaining pieces of metal from the ends with wire cutters or pliers, and set the minimum gap between the parts.
- Sew 5 mm holes in the workpiece in 30 mm increments at the junction with the solid arch.
- Weld the workpiece to the solid part of the arch either spotwise or with a continuous seam.
- Clean and sand the seams. Sometimes they are covered with special plastic covers.
- Prime the entire surface of the treatment area, apply an anti-corrosion coating and paint.
- Restore the original disconnections from the trunk, bulkhead and suspension.
If a preliminary inspection shows that the arch is worn along its entire contour, the entire part will need to be replaced.
Stages of a complete arch replacement
Pre-cut and form a new arch. Any turner can do this. Light alloys, such as aluminum, are suitable as materials. For convenience, when carrying out work, you should lift the car with a jack and remove the wheel. A complete replacement of the rear arch, including the wing, is carried out, as with a partial replacement, after disconnecting it from the trunk, floor, partition and suspension. Remove the paintwork from the wing and arch down to the metal base. Try on the wheel arch being installed with your hands. Mark a line along which the old arch will be cut. The most important step when installing a new arch with your own hands is welding, which is performed with a special apparatus. It starts in the center of the arch and wing, then is welded along the edges. If the gaps coincide, welding is carried out along the entire contour circle
Particular attention is paid to fastening to the threshold; when moving, all the main load will be here. Finally, a welding primer is applied. All subsequent actions of a complete replacement of an arch are similar to those carried out during a partial replacement.
Body repair with putty
This method is used when you urgently need to repair a small hole without welding or there are no other options for car repair. However, it should be understood that this is a temporary measure, since the putty will quickly crumble. To repair the damage, use a special putty with small, medium, and large glass fibers. When preparing it, you need to ensure that there are no air bubbles. To create an even layer, a lining is installed on the back of the hole.
A primer is applied to the prepared area of damage. After it dries, putty with large fibers is applied. Depending on the size of the hole, several layers are applied and each layer is completely dry. The total thickness should not exceed 2 mm, otherwise the patch will begin to crack. The last layer is applied with fine fiber putty. The repaired surface of the car is treated with fine-grained sandpaper.
Fiberglass and mesh
To repair more extensive damage, an aluminum patch mesh is used. A piece slightly larger than the hole is cut out of it and attached with masking tape. Next, sealing holes in the car body without welding is carried out in the following sequence:
- a thin layer of fiberglass putty is applied without touching the tape;
- after drying, the tape is removed;
- subsequent layers of putty are applied after the previous one has dried;
- the surface of the car is treated with sandpaper or a grinding machine until smooth;
- To strengthen the mesh, several layers of putty are applied to the back of the body.
Long-term auto patches are made from fiberglass and epoxy resin. Several overlays are cut from it, the first of which should cover the hole with a margin of 2 cm. The size of each subsequent piece is made larger than the previous one. The last overlay should cover all the metal stripped during the preparation process.
The cut pieces are impregnated with resin and placed on the hole in a sequence of increasing sizes. If you need to seal large holes on the back of the body, use linings to prevent the fabric from sagging. After laying all layers of fiberglass, wait for the resin to completely harden. The time required for this is indicated in the instructions.
Welding method
If the surface is so corroded that puttying is not possible, you will need welding. Obviously, to carry out work of this kind with your own hands, you must have a welding machine and have the appropriate skills in handling it. So, repair by welding looks like this:
Carefully wash and dry the car. Using a grinder, we cut off all the affected areas of the wheel arches. Align and clean the edges (for making patches, it’s good to get arches that have been used and are no longer in use). We cut out suitable patches and bring them to the shape we need in order to obtain the correct wing configuration.
Rear arch repair using welding
We prepare such patches for the inner and outer parts of the arch. We spot weld the inner patch first, then the outer one. It should be recessed compared to the rest of the surface. Carefully sand the weld seams. Using putty we derive the geometry. We sand the putty on top. Apply a layer of acrylic primer. We paint the repaired area of the car.
Varieties
The following materials are used for the production of mudguards:
- plastic. But according to experienced drivers, this material is not strong enough. Plastic wheel arch extensions perform a decorative rather than a protective function;
- fiberglass. It has great strength, but the cost is usually high. They are quite difficult to install;
- fiberglass. It is distinguished by its high elasticity and resilience; this material is often used to make do-it-yourself overlays;
- rubber - recently it was the only material for the production of fenders. It is characterized by elasticity and practicality, thanks to this it does not lose popularity even now. Rubber wheel arch extensions are universal and suitable for any car model. Their only downside is that rubber fenders do not have an elegant design;
- cable plastic is an economical option with excellent characteristics, and it is also easy to install;
- Duraflex is the best material for the production of expanders. It is elastic, resistant to the aggressive effects of natural factors, does not deteriorate under the influence of ultraviolet rays, and adheres well to the surface.
Rubber wheel arch extensions are the most common because they are practical and easy to install.
Puttying
So, if we are talking about minor damage, the putty method is used. Step by step it looks like this:
- It is necessary to thoroughly wash and dry the car.
- Remove all bare metal rust from the damaged areas and sand them thoroughly.
- Treat areas with reactive primer and allow the surface to dry.
Car rear arch putty
- Place acrylic filler on top of the reactive layer - under no circumstances should putty be applied to acidic primer.
- After the acrylic has dried, apply putty and wait for it to dry.
- Thoroughly sand the dried putty, gradually reducing the grain size of the abrasive. Thus, level the surface, preparing it for painting.
- Paint those areas of the car that have been repaired.
Installation
Store-bought fenders for arches must be secured in a special way. Standard fastening of the expander is carried out using the following tools:
- drill;
- drill;
- automotive tools;
- scissors.
Installation of plastic expanders is carried out only at positive air temperatures.
The car must first be washed and dried, and the working areas must be degreased. Then they lay out the kit and begin installation.
- The factory screws are unscrewed, the protective film is partially removed and the expander circuit is released.
- The overlay is applied to the bridge and the existing gaps that have formed between the part and the wing are adjusted.
- Install the standard screws, but do not tighten them.
- Place the complete fasteners.
- Remove the protective coating from the adhesive tape on the expander and press the pad tightly against the machine body. For reliability, you can drill the product with self-tapping screws.
During installation, plastic expanders need to be heated with a hairdryer so that they become more elastic and take the desired shape.
After installation, the car should be kept in a warm place for two days.
Arch repair scheme
Repair procedures vary depending on the type of damage (scratches, dents, rust, etc.). As an example, we will give a simplified scheme for repairing an arch in the event that it is rotten only in one small area, but through and through.
- Step 1 Cost assessment. You have two preliminary options for estimating the cost of arch repair - call and tell us everything in words or send us photographs (videos) of the damage. The specialist will tell you the cost, which does not change in 80% of cases (you will find out why this is later).
- Step 2 Arrival at the service center. Having decided to contact us for help, you need to choose a convenient day and time to come to the service - contact us in any convenient way. You will find all possible communication options on the contact page.
- Step 3 Inspection. You have arrived at the service. The technician put the car on a lift and inspected the damage. If the technician finds damage that was not identified before coming to us, then he will tell you everything, show you and offer options, and you will already make a decision.
- Step 4 Spare parts. There are two options for fixing the rotten part of the arch - installing a patch or sealing it with fiberglass. After consultation with the master, you will choose the appropriate option for yourself. Metal rots, plastic does not. For example, let's assume that metal was chosen to replace the area.
- Step 5 Repair. The master will cut out the rotten area, clean it, weld a patch, sand it, sand it, treat it with various metal compounds, putty, prime it, paint it, dry it and polish it - he will carry out a cycle of work.
- Step 6 After repair. You will carefully examine the master’s work and accept it, or if there are any comments, then express them. although there are almost no comments on our work. If you have any questions, ask them to the master, and he, in turn, will tell you some specifics, for example, how long it takes to wash the repaired area (the timing depends on the materials used). That's all!
What to do after signs of corrosion appear?
Typically, traces of rust appear in the form of brown dots, popularly called “saffron caps.” The appearance of such elements indicates that the process of influence of external factors on the metal has already begun. As soon as you notice this effect, you need to get down to business immediately. You should contact a body shop or paint shop with a good rating among motorists. Usually these specialists will find the best way to solve the problem.
When working independently, you should do the following:
- carefully examine the area of damage to understand at what stage the corrosive attack is, this will help plan further actions and get better results;
- prepare a tool for performing basic body work, it’s worth mentioning right away that you won’t be able to do the painting at home, you will need very expensive equipment;
- get different types of sandpaper, rust converter, solvent, rags, and also reserve 1-2 hours of time (costs depend on the amount of damage);
- clean the area of damage so that no rust remains; this is done with sandpaper and constant watering; a certain area of the paintwork will also be affected;
- Use a rust converter to treat the area to remove any rust, then refinish with a primer (can be used in a spray can).
Having prepared the spot for painting, it is best to contact specialists with a good spray booth and professional equipment. If appearance doesn’t matter to you, you can paint it at home using a small garage compressor and an inexpensive spray bottle. Of course, in the latter case, the paint spot will be very different from the color of the entire car. The quality of work also depends on the quality of paint selection.
Repair kit
If you need to replace the rear left wing of a VAZ 2114, which has significant deformation, it is recommended to purchase a complete repair kit, which includes two sidewall panels, moldings, bolts, and inserts. The number that the AvtoVAZ manufacturer uses for its repair kits for 2114 is 21090-5401065-00. In addition to the main enterprise, parts for the Lada are produced by companies and experimental workshops:
- Nachalo software;
- Kamaz (Naberezhnye Chelny).
All replicas are supplied in original packaging; parts are made from black steel up to 0.8 mm thick. The part must be covered with transport primer.
Useful information about wheel arch repair
If you want the front and rear wheel arches on your car to look great and not show any defects, contact us. Our service specialists will perform high-quality repairs to arches, regardless of the degree of damage. We have at our disposal modern equipment, materials and tools for the complete restoration of the body and its components, and the craftsmen thoroughly know the nuances and features of this type of work.
Types of damage and ways to eliminate them
When operating a car, the arches receive different types of damage:
- Chips, peelings, cracks in paintwork;
- Surface corrosion;
- Severe damage to the metal by rust, up to the formation of holes;
- Dents, changes in geometry, surface breaks as a result of impacts;
These defects are equally inherent in both the front and rear wheel arches. But the complexity of restoration of arches varies. At the rear, the arch consists of two parts - external and internal, connected into a single structure by a permanent connection. At the same time, the rear wing itself with the arch is part of the rear part of the body and cannot be removed. The front fender can be removed from the car, which simplifies the process of restoring it.
Based on the degree of damage, a restoration technology is selected, of which several are used for arches:
- Cosmetic repairs (for damage to paintwork and surface corrosion);
- Straightening (dents and geometry changes are eliminated);
- Sealing holes;
When redecorating an arch, craftsmen clean its surface down to the metal, treat it with corrosion inhibitors, followed by putty, primer and painting.
Note that painting work is necessarily included in the process of restoring wheel arches. They are the final stage for any type of body repair.
Dent removal and straightening
In a garage environment, small dents are often repaired with fiberglass and putty. But this repair is incorrect, although in this way it is possible to restore the geometry of the surface. The essence of the work comes down to filling the dent with layers of fiberglass and putty, followed by sanding to give the required shape. And then the surface is painted over.
The disadvantage of this method is the need for thorough surface preparation, which is not always done. Therefore, corrosion often forms under the applied materials. Also, a layer of putty that is too thick eventually cracks along with the paintwork and the defect on the arch becomes noticeable again.
To restore the geometry of the arch surface, we straighten it. Using specialized equipment and tools, craftsmen level surfaces to an almost ideal state, regardless of the complexity of their shape and the number of creases.
To remove dents we use:
- slipway;
- Spotter;
- Reverse hammer;
- Hammers and extensions for straightening;
After straightening, the putty is used only to seal the smallest defects, so the thickness of the applied layer is insignificant and it will not crack in the future.
Filling holes
The most technologically complex operation is filling holes and replacing the arch in case of severe corrosion. Car enthusiasts often use fiberglass for this, which is also wrong. This method comes down to cleaning the surface, treating the edges of the holes with chemicals. means to prevent further spread of corrosion and fill the rotted area with fiberglass. After this, the surface is given the desired shape by puttying and sanding, followed by priming and painting.
It is better to remove holes on wheel arches by welding. We repair arches like this:
- We determine the size of the damaged area and make markings;
- We cut out replacement metal;
- Cut out the rusty part of the arch or its entirety (when replacing);
- We weld the prepared metal;
- We clean the welds;
- We treat the seams and adjacent areas with anti-corrosion agents;
- We putty and sand the arch to give the desired shape;
- We carry out painting work.
Note that this is a general algorithm for restoring arches by welding. Each specific case of repair has certain nuances and features that we take into account.
Whatever the condition of the arches on your car, we will fix them. You can evaluate the quality of arch restoration performed by our masters from the photos below.
What to do after signs of corrosion appear?
Typically, traces of rust appear in the form of brown dots, popularly called “saffron caps.” The appearance of such elements indicates that the process of influence of external factors on the metal has already begun. As soon as you notice this effect, you need to get down to business immediately. You should contact a body shop or paint shop with a good rating among motorists. Usually these specialists will find the best way to solve the problem.
When working independently, you should do the following:
- carefully examine the area of damage to understand at what stage the corrosive attack is, this will help plan further actions and get better results;
- prepare a tool for performing basic body work, it’s worth mentioning right away that you won’t be able to do the painting at home, you will need very expensive equipment;
- get different types of sandpaper, rust converter, solvent, rags, and also reserve 1-2 hours of time (costs depend on the amount of damage);
- clean the area of damage so that no rust remains; this is done with sandpaper and constant watering; a certain area of the paintwork will also be affected;
- Use a rust converter to treat the area to remove any rust, then refinish with a primer (can be used in a spray can).
Having prepared the spot for painting, it is best to contact specialists with a good spray booth and professional equipment. If appearance doesn’t matter to you, you can paint it at home using a small garage compressor and an inexpensive spray bottle. Of course, in the latter case, the paint spot will be very different from the color of the entire car. The quality of work also depends on the quality of paint selection.
How to replace a rear arch on a car with your own hands
As I said in the previous article, I will write about the restoration of the Daewoo Lanos car. This article will be about fender arch restoration, or more precisely about fender arch replacement.
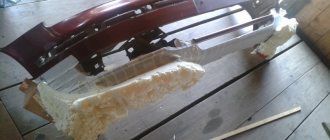
In my case, the arch needs to be completely changed, since it was already repaired by serious guys several years ago using foam. This is usually done before selling a car. The part is foamed, after the foam has dried, the excess is cut off to give the foam the shape of the part. Then all this stuff is putty. Putty gives rigidity and outlines the final shape, and then the whole thing is painted. At first glance, it is almost impossible to distinguish whether a part is welded or foamed.
Repair arch
To replace it, I bought a repair arch, since a lot of parts were damaged, and bending the whole thing yourself would take a lot of time and would not cost much less in terms of materials.
I will not weld the entire purchased part, since this is not necessary. I need to cut out a part of it that will cover the area affected by corrosion. The part that I will weld should be slightly larger than the cut out part of the wing. First I need to find the area that is affected on the wing and that is foamed.
Search for corrosion on the arch
In order for the arch replacement to be done as efficiently as possible, you must first find and remove all corrosion. I will look with a screwdriver. I take a medium screwdriver and apply gentle blows along the entire length of the arch. Where it fails, there is probably rot and I need to replace it, where it holds the blow of a screwdriver, I will clean off the paint with a grinder and take a look.
Removing rot from a part
To remove the affected area of the wing, I will use a grinder. I cut out everything that is rotten through or will soon rot and clean the edges of the cut hole. On the internal mudguard, since there is now access, I clean everything with a metal brush and treat the corrosion with acid. All the saffron milk caps and rot have been etched and cut out, now you can begin installing the arch.
Welding a new wing arch
Having adjusted the new part to a size slightly larger than the cut out part of the wing, I place the fresh part behind the old part of the wing and grab it. In order not to overheat the wing, I place points 10 cm apart from each other. When I’ve done it once, I let the wing cool a little and start putting intermediate points so that I get a distance between the points of 5 cm. I do this again so that I get approximately 2.5 cm between the points. If the welding areas are overheated, the metal will twist and either be squeezed out, or a depression will form, and this will be a problem area. Even if all this is leveled with putty, the putty will burst after a while and there will be a crappy crack in the paint along the entire seam.
Finishing the arch
When the arch is welded, all that remains is to clean the welding points, putty and paint. I will paint the whole thing a little later, since I need to paint the whole car, so I’ll post a photo of the painting a little later.
This is what I got after cleaning the spots and applying the starting layers of putty. I use putty with fiberglass. I haven’t finished the putty yet. I'll post the finishing touches a little later.
I filmed all this and posted it on YouTube. So I advise you to watch the video on replacing the arch.
Rivets
This method not only repairs large holes in the car body, but also replaces parts (fenders, aprons) without welding. In terms of reliability, it is not inferior to welding. It is recommended to install rivets in an inconspicuous place. Since there is no splash of molten metal during operation, like welding, it is often used to repair car floors.
The riveter required for the job can be bought in a store (costs approximately 500 rubles). The technology is simple:
- The patch is cut so that it overlaps 2 cm around the edges of the hole.
- By attaching it to the body, it is given the desired shape.
- The locations of the holes for the rivets are marked.
- After drilling the patch with a drill according to the diameter of the rivets (4 - 6 mm), it is advisable to countersink the edges of the holes so that it fits more tightly to the surface of the car body.
- Having applied the patch again, the center of the first hole is marked and drilled.
- After riveting it and leveling it, the patches are tapped and the remaining holes are drilled in place.
- To ensure a tight fit of the patch to the car body, rivets are fastened from the center to the edges.
- To prevent moisture from getting inside, the joint around the perimeter and rivets is coated with sealant.
Read with this
- Universal wheel arch covers
- Wheel width
- Engine repair in Moscow
- How to quickly remove the starter on a VAZ 2110 with your own hands
- Sound insulation of car fender liner
- Vehicle check
- Frozen lock in the car. how to open a frozen car lock
- Washing the car, doing everything right
- Do-it-yourself car soundproofing, what materials are required
- Fine for unreadable car number
Purpose
Wheel arch extensions prevent dirt and small stones from entering the car body while driving.
Flare devices are often called mud flaps, fenders, fender flares.
The function of fenders is as follows:
- protect the body from dirty splashes;
- help prevent stones from getting on the surface of the car, which can cause deformation;
- give an expressive look to the car.
Wheel arches will need to be widened for SUVs and crossovers. Such tuning is useful for cars participating in races or rallies.
Installing the arched device is not difficult. After spending a couple of hours on repairs, you can make the overlays yourself. If you don’t have time for this, you need to go to a car store that sells different types of similar devices made in Russia and abroad.