PREPARATION: Careful preparation is essential to maximize the life and reliability of your universal bumper lip. The installation area for double tape must be clean, dry and degreased before installation. Installation is carried out at a temperature of at least 21º C outdoors or indoors. In a cold room or outdoors, it is necessary to heat the tape and the adhesive surface using a hair dryer or indoor heat guns to help the adhesive adhere to the surface as much as possible. STEP 1: Remove the red protective film from the tape 20-30 centimeters, heat the tape and bumper with a hairdryer, and apply it to the surface of the vehicle. STEP 2: Continue installation with the rest of your car, stick, press and hold for a few seconds applying pressure from the bottom where it sticks. Make sure there are no air bubbles or gaps and continue with step #1. STEP 3: Trim off the excess with sharp scissors. It is advisable to make the first cut further than you want to see what the result is and how sharp the scissors are, so that you don’t end up with a crooked cut. Next, after making sure that the scissors cut well and the cut is even, make the final cut along the edge of the bumper arch.
Cleaning: Wash the bumper lip the same way you wash your car. Using soap and water will help remove dirt, dust and streaks. After Installation: Do not drive or wash your vehicle for 24 hours after installation to allow the tape to fully adhere to the vehicle's surface.
The Secret to Shine: You can easily give your all-purpose lip a nice glossy shine or help remove scuff marks by applying tire and plastic ink or wax gloss.
This recommendation will allow you to drive for more than two seasons without additional fastenings!
When installed not on a smooth paint coating, but on plastic (rough, matte) bumper elements, the service life of the double tape may be shorter.
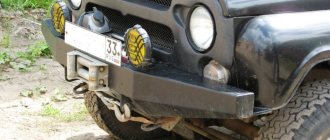
Fiberglass bumper manufacturing process
To make the product yourself, you will need not only components, but also competent guidance on how to make this tuning element.
What is needed to glue the product
An experienced car enthusiast can find most of the tools in his garage. Then you should check the list below and purchase the missing materials and equipment. You need:
- epoxy resin - 400 ml (if epoxy is not available, you can use polyester resin);
- fiberglass packaging (the best option is “Steklomat 300” and “Steklomat 600”);
- gelcoat hardener (taken at the rate of 1 cube per 200 ml of resin);
- Bulgarian;
- protective gloves, respirator, glasses;
- industrial plasticine - 5 kg;
- masking tape - 5 rolls;
- putty knife;
- rubber roller;
- sandpaper;
- Teflon polish.
Photo gallery: materials for work
Sequence of operations to create a part from scratch
The algorithm below will help you figure out how to properly glue the bumper:
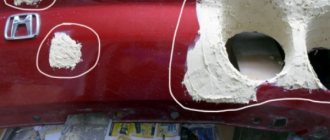
- The standard bumper is removed from the car. Areas that have become unusable are carefully cut off using a grinder (this category usually includes the lower edge and openings of fog lights).
- Strips of masking tape are glued to the areas of the bumper surface that are planned to be changed, then a thin layer of warm industrial plasticine is applied to the tape.
- Next, a second layer of cold plasticine is applied, which is carefully pressed down and leveled with a spatula (a rubber roller can also be used for these purposes).
- Masking tape is again glued onto the upper part of the plasticine-coated bumper (this is what will be used to check the shape of the bumper and check the lines).
- Now a series of parallel lines are applied to the layer of tape with a marker, located at a distance of 10 cm from each other (this is necessary so that the future shape of one side of the bumper can be easily transferred to the other side, and this can be done with maximum accuracy).
- The adhesive tape profile obtained in this way is transferred to the second side of the bumper.
- Then the tape and markings are applied in the same way to the lower edge of the bumper, after which holes for the fog lights are carefully cut in the plasticine.
- The resulting model is installed in the working position, its symmetry and the correct location of the holes are assessed.
- Now, based on the modified bumper, it is necessary to make a matrix, according to which a new bumper will be created. The entire prepared surface is covered with Teflon polish in at least 3 layers (this will not allow the old bumper to stick to the matrix). Then a layer of gelcoat hardener is applied to the polish, which is sometimes mixed with aluminum powder.
- At the next stage, to strengthen the bumper, several layers of epoxy resin are applied to it, on which a layer of fiberglass is laid. In this case, it is necessary to ensure that no air bubbles remain under the fabric.
- Once the fabric has hardened, the surface is sanded to remove any loose fibers.
- The old bumper is carefully removed from the matrix. The plasticine remaining on it must be thoroughly washed off with either kerosene or white spirit.
- The resulting matrix is lubricated from the inside first with industrial wax, then with a gelcoat hardener, after which the first layer of fiberglass is applied. It is rolled with a rubber roller to eliminate bubbles. Next, the second layer is laid, then the third (and for the third layer it is recommended to use “Steklomat 600”).
- The resulting structure must be allowed to harden within 24 hours. After this, the finished fiberglass bumper is carefully removed from the matrix and processed with fine sandpaper. Now it is ready for painting.
Features of choice
The part is produced by several manufacturers in China, the USA and Korea. Products differ in the quality of rubber, the width of the tape, and the curvature of the contour along the width. Some manufacturers supply their creations with soldered decor of various colors - so that you can choose a lip to match the car body.
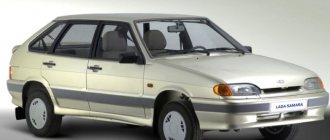
As already mentioned, the finished part is a tape of various lengths. The length of the rubber lip in the standard version is 2.3 meters. This length is quite sufficient for standard sedan cars. If a splitter is purchased for GAZelles, KAMAZs and jeeps, it makes sense to pay attention to tapes with a length of 250, 280, 300 or 330 centimeters. Just keep in mind that the longer the tape, the higher the cost.
In order not to get into trouble with choosing the length of the product, it makes sense to use a tape measure to measure the required length of the part of the car that you plan to refine: bumper, wheel arches, sills, rear bumper. Manufacturers recommend buying a lip 10 centimeters longer than the figure obtained as a result of the measurement.
We make it ourselves
If you have previously had to deal with epoxy glue and the technology for its use, then making your own front bumper lip will not be difficult for you.
For ease of use, I recommend removing the bumper from the car. This will allow you to perform all necessary operations efficiently and comfortably. The lip is made from ordinary polyurethane foam or polystyrene foam, followed by gluing with fiberglass in several layers (usually 2–3 layers). To securely attach the lips to the bumper, I recommend carefully sanding the places on the bumper where they will be attached to each other.
If polystyrene foam is used, its individual sheets can be fastened using “liquid nails”. And in the case of using polyurethane foam, you just need to stock up on the required number of cans.
After creating the main blank from the above materials, we pick up a sketch of our product, a sharp knife (scalpel, razor or something else sharp and cutting) and proceed, like sculptors, to cutting off all that is unnecessary. This process is quite painstaking and requires patience and attention. But sooner or later it will be completed, and then it will be possible to begin gluing the blank with fiberglass.
If polyurethane foam was used, then pasting can be done directly on it. If polystyrene foam is used, it must first be covered with technical plasticine or putty, since epoxy glue has a negative effect on it.
After applying the first layer of fiberglass, you must wait until it is completely polymerized. Depending on the external temperature and how much hardener was added to the resin, this process can take from 12 to 24 hours. After this, we eliminate minor flaws in the pasting using sandpaper or another available method and glue on subsequent layers of fabric. By gluing at least two, and preferably three, layers, we will get a fairly strong lip, ready to withstand external influences. All that remains is to do the final work.
These works include sanding first with coarse and then fine sandpaper to give a smooth surface. If necessary, the surface can be puttyed and sanded.
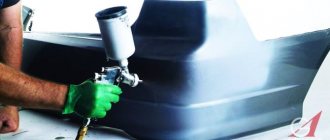
The final stage is painting in the desired color. This color can match the main color of the car or be contrasting. It is most convenient to carry out this operation using a can of auto enamel.
The lower body kit of a car is often made of rubber. And it is the simplest, most convenient and cheapest solution. The lip of the front bumper, like the rear one, is formed by gluing (or another method of fastening) a special universal material of a special shape. Tapes are available in various lengths and qualities. These tapes are universal (they are also called splitters). Before purchasing such tapes, you need to use a tape measure to measure the length of all car body kits in order to purchase the required amount of tape. The rubber lip is usually attached to the bumper using double-sided tape. Thanks to this, the front body kit of your car will look stylish.
Car bumper skirt - what is it and what is it for?
An addition to the bumper is otherwise, in technical language, called a body kit or trim, lip. Often, to properly secure it, the skills of a body shop are required. Without a correct fit, the lip does not sit correctly, and modernization becomes a waste of money and time.
The skirt is a spoiler with a special arrangement. The element is separate, can be a single piece or a composite spare part. The main thing is that with proper installation, the aerodynamics of the body increases. This effect is explained by the special design of the part, which is capable of redirecting air flows. Therefore, it is also called an aerodynamic fairing.
Tuning a car bumper using building materials
At the very beginning of the work, you need to clearly understand the technique of its implementation.
To make the body kit look unique, you are allowed to tune the front or rear bumper yourself or make changes to the factory model.
For understanding, we will describe both of the above versions.
Initially, it is necessary to remove the body kit from the vehicle for its subsequent cleaning. Do-it-yourself tuning of the rear and front bumpers is no different from each other.
It is necessary to fix thick cardboard on the right and left edges, so that the mounting foam will be concentrated in one place.
When using foam, you need to take into account that when drying, it expands and becomes voluminous. After filling the product with this mounting agent, let the foam dry, and then make the desired shape of the body kit.
To work you will need a knife and sandpaper. The body kit should then be properly treated with fiberglass and epoxy resin. After applying the putty, the layer is re-treated with sandpaper.
The final step will be priming and painting the finished product.
The hardest thing is to make the body kit yourself. Let's take a closer look at the bumper manufacturing process.
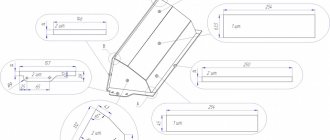
Spoiler creation process
Working with polystyrene foam is quite simple, but there is one caveat. After cutting, a lot of debris remains, which is very well electrified and can stick to the drying element at the most crucial moments. Therefore, try to remove the crumbs immediately.
We cut a sheet of foam plastic measuring 1x1 and 4.5 cm thick (sellers usually say 5 cm) diagonally. Cut out the wing blade. So the width of the foam sheet will definitely be enough for you. Next we move on to the fastenings. It is necessary to cut 1.5 mm plates from sheet steel. We drill 3 mm holes with a distance of approximately 2-3 cm. In order to reduce weight and improve adhesion, bend them with the letter L. After these manipulations, weld two 6 mm nuts to the base. Now you can glue them into foam blanks.
We glue the wing blade with epoxy glue and two layers of fabric. Then we assemble the structure.
Foam bumper
You can make a homemade bumper using polyurethane foam in the same way as using polystyrene foam. First of all, a box is made. It will serve as a frame that holds the polyurethane foam sealant.
Remember, foam has the ability to expand in volume after drying. After the installation material has completely dried, start marking the bumper. Now you can cut out the product.
When preparing the model, do not forget about the fasteners; they will be identical on the bumper and the car.
Next, the bumper is processed with sandpaper, as well as the use of resin and fiberglass. Finally, the bumper is primed and painted in the desired color.
Installation: simple but delicate
In the simplest version, installation will involve attaching the apron to the bumper using double-sided tape. However, this method is not the most reliable; there is a risk of losing the apron at high speed or when the car is used harshly.
An alternative option involves attaching the skirt using a construction stapler. This method is more successful. During the work, you must ensure that brackets are placed at least 1 bracket per 10 cm.
The ideal, but also the most labor-intensive installation method involves fixing the product using self-tapping screws and plastic washers. The fastening step is also 10 cm. It will take a little more time, but you definitely won’t have to redo it!
When installing, it is recommended to make cuts along the edge of the tape so that it fits neatly in the bend areas. It is better to make cuts in the shape of the letter A.
The installation is most conveniently carried out on an overpass.
|
Comes from motorsport
Another name for this part is splitter. In big motorsport, a splitter is a special limiter in the form of a plane, thanks to which a vacuum is created under the bottom of the car by limiting its flow under the front part of the bumper. The thinner air under the car provides a kind of cushion on which the car acquires greater lightness and, accordingly, speed.
This technology is complex; it is hardly possible to achieve a similar aerodynamic result using a rubber lip at a speed of 90 km/h. However, the universal rubber lip has its own advantages; it makes the operation of the car more comfortable and somewhat special for the car enthusiast.