Removing the rear bumper of a Hyundai Solaris
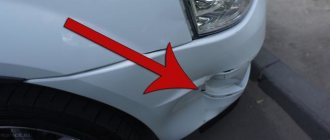
On many cars, the rear bumper is even more of a consumable than oil or antifreeze.
In a big city, there are always those who will “catch up” with a car enthusiast’s car and create an accident out of the blue. In order not to lose value, such a part is not restored, but a new one is purchased. Fortunately, for the Hyundai Solaris the rear bumper is quite easy to get, and you don’t have to buy it in the store. The so-called analysis contains parts for both the hatchback and the sedan. In addition to the bumper itself, both the sedan and the hatchback can be equipped with a diffuser. This part allows you to save the lower part of the bumper and at the same time looks quite nice. However, each driver has a choice whether to install such a part or not. On the one hand, a diffuser is quite a practical thing, but on the other hand, not everyone has holes for installing it, so you may not be able to do it yourself.
Such details do not come separately. In addition to the diffuser, the kit also includes exhaust pipe tips that will add beauty to the appearance of the car.
For the Hyundai Solaris sedan, this is a very interesting solution, as the vehicle becomes more aggressive in its exterior, and the rear bumper retains its appearance.
Which bumper to buy?
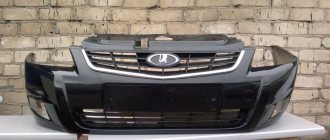
This part is the most frequently damaged body element. Dismantling will not be difficult.
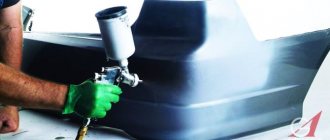
A bumper on a Hyundai Solaris for further painting costs about 2000-2500 rubles. Also at car markets they sell already painted bumpers in the color of your car, but their quality will differ from professional painting by a painter for the worse. It is possible for such a coating to be torn off by contactless washing, since there will not be sufficient adhesion of the paint to the plastic.
We also recommend that you read the article on painting the bumper.
Step-by-step replacement instructions
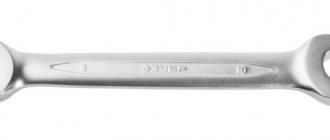
Required tools and accessories:
- Screwdrivers - slotted and figured;
- Keys for 12, 10, 8 mm;
- Bumper backing.
First you need to determine whether there is a diffuser. If it is installed, it is removed first.
Let's start removing the rear bumper of the Hyundai Solaris.
It is necessary to remove the rear lights; to do this, unscrew three bolts on each side and remove them. We disconnect the connectors from them. We remove the lights.
We tear off the wheel nuts, jack up the car and unscrew the wheel. Unscrew the mudguard.
Unscrew the screw securing the bumper to the side bracket. Likewise on the other side.
Unscrew and remove the two clips securing the bumper from the bottom.
Next, unscrew the two upper pistons from the amplifier.
At the places where the lights are attached, unscrew and remove two clips on each side.
We move the bumper to the sides along the edges and carefully and slowly remove it from the Hyundai Solaris.
Disconnect the parking sensor connectors. We place it on oilcloth or fabric so as not to damage the paintwork.
Unscrew the two screws securing the light reflectors. We remove the reflectors.
If the rear amplifier is damaged, dismantle it by unscrewing two bolts on each side with a 12 mm head, securing the amplifier to the body. Let's take it off.
At this stage, the removal of the bumper is completed, as you can see, you can do everything yourself, there is nothing complicated about it. Therefore, almost every car enthusiast, even a beginner, can change this part. You should not overpay to car services, which, depending on the make of the car, can add several thousand to the price tag.
After replacement, you can add a diffuser, which will preserve the appearance of the rear bumper for a long time. Also, the diffuser is a pretty good solution for the Hyundai Solaris in terms of tuning the appearance. It can be removed at any time. Moreover, it is quite simple to establish that such a part can be removed.
Features associated with replacing a brake drum
Some of them (relating to annual prevention and the use of proper lubrication) have already been mentioned. Another important point is that if one of the drums wears out and is replaced, the second drum must be replaced (even if it has less wear). This rule is strictly mandatory and has no exceptions.
Brake drum installation
In addition, in case of almost all damage - cracks, chips, grooves, and others - the drum should be replaced; it cannot be repaired. The only case when the situation can be corrected is if there are small bevels (in this case, you can turn the part on a lathe until you get an even round shape). True, after this operation you should check its diameter - if after grooving it exceeds 201.5 mm, then such a drum can no longer be used.
Removing and installing the rear buffer (bumper) Hyundai Solaris
Tools:
- L-shaped socket wrench 10 mm
- L-shaped socket wrench 12 mm
- Large Phillips screwdriver
Note:
The work should be done with an assistant. We carry out operations on an inspection ditch or overpass.
1. We remove the mudguards and unscrew the screws securing the fender liners to the rear bumper, as described here.
2. We remove the rear lights.
Note:
Fastening the headlight block (3 nuts) and chip.
2. From the bottom of the car, use a Phillips screwdriver to unscrew the clamps of the two pistons securing the bumper to the bumper amplifier brackets and remove the pistons from the holes in the bumper and the amplifier bracket.
3. Similarly, we remove the pistons for the upper bumper mounting to the two amplifier brackets.
4. Using a 10mm wrench, unscrew the screws securing the bumper to the rear fenders on both sides of the car.
5. The bumper is secured under the rear lights with a piston and a self-tapping screw. Use a Phillips screwdriver to unscrew the fastener and the screw.
Note:
We perform similar operations on the left side.
6. By pulling, we separate the left side of the bumper from the body, overcoming the resistance of the plastic holder clamps.
Note:
Supporting the left side of the bumper, similarly pull the right side of the bumper away from the body and remove the bumper.
7. An amplifier is installed under the rear bumper.
8. To remove the rear bumper amplifier on each side of the car, use a 12mm wrench to unscrew two bolts securing the flanges of the bumper amplifier to the body.
9. Remove the bumper amplifier.
10. Install the amplifier and rear bumper in reverse order.
The article is missing:
- Photo of the instrument
- High-quality photos of repairs
Where is the best place to dismantle?
The work will need to be carried out in a prepared garage. A slipway or inspection hole will be required. It’s just that on asphalt or ground it’s extremely inconvenient to remove the rivets that hold the part in place. An uncomfortable posture of the technician when working to remove the bumper of a car standing on the asphalt will significantly lengthen the work time.
The car sits very low and removing the mudguards and protection will be extremely inconvenient. Also, the presence of an overpass will allow you to gain access to the screws that are located at the wheels of the car. If necessary, it is also more convenient to remove the trunk trim in an equipped and clean garage.
How to remove the rear bumper of a Hyundai Solaris » mallsspb.ru Blog of a lazy admin
How to remove a Hyundai solaris bumper and install a protective mesh.
The bumper is held on top by two pistons and four screws. You need to remove the parts located on both sides and disconnect the andapka plugs. If for some reason the bumper continues to hold, then perhaps not all the screws or clips have been removed.
Hyundai Solaris APL › Logbook › Removing the solaris rear bumper. Tell me those who filmed...
Disconnect the power supply terminal blocks for the fog lights. How to remove the front bumper on a Hyundai Solaris with your own hands Without a bumper. The WD solution is used to treat the places where the body kit is attached to the car.
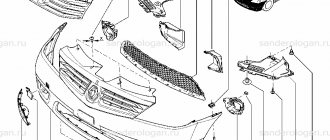
Removing the front bumper of Hyundai Solaris
- 78 15 96k
- 8 0 17k
Removing the front bumper of the Hyundai Solaris is covered in detail in this photo report. This procedure is very simple. you need is a 10 mm wrench and a regular Phillips screwdriver .
There are not many reasons why you need to remove the front bumper. Basically, the bumper is removed for its partial repair (melting) and painting. Because, no matter how careful the driver is, the front bumper is often subject to various damages, such as scratches, small impacts, etc.
Since the bumpers in modern cars are overwhelmingly made of plastic, they can be completely repaired in almost any situation. Watch the video for more details. If the bumper cannot be repaired, you will need to buy a new one.
Catalog numbers and prices of the front bumper Solaris
The article number of the original Hyundai Solaris front bumper is 86511-4L000, the average price of this is around 5,500 rubles. Analogs, such as: TYG HN04102BA, Atek 23201050, Api HN0420000-1100, can be purchased at prices ranging from 1940 to 3000 rubles.
The cost is indicated as of summer 2022 for Moscow and the region.
It is better to carry out work on an inspection pit or a lift, since the rivets are located in hard-to-reach places, and the machine itself is quite low.
The first step is to unscrew the rivets located at the bottom of the bumper, two on each side.
Then unscrew the bolts that are located under the headlights. They seem to be hidden along the edges of the bumper on the inside. I’ll say right away that unscrewing these bolts is very inconvenient, so for convenience I recommend turning the wheels out to create a gap.
Under the headlights and along the edges, the bumper is held in place by clips, so be careful not to break anything.
Next you need to disconnect the fog lights.
In the engine compartment, unclip the two rivets at the edges, then unscrew the four fastening bolts.
Cases of dismantling
Replacement is usually required if the part is damaged due to unfortunate contact with a wall, tree or another machine. The result may be a dent or crack. Not everyone can correct these faults on their own; if the geometry of the part is seriously damaged, it will most likely need to be replaced.
In addition to standard situations in which replacement or the need to remove the rear bumper of a Hyundai Solaris hatchback or sedan is required, there are also non-standard ones. Among them:
- restyling;
- installation of an original lighting solution;
- the need to renew peeling enamel if the plastic part has been painted.
Dismantling may be required in various cases. The front bumper, due to its special location and purpose, is most often subject to mechanical stress. This is the main reason for the need for dismantling; in addition, it is necessary:
- to gain convenient access to units located in close proximity to the bumper;
- for carrying out paint and varnish work (it is more convenient to carry out them with the element dismantled);
- to clean the radiator grille honeycombs from debris contained in them;
- to replace the sound signal;
- for external car tuning.
When replacing headlights, it is necessary to partially remove the front bumper on the Solaris, since one bolt holding the headlight is located under the plastic lining. To do this, turn the wheels out so that you have free access to it. It connects the upper corner of the bumper and the fender. Unscrew it with a 10mm socket, and then pull the plastic towards you to remove it from the clamps.
How to remove the rear bumper on a Solaris
How to remove the rear bumper of a Hyundai Solaris
Installing the bumper is done in the reverse order. It is important to replace any damaged adapters and ensure that the connectors are connected correctly.
Why do bumpers change? Even the most experienced drivers get into minor accidents from time to time. Fortunately, such accidents only require restoration or replacement of one part of the car's exterior.
Sometimes it is necessary to remove the rear bumper on a Solaris hatchback. Removing the rear bumper. This article will be about the detailed replacement of bumpers on a Hyundai Solaris car. Installing a rear view camera on Ford Focus 3 and Ford Kuga 2.
At the moment, rear view cameras are already becoming commonplace. What remains for our client to do most often arises in Restoring the Bumper Fasteners Restoring the Bumper Fastenings 2 Creator: Special Technologies Posted by: Full size Moving the bumper towards you, disconnect the 2 license plate light wires and the 4 parking sensor wires, whoever has them.
When disconnecting the sensors, tap them, as the locking latches are clogged with dirt, which prevents them from being pressed.
But only at first glance does it seem impossible. Most owners of a Hyundai car think that they will have to go to a service station, but they can cope with this task on their own. You will learn below how to properly remove this body element.
How to dismantle the rear bumper on a sedan There may be quite a few reasons for dismantling this part on a Hyundai Solaris. Most often, car owners want to repaint it, remove scratches, dents, install parking sensors, or directly replace the body element itself.
Removing the rear bumper of a Hyundai Solaris
In any case, dismantling the bumper is done the same way. Comparison Removing the rear bumper of a Hyundai Solaris On many cars, the rear bumper is even more of a consumable than oil or antifreeze.
In order not to lose value, such a part is not restored, but a new one is purchased. Fortunately, for the Hyundai Solaris the rear bumper is quite easy to get, and you don’t have to buy it in the store.
Having removed both headlights, we notice under them two pistons and two screws securing the bumper to the wings. We jack up the car, remove the wheels one by one and unscrew 4 screws and 1 piston on each side that secure the bumper to the fender, fender liner and mudguard.
I managed not to jack it, but to use a short screwdriver and a set of sockets. Search the Hyundai-doc website. All rights reserved. Adblock detector.
What to do if fasteners are broken
Modern bumpers are equipped with parts made of plastic; they are the ones that most often break during various repair work, as well as in accidents. In the case where the fastening elements are broken, it is absolutely not necessary to buy a new damper; it is enough to repair them yourself.
When you have purchased new plastic latches, all you need to do is install them on the dismantled bumper. To do this, you first need to install a new ear of such a fastening. This element must be glued to the surface of the damper, then secured with self-tapping screws and then checked for reliability of the entire connection. In addition, fastening the shock-absorbing device latch on the inner surface can also be done using rivets.
This is interesting: How to adjust the tension of a car alternator belt: ways to tension it yourself
In the same case, when you could not find a suitable set of new latches, you will have to resort to handicraft production of such parts. Such a move is justified only in rare cases, since it is associated with a violation of the integrity of the damper, which can lead, in the future, to its rapid destruction. From a technical point of view, such a repair consists of cutting a rectangle of the required size from a sheet of metal. A hole is drilled in it for the mounting bolts that will now hold the bumper.
This is a barbaric method, so it is better to try to select standard fasteners in the kit. Such mounts do not have to be produced for a specific model; installation of suitable products from other cars is quite acceptable. This procedure ends with the installation of the bumpers in their original places.
Despite the fact that the car bumper mounts are made of fragile plastic, if they are properly dismantled and installed, they can be prevented from being damaged. In the same case, when this does happen, you can easily install new ones in their place. Thus, this element of the body structure will be restored and can serve you for a long time.
Removing the bumper on a Hyundai Solaris: step-by-step instructions
Minor damage to the car bumper significantly spoils the appearance of the vehicle. A collision with an obstacle, a traffic accident, after these events, the object requires repairs. To complete it, you need to know how to remove the bumper on a Hyundai Solaris with your own hands.
Replacement Tools
For dismantling, you will need to stock up on the following set of tools
- Key for 10.
- Screwdrivers with flat and figured tips.
- Rags.
- Wire brush.
- WD-40 solution.
After preparing the necessary set of tools, you will need to perform a number of preparatory work for removal.
Front buffer
Before removing the front bumper you will need:
- Drive the car to an overpass, inspection hole, or use a jack. The mounting bolts are very inconvenient to unscrew, so the vehicle must be located on a hill.
- Wash work surfaces thoroughly. Clean the bottom from traces of corrosion. Dirt and dust. During operation, dirt and rust will fall on the driver, therefore, it is wise to clean the bottom and lower part from dirt
- Disconnect the battery terminals. Removal is accompanied by the removal of the car's fog lights. This will require intervention in the engine compartment of the car. In order for the operation to be successful, the vehicle is de-energized.
- Use a WD-40 solution to treat the places where the body kit is attached to the car. This removes dirt and rust from the bolts and rivets.
Many motorists begin the process of replacing body kits without completing any preparation. As a result, they face a number of difficulties and inconveniences. Therefore, preparatory work should be carried out, and then removal should begin.
Dismantling
When removing the front bumper of a Hyundai Solaris, perform the following steps:
- Unscrew the rivets along the edges located at the bottom of the bumper. To do this you will need to use a Phillips screwdriver.
- Remove the bolts on each side under the headlights. They are located in the inner niche of the body element. In order to access them, you will need to turn the wheels out.
- Under the headlights and along the edges, the bumper is held on by latches. To disconnect them, you need to use a flat-head screwdriver.
- Disconnect the fog lamp wire from the electrical controller.
- Under the hood, using a 10mm wrench, unscrew four bolts, they secure the body kit to the body. It is important not to lose the nuts from the holders.
- In the central part, where the radiator frame is located, you need to snap off 2 clips.
- In the lower part, dismantle the 8 bumper fastening pistons.
- Gently pull the body kit in your direction. Start pulling from the upper right corner of the body kit.
- In places where the part cannot be dismantled, unscrew the plastic pistons.
- Remove the buffer from the brackets located at the wings of the car.
The piston retainers are made of plastic . When dismantling, you need to carefully remove them so as not to damage them.
Installation
The buffer is installed in the reverse order of removal:
- The object is installed on brackets.
- The pins and clips on which the element is attached are closed.
- Four bolts are tightened under the hood.
- Connect the wire from the fog lights.
- Attach the buffer to the remaining fasteners.
- Tighten the bolts under the wings.
- Rivets are attached to the lower part of the body kit.
Do not make great efforts when dismantling bolts and nuts. This way you can easily break the thread, which will significantly complicate the process of dismantling and installing the body kit on the car.
Rear bumper
In order to avoid damaging the body element during dismantling, it is important to know how to remove the rear bumper on a Solaris. Before performing the operation, preparatory work is carried out:
- Drive the vehicle to an overpass, inspection hole, or lift the car on a jack.
- Remove the wheels. This will subsequently make it much easier to replace the buffer on the vehicle.
- Clean the lower part of the car's underbody from dirt and corrosion elements.
- Disconnect the car.
- Treat the fasteners with a WD-40 solution, and 15-20 minutes after application, begin removing the fasteners.
After preparation, proceed directly to removing the rear buffer.
How to remove the rear bumper from a Hyundai Solaris
The process of removing the rear bumper of a Hyundai Solaris is as follows:
- Remove the lights. To do this, use a 10mm socket to unscrew the 4 nuts that hold the taillight housing. Next, the object is moved towards the number, removed from the niche, and disconnected from the connector.
- Remove the clips holding the body element. They are located under the rear lights.
- At the bottom of the body kit, remove the screws and clips that secure the fender liners and half-lockers.
- Two clamps are dismantled, which connect the upper part of the body element and the power fastening under the license plate of the Solaris buffer.
- The fasteners, the lower part of the body kit and the power beam are removed.
- The screws near the rear lights are unscrewed last.
- After removing all fasteners, the object is slightly lifted and pulled towards itself. For ease of work, the part is taken in the middle.
The dismantling process on the sedan and hatchback is completely identical.
Classification of fasteners
The bumper is the first protective element of the body. But it protects the structure of the car only conditionally. Manufacturers mainly install plastic parts. They are light in weight and can be removed and returned easily and quickly. There is one drawback - the plastic breaks at the slightest impact. The only thing that remains for manufacturers is to ensure reliable fixation of the part.
Bumpers can be installed in a variety of ways. As a rule, the fastening consists of separate elements and special slots for snapping into the grooves. Fastening pistons are widely used in cars of foreign brands.
Brackets
This sample most reliably fixes the product on the car body. Each manufacturer makes bumper mounting brackets according to its own unique design. They look like small elongated parts. The distinctive characteristics of the products are strength and durability. The elements can last for many years without breaking down even in conditions of poor-quality road surfaces. However, they also suffer in road accidents.
Brackets have been used by manufacturers of various car brands for a long time. This type of fasteners is most widespread in Europe, Russia and the USA.
Latches
Trying to minimize the cost of manufacturing vehicles, companies switched to a simpler type of fastener - latches. They are made from the same sheet of plastic as the bumper. The principle of quick-release fastening is that the part, thanks to the presence of special slots, is inserted into the grooves.
Advantages:
- No need to connect to the bumper.
- In case of serious damage, the entire structure is completely changed.
- Installation and dismantling is carried out in a matter of minutes.
Flaws:
- Fragility. The locking latches can break if one or more wheels fall into a large hole.
- Over time, the slots in the plastic wear out and the fastening weakens.
- Most motorists damage the latches during dismantling.
When purchasing a used car, be sure to pay attention to the specified bumper mounting parts. If the design of the machine specifically provides for latches, then with a high probability they have already been altered several times by the owner.
Self-tapping screws
The simplest and most cost-effective mounting option. It is used mainly on domestically produced cars. Screws are also used to secure bumpers on used foreign cars.
The method allows you to solve the problem of broken fasteners quickly and for a long time. However, this fastener has a huge disadvantage - it destroys the structure of the bumper. This applies not only to self-tapping screws, but also to factory fasteners. When using vehicles, a backlash is formed at the fixation points, which increases over time. Often the screws are unscrewed randomly, so owners have to constantly check the tightness of the fasteners.
This is interesting: Basic methods for replacing a license plate light bulb on a car
Bolts
Among experienced drivers, a bolt and nut is considered the best type of bumper fastening. Its effectiveness lies in its ease of maintenance. This type of fastening can be unscrewed at any time, the bumper can be removed and mounted back.
Another advantage is that the connection securely fixes the bumper for a long time.
Among the disadvantages, it should be noted that in some car models it is difficult to get to the bolts and nuts at the same time.