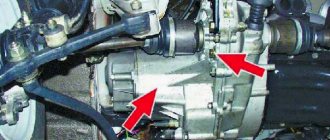
Nova Granta with automatic transmission received more than 30 design changes and new components. Let's look at some of them.
The rear support of the automatic transmission has also undergone changes. It became stiffer and received a more reinforced bracket.
A vehicle with an automatic transmission is the desire of every lover of the domestic automobile industry. The first cars equipped with automatic transmission were produced in the middle of the 21st century, but until now this technology has not been widely used on VAZ models. But experiments were still carried out.
There is always a way out
The structure of the design makes it possible, while accelerating, to constantly maintain the motor in operating mode corresponding to the highest power indicator, and the increase in speed occurs through slow, smooth switching of the transmission indicator.
With various manual transmissions, the engine must operate more often in the minimum favorable speed modes; for this reason, a vehicle with a CVT can pick up speed in a shorter time than with a manual transmission.
Synchronizer design and how it works
If a car enthusiast has already imagined a complex mechanism, then we hasten to assure him that the synchronizer is designed quite simply and does not include either electrical or hydraulic components. When studying it, one can draw an analogy with some other auto mechanisms that solve the problem of discrepancy between the rotation speeds of various elements. Its main features are speed and incredible mechanical strength. So, the synchronizer includes the following elements:
- Hubs with so-called breadcrumbs;
- Locking rings;
- Engagement clutch;
- A gear having a friction cone.
The basis of the mechanism is a hub with special external and internal splines. Internal splines allow the hub to have a permanent connection with the transmission shaft. External splines are responsible for connecting the coupling to the hub. The hub has 3 grooves, spaced 120 degrees apart. Spring-loaded crackers are inserted into the grooves, which are responsible for fixing the coupling in the neutral position. The neutral position is called one in which the synchronizer is not yet turned on.
What to choose: VAZ 2114 or Grant
In fact, the question only depends on your budget: if you have enough money to purchase a Granta in a minimal configuration, the choice is clear. And the point is not only that in almost all indicators Grant is ahead, and significantly so - in any case, you are buying a new car. This means that in the coming years you won’t have to think about where to get money for unscheduled repairs.
In the case of a used Lada Samara, this option is most likely. But if the main thing for you is that the car just drives, then the VAZ 2114 will be a good alternative to its competitor - in terms of efficiency it is quite a bit inferior, and in terms of maintainability it is a cut above, and the cost of spare parts is about two or three times lower.
Instead of a manual gearbox handle, an electromagnetic coil is installed, with the help of which the automatic gear shift mode is changed, and the clutch disc is also eliminated. The weight of the VAZ 2109 car increased by 15 kilograms after installing the variator. The transfer device is located in place of traditional mechanics using a special gasket. It is designed to transmit torque up to 145 Nm and easily develops to 130 Nm. All special parts that were needed for installation were developed at the aircraft factory.
The vehicle's acceleration is accompanied by the constant sound of a running engine, which causes the smell of scorched ferodo. For this reason, it makes some people dislike CVTs.
A VAZ equipped with automatic equipment does not have such disadvantages. Acceleration seems to follow a smooth acceleration line. And when this limit is overcome, a sudden increase in revolutions occurs, which is accompanied by a significant increase in acceleration.
If you have a desire to replace the manual gearbox of a VAZ 2114 with an automatic one, then this must be done in specialized centers. For this purpose, it is better to use an automatic transmission from a Toyota Camry. Installing an automatic transmission on a VAZ 2114 involves not only replacing the automatic transmission mechanism itself and the automatic transmission lever; it will also require a number of modifications in other components of the car. This publication will tell you how to install an automatic transmission on a VAZ 2114.
Transmission repair (manual transmission) - prices
| Service | Price | |
| Replacing a solenoid in an automatic transmission | from 2500 rub. | Order |
| Manual transmission repair | from 3000 rub. | Order |
| Clutch replacement | from 3500 rub. | Order |
| Jeep automatic transmission repair | from 7990 rub. | Order |
| Automatic transmission repair | from 7990 rub. | Order |
| Automatic transmission replacement | from 800 rub. | Order |
| Valve block repair | from 5000 rub. | Order |
| CVT repair | from 7999 rub. | Order |
| Bleeding the clutch | from 220 rub. | Order |
| Replacing clutch fluid | from 1200 rub. | Order |
| Replacing the DSG 7 clutch | from 9490 rub. | Order |
| Replacing a manual transmission | from 3000 rub. | Order |
| Manual transmission oil change | from 500 rub. | Order |
| DSG repair | from 12500 rub. | Order |
Yudu performers provide high-quality gearbox repairs at the most affordable price in Moscow. Contact a professional registered with youdo.com if your car's gearbox is faulty. The specialists you find using the Yudu service will provide inexpensive maintenance services for trucks and cars.
The VAZ 2170 16 cl engine has a drawback in the form of a valve cover gasket leaking, as a result of which the ignition coil (module) may fail, the solution to the problem is repair and lubrication of the cylinder head elements.
In Kalina's car, there is a frequent case of a leak in the interior heater, under which the car's ECU is located, which after such a bath in antifreeze fails, the solution to the problem is to replace the heater and the car's ECU, followed by reinstalling the main location of the ECU.
Lada Granta cars have a factory defect in the wiring harness, which leads to a malfunction of the electronic system and unstable operation of the gas pedal and throttle valve. The solution to the problem is replacing the harness.
The weak point in the 2114 car is the heater valve, which breaks down and leaks.
Coils and ignition modules often fail; as a rule, this happens after prolonged frosts; I cannot withstand low temperatures.
The AvG company provides professional repairs of VAZ cars in Kazan.
At the AVG repair center you can undergo comprehensive diagnostics of all vehicle systems. Our car service center employs qualified employees, professionals in their field; we have the necessary modern and reliable equipment for accurate diagnosis of car breakdowns.
Diagnostics at the AvG repair center is carried out in stages:
- Diagnostics of injector and fuel injection systems,
- Brake system diagnostics,
- Transmission diagnostics,
- Chassis diagnostics,
- Diagnostics of the cooling system.
- Engine diagnostics, timing belt inspection.
The AvG repair center carries out repairs of VAZ cars of the following models: Priora, Largus, Kalina, Lada Samara 2114.
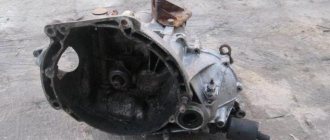
Work on dismantling the five-speed gearbox VAZ 2107
Installing the car on a lift (you can use an overpass or a pit) is preceded by disconnecting the battery and removing the radio panel:
- Remove and disassemble the gearbox rod.
- Remove the cover from the gap where the lever attaches and remove the foam filling.
- Remove the exhaust pipe from the exhaust system.
- Move the starter, disconnect the speedometer wire.
- Unscrew the bolts holding the cardan and remove it.
- The clutch cylinder is removed using the same method.
- After this, the gearbox is removed from the car. To do this, it is best to invite assistants who will support the mechanism while you unscrew the mounting bolts. At this stage, it is also advisable to drain the transmission oil.
Article on the topic: Repairing automatic transmission on Peugeot 307
After all these steps have been completed, we repair the VAZ 2107 gearbox.
Reviews of Priora with automatic transmission
You can often find articles on the Internet about Lada Priora with automatic transmission, in which owners talk about the wonderful transformation of their car, but the point is that Priora with AMT is not much inferior to such crafts, and to buy it you don’t have to go through a whole series of difficult shocks. In addition, even the most powerful engine of this car is enough for a quiet ride around the city or on the highway, but if there is a need to overtake not a single passenger car, but something larger, then 106 hp. With. To perform the maneuver comfortably is not enough, and no automatic transmission will change this.
Source
Installing an automatic transmission on a VAZ 2114
— As practice shows, the best option for a VAZ 2114 car is an automatic transmission from a Toyota Camry car. Previously, the automatic transmission from Toyota Camry undergoes a major overhaul with the replacement of worn parts.
— Installing an automatic transmission on a VAZ 2114 begins with preparing the car for such a replacement. The air intake system is removed from the engine compartment, the front wheels are removed, the suspension and steering gear are disassembled, and the axle shafts are removed.
“Then it’s the engine’s turn. The engine is completely removed downwards from the engine compartment using a dolly.
— Preparing the engine for installation of a new box begins with removing the brackets that have become unnecessary for attaching the transmission to the body.
— We are starting to prepare other components of the car for the installation of an automatic transmission. It is necessary to install an additional radiator for the box cooling system.
— At this time, another mechanic is dismantling the manual transmission of the VAZ 2114 and preparing a place for docking the engine with the automatic transmission.
— Now it’s the turn of the clutch and flywheel. These details are no longer needed.
— Next, it is necessary to carry out an important operation to refine the angular velocity joints. The diameter of the axle shafts is reduced on a special machine. Without this work, joining the VAZ axle shafts to the new gearbox will be impossible.
— Now it’s the turn of the new flywheel, with this operation the process of installing a new gearbox on the old engine begins. Install a new box on the engine.
— The key operation is to attach the new box to the flange of the VAZ 2114 engine. It must fit exactly where the old box is attached.
— It is necessary to adjust the seats to the engine housing and gearbox for a tighter fixation of the brackets.
— Now install the box together with the engine in the engine compartment of the car.
— All that remains is to connect the electrical wiring harnesses of the transmission control unit to the vehicle’s on-board network. And also carry out a complex of installation work in the cabin.
The following video talks about installing automatic transmissions on VAZ cars.
If you need to move quickly and comfortably, it is recommended to use the services of a taxi in St. Petersburg. Qualified driver, reasonable prices and quality service. A nice fact is that you can order a taxi to the airport online.
More about installation
Now our domestic, beloved and famous car “VAZ-2112” has joined the models with an automatic transmission, which is quite natural. However, it is not yet possible to replace the gearbox with an automatic transmission yourself:
- Quite a few experiments were carried out and with the technical support of the ZF concern (a German concern) it was possible to release such a modified model of the usual “twelfth”
- It is important to note that a not quite real full-weight automatic VAZ 2112 gearbox was installed in our old VAZ, but instead a variator of V-belt equipment was used (new development)
- This happened as a result of the fact that a regular two-liter engine simply does not fit the car, due to the lack of technical modification capabilities and their directions
Let's try to figure out together how the installation of the VAZ 2112 system with an automatic transmission takes place:
- Firstly, a power unit was installed, located transversely, otherwise it would not fit
- In addition, the entire hydraulic mechanics system was rebuilt, due to the fact that it is very expensive to maintain and repair.
- Finally, the last stage is the development of the machine’s power; it is important to understand that uncontrolled (uncontrollable) power may well lead to completely unexpected situations, even emergency ones, especially when the vehicle is moving
- It is also important to note that the clutch pedal, which was in the manual transmission, is no longer needed here.
- Therefore, using the developed stand, it was possible to hide it
- The result we get is this: the torque variator is 145 Nm, and now it can work at 130 Nm
- It turned out during the experiments that the hydromechanical gearbox is completely unsuitable for the “tenth model” - since the transversely mounted engine requires a very compact transmission
- Therefore, from the ZF range we had to select a stepless variator model VT1 with hydraulic control
- For your information, similar electronically controlled units are used on Mini cars (having only two front seats and a trunk)
Simplified diagram of a V-belt variator: where a means the maximum gear ratio (at low speed)
- It is worth noting an interesting fact - absolutely all spare parts were manufactured at an aviation manufacturing plant
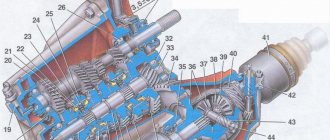
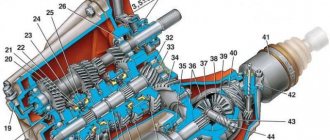
Engines and transmissions
Of course, the gearbox was only mechanical - no robots, much less automatic machines, were dreamed of on such cars - this was the prerogative of much higher-class cars.
But then Granta came and the situation changed. Here we can already talk about a full line of engines.
The base engine is a 1.6-liter 87-horsepower eight-valve engine, which is mated to a five-speed manual transmission.
It is complemented by a sixteen-valve analogue, developing 98 horsepower, which is paired with a four-speed Japanese Jatco automatic transmission.
In general, a comparison of the engines of the VAZ 2114 and Grant allows us to determine a clear winner - the Lada Granta is ahead by a large margin.
Which automatic transmissions are suitable
The most suitable transmission, the installation of which does not require any major modifications, is the Jatco JF414E - a good four-speed hydraulic automatic transmission of a somewhat outdated design, but not without reason it is classified as an indestructible automatic transmission. The Jatco JF414E automatic transmission, which appeared in 2010, is a modified RE4F03A transmission from 1989, so the automatic transmission retains all the best features of classic hydraulic automatic transmissions.
If for some reason the Jatco JF414E is not suitable or is not available, pay attention to all automatic transmissions of front-wheel drive cars with an engine capacity of up to 1.8 liters and a power of up to 120 hp. With. However, when installing such boxes, 2 serious problems will arise:
If you go the unofficial route, there is a high risk of finding yourself accused of bribery, which carries serious prison terms.
History of cooperation with Jatco - the first automatic machine at VAZ
In the history of the concern there were many different experiments with automatic transmissions, but the cars did not go into production. Therefore, Lada Granta is considered a pioneer in this matter. The car received a good box from Jatco, and this is one of the main advantages, since all domestic developments at that time were too crude. However, around that same time, the Russian robot began to be installed on the Priora, but we will talk about it below. Assessing the features of the Lada Granta with an automatic transmission from the Japanese company Jetco, you can notice the following important features of the equipment:
- the automatic transmission was configured with the assistance of Japanese and Russian engineers ideally for the Lada Granta car; it took a year and a half to finalize the basics;
- during the finalization, not only the physical properties of the car were taken into account, but also the operating features of the vehicle, and some subtleties of the Russian climate;
- the gearbox does not require serious attention to maintenance - it is enough to fill in the appropriate type of oil during service, and there will be no more difficulties;
- buyers of Lada Granta with automatic transmission do not complain about the operation of the automatic transmission, but there are some complaints about the quality of work and timeliness of switching;
- It’s worth remembering that this is a budget automatic machine, even if it’s Japanese, extreme driving is contraindicated for it, you should take into account its nature when driving;
- There are a number of recommendations from the Japanese manufacturer that can be found in the public domain; it is better to follow these tips for long-term operation of the box.
Probably the only disadvantage of this box is its cost. Jatco is a foreign partner, so the price of an automatic transmission is highly dependent on the exchange rate in Russia. This makes certain preconditions for the constant rise in price of cars using this box. Therefore, AvtoVAZ is not in a hurry to install this automatic machine on all the concern’s cars. There is one more drawback that some owners of Grants with an automatic rifle are well aware of. This is a very expensive repair. At any service station they will charge you quite a lot of money when working with this box, since it is technologically quite complex for maintenance. Parts are also expensive, making repairs even more unaffordable.
Automatic transmission selector in the interior of a VAZ-2103 (Photo by Abarth Works Museum)
Yes this is true. But Soviet and Russian citizens saw such Zhigulis and Ladas only after the collapse of the USSR.
The thing is that the leaders of the Country of Soviets seriously needed foreign currency. But shouldn’t we sell our military equipment to the capitalist states of Europe and North America?
I’m extremely interested in who was the first to come up with the idea of calling the VAZ-2107 “Russian Mercedes”
And then what? We decided to try it with passenger cars for civilians. But if a citizen could calmly pull the gearbox poker, and there were no traffic jams on the roads of Soviet cities, then a conventional Dutchman will not understand this.
The Automatic inscription makes it clear that this is an “automatic Zhiguli”
The Finns came up with the idea of installing a turbine on the VAZ-2107, and in the USA they changed the headlights, bumpers and strengthened the doors of Zhiguli cars so that AvtoVAZ’s creations could fit into the local safety requirements.
The Finnish "nine" received a new name - Lada Baltic
The coloring was also better. Externally, the Scandinavian specimen could be distinguished by a different plastic body kit. Also, local hatchbacks were distinguished by the presence of a driver’s airbag.
The same German steering wheel with an airbag
If you were interested, you can subscribe to the channel and like it. I will be grateful! Every day I write about people's cars.
Does anyone remember in what issue and for what year there was an article in ZR about installing an automatic transmission on the 9-ku and M-2141?
there was an article in 2001, I think, in the AR called “automatic for Lada”, it seems .. they installed it from Toyota
IMHO you're wasting your time. The power and torque of those engines on which those boxes were installed are not at all VAZ ones. Well, at least the moment is accurate. I have an 82gv on my Honda. on a 2 liter engine the torque was already 2500. and the gearbox is configured so that when the valve is opened slightly, it keeps the rpm at 2000 - 2500.
A car with an automatic transmission is distinguished by its smooth ride, ease of control, and good dynamic characteristics. The installation kit includes a Toyota automatic transmission, a starter, and a flywheel from a Toyota vehicle. A gear selector is installed in the cabin. Automatic transmission installation time is 4-5 working days.
In total, we have installed more than 50 automatic transmissions for various models. The warranty on the installed automatic transmission is 1 year or 40,000 km.
The cost with installation in our service is 50,000 rubles. Installation is carried out by appointment.
It is possible to ship automatic transmission kits to VAZ for self-installation. Currently, it is possible to supply kits for models of the Kalina family and models from the VAZ 2110, 11, 12 series. The kit includes: a four-speed Toyota automatic transmission ready for installation, an adapter plate, a starter, a flywheel converted for VAZ engines, a gear selector, a control cable , electrical wiring harness, a set of converted internal CV joints, modified front suspension brace, automatic transmission mounting brackets, fasteners, detailed installation instructions. The cost of the set is 45,000 rubles.
A vehicle with an automatic transmission is the desire of every lover of the domestic automobile industry. The first cars equipped with automatic transmission were produced in the middle of the 21st century, but until now this technology has not been widely used on VAZ models. But experiments were still carried out.
Which cars are replaced with automatic transmission?
The manual transmission on the automatic transmission is replaced on those cars that were equipped with both types of switching mechanisms at the factory. For example, if you want to equip a VAZ 2109 with an automatic transmission, you will have to search for a suitable box for years, and this is unlikely to bring success. But Toyota or Volkswagen almost always have paired models with automatic transmissions. There are a number of successful projects of this type with these models:
- Mitsuibishi Pajero. The SUV provides a lot of space under the hood to install any equipment you want and get excellent performance. Moreover, the engine can easily withstand any load.
- Toyota Land Cruiser. Older models came with a manual transmission, but here the replacement will be difficult due to all-wheel drive systems. Therefore, the work should be entrusted to professionals with good experience.
- Opel Vectra. At the same time, there are alterations both on older versions of the B series and on more modern C. The machines last a long time even with a makeshift installation, delighting with their characteristics.
- Mazda 3. They also often change the manual to an automatic on the Mazda CX-7, which works great with an automatic transmission. Engines from Japanese concerns serve better under automatic transmissions.
- BMW of various models. Bavarians today practically do not offer manual transmissions, but before there were plenty of them. There are even a number of service stations that re-equip such cars, including replacing the transmission.
As you can see, the list contains many popular models of cars. This means that even on less popular vehicles, replacing a manual transmission with an automatic one that is easy to use is quite possible. You just need to find out an individual approach to each machine, since there cannot be any factory instructions in this regard. On older cars, the procedure is much simpler, because they don’t have a lot of electronics that block the work with any changes.
Lada 2109 Simply VAZ › Logbook › Manual transmission c52 Toyota in VAZ. Beginning
As they say, a gearbox on a turbo pelvis is a consumable item... well, I don’t know, of course, what I’m doing wrong with my gearbox, but in 2 years I haven’t broken it or the drive... The only thing I always knew was that with the next inflation of 1 bar the gearbox could burp, but I still have to drive) In 2021, I decided to change all the bearings in the gearbox (I should have done this in 18 years), I even found some bearings that were Japanese. I changed the whole thing and... well, it hummed and made noise and is still noisy (And from that time I began to look for what could be done with the gearbox, what could be done to blow and not worry so much about it, I looked at the sports series, prices for them, of course, space starting from 15 thousand to 25 thousand... and again, people break the reinforced row 104... it’s not really an alternative (((I haven’t ridden the sports rows myself, but people write that they are noisy, so that’s also a minus(
Let's search the turbo market, naturally an evo gearbox with the same price as a spaceship, especially since I don't have a drag car and everyday so it also disappears, I was looking, looking, looking, looking, looking, looking, looking, looking, and then a sales ad pops up. adapter plate and flywheel for Toyota C-series gearbox. Its price of 10 thousand seems to be more or less the price.
I called the seller, the guy began to explain everything and said that he himself drives his 2108 to such a gearbox. I asked to take a photo of his device, he said no question. He sent me photos, I looked at everything, everything in the photo is what I need, and I saw that he had a twin-scroll turbo under the hood. I decided to ask how much it was blowing, he said 2 bars I... how much how much? it is again 2 BARS and this has been in the stock Toyota gearbox for a year... well, I think this is the result.
As a result, I bought an adapter plate and a flywheel from him at the end of October 2018)
Then we started searching for a manual transmission, in Kemerovo we can’t find such a thing, or we can find it but it’s already a corpse. Mikhail (who is the seller) also advised to look not for a bare manual transmission, but for a complete one with everything. My search led me to a site in Vladivostok, I asked people about this site and they said that everything was fine. On this site I found a manual transmission from Levin ae101 with a 4a-ge engine with drives, clutch, pedal, all the pipes from the cylinder to the gearbox, and for some reason they sent the dashboard even though it wasn’t in the ad) I ordered it at the end of December 2022 , and arrived at the beginning of January 2019.
4. Installation of the electromagnet. The electromagnet is installed in the left (along the direction of the car) rear corner of the car’s engine compartment under the steering mechanism. An additional bracket is attached to the place where the standard clutch cable sheath is attached to the gearbox. The electromagnet cable sheath is secured to an additional bracket. A boot is placed on the cable.
Next, the electromagnet should be moved towards the bracket so that the bending of the cable sheath is minimal and smooth, after which the electromagnet is fixed in this position.
READ How to install prohibited mods here
ATTENTION! It is imperative to achieve a smooth bend of the cable even by shortening or lengthening the cable sheath.
Adjustment of the electromagnet cable drive, starting speed and gear shift time (if necessary) is carried out in accordance with the product data sheet.
After adjusting the clutch, you should cut out windows on the instrument panel to install the warning light and the clutch switch.
RECOMMENDATIONS FOR INSTALLING AN AUTOMATIC CLUTCH VEHICLE REQUIREMENTS
Before installing the system, check and install:
— stable idle speed;
— ease of gear engagement (especially reverse and first gear when the clutch pedal position is adjusted in accordance with the vehicle’s operating manual).
- charging the battery:
— the force on the clutch pedal must comply with GOST standards, i.e. 10-12 kg.
- with a force of 10-12 kg, install two springs in their regular places, with a force of less than 10 kg - the springs do not need to be installed.
ATTENTION! Check and repair electrical equipment with the ignition system turned off and the automatic clutch switch in the off position!
In case of weak contacts, ensure the reliability of their connection by pre-clamping them with pliers or a clock screwdriver!
After installing the electromagnet, be sure to ensure the entry (exit) of the electromagnet cable inside the tip of the shell WITHOUT TOUCHING IT with the cable at the entrance of the tip of the shell (when turning the clutch on and off) - by bending the bracket for fastening the shell or the bracket connecting the tip of the electromagnet cable to the clutch release fork!
APPLICATION
We offer two ways to reduce the force on the clutch release fork:
Replacing the basket with a soft one is preferable!
On some VAZ models with an injection ignition system, the cylinder operation algorithm is left the same as on carburetor engines (such cars are rare). This discrepancy is revealed by the fact that when the engine speed increases, the clutch pedal is released at very high engine speeds (or the clutch pedal is not released at all). To eliminate this misunderstanding, the block provides the possibility of switching from an injection system to a carburetor system (and vice versa).
The block is implemented to work with an injection ignition system. To switch the unit to a state of operation with a carburetor ignition system (or to an injection system with a carburetor operating algorithm), it is enough to disconnect the jumper from input No. 3 on the six-pin block X2 of the clutch automatic harness and connect it to input No. 2 on the eight-pin block X3 of the control unit. ATTENTION. Transfer the contact when the system is turned off.
Inventory (delivery set): 1-Gearbox shift knob;2-automatic clutch wiring harness assembly;3-electromagnet assembly;4-control unit;5-installation instructions;6-Passport.
Where to buy a used box for a Zhiguli?
Any vehicle unit, the gearbox, is no exception, has its own safety margin and amount of working resources. At the end of the latter, it is time to think about replacing the transmission unit. Today, several options are available to solve the problem. The simplest and first thing that comes to a car owner’s mind is buying a new box. But enthusiasm in this regard often dries up after a short monitoring of prices for these units. A new box requires a serious investment. Is there a way to save money?
Let's go to the secondary market
Logic dictates that spare parts can be found cheaper on the secondary market. And indeed it is. It is not difficult today to buy a used manual transmission or gearbox for a VAZ 21099, the price of which is determined by its condition. A large number of offers are found on the Internet. Conventionally, the secondary market can be divided into three sectors:
- private;
- garage;
- professional.
The first two provide for the implementation of transmission units either by the Zhiguli owners themselves or by individual craftsmen
Such offers can attract the buyer's attention based on financial criteria. But if you are looking for a product for the query “gearbox for VAZ 2108, 2109, 21099, price, used 5-mortar”, do not rush to choose by cost
Assess all the risks and benefits of each proposal.
In the professional sector, it is also easy to find out how much a gearbox costs for a VAZ 2108, 2109, 21099; the price varies depending on the current safety factor of the unit. Refurbished components are offered for sale, fully ready for use. The choice in favor of such a box can be considered rational. Unlike private owners, professionals provide a guarantee on used units.
Choosing a service provider
If you need a used gearbox for a VAZ 21093, the price of which is reasonable and the quality is high, contact our workshop. We will also select transmission units for nines and ninety-nines.
All units offered for sale have been restored by our craftsmen. When performing major repairs, original VAZ spare parts were used. Complex troubleshooting is carried out using a special tool. The techniques used allow us to guarantee the quality of the overhaul.
Used boxes for VAZs are almost always available in our workshop. This allows you to optimize the replacement process and simplify the ordering of units. Do you want to purchase a used box to replace one that is worn out or damaged in an accident? Contact us by phone, mail, or come directly to the workshop to discuss the details of the transaction!
Cooling
Water Pump (Pump), Water Pump (Pump) Pulley, Water Pump (Pump) Gasket, Intercooler, Intercooler Hose, Thermostat, Thermostat Housing, Thermostat Gasket, Radiator Fan, Fan Assembly, Inverter Fan, Diffuser, Fan Motor, Fan Relay, Viscous coupling, Impeller, Air conditioning, Air conditioning compressor, Compressor bearing, Compressor pulley, Pneumatic switch, Air conditioning dryer, Air conditioning pipe, Air conditioning control unit, Interior temperature sensor, Air conditioning evaporator, Thermostatic valve, Air conditioning mount, Air conditioning resistor, Air conditioning relay, Air conditioning hose, Radiator, Cooling radiator, Radiator mounting, Radiator hose, Coolant sensor, Air conditioner radiator, Inverter radiator, Radiator pipe, Adapter flange, Expansion tank, Expansion tank cap
VAZ 21099 - how to disassemble the gearbox
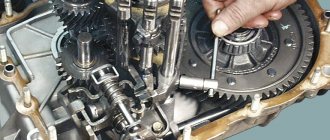
After the box is removed from the car, you can begin disassembling it. Disassembling the gearbox on a VAZ 21099 car is necessary to perform various repairs to replace failed system elements. To carry out the work, prepare a standard set of tools and perform the following sequence of actions:
We install the box in a vertical position and begin disassembling. First of all, we need to remove the back cover by unscrewing the six bolts securing it. Then unscrew the bolt and remove the clutch cable bracket.
Applying light blows to the lid with a hammer, remove it from the studs, and then remove the sealing gasket located between the lid and the box body.
Engage third or fourth gear, then remove the fifth gear fork bolt and then engage it by moving the clutch so that the splines engage the gear.
Now that the gears are engaged with each other and the shafts, as a result, do not turn, we unscrew the secondary shaft nut, having previously unlocked it. It is advisable to unscrew this nut and subsequent ones using a socket head so as not to damage the edges.
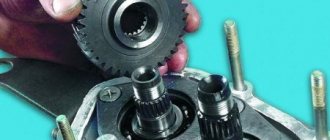
Next, unscrew the input shaft nut. Then, using two flat screwdrivers, pry off the fifth gear synchronizer and remove it together with the fork.
The synchronizer itself must be removed carefully so that the clutch with spring-loaded balls does not come out and they do not fall apart
Now we remove the synchronizer blocking ring and, following it, using two screwdrivers, remove the driven gear of the secondary shaft.
There will be a needle bearing located under the gear; it must be removed along with the thrust ring.
Next, remove the fifth gear drive gear by carefully prying it off with a screwdriver.
Using an impact screwdriver, unscrew the four screws securing the shaft bearing pressure plate and remove it.
Remove the needle bearing bushing and the thrust washer located underneath it from the secondary shaft.
We also use screwdrivers to remove the retaining rings of the bearings of the primary and secondary shafts.
There are three locking plugs located on the side of the body. Using a spanner wrench, unscrew them one by one and carefully remove the ball and spring.
The rear engine mount is attached to the gearbox with two bolts; we need to remove it by unscrewing the mounting bolts.
- Next to the reverse light switch, there is a reverse speed lock plug. We unscrew the plug and then tilt the box slightly and remove the spring and ball from the hole.
- Unscrew the twelve nuts that secure the clutch housing to the box body.
- Now you can disconnect the crankcase. To do this, use a screwdriver, the end of which is inserted into special slots located at the junction of the crankcases in three places.
- Between them there will be a sealing gasket, which we remove and during subsequent assembly we replace with a new one, since it is not suitable for reuse.
Next, we need to remove the rod with the first and second gear shift forks. To do this, unscrew the bolt securing it and, lifting it slightly, remove it.
- In the same way, we unscrew the bolt securing the rod of the third and fourth gears and, removing the lever from engagement with the head of the rod, remove it.
- Immediately remove the fifth gear fork rod.
Use pliers to remove the locking ring and remove the reverse gear fork.
Remove the reverse gear. Then, with both hands, simultaneously remove the secondary and primary shafts
Please note that when removing the shafts, the inner rings of the bearings remain on the shafts
- Remove the driven main gear along with the differential. Then unscrew the three bolts securing the gear shift mechanism and remove it.
- Remove the bearings of the primary and secondary shafts. To press out the secondary shaft bearing, use a suitable tool. To remove the input shaft bearing, you first need to press in the oil seal.
- There is a magnet in the clutch housing to collect metal shavings, pull it out and clean it.
- Disassemble the speedometer drive housing.
- Unscrew the reverse light switch from the housing.
- Disassemble and remove the gear shift joint.
At this point, the repair work to completely disassemble the gearbox on the VAZ 21099 is completed. Make the necessary repairs, then reassemble in the reverse order, taking into account the following nuances.
There is always a way out
The structure of the design makes it possible, while accelerating, to constantly maintain the motor in operating mode corresponding to the highest power indicator, and the increase in speed occurs through slow, smooth switching of the transmission indicator.
With various manual transmissions, the engine must operate more often in the minimum favorable speed modes; for this reason, a vehicle with a CVT can pick up speed in a shorter time than with a manual transmission.
Replacing the front bearing
Changing the front input shaft bearing is more difficult. But it is still quite possible to do such work with your own hands.
Removing the front bearing
In normal condition, the front bearing rotates smoothly, no jamming or play is observed. If defects are found as a result of the inspection, the element will have to be replaced.
To work you will need:
- Screwdriver;
- Hammer;
- Bearing ejector.
If there is no ejector, use sawdust and Litol 24 lubricant. We will tell you more about their use.
Now that everything is ready, you can get to work.
- Remove the gearbox from your VAZ 2109. The task is not the most difficult, but it cannot be called an easy walk either.
- Remove the clutch cover with pressure plate from the flywheel.
- Remove the clutch driven disc from the flywheel.
- Now dismantle the flywheel itself.
- If there is a puller, there will be no problems with removing the bearing. But in its absence, arm yourself with improvised means - sawdust and Litol.
- Prepare a mixture from Litol 24 and sawdust. The proportions will be 1 to 1.
- You will need approximately the entire plastic lid from a large jar of the prepared solution of sawdust and lubricant.
- Mix the ingredients thoroughly to obtain a homogeneous mass.
- Fill the internal cavity behind the bearing with the prepared solution. Please note that after this the old bearing can no longer be used.
- Using a driven disk centering mandrel, press out the bearing. Add a little mixture periodically as the bearing begins to gradually move out of its seat.
- Make sure the element comes out of the socket completely.
- Clean the nest from any mixture remaining inside. Make sure that nothing is left there, otherwise you will soon have to carry out repairs again.
- Place the new bearing over the seat and lightly tap it into place with a hammer. You should only hit the outer ring.
- Be sure to press the bearing completely. Here you will need any metal tube or mandrel of suitable diameter.
- Return all dismantled components to their place, reassemble the structure in the reverse order.
Changing input shaft bearings is not the easiest task. The main difficulty is related to the need to remove the gearbox. Otherwise, even beginners can do the procedure. But it's not worth the risk.
Types of box configuration
The configuration of gears can be different, depending on what you want to get as a result:
- Of course, the most widely used configuration is for driving in urban conditions, since such a configuration is available to anyone who wants to increase the acceleration dynamics of the car
- Here, as a rule, the main pair of gears is changed from a standard one (having a gear ratio of 3.7 and a 17-tooth gear) to gears with gear ratios of 4.1 or 4.3, having 15 teeth
- It is important to note that in this case, the acceleration speed of the car increases, and the gears are shortened, and the maximum speed of the tuned VAZ 2109 drops by about 10-15 kilometers per hour (this depends only on the engine)
- There is a more improved configuration, this is when a sports series is selected and mounted to the main pair (all non-standard gears)
- Using this row helps make passes longer and minimizes the loss of top speed.
- As in the first case, the sports series are also matched to the main pair and according to engine capabilities
- If, for example, you have a forced engine, then the sports series will come with a standard main pair
Instead of a manual gearbox handle, an electromagnetic coil is installed, with the help of which the automatic gear shift mode is changed, and the clutch disc is also eliminated. The weight of the VAZ 2109 car increased by 15 kilograms after installing the variator. The transfer device is located in place of traditional mechanics using a special gasket. It is designed to transmit torque up to 145 Nm and easily develops to 130 Nm. All special parts that were needed for installation were developed at the aircraft factory.
The vehicle's acceleration is accompanied by the constant sound of a running engine, which causes the smell of scorched ferodo. For this reason, it makes some people dislike CVTs.
A VAZ equipped with automatic equipment does not have such disadvantages. Acceleration seems to follow a smooth acceleration line. And when this limit is overcome, a sudden increase in revolutions occurs, which is accompanied by a significant increase in acceleration.
Tuning the VAZ 2109 transmission
The classic transmission of all VAZs is manual. It is quite reliable, cheap to maintain and well suited for use on domestic roads.
Upgraded car
There are several popular types of tuning for manual transmissions. They appeared as a banal need to improve the performance of the car. The main work packages include:
- Replacing the backstage.
- Conversion from 4-speed to 5-speed.
- Installation of a sports row.
- Modernization of the pedal unit.
- Replacement of the main pair and differential.
Let's take a closer look at one of the tuning options. Replacing the rocker with a short-throw one is a useful tuning that will significantly simplify gear shifting. We all know that the lever of the “nine” and most other VAZ cars is absolutely inconvenient. It has a huge backlash, which simply has a terrible effect on the accuracy of gear shifting. If men with long hands can still cope with it without any critical effort, then women will have a very difficult time with it.
The easiest way out of the situation is to install a short-stroke cardan from the Lada Kalina on the 2109. Such tuning will cost you approximately 1,500 rubles. Along with the cardan, you will have to get a boot from the same model, because it won’t be original with it.
The necessary tools for work are a set of keys, a slotted screwdriver and a hammer. It will also be very good to have an assistant.
The process of replacing the gearbox rocker
Dismantling the old rod
First you need to loosen the clamp on the main rod and remove the hinge from it. To do this, use a 13mm wrench. Next, remove the boot and, using a 10mm wrench, unscrew the bolt on the desired cardan. Usually it is fixed almost tightly, so here you will need a hammer to loosen it a little with gentle blows. By the way, you can immediately check the condition of the oil seal and, in case of any defects, replace it with a new one.
New drawstring and cord from Kalina
Installation of a modified backstage
Having removed the old cardan, you can begin installing the new one. To do this, you must first put on the boot. Next, we place a new cardan on the gear selector rod and secure it with a fixing bolt. Be sure to make sure that the bolt fits into the special recess on the rod. Also, do not forget to apply thread locker to the bot so that it does not unscrew due to vibration.
The next step is to put the drive rod on the rod. For some models, the stem from Kalina will have to be shortened by about 1.5 cm.
Adjustment
Next, you must carefully adjust the position of the lever so that it is centered with a slight offset to the right. Here we will need an assistant who will have to monitor the placement of the lever in the cabin. After installation is complete, tighten the clamp, while an assistant must hold the lever from moving.
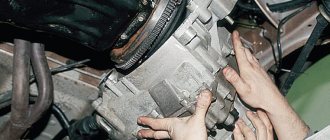
Installation and removal process
After studying the device, car owners are wondering how to remove the gearbox on a VAZ 2108. Installing and dismantling the gearbox should not cause difficulties if you follow the steps.
- The car is installed on an inspection ditch or a lift. The engine hood must be raised. This position is fixed.
- Self-repair of the gearbox requires that you carefully examine the engine and its internal compartment.
- The battery and other wires should not be together either. The same applies to the top dead center sensor, relay on the traction type starter.
- Next, the speedometer drive housing is disconnected from the cable of the same drive. The design of the VAZ 2108 gearbox is such that to solve this problem it is necessary to unscrew the union nut.
- It is necessary to make sure that the wire with ground and the location of the clutch housing are separate.
- The sensor indicating the dead top point must be installed separately from the crankcase responsible for the clutch.
- The cable should no longer be connected to the fork that disengages the clutch.
- The next step: unscrewing the part of the structure where the top bolts and nuts are located. The bracket for lifting the power unit should be located on the left side of the stud responsible for fastening it to the intake manifold.
- Repairing the secondary shaft of the gearbox involves installing a cross member with serial number 67. 7820. 9514 on the gutters. The crossbar is hooked onto a special bracket. The bracket itself is usually installed on a stud in the intake manifold. Any type of power unit is hung in the form of a hoist if there is no crossbar.
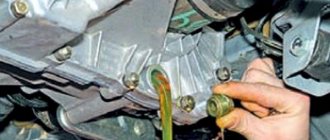
Details of a disassembled gearbox from a VAZ 2108. Maintenance of the gearbox involves work related to removal, which is carried out in the lower part of the car.
- The repair of the gearbox cushion and other parts begins by removing the lower cover of the clutch housing and the engine mudguard.
- When overhauling the VAZ 21083 gearbox, it is necessary to completely drain the oil that may be inside the gearbox.
- Disconnecting the wires is mandatory for the light switch responsible for reverse.
- After this, when tuning the VAZ gearbox, you can loosen the clamp. The rod is disconnected from the gear selection rod hinge.
- The mount has a stud nut. She also turns away.
- Replacing the transmission requires that the ball joints at the control arm be completely disconnected.
- Defective gearbox means that you will need to knock out one hinge from the side gear. To do this, you can buy a special lift 67. 7801. 9524. Or use a special hammer, it will help damage the hinge inside, or rather its body, passing through the block part. Taking a technological mandrel or plug, you can understand that the semi-axial gear is easily fixed to the structure. The box repair book will become an indispensable assistant.
- At the next stage, the second hinge is completely knocked out. If you study the transmission repair instructions, you will understand that this step cannot be avoided.
- The wheel drive shafts are moved to the side. The six-speed gearbox is assembled in the reverse order.
Gearbox VAZ 21099 shift diagram
Gear shift technique
What I would like to share with you!
In non-professional circles, and often in professional ones, there are a lot of misconceptions about gear shifting. The purpose of this article is to tell you how to do it correctly. We do not set ourselves the task of covering all aspects and talking about all the intricacies of gear shifting, for example, how and in what cases you can shift without using the clutch. We want to explain the correct basic technique. This will answer almost all your questions and dispel any confusion, allowing you to confidently and correctly change gears both on the track and on the street.
The article is written taking into account a manual gearbox with synchronizers, i.e. an ordinary “handle”, which is installed on almost all cars from Nine to Zonda. The materials for this article were collected from many professional sources.
So, we hope that everyone reading this article understands why you need to change gears - to keep the car in the desired engine power range.
Working with the clutch and gas With the correct gear shifting technique, working with the clutch pedal always looks like this - pressed, released. Except when pulling away, the pedal is never released (and certainly not depressed) slowly. It is quickly squeezed out (preferably to the floor, especially when shifting down) and quickly released. There is no need to hit the pedal or throw it. Everything is done smoothly, but quickly, as, indeed, with all other elements of car control. The gas pedal is released when changing gears to relieve the load on the gearbox.
Switching to a lower gear For “advanced” drivers, let us immediately clarify that switching to a lower gear occurs only in order to maintain power. The brakes are used to stop, not the engine. The pads cost pennies and are cheaper than gasoline and a clutch. It is especially important not to engage in nonsense on a slippery/icy road - unfulfilled (or incorrectly performed) throttle adjustment can lead to a skid (drift on front-wheel drive cars) and subsequent ditch, and no abs will save you.
First, we will explain what a gas booster is and why it is needed. Imagine that you are driving 60 km/h... Suddenly a fancy Sky with neon lighting “flies up” to you from the left and starts honking and accelerating. Of course, your action is to move on and I’m not in a hurry. But suppose you decide to answer the “challenge”. You need to shift from 5th gear to 2nd. If you simply depress the clutch, engage 2nd gear and release the clutch, the car will jerk very strongly, and the clutch with the gearbox will have a hard time. Why is this happening?
Release the gas, press the clutch pedal and change gear. The engine speed drops to idle, and the clutch rotation speed increases, because the wheel speed remained the same, but the gear ratio increased.
Now the difference between the speed of the engine and the gearbox is 4000 rpm. If you release the clutch, the engine and wheels will have to match speeds very quickly. The engine will spin up sharply to 5000 rpm and will transfer a lot of stress to the wheels (equivalent to a sharp, brief application of the brakes), which in this case may lose traction if they are subject to strong lateral forces or if the road is simply slippery. If you release the clutch slowly, the stress will be much less, but then the clutch will burn.
To avoid this, it is necessary to add gas, i.e. press the gas a little before releasing the clutch. This is done very quickly: the foot hits the gas pedal, in our case quite deeply, almost to the floor, and instantly releases it. Immediately the clutch is released, and the right foot presses on the gas again, but this time to accelerate. The purpose of accelerating in this case is to raise engine speed to 5000 rpm or a little higher. If you do everything correctly and then quickly release the clutch, you will not feel anything at all, and the car will begin to smoothly accelerate when you press the gas again.
From India to Ulyanovsk
The UAZ Patriot also received a new automatic transmission. Together with an improved petrol unit with a volume of 2.7 liters and a power of 150 hp. With. Now the Indian automatic 6-speed Powerglide 6L50 transmission will be installed.
At the moment, it is “Loaf” that is the main long-liver of the Soviet and Russian automobile industry. The 452 has a variety of versions: from banal ambulance and military ones to an experimental bus with three axles and a car for filming. Commons.wikimedia.org
For example, the UAZ-452D is a truck with a double cab and a wooden body. Commons.wikimedia.org/Ralf Roletschek
The main long-liver among the Zhiguli is the Niva, which over time changed its name from VAZ-2121 to Lada 4×4 Urban. It also has a large number of modifications. Commons.wikimedia.org/Juanedc
For example, the Stalker rear-wheel drive SUV, developed in Tolyatti. Commons.wikimedia.org/apal.by.ru
The oldest car in the world today is the two-seater Morgan 4/4 roadster, which has been in production since 1936. Commons.wikimedia.org/Liftarn
It is followed by another Briton - the Bristol Type 603, whose appearance has not changed since 1983. Commons.wikimedia.org/Charles01
The original modification of the Mercedes-Benz G-Class in the 461st body has been produced since 1979 and until now, mainly for military purposes. commons.wikimedia.org/M93
The Volkswagen Type 2 was in production for 64 years. Commons.wikimedia.org/Voogd075
And Hindustan Ambassador is 56 years old. However, production of these two cars has now been discontinued. Commons.wikimedia.org/Stefan Oemisch