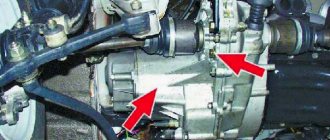
Repair of the gearbox on the VAZ 21099 is required quite often. If the car owner has never carried out such repairs with his own hands, then it is better to contact specialists.
For the first time, you can invite an experienced mechanic to help. If the car owner does not have experience in such repairs, then he will do more harm than correct the situation. Besides, it all depends on the breakdown. Perhaps it is not significant and every car owner can handle it.
If you still decide to repair the gearbox yourself, then you need to have step-by-step instructions and a video for repairs with you.
The gearbox on the VAZ 21099 has the same device and requires the same repairs as on the eight and nine.
First, let's figure out what the gearbox on the VAZ 21099 consists of.
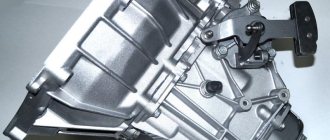
Gearbox device
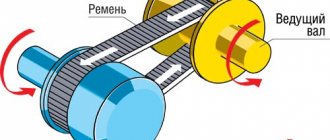
A manual five-speed gearbox is a complex mechanism consisting of gear ratios, a housing, and gears. There are different configurations of the VAZ 21099 car. With four-speed and five-speed gearboxes.
Device:
- closing cover on the crankcase;
- drive gears of each gear, reverse, axle;
- bearings;
- gearbox housing;
- bushings;
- shaft bearings;
- synchronizers for each gear;
- oil seals;
- satellites;
- breather;
- primary, secondary shafts;
- couplings;
- bushings;
- differential box;
- bearings;
- drain plug for transmission oil;
- rings and half rings;
- gear shift fork.
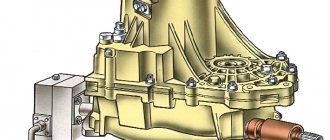
Design of the gearbox of the VAZ 21099 car
So:
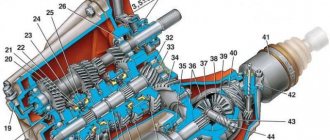
- On the input shaft pos. 23 (Fig. 1) there is a block of drive gears, which are constantly in mesh with the driven gears of the gears when moving forward.
- On the secondary shaft pos. 33 the driven gears are located on needle bearings. There are also two synchronizers on it.
- The secondary shaft is manufactured together with the main gear drive gear. A two-satellite differential, the driven gear pos. 34 main gears.
Figure 1. Main components and parts of the gearbox of a VAZ 21099 car
- The differential bearings are installed with interference, which is adjusted by selecting different thicknesses of the rings, pos. 4.
Advice: When operating a VAZ 21099 car within a large city, when frequent gear changes are required, it is better to use motor oil that provides a longer service life of the synchronizers. On highways, where gear changes are rare, preference is given to transmission oil, which increases the life of gears and bearings, although the durability of synchronizers is slightly reduced.
Causes of gearbox malfunctions and methods for eliminating them
For each car there is a manual for caring for it, which contains specific instructions for troubleshooting certain problems. So:
- Noise in the control room.
The reasons may be:
- wear of teeth on gears;
- bearing wear;
- The oil level in the box may have dropped.
Trouble-shooting:
- oil is added;
- worn parts and bearings are replaced;
- If necessary, damaged oil seals will be replaced.
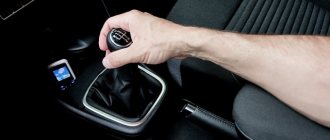
- There are difficulties when changing gears.
The reasons may be:
- the clutch is not fully depressed;
- there was a deformation of the rod that controls the gear shifting mechanism;
- jet thrust deformation;
- the screws securing the hinge or lever of the selector rod have become loose;
- the adjustment of the drive that changes gears is incorrectly selected;
- The plastic parts in the gear shifting drive have failed.
Elimination of causes:
- if possible, the rods are straightened; if necessary, they must be replaced;
- screws are tightened;
- gear shift drive is adjustable;
- Damaged parts are replaced.
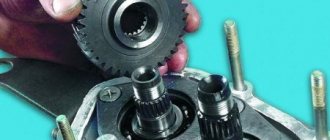
VAZ 21099 gearbox repair - wear of rods and forks for gear shifting
- The transmissions turn off spontaneously.
The reasons may be:
- the ends of the synchronizer teeth on the coupling and gear are damaged or worn;
- cracks or delamination of rubber appeared on the rear supports, which created an increased vibration of the power unit on them;
- Incorrect adjustment of the gear shift drive or incorrectly tightened protective cover of the traction rod cause the gears to not engage.
Elimination of causes:
- damaged and worn parts are replaced;
- drive is adjustable;
- The cover on the traction is being adjusted.
- There is a noise or crackling sound when shifting gears.
In this case:
- insufficient clutch release;
- The locking ring of the gear shift synchronizer is worn out.
Eliminated by replacing the blocking ring.
- Oil leak.
The reasons may be:
- the input shaft seals are worn out;
- the gear selector rod is worn out;
- The speedometer drive shaft seal has failed:
- the fastening of the crankcase or cover to the gearbox has become loose;
- the sealant under the cover is damaged;
- The fastening that covers the drain hole has become loose.
Elimination of causes:
- it is necessary to replace: oil seals, sealant, gaskets;
- tighten bolts and nuts;
- tighten the drain plug.
Advice: If, when repairing the gearbox, the following were replaced: gearbox or clutch housings; differential bearings or its housing, then even when replacing one device, the differential bearing adjusting rings must be selected.
Signs and causes of gearbox malfunction
- Transmission malfunctions can be caused by:
- natural wear and tear of parts;
- mechanical damage as a result of an accident;
- systematically not fully squeezing gears;
- sealant is damaged;
- sudden release of the clutch pedal;
- regularly engaging reverse gear when the car moves forward;
- low level of transmission oil in the gearbox;
- irregular gearbox oil changes;
- Frequent wheel slipping when starting off (grinding).
Signs of a breakdown of the VAZ 21099 gearbox include:
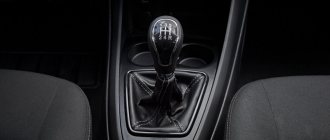
- The gearshift lever is loose;
- extraneous sounds in the box;
- when there is a load on the box, the speeds go off (when driving in tension);
- grinding noise when changing gears;
- transmission oil leakage;
- jerking when driving.
Which box is suitable for VAZ 21099?
It is obvious that the gearboxes installed on cars of the VAZ 2108-99 family (including four-speed ones) are completely interchangeable.
You can also put a box with a VAZ 2110, VAZ 2114-15 - in cases where it is installed with an injection eight-valve VAZ engine.
But when installing these units on a VAZ 21099, you will also have to replace:
- clutch cable or release bearing fork;
- starter - on these cars it has two rather than three mounting points and an armature bushing installed in the front cover.
In addition, nowadays you can buy a “sports” gearbox with shafts, the gears of which have different gear ratios, and such boxes are produced with different rows - for city traffic and for driving on the highway.
Gearbox oil drain
First of all, drain the oil from the box. If you do not know how to remove the gearbox, then use the following instructions:
- Place the car on a flat surface
- We place wheel chocks on both sides under the rear wheels.
- Disconnect the car.
- The mounting bolts are unscrewed from the crankcase and its protection is removed.
- The ground wire connected to the crankcase is unscrewed.
- Unscrew the nuts on the clutch cable.
- Completely remove the clutch cable. We disconnect it from the box.
- Remove all wires from the starter.
- We remove the starter. To do this, unscrew the bolts that hold it in place.
- The drive rod, which switches speeds, is disconnected from the hinge.
- Disconnect the speedometer and cable that drive it.
- Unscrew the bolts and nuts securing the rod.
- The hinge pin is removed from the strut arm.
- The suspension joint and steering knuckle are separated.
- The CV joints are removed.
- The shield is removed.
- The box is attached to the engine with bolts. We unscrew them.
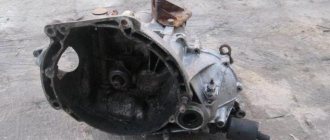
- We remove the box.
We will prepare a gearbox switching diagram in advance.
Dismantling
To dismantle the box, we recommend that you rely on the instructions, strictly follow the sequence and reinforce your skills with visual videos.
- Disconnect the negative terminal from the battery and drain the oil from the gearbox system.
- Unscrew the bolts that hold the crankcase guard in place and remove it.
- Disconnect the ground (wire) from the clutch housing.
- At the end of the clutch cable, loosen the tension on the nuts slightly.
- Remove the cable end from the clutch lever.
- Disconnect the block from the traction relay.
- Disconnect the wire going to the starter traction relay.
- Dismantle the starter itself directly.
- Disconnect the drive rod from the joint tip. We are talking about traction, which switches gears.
- Disconnect the cable from the car's speedometer drive.
- Unscrew the tie rod ball joint.
- Remove and press the steering rod hinge pin out of the strut swing arm.
- The shank of the inner CV joint of the front wheel drive should be pressed out and moved to the side.
- Disconnect the second CV joint.
- Remove the clutch housing shield.
- Release the gearbox from the fasteners holding it to the engine.
- Remove the box.
Carefully remove the gearbox
Be sure to move it horizontally away from the motor before directly removing the box. Then disengage the input shaft. Be careful not to damage the clutch spring petals.
Assembling a VAZ 2107 5 mortar gearbox
Detailed repair of VAZ gearbox (part 1). Do it yourself! Detailed repair of VAZ gearbox (part 2). Do it yourself!
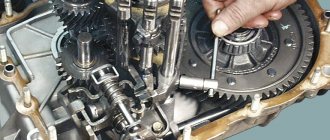
Analysis of the gearbox
Now we disassemble the box and find out the causes of the problems. If you hear extraneous knocks in the gearbox or the gearshift lever rattles, then the reason for this may be wear of parts. They need to be replaced. We disassemble:
- the outside of the box is cleaned;
- placed vertically;
- covers are removed;
- use a rubber hammer to break off the lid of the box;
- We turn on fourth or third gear (otherwise the assembly will not be carried out correctly);
- after unscrewing the bolt that secures fifth gear, turn it on;
- unscrew the nuts of the front and rear shafts;
- remove the fork and 5th gear synchronizer;
- remove the reverse gears;
- disconnect the secondary shaft from the gear;
- the bearing is secured with a plate, remove it;
- the gear, which is the drive gear, is removed from the shaft;
- the bearing plate is removed;
- the rings of the primary and secondary shafts are removed;
- there is a plug on the latch, unscrew it;
- carefully pull out the spring and locking ball;
- We also take out the other two balls;
- there is a power unit in the back of the box, remove its support;
- The shift box housing is secured to the clutch housing;
- remove the crankcase;
- unscrew the bolts securing the gears;
- remove the plug;
- stock too;
- the forks and rod are removed from the gearbox.
After we have disassembled the gearbox, we will diagnose it. Let's prepare replacement parts and begin putting the box back together. We do this carefully. An incorrectly assembled box will not work or will not work correctly.
Gearbox repair
Routine repair of the box and repair of faulty parts consists of replacing seals and replacing or adding oil.
Repairs associated with dismantling and disassembling the unit are carried out in the following cases:
- gears switch off spontaneously, or they turn on with difficulty;
- the box makes noise while driving;
- The gearbox housing is damaged.
Parts of the disassembled box are inspected for wear or damage. As a rule, all bearings are replaced, including needle bearings. Also, as a preventive measure, the bronze synchronizer locking rings are replaced.
But sometimes repairs are not financially justified and it is more profitable to buy a gearbox, for example, on the secondary spare parts market (car disassembly, etc.). Then the question arises about the compatibility of units of different machines.
Reinstalling the gearbox
Gearbox assembly:
- we change all non-working elements;
- workers clean with a rag;
- assembly is carried out;
- degrease parts with threads;
- if necessary, lubricate the elements;
- change gaskets;
- insert the balls and bearings into place;
- we assemble the synchronizer;
- We put all the springs in place and tighten the bolts. When assembling, lubricate all connections with sealant;
- attach the box to the engine;
- add oil;
- connect the battery;
- we start the car and check it.
The VAZ 21099 gearbox is adjusted during assembly. Also, after installing the gearbox, you need to adjust the gearshift lever. It is important to adjust the gearbox and gearshift lever correctly.
It should be remembered that prevention can help avoid repairs and troubles along the way. Taking good care of the gearbox is the key to its long-term operation.
General recommendations for assembling the VAZ 21099 gearbox
Do not change the tapered differential bearings unless necessary - otherwise you will have to adjust the gap between the teeth of the main gear gears; It is better to replace all the needle bearings of the gears; When assembling, install only new oil seals; pay attention to the installation of the synchronizer blocking rings - opposite the grooves for the sliding clutch cotters there should be smaller protrusions on the ring; install the bolts securing the forks to the rods and the thrust plate of the bearings with thread sealant; It is better to use cardboard gaskets between the crankcase parts rather than paronite ones; While the gearbox is removed and disassembled, it will not be superfluous to replace the front starter bushing and clutch fork bushing.
Finally, before installing the gearbox, remove the clutch basket to assess the condition of the clutch discs while it is still accessible.
Gearbox tuning
Service station services are not always a matter of the need to troubleshoot the box. Today, tuning the VAZ 2108 gearbox is a common thing and almost a fashionable “car trend.” In most cases, it consists of improving the unit and increasing its performance. In order for the car to drive at a decent speed even with a not very powerful engine, you need to choose the right gear ratios for the VAZ 2108 gearbox. This transmission tuning technology comes from motorsport. Craftsmen add a 6th gear to the boxes of modern VAZ 2108. The numbers are selected in accordance with the torque and power characteristics of the engine and the size of the wheels installed on the car. Don't plan to add a gear, but want to drive in comfort? Service station masters will select the sports gearbox series of the VAZ 2108 in accordance with the characteristics of the filling of a particular car. This will solve the problem of transmission imbalance and allow the car’s engine to realize its full potential.