Transmission diagnostics
Noises, howling of gears in the box, while the gearbox lever is in the neutral position. Increased noise during gearbox operation can be caused by the following reasons:
- The oil level is low or the oil needs to be changed. Drain the old one and fill it with new oil of the required brand. We check the old oil from the box for the presence of metal particles or water;
- The gearbox input shaft bearings are worn out;
- There are defects in the gear teeth;
- An axial displacement of one or more shafts has occurred;
- Noise may also occur when the torque of the engine shaft changes. Check by changing the idle speed and see if the noise disappears or not.
We eliminate malfunctions by replacing (or adding oil) or replacing worn parts. Difficulty shifting - may mean:
- Incomplete disengagement when pressing the clutch pedal;
- The switching mechanism is broken;
- A hinge defect has occurred;
- The screws securing the shift rod hinge or lever are loose;
- The shift lever is bent;
- The drive rod for controlling the switching mechanism itself or the reaction rods are deformed;
- Improper adjustment of the shift drive.
Here it is necessary to adjust or replace damaged or faulty gearbox parts. Gears 1st - 2nd, 3rd - 4th or 5th - reverse (switched using one fork) do not shift. The bushings of the rod lock for these gears have shifted in the gearbox housing. Spontaneous shutdown (crunching noise is heard when shifting ) occurs for the following reasons:
- Damage and wear of gear teeth and couplings;
- Increased vibration of the unit on the mounting supports;
- Incomplete activation due to incorrect drive adjustment;
- Switching off 3-4-5 gears occurs spontaneously when the secondary shaft nut is loosened;
- The springs of the rod clamps are broken;
- Gear rods are worn out;
- Forks are deformed and worn.
It is necessary to replace all damaged or worn parts and adjust the drive itself. Noises or crunching sounds heard when turning on occur for the following reasons:
- Incomplete engagement or clutch failure
- Synchronizer locking ring worn
- A crunch heard when shifting into reverse means the clutch is broken.
Low gearbox oil level occurs due to oil leakage:
- Worn input shaft oil seal;
- Damage to drive seals (so-called CV joints);
- Damaged shift rod seal;
- Violation of the shaft seal or gasket of the speedometer drive;
- If the fastening is loosened or the gasket or sealant at the joints of the cover fastening to the body is damaged;
- The thread of the drain plug is damaged;
- Leakage through the reverse sensor;
- cracks in the 5th gear housing or cover.
We eliminate the cause by replacing damaged or worn parts.
A knocking noise occurs when moving from a standstill or when switching:
- The pinion axles in the differential are worn out
We fix it by replacing worn or damaged parts
Noise that occurs in any gear when accelerating or braking the engine:
- Main pair malfunction
Noise increasing in high gear:
- Malfunction of the upper bearing of the secondary shaft
If the noise increases in lower gears, this means:
- Malfunction of the lower bearing of the secondary shaft
Jerks occur when the vehicle is moving in reverse:
- 2nd gear synchronizer malfunction
Warning: When one of the listed parts was replaced during transmission repair: clutch or gearbox housing, differential housing or differential bearings, it is necessary to select differential bearing adjusting rings.
For your information: This section describes the repair of a five-speed gearbox (which is a structural transformation of a four-speed gearbox) in a more complex device, however, the most common.
Gearbox disassembly
| Rice. 3.13. Gearbox installed on a stand for disassembly and assembly work |
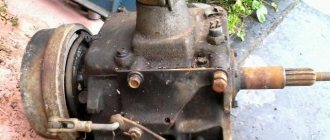
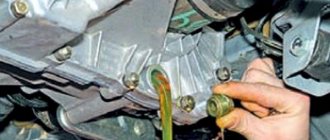
Wash the gearbox, preventing water from entering the crankcase, and place it on a stand () for disassembly. Remove the power unit suspension bracket and the clutch release cable mounting bracket.
| Rice. 3.14. Removing the rear transmission housing cover |
After unscrewing the nuts, remove the rear cover () of the gearbox housing and the sealing gasket.
Remove the mounting rings from the primary and secondary shaft bearings.
Remove the retainer cover and remove the springs and retainer balls from their sockets. Unscrew the plug and remove the reverse fork clamp parts.
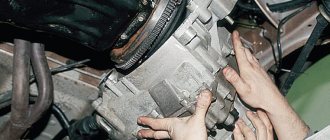
| Rice. 3.15. Removing the gearbox housing |
Unscrew the bolt and nuts securing the gearbox housing to the clutch housing and remove the housing () from the studs.
After unscrewing the bolts securing the forks to the gearshift rods, remove the rods and forks. Take out the axle and remove the reverse idler gear.
| Rice. 3.16. Removing the primary and secondary shafts |
| Rice. 3.17. Removing the differential |
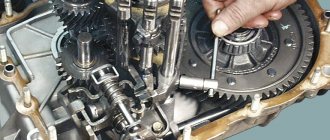
Remove the input and output shafts () from the clutch housing roller bearings at the same time, and then remove the differential (). Press out the outer rings of the shaft and differential bearings from the clutch housing using pullers 67.7801.9529 and 67.7801.9530.
| Rice. 3.18. Removing the gear selector mechanism |
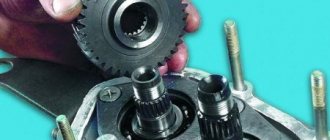
Unscrew the bolts securing the gear selection mechanism () and remove it.
| Rice. 3.19. Removing the gear selector rod |
Unscrew the screw securing the gear selector lever, remove it from the rod, and remove the rod from the clutch housing ().
| NOTE Unnecessarily, do not remove the hinge and gear selector lever from the gear selector rod, since the conical screws securing them are installed with a special glue. |
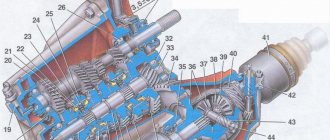
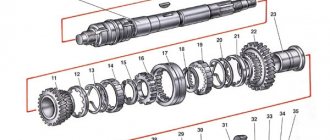
| Rice. 3.20. Secondary shaft parts: 1 – nut; 2 – ball bearing; 3 – thrust washer; 4 – bearing sleeve; 5 – needle bearing; 6 – 4th gear gear; 7 – bearing spacer ring; 8 – synchronizer blocking ring; 9 – sliding clutch for synchronizer of 3rd and 4th gears; 10 – sliding coupling hub; 11 – third gear gear; 12 – retaining ring; 13 – thrust half-rings of the secondary shaft; 14 – 2nd gear gear; 15 – sliding clutch for synchronizer of 1st and 2nd gears with reverse gear; 16 – retaining ring of the synchronizer hub; 17 – hub of the sliding clutch for the synchronizer of 1st and 2nd gears; 18 – synchronizer spring; 19 – cracker; 20 – retainer; 21 – 1st gear gear; 22 – roller bearing; 23* – thrust washer; 24* – bearing sleeve; 25* – 5th gear gear; 26* – sliding clutch hub; 27* – sliding clutch for 5th gear synchronizer; 28* – thrust plate * Five-speed gearbox parts |
If it is necessary to disassemble the secondary shaft, clamp it in a vice with pads made of soft material, hammer it out, then unscrew the nut and use a universal puller to press the ball bearing from the shaft. The bearing is pressed off the input shaft in the same way. Then remove the driven gears of IV, III, II and I gears and synchronizer parts from the secondary shaft in the order shown on. Remove the retaining ring of the synchronizer clutch for 1st and 2nd gears. Press the hub of the synchronizer couplings using a press or using a puller A.40005/1/6.
Disassemble the differential in the following order:
| Rice. 3.21. Differential assembly: 1 – satellite axis; 2 – semi-axial gears; 3 – speedometer drive drive gear; 4 – differential box; 5 – satellite; 6 – driven gear of the main gear |
— if it is necessary to replace the driven gear, unscrew its mounting bolts and press gear 6 () from differential box 4;
| NOTE Unnecessarily, do not press the synchronizer hubs from the shaft, so as not to reduce the tension in the spline connection, and do not press the oil seals out of the crankcase if they are not worn out or damaged. |
| Rice. 3.22. Removing the retaining ring from the pinion shaft |
— remove the retaining ring () from the satellite axis and press out the axis;
— remove side gears 2 (see) and satellites 5 from the differential box;
— if necessary, press the bearings from the differential box using stop 67.7853.9582 and a universal puller.
| Rice. 3.23. Details of the gear selection mechanism: 1 – gear selection rod; 2 – gear selection rod lever; 3 – housing of the gear selection mechanism; 4 – three-arm gear selection lever; 5 – blocking brackets; 6 – axis of the gear selection lever; 7 – guide axis of locking brackets; 8 – reverse fork; 9 – clamp; 10 – thrust washer; 11 – spring |
If necessary, disassemble the gear selection mechanism, for which unscrew the nut securing the axis 6 () of the gear selection lever and remove the retaining rings from the reverse fork axis and from the axis 7 of the locking brackets, remove the reverse fork 8, the gear selection lever 4 assembled with the locking bracket 5, lever axis 6 and spring 11 with thrust washer 10.
If necessary, remove the speedometer drive by unscrewing the nut securing it and, supporting the driven gear shaft, remove the speedometer drive.
The work methods and procedure for disassembling and assembling a five-speed gearbox are similar to those described, but before removing the primary and secondary shafts, do the following:
| Rice. 3.10. Rear part of the five-speed gearbox: 1 – driven gear of the fourth gear of the secondary shaft; 2 – driven gear V of the secondary shaft transmission; 3 – 5th gear synchronizer; 4 – secondary shaft; 5 – rear cover of the gearbox housing; 6 – breather; 7 – input shaft; 8 – drive gear of 5th gear; 9 – thrust plate for fastening bearings; 10 – gearbox housing |
— after removing the rear cover 5 (see ), lock the input shaft using device 41.7816.4070 and unscrew the nuts from the primary and secondary shafts;
— Unscrew the bolt securing the 5th gear fork on the rod and use a universal puller to press the 5th gear synchronizer assembly with gear 2 and the fork from the spline of the secondary shaft. Then press gear 8 off the input shaft;
— using an impact drill/screwdriver, unscrew the screws securing the thrust plate 9 and remove the adjusting rings from the bearings of the primary and secondary shafts.
What to choose
The design of the VAZ 2109 gearbox is imperfect, but this is not a good reason to change it completely. The design itself is reliable, it just requires some modifications. The best option is to replace the problematic part, which causes frequent unit breakdowns, or install new components.
- If you need to change the gear ratios of your original transmission, replacing a pair of gears from 17-tooth to 15-tooth parts will do. This modernization increases the efficiency of acceleration, the transition time from gear to gear is reduced, but the maximum speed of the car decreases. Perfect for traveling in urban areas.
- Installing sports gears makes the gears “longer”, that is, switching from one gear to another is required less often, while the dynamics of acceleration and maximum speed are practically not lost. This gearbox tuning is suitable for those who want to increase the speed characteristics of their nine. Mainly used after replacing the engine with a more powerful analogue.
- You can try replacing the original secondary shaft of the nine. The problem with this part is that it is hollow inside. Due to dynamic loads on the assembly, it often happened that this particular shaft shattered into pieces, which led to the final breakdown of the entire gearbox due to fragments stuck in the teeth. Replacement is made with a solid analog shaft for a pair of gears with a gear ratio of 4.13.
- Want to make your car more agile on the track? Buy additional sports hub bearings for tuning. They will slightly improve the performance of the chassis, but the main thing is that they are more reliable than factory parts.
- Start adjusting the differential, but do it only in reputable auto repair shops and service stations. Incorrect adjustment of the part will lead to frequent breakdowns or loss of vehicle controllability.
There are a lot of tips and fairly detailed instructions on how to independently replace a part of an assembly or the entire assembly, but you don’t need to do this if you don’t know the architecture of the car. When carrying out many works, practice and clear knowledge of the matter are required, so it is better to entrust the work to the masters at the service station.
If you need to improve the gear shift mechanism of a VAZ 2109, then before modifying it you need to purchase some additional parts and replace the factory ones with them. This option for solving problems is the cheapest and simplest. Installing an automatic transmission on a VAZ 2109 is not always justified. This modification will simplify driving the car, slightly increase the working life of the unit and allow it to smoothly transition from one speed mode to another. On the other hand, not every owner of a nine can handle repairs, maintenance and installation of automation, so taking into account the costs, this solution is not effective.
Some maintenance tips
Before carrying out a major overhaul of the VAZ gearbox, it is necessary to completely clean the parts inside. Use a brush or scraper to remove all deposits. A strong jet of air is suitable for washing and blowing. The gaps of the gearbox gear are also completely cleaned.
Repairing a gearbox transmission is not as difficult as it might seem. And transmission breakdowns are not as terrible as you might think at first glance. It is enough to carefully study the transmission repair manual in order to perform all the necessary work at home.
Possible causes of VAZ 2109 gearbox failures
Gearbox: purpose, types of gearboxes, their advantages and disadvantages
Like any other device, the “nine” gearbox begins to fail over time. The quality of spare parts used during repairs also plays a significant role. If you adhere to the manufacturer’s recommendations, then gearbox repairs (including preventative ones, in the absence of breakdowns) should be performed every 50,000 km. Let's consider the main causes of gearbox breakdowns according to the “symptoms” listed above:
"outgoing gear"
Most likely, the gear block of the ejected gear is badly worn. The locks on the clutch or gear may be worn and these parts will need to be replaced. The main reason is systematic violation of operating rules, incorrect choice of speed mode, too sharp switching, incorrectly adjusted clutch.
transmission noise when operating in neutral gear
Any gearbox has a certain noise threshold, which cannot be an indicator of a breakdown; not a single gearbox operates absolutely silently. An increased noise level may indicate the need to change the oil in the box or its insufficient level. In addition, noise may increase if the engine is unstable. For example, if a sports camshaft was installed on the car, and the gearbox does not resonate with it. For a more accurate diagnosis, it is recommended to take it to the nearest service station, since the gearbox can make noise for many reasons, including those not related to the gearbox itself.
the gear engages with a crunch, shifting into gear is difficult
If the gearbox has a decent mileage, then the reason is most likely the wear of the synchronizer. It urgently needs to be replaced, as the situation is fraught with failure of the entire gear unit. When the gearbox is new, or the synchronizer has recently been changed, the gears may also be a bit difficult to engage - this is normal.
The gear does not engage smoothly and requires effort to engage
Difficulties when engaging a gear can be explained, as mentioned above, by replacing the synchronizer. Over time, the parts break in and switching is effortless. Immediately after replacing the synchronizer, it is not recommended to shift gears abruptly and maintain short pauses when switching. The transmission still does not engage - use a double squeeze. If the gear does not engage clearly, this may indicate a malfunction in the gear selection mechanism, as well as incorrect adjustment of the rocker or its support. To accurately determine the cause, you need to examine the backstage.
gearbox play - shift lever dangling
First of all, check the condition of the “cardan” (gearbox joint). Very often, the cause of play is a conical fastening bolt that can unscrew. Backlash can also occur in the rocker itself as a result of its wear. In this case, it is necessary to replace the link. In addition, the return spring may burst. This part is located in the gear selection mechanism - the gearbox will need to be repaired and the spring replaced.
the curtain rings
It should be noted that this is a very common drawback of all domestic cars, very often occurring after repairs to the chassis. Sometimes it happens the other way around - after repair, the clanging disappears (if it happened on a new car). The reason may be a manufacturing defect, which even AvtoVAZ representatives admit.
In addition, the reason may be vibration of the engine + gearbox, which is transmitted to the scenes. The ringing may be associated with the car body or incorrect choice of support points. In such cases, attempts are made to eliminate the ringing by installing an o-ring near the rocker (relevant only for VAZ 2108-2115).
oil leak from box
Possible reasons are poor fastening of the crankcase cover, loss of tightness of the shaft seals. In addition, you may need to replace the box seal or simply tighten the drain plug. It also doesn’t hurt to inspect the gearbox housing for damage and cracks.
Dismantling
To dismantle the box, we recommend that you rely on the instructions, strictly follow the sequence and reinforce your skills with visual videos.
- Disconnect the negative terminal from the battery and drain the oil from the gearbox system.
- Unscrew the bolts that hold the crankcase guard in place and remove it.
- Disconnect the ground (wire) from the clutch housing.
- At the end of the clutch cable, loosen the tension on the nuts slightly.
- Remove the cable end from the clutch lever.
- Disconnect the block from the traction relay.
- Disconnect the wire going to the starter traction relay.
- Dismantle the starter itself directly.
- Disconnect the drive rod from the joint tip. We are talking about traction, which switches gears.
- Disconnect the cable from the car's speedometer drive.
- Unscrew the tie rod ball joint.
- Remove and press the steering rod hinge pin out of the strut swing arm.
- The shank of the inner CV joint of the front wheel drive should be pressed out and moved to the side.
- Disconnect the second CV joint.
- Remove the clutch housing shield.
- Release the gearbox from the fasteners holding it to the engine.
- Remove the box.
Carefully remove the gearbox
Be sure to move it horizontally away from the motor before directly removing the box. Then disengage the input shaft. Be careful not to damage the clutch spring petals.
Useful tips
It is extremely important to monitor the serviceability of the gearbox, and if signs of breakdown are detected, fix them immediately. Do it yourself or with the help of a car service - this is your personal decision.
When operating a car in city conditions, you have to change gears more often. Therefore, it is recommended to use motor oil here. This ensures that the synchronizers remain effective longer. Transmission oil is better suited for highways, increasing the life of bearings and gears, although the synchronizer lasts less.
Internal structure of the box
How to replace a gearbox on a VAZ 2108 car
Repairing a VAZ 2108 gearbox is not reasonable in all cases; exchange in most situations is more reasonable and simpler. You can buy a gearbox new or used. The choice of unit is determined by the advantages and financial capabilities of the car enthusiast. It is profitable to buy a used box for disassembly. There are serviceable spare parts on sale with less than half capacity. The advantages of used units are obvious.
The disassembled gearbox is exactly free of manufacturing defects (it has been tested on the highway), it has been diagnosed by professionals from the service center before sale, it is serviceable and efficient, and for all that, its cost is less than that of a new one. In reality, for a VAZ 2108 gearbox, the cost is determined by the node type (4 or 5 range) and the level of wear. By installing this gearbox, you can save money and time on repairs.
You can replace the VAZ 2108 gearbox from a 4-speed to a 5-speed. Then the car’s capabilities will become several times greater, this will also depend on the type of engine. After all, it happens that with a 4-range gearbox, the car seems to lack one more speed.
About the oil
For good performance of the VAZ 2109, all important components must be coated with oil. Typically, the manufacturer independently determines the brand of engine and transmission parts that are recommended for use in cars of a given model.
If you do not have such information, you should consider the main purpose of the machine:
- if the VAZ is driven on excellent roads in the regional center, there is a certain type of oil for this;
- if you drive a car, a transmission would be the ideal option.
Remember to maintain the optimal oil level
When filling oil, it should be taken into account that the VAZ 2109 box requires a slightly larger amount. Only this approach will help protect and cover all spare parts located at the crankcase outlet.
Since the gearbox is the second most important element of a car, in the event of the slightest breakdown it is necessary to immediately eliminate the shortcomings. Let's look at the main malfunctions that can occur with the gearbox
Let's look at the main malfunctions that can occur with the gearbox.
'); if(“undefined”===typeof loaded_blocks_drive){loaded_blocks_drive=[]; function n(){var e=loaded_blocks_drive.shift(); var t=e.adp_id; var r=e.div; var i=document.createElement(“script”); i.type=”text/javascript”; i.async=true; i.charset=”utf-8″; i.src=”https://www.drivenetwork.ru/data/”+t+”.js?async=1&div=”+r+”&t=”+Math.random(); var s=document.getElementsByTagName(“head”)||document.getElementsByTagName(“body”); s.appendChild(i); var o=setInterval(function(){if(document.getElementById(r).innerHTML&&loaded_blocks_drive.length){n(); clearInterval(o)}},50)} setTimeout(n)}loaded_blocks_drive.push({adp_id:e ,div:t})})(47602)
Automatic transmission shutdown
- worn gears and locks on the coupling;
- failure to comply with vehicle operating rules;
- incorrectly selected speed mode;
- incorrect shifting with a poorly adjusted clutch;
- unprofessional gearbox repair (ignoring clutch replacement);
- ignoring repairs in the presence of extraneous noise in the form of crunching.
If you contact a service station in a timely manner, the VAZ gearbox can somehow be saved. If the condition is too neglected, count on expensive repairs.
What do the noises in the 2109 box mean?
There are no silent boxes. Each of them has a maximum permissible noise level, which is established by GOST.
- Extraneous noise from the VAZ box may occur as a result of the operation of gears and bearings;
- Used or low-quality oil also causes noise;
- Sometimes the reason for its appearance may be the operation of the power unit. In this case, the speed may be unstable or a powerful camshaft may be installed.
It takes forever to describe extraneous noises, since each driver hears them differently. To more fully understand the cause, it is necessary to diagnose the transmission.
Crunching sound when changing gear
Excessive or improper use of the vehicle.
If there is a crunching noise, the synchronizer will need to be replaced. If you decide to save money on it, you should expect to buy a whole block of gears in the future.
In addition, the presence of a crunching sound may indicate that it is time to change the used oil. Or perhaps it was filled with the wrong degree of viscosity?
Knocks
If you hear knocking noises in 21099, you should immediately check the gears
Perhaps one of the pairs has a chip; If a knocking noise occurs while driving, or when you switch the gearbox from one gear to another, pay attention to the satellites. Most likely they are the ones that have worn out.
The gearbox on a VAZ burst
Whether or not to purchase a new box is up to you. Judge for yourself, repairing it can cost you the same price as buying a new one.
The box is unstable and switches hard
The cause of this type of problem with box 21099 is the synchronizer or gear. In some cases, this situation may occur when purchasing new gearboxes or after repairing them.
Gearbox synchronizer
In any case, you should know that when buying a new car you need to run it in. Rough operation of the vehicle leads to serious problems.
What is a box and what is it for?
Window tinting for VAZ 21099-2109-2108
Let's figure out what it is and what it is intended for:
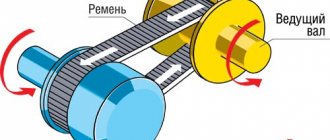
- A gearbox is needed to convert (change) the rotating (torque) moment that is transmitted to the drive wheels
- And also change the direction of torsion (rotation) of the wheels (providing reverse motion of the car)
- In addition, the gearbox makes it possible to disconnect the driveshaft from the crankshaft (and drive wheels)
- When the engine itself is idling (during starting, warming up and coasting)
- Manual transmission - as in our case (has an abbreviated name - manual transmission, as well as a common name - mechanics)
- The mechanics is a kind of multi-stage cylindrical gearbox, which provides for manual gear shifting
- According to the number of steps, four-speed, five-speed, six, seven and more speed gearboxes are distinguished (reverse gear is not taken into account)
- The main advantages (advantages) of a manual transmission are the simplicity of its design, operational reliability, the ability to be controlled manually in all driving modes and an affordable price.
- It is thanks to these qualities that the manual transmission is the most common type among gearboxes today.