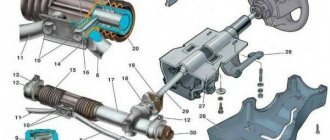
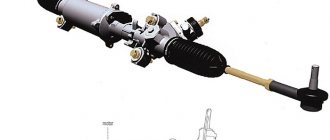
The VAZ 2110 steering rack is one of the most important parts of the car’s chassis. It connects the wheels and steering wheel through a special mechanism into a single whole. The vehicle's controllability, people's lives and traffic safety depend on its serviceability. Therefore, it is important to maintain the functionality of this unit and be able to quickly diagnose problems, given that rack faults can easily be confused with other faults. Knowing the structure of the mechanism and signs of malfunctions will help to simplify their identification.
In today's article we will talk to you about the main faults of the VAZ 2110 steering rack and how to repair them yourself.
Main faults of the VAZ 2110 steering rack
In modern VAZ 2110 cars, breakdowns of the steering rack and power steering are a very common occurrence. The reasons may be the following:
- Frequent driving on uneven roads, getting the car into potholes at high speed, active (uneconomical) driving style. In such a situation, the steering rack and power steering will quickly fail, an annoying knock will appear, and controllability will deteriorate. The result is failure of the unit;
- sudden acceleration when the steering wheel is in the extreme right or left position. This driving practice negatively affects the life expectancy of the steering rack;
- Regular trips to curbs are a big load for such an important mechanism.
Fans of such “obstacle driving” will very soon have to spend money on repairing the steering rack.
We have identified the main reasons. But how to determine whether a steering rack is faulty in practice? For what symptoms? We will look at this issue in more detail.
Geared vs conventional: which starter should you prefer?
A conventional starter does not have a gearbox; the rotational motion is transmitted directly to the crankshaft. Therefore, its design is simple and allows you to carry out repairs at home. Due to the fact that the electric current supplied to the device instantly engages the flywheel crown and gear, the engine starts, which is called “half-turn”. Classic units, due to their simple design, are reliable devices that can withstand electrical influences, but can fail when exposed to low temperatures.
The principle of operation of the gear unit is the same as that of the classic unit - the conversion of electrical energy into mechanical energy.
The difference is in the design - a gearbox is included, which is located between the armature and the bendix. In addition, the windings are equipped with permanent magnets, which increased the reliability of the mechanism. Geared devices are increasingly conquering the car market. In order to figure out which starter is better, you should find out the advantages and disadvantages of each of them.
Advantages of the classic version:
- simplicity of design;
- high maintainability;
- availability of spare parts;
- low cost.
The disadvantages include the following:
- the need for high starting current;
- rapid wear of parts;
- unstable operation at low temperatures;
- large weight and dimensions.
In general, an ordinary unit can be assessed as a reliable device when used correctly.
The gear unit has the following advantages:
- light weight and small size;
- can operate in a wide temperature range;
- long service life;
- economical energy consumption (40% less than usual).
Thanks to the presence of a gearbox, starting reliability at low temperatures has increased. Since a small current is required to start the power unit, the likelihood of a successful start increases in winter.
How to tighten the steering rack on a VAZ 2110 with your own hands
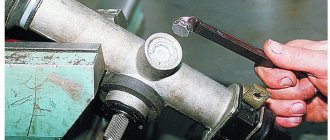
In order to tighten the steering rack on a VAZ 2110, you must perform the following procedure
- Unscrew the nuts inside the passenger compartment and remove the fastening bolts of the lower universal joint to the steering rack gear shaft. To do this, you will need a 13mm socket. The bolt can turn, so hold it with an open-end wrench.
- In the engine compartment itself, remove the nut of the upper fastening of the rack boot.
- At the bottom of the car, remove two more nuts that secure the rack boot.
- Remove the boot.
- Raise the front of the car and remove the front wheels.
If you are going to remove the steering, but not dismantle the rods, follow these instructions:
- Remove the locking plate from the rod mount by prying it off with a screwdriver. Then unscrew the two bolts that secure the rods and rack;
- Using a 13mm socket, remove the nuts from the steering gear brackets connecting to the front panel;
- Move the rack forward a little to remove the gear shaft from the shield hole;
- Remove the rack together with the rods.
If you want to remove the steering rods, unscrew the rod end from the swing arm of the shock absorber struts. To do this you will have to do the following:
- Remove the cotter pin using pliers;
- Using a 19mm spanner, unscrew the ball pin fastening nut, but not all the way;
- Use a 17 socket to loosen the tension bolt of the rod end;
- Now press out the ball pin. To do this, insert a mounting blade between the swing arm and the tip. Press the tip away from the lever, and apply several blows with a hammer to the end of the rotary lever;
- Unscrew the ball stud nut completely;
- Remove the ball pin from the lever hole;
- Use a screwdriver to open the groove of the tie rod end;
- Remove the tip, holding the threaded adjusting sleeve with a 27mm wrench. Count the number of turns so that during reassembly you can tighten it by the same number of turns;
- On the tie rod, try to maintain the position of the threaded bushing. This way the toe angle of the wheels will remain as correct as possible.
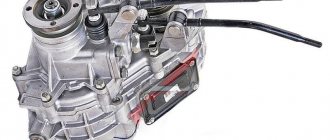
Gear starter
The general principle of operation is no different. Electrical energy is also converted into mechanical energy. The only difference is the presence of a gearbox. In addition, this starter also has permanent magnets in the winding, which makes it possible to slightly increase the reliability of the electric motor as a whole. Of course, there are some peculiarities here. In particular, many are interested in how much a starter of this type costs. In most cases, a little more expensive than classic ones, but not much. On average by 10-15%. But its service life is an order of magnitude longer, and this is definitely worth taking into account.
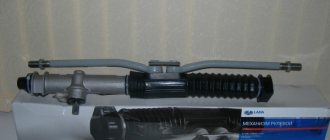
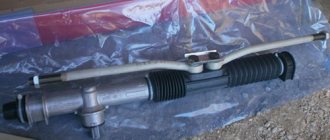
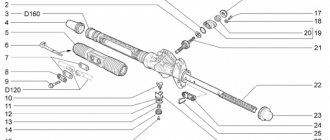
What kind of steering rack is on the VAZ 2110 - interchangeability of parts
To restore the functionality of the steering rack, as a rule, it is repaired, but sometimes it is necessary to replace the rack assembly. Do you know what steering racks were used on the VAZ of the tenth family, and what racks can be installed instead of the old one?
On the “ten”, the manufacturer installed steering racks of the old model (from VAZ 2108) and the new model with the index 2110. All the racks indicated in the table below are interchangeable, so that there are no installation difficulties, it is recommended to buy the rack together with the rods. Steering racks with power steering are replaced only with similar ones.
By the way, it is not necessary to change the steering mechanism assembly, you can try it
Let's sum it up
If you decide to replace this unit, then you first need to decide where the starter is located. This is usually the driver's side under or to the side of the engine. To remove it, you need to make room. Depending on the location, it may be necessary to remove the engine protection or the air filter with the box. Next, disconnect the wires and unscrew the bolts. Determining where the starter is located is not difficult. It has a cylindrical shape, and several wires come from it, secured with a nut. Everything is done quite simply and quickly.
So we answered the question about which starter is better: gear or conventional. Classic starters are good in their own way, but are gradually being phased out. But they also have their strengths, just as gearboxes have their weaknesses. For example, in the outback it will be difficult to find spare parts for a starter with a gearbox, but for a regular one - no problem. The same can be said about repairs - not everyone has encountered gearboxes on the starter and not everyone will undertake it. How much does a starter with gearbox cost? It all depends on the brand of the car; a normal one will cost 5-7 thousand rubles.
The gear starter design is distinguished by a gear transmission between the armature and the overrunning clutch. The safety margin is ensured by increasing the torque in the gearbox supplied to the flywheel of the internal combustion engine.
By analogy with a conventional starter, the gear version uses permanent magnets instead of windings, simplifying the design, reducing its weight and size. Maintainability is practically not reduced; the main causes of breakdowns and repair methods are discussed below.
How to replace the steering rack of a VAZ 2110 step by step instructions + photo report
In order to independently replace the steering rack of a VAZ 2110, you must perform the following procedure:
- Before you start work, unscrew the wheels so that they are directed towards the front, then hang the front part and remove both front wheels from the car, but before that, carefully secure your car so that it does not fall to the ground, and for this You will need to put it on the handbrake, put wheel chocks under the rear wheels just in case, and most importantly, the area on which you are going to do the work must be flat and must be asphalt, in case the car does fall, place the wheels under it in advance (So that it fell on them).
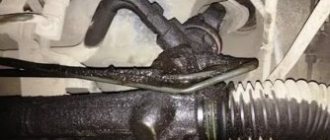
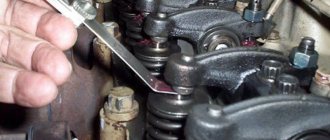
- Let's go to the salon, while there, you will have to use two keys (one bolt must be kept from turning) to unscrew the nut of the bolt, which compresses the clamp clamp, with the help of which the propeller shaft is held on the splines of the steering rack, after the nut is unscrewed and the bolt removed (see small photo), insert a powerful screwdriver into the slot (where the bolt was located, indicated by a blue arrow) and with its help, unclench the clamp so that the driveshaft can easily come off the steering rack splines.
- Now, on both sides, pull out the steering tips from the holes into which they go, we will briefly explain how to pull out the tip using the example of the right side, in general, take pliers and use them to pull out the key (This is a kind of metal wire), as soon as it is pulled out, unscrew the nut and using a puller, press the tip out of the hole and that’s it, if you need pictures and you have no idea what a steering tip is, then in this case read the article: “Replacing steering tips”, it says everything in detail.
- When both steering tips are removed from the holes, start turning out the bolts that secure the rods themselves (the steering rods are located on these rods), they are directly screwed to the steering rack in the central part (To remove the bolts, pry up the locking plate with a screwdriver, it does not allow the bolts spontaneously unscrew) by unscrewing one bolt at a time, completely remove the rods from the car (you need to pull them out through the wheel arches) and as you already noticed in the small photo, when removing the rod, the person still holds the connecting plate, do not lose this plate, when turning out the last bolt, this Always hold the plate with your other hand.
- And finally, unscrew two nuts on each side that secure the steering rack to the dashboard, remove the metal clamps and through the arch, remove the rack completely from the car, you can get acquainted with all this in more detail by looking at the photos below:
Before buying a rack, you should know something, firstly, before you buy a new rack, look at the markings on the old one and buy according to it, racks are generally interchangeable, but to avoid problems, buy everything according to the index and by the way, if If you have power steering installed, then take the new rack from the power steering!
Starter operation stages
This node works as follows:
- connection of the gear to the flywheel;
- starting the starter;
- disconnecting the gear and flywheel.
Naturally, the starter only works when the engine starts, and then turns off. If this does not happen, then one of the mechanisms is faulty.
After the driver inserts the key into the ignition and turns it to the operating position, current is supplied from the battery to the traction relay. Thanks to this, the bendix of the gear starter engages the gears, at the same time, due to the supply of voltage to the electric motor, the circuit is closed and the car starts. Once the engine speed exceeds the speed of our starter, it turns off. It turns on only the next time the engine is started. Well, now let's look at how a gear starter differs from a regular one. There are some interesting details here.
Why is cleaning necessary and its frequency?
When the ventilation system is clogged, an emulsion containing soot and oil residues settles inside the engine, resulting in the creation of excess pressure, leading to damage to the seals. This leads to loss of sealing and oil leaks, which can be seen during an external inspection of the engine block. Crankcase gases are gases from engine cylinders that are not discharged through the exhaust valve, but are squeezed out into the crankcase through the gaps of the pistons and piston rings when the engine is running. This process occurs especially intensively in worn-out engines with high mileage. For VAZ 2101-2107, these are mileages of 80-100 thousand km.
If the crankcase ventilation is not cleaned in a timely manner, the operation of the fuel supply system will be affected. In carburetor engines, the air filter and the carburetor itself become dirty; in injection engines, the throttle assembly, inlet pipe and sensors become dirty. All this leads to a decrease in power, problems with operation, and in some cases a complete stop of the engine. To avoid this, additional elements are introduced into the ventilation system to clean crankcase gases from emulsions containing oil.
If the crankcase ventilation system is not cleaned in a timely manner, the hoses crack due to excess pressure. This causes excess air to be sucked into the engine. Carburetor engines are not so sensitive to this problem, but in injection systems the quality of the mixture sharply deteriorates, the stability of the engine is disrupted and its power is reduced.
The best option is to clean the crankcase ventilation on a VAZ classic immediately before changing the oil. This frequency allows you to keep the system in order, change cracked hoses on time, extend the life of the engine, and reduce fuel consumption without loss of power.
Video: How to disassemble and clean the breather, crankcase ventilation
Gear starter repair
Since the engine starting unit has friction parts and is equipped with an electrical part, breakdowns still occur. The complex design of the gear starter in some cases makes repairs unprofitable; this unit is completely replaced. However, in some cases, the car owner can identify and fix the problem on the spot.
Solenoid relay failure
In this case, repairing a gear starter requires complete disassembly of this engine starting unit. Experts recommend taking a photograph of the solenoid relay before disassembling it, so as not to confuse the polarity of the contacts. If the relay is dismountable, visually inspect the “nickels”; if they burn, they can be cleaned with sandpaper; if there is significant wear, it is better to replace them entirely.
Start problems
If, when you turn on the ignition with the key, you hear the characteristic sound of the retractor relay operating, but the flywheel does not spin, most likely the bendix has worn out. In this case, the starter drive should be replaced entirely, preferably in a specialized service center.
In any case, it is necessary to check the battery charge level; perhaps the starting current is not enough, even for a gear starter that sharply increases torque.
No response to the ignition key
This malfunction of the gear starter is most often caused by an interruption in the circuit. To restore the functionality of the starting unit, you must:
- tighten the terminal fastening nuts;
- clean oxidized terminals if necessary to restore contact;
- checking battery charging, charging as necessary;
- revision of the bendex and its replacement if necessary; this part is not subject to restoration.
This breakdown, in principle, does not require a visit to a service station; it can be easily repaired on your own.
Magnets falling out/sticking
When disassembling a failed starter, it is very difficult to maintain the original order of the permanent magnets. In principle, inserts piled up in a heap are not a problem for the car owner if there is a compass. Using the random method, you can put them in the required sequence with a 30–50% probability, so you should approach the repair yourself systematically:
- for normal operation of the starter, 3 magnets are used with the magnetization vector directed outward, and the same number with the opposite direction of the magnetization vector, but inward;
- they must be alternated with each other when installing in a cage;
- the magnetization vector is determined by the compass, for this purpose the insert is installed on the edge near the device, for three magnets the arrow will turn towards them with the north side, for the remaining ones - with the south side;
- They stick to the cage body independently; their relative position in the starter is achieved through spacer polymer rings on both edges of the inserts.
In order for the armature to operate (rotate) in the desired direction, it is necessary to place the starter vertically, put the lower remote ring on it, and then the housing, placing the “+” wire retractor slot on the relay side.
Then the housing is removed together with the lower remote ring, the magnets are installed alternately north/south, and are fixed with the upper remote ring, taking into account the holes for the tie rods.
The brush assembly in the form of a repair kit is mounted after installing the cardboard insulation in the groove of the positive wire.
Attention: Before installing the starter in place, it is necessary to check its characteristics. To do this, you should rotate it when connecting it to the battery and make sure that the retractor is working.
Thus, some faults of the gear starter can be eliminated on your own. However, to ensure guarantees, it is better to visit a service station, where professionals do not make mistakes and advise the user on choosing a starter or repair kit from a specific manufacturer for their car.
Purpose of a gear starter
The main problems at the time of starting an internal combustion engine - thick oil at subzero temperatures, a dead battery, extreme loads on the on-board electrical system - are completely solved by a gear starter with a planetary type transmission.
A regular starter starts a car in several stages:
- With the ignition key, the car owner closes the circuit on the traction relay;
- at the same time, the overrunning clutch (Bendix) engages with the flywheel;
- the next circuit closes, voltage is supplied to the electric motor;
- the motor starts until its shaft reaches a rotation speed greater than that of the starter;
- in this case, the overrunning clutch will automatically break the engagement of the electric motor shaft and the drive gear.
In a gear-type starter, the bendix and armature shafts are displaced relative to each other in space, but remain parallel to each other. Gears with different numbers of teeth reduce the rotation speed of the bendix, but the torque on the flywheel increases sharply, ensuring guaranteed all-season starting of the internal combustion engine.
Pros and cons of a gear starter
Since the gear starter has an improved design, the main advantages of this starting unit are:
- the voltage does not drop when the flywheel spins, it is enough for the ECU;
- the speed decreases, but the torque increases;
- increasing the service life of brushes due to lower starting current on the armature windings;
- with the exception of Bendix, all parts last at least twice as long;
- The launch unit is smaller in size and easier to maintain and repair.
Lada 2109 purple 1.5i carbon › Logbook › The breather is clogged and the valve cover mesh is covered
Gift to everyone. I haven't written anything for a long time, but then it happened. The breather is clogged and the valve cover mesh is covered! Because of this, such pressure was created in the engine compartment that oil poured out of all the smallest cracks! There was a metallic knock in the breather!
The car held the idle speed perfectly, but as soon as it was time to move off, stepping on the gas, the engine compartment was filled with oil and the car began to choke and stall =((. And so in order to eliminate this reason, I had to open the head, and also buy a new valve gasket, valve cover mesh and sealant. Having opened the whole thing and getting to the mesh, I realized that this is 100% the reason! It was clogged to such an extent that a speck of dust would not get through! I threw the mesh into a solution with a solvent, cleaned it and rubbed it, it was useless, I had to buy a new one! Having replaced the mesh and cleaned the breather tube itself, I installed a new gasket under the valves, filled it with sealant and put it back =) Started the car... everything was super good! =)) It worked for about 10 minutes and then it stalled...xDDDD...ran out of gas.
Source