| Malfunction (symptom) | Causes | Remedy |
| No oil pressure | Malfunction of the oil pressure indicator. Pump shaft failure. Cut of the pump drive gear mounting pin. Low oil level in the engine crankcase | Replace the oil pressure indicator. Replace the pump shaft. Replace the pin. Add oil to the top mark of the dipstick |
| Low oil pressure | Oil leakage in oil lines. Stuck drain or safety valves. Clogged oil receiver mesh in the pan. The tube supplying oil from the pump to the block is loose or the gasket is damaged. Malfunction of the oil pressure indicator. Low oil viscosity. Worn oil pump parts | Inspect the oil lines and repair any leaks. Wash the valves and remove burrs if necessary. Wash the oil receiver screen. Tighten the bolts or replace the gasket between the tube and the block. Check the pointer and replace it if necessary. Change the oil. Replace worn parts or pump assembly |
| Smoky exhaust (blue smoke) | Oil entering the combustion chamber due to excess oil in the crankcase | Set the oil level to the top mark of the dipstick |
| Insufficient rotation speed of the centrifuge rotor | The rotor nozzle is dirty. Damage to the gasket between the frame and the rotor cover. Rotor axis jamming | Clean the injectors. Replace the gasket. Replace the centrifuge |
| High oil pressure | High oil viscosity. Pressure relief valve stuck. Oil line clogged | Change the oil. Wash and adjust the valve, remove burrs. Clean and flush the oil line |
When the filters become clogged, the bypass valve is activated and the oil enters the system unpurified (bypassing the filters). This leads to rapid wear of engine parts. Therefore, it is necessary to periodically check and, if necessary, replace (or clean) the filter elements. As the pump teeth and walls wear, the oil flow and pressure in the system decreases. Therefore, periodic monitoring of the pump’s performance is necessary by measuring the pressure at the outlet of the pump while the engine is running, as well as by visually checking and measuring the gap between the ends of the gear teeth and the walls of the housing when disassembling the pump.
Failures and malfunctions of the lubrication system
Oil pressure exceeds the permissible value during normal engine operation (in all modes)
Sensor or pointer is faulty
Replace sensor or pointer
Due to oil contamination, the pressure relief valve jammed
Clean the seat and pressure relief valve, adjust the valve
Increased oil pressure when the engine is idling and at average crankshaft speed
System channels are dirty
The oil in the engine is too viscous
Replace the oil with another one in accordance with the manufacturer's recommendations
Low oil pressure with normal oil flow
Low oil level in the system
The pressure reducing valve is worn out or misadjusted; mechanical particles got under the valve
Choosing engine oil for VAZ 2103
What to look for when choosing oil? Correctly changing the oil of a VAZ 2103 engine, or any other engine, means filling in the same type of oil as it was from the same company, preferably. How to choose the right motor oil
How to choose the right motor oil
This is done because the engine is already accustomed to working with this oil and there is less chance of harmful deposits, precipitation and the like. But you can switch to another, say, higher quality oil. So which one should you choose? As for the manufacturer, there are no special rules. It all depends on the desire and price of the oil. If finances allow, it’s better to buy more expensive ones, because more expensive means better quality. And the higher quality the oil, the later it is to overhaul the engine. You can buy oil of domestic brands or foreign ones - but not a cheap fake - it will only make things worse!
There are many companies - choose the bestMineral motor oil
Mineral water from LIQUI-MOLY
So:
- Is mineral oil (simply “mineral water”) suitable for a VAZ 2103? Yes, it will do. After all, this car was manufactured back in Soviet times, and then, perhaps, this was the only oil they used. We went and were happy.
- But “can” does not always mean “necessary”. Yes, it is permissible to use a mineral water engine, but it is not recommended. Why? Time will tell - or rather, time will pass, winter will come, frost will hit and your engine, when you try to start it, will show you, excuse me, nothing!
- Yes, yes, and all because mineral oil has a very bad property - it freezes at low negative temperatures. This is not the only negative property. Mineral water also leaves deposits on engine parts and also requires frequent replacement.
Semi-synthetic
Semi-synthetic 10W-40
So:
- This oil has already improved properties and characteristics in comparison with mineral water. The service life of semi-synthetics is noticeably longer; accordingly, it will better retain its properties until the necessary replacement due to mileage. Less negative impact on the engine than mineral oil.
- The price of such oil is not that high. It is easy to buy in almost any store. In a word, it is a universal oil, which is often used in Zhiguli cars.
Synthetic motor oil
Synthetic motor oil
So:
- This oil is by far the best there is. It has become widespread due to its high performance properties and good ability to maintain the functionality of all engine parts.
- Synthetics also hold up well at low temperatures, which is extremely useful under harsh working conditions.
- But still, synthetic motor oil is not recommended for use in such cars for several reasons. The main one is expediency. The whole point is that the car was developed a very long time ago, when such oils did not yet exist.
- And engine parts can easily run on both mineral water and semi-synthetic. And the price for synthetics is simply astronomical. So there is simply no need to pour such oil when changing the oil in a VAZ 2103.
Lubrication system maintenance
The most common malfunctions of the lubrication system are: decreased oil level, increased or decreased pressure in the system, oil contamination.
A decrease in oil level can be caused by a leaky engine oil sump, a poor crankshaft seal, or worn oil seals and oil burnout.
Increased pressure in the lubrication system can be caused by the use of oil of high viscosity, contamination of the system channels and oil filter, malfunction of the pressure relief valve, in rare cases - failure of the oil pressure sensor, and low pressure - insufficient oil level in the oil sump, a decrease in its viscosity, or clogging of the oil receiver , wear of oil pump parts, crankshaft or camshaft bearings, sticking of the pressure reducing valve in the open position.
The reasons for intensive oil contamination and its rapid aging are the ingress of coolant into the oil, prolonged engine operation in modes different from the nominal ones (coolant temperature less than 60 ° C or more than 100 ° C), significant wear of parts of the cylinder-piston group, and the use of inappropriate oil.
The quality of the lubricant and the lubrication system have a significant impact on the operating efficiency of the equipment. Therefore, any disturbances in the lubricant supply system can lead to improper operation of the mechanism and its rapid wear. To avoid this, it is necessary to carry out regular diagnostics of the equipment and study all possible signs and causes of malfunction of the lubrication system.
Fixing oil leaks in a car
Once you've found the source of the leak in your car, it's time to decide whether you can fix it yourself as soon as possible. For example, even if you don't have much experience in car maintenance and repair, you can fix a valve cover gasket leak quite easily.
Also, in some cases, you will be able to eliminate oil leaks from the oil filter yourself. In other cases, you need some experience in car repair and maintenance, as well as a repair manual for your car model. Especially if the oil starts leaking due to wear of the crankshaft seals. If you have such experience, then if you find oil leaking, contact a technical auto center as soon as possible. True, we still advise you to enter the location of the leak yourself in order to avoid being deceived at the car service center.
Fortunately, as is the rule, oil and other fluid leaks in new or fresh cars are a rare occurrence. However, as the mileage increases and depending on the load on the vehicle during operation, many of its gaskets, seals and oil seals wear out, which can lead to fluid leaks. Gaskets and seals in the engine can wear out especially quickly due to sudden temperature changes.
Therefore, from time to time you should not only simply change the oil, oil filter and air filter, but also conduct a thorough inspection of all the main components of the car. This is the only way you will be able to notice a possible leak of oil and other liquids in time.
Don't be afraid to own your own car. Each of you is able to inspect your car from time to time for fluid leaks. You don't need any skill for this. Your task is to notice the leak in time.
Remember that periodic inspection, as well as timely scheduled maintenance, will help you keep your car in good condition, and also protect you from major breakdowns. This will allow you to save not only your nerves and time in the future, but of course money.
Types of lubrication system malfunctions
Normal operation of the equipment requires constant monitoring of oil temperature, presence of contaminants, water ingress or leakage. There are several types of lubrication system malfunctions, the untimely detection of which can lead to serious problems with the equipment. Among such violations:
- damage or wear of the oil pump;
- clogging of the filter element;
- damage to the pump gasket;
- poor filter fixation;
- failure of the pressure sensor;
- low oil level;
- heating the lubricant;
- pressure relief valve sticking.
The cause of these malfunctions may be the end of the service life of system elements, violation of the rules for working with equipment, or poor quality maintenance. Among the most common types of violations are the use of low-quality lubricant and irregular replacement of the oil or filter element.
Causes of injector clogging
Typically, problems with the injection system occur when using low-quality gasoline. Heavy paraffins contained in such fuel settle on the walls of the system, cutting off the fuel supply. Manufacturers of high-quality gasoline add detergent to it - a special additive that dissolves deposits. Low-quality gasoline contains too much paraffin, which forms deposits faster than detergents can remove them. Deposits form more intensively at low temperatures, so when the car is frequently driven with a cold engine, the injector becomes clogged more often.
Deposits can accumulate not only in the injectors. Often vapors settle on the throttle valve, which leads to a change in the proportions of the air-fuel mixture entering the cylinders.
Deposits of substances contained in low-quality gasoline may also appear on the back of the intake valve plates. This can lead to valve burnout or fuel detonation.
To clean the injection system of deposits, it is necessary to use special flushing fluid and equipment. You can wash the injector in a garage. To do this, you need a syringe and washing liquid. The latter is mixed with gasoline and poured into the injection system through the hose of the vacuum brake booster. First, the operation is performed with the engine turned off, then with the engine running. The mixture is fed into the running engine gradually, in small portions. As a result, the deposits dissolve, enter the engine cylinders and burn there. In this case, clouds of smoke may briefly appear coming out of the muffler.
The power unit of the injection VAZ 2107 was the first at AvtoVAZ in a number of injection models. Therefore, the new product raised many questions and comments: Soviet drivers did not know how to maintain and repair such an engine. However, practice has shown that the injection equipment of the “Seven” is very practical and convenient, and also allows for a number of alterations and modifications for the driver himself.
Signs of lubrication system malfunctions
External signs of lubrication system malfunctions are increased material consumption, oil contamination, increased or decreased system pressure and heating of the lubricant in friction units.
Low system pressure may indicate insufficient oil, a leak, worn pump parts, or a stuck pressure relief valve. Increased pressure may indicate excessive viscosity of the lubricant used or clogged oil lines.
The quality of lubrication is also affected by increased material temperatures in oil systems. The cause of such a violation may be excessive heat generation that occurs during friction of parts. Therefore, it is necessary to carefully monitor the temperature conditions of the lubrication system. As bearing temperatures rise, check the oil filters and valves for clogging, and make sure there are no oil leaks or oil pump problems.
Does oil even drip from under your car?
If you regularly find drops or even puddles of viscous oily liquid under your car, you first need to make sure that the problem is really with the oil. Perhaps this is simply water that has accumulated during the trip, which washes away many years of dirt and drains when the car is at rest. There are other options for the formation of unpleasant puddles during the operation and storage of a car. It is worth doing the following checks:
- take a sheet of white paper, use a cotton swab to collect liquid from the puddle and anoint the paper, look at the result and wait a few seconds to be sure;
- if you have oil in front of you, the paper will become more transparent in the place where you smeared it with liquid, and a greasy stain will also be visible that does not go away for a long period of time;
- if the spot is just wet, then you are dealing with another liquid, it could just be water from the washer reservoir or rainwater that has collected in certain grooves;
- if the paper begins to turn green, red or blue, it is worth checking the cooling system; most likely, the leak is coming from there, and there is antifreeze on the garage floor;
- With a constant frequency of liquid appearing on the floor where the car is stored, it is still necessary to carry out a full-fledged high-quality diagnosis and solve all the problems.
Do not use barbaric verification methods, which are written about so much on the Internet today. Spare your car and take it to a mechanic. You can simply show the car to an experienced person who knows more than you in technical aspects and can really help you complete all the tasks efficiently and in a short time. All this will really help to find the problem and fix it in order to get rid of unpleasant and alarming stains.
Possible problems when removing the engine sump
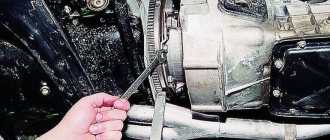
Usually it is not possible to remove a part if the bolts are rusty. They need to be unscrewed carefully so that the pins do not break off. It is necessary to preheat the mounting location, and then slowly unscrew the bolt. In domestic cars, the bridge often gets in the way after unscrewing the fasteners. In this case, you should not try to cut off the interfering strips. The problem is solved by removing the oil pump.
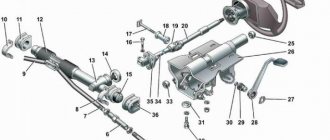
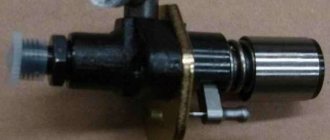
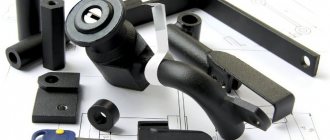
Oil pump
It is important to raise the engine to a sufficient height. Otherwise it will be impossible to get to the pallet
The engine is raised until it reaches the nuts securing the mounts. It is convenient to use a diamond-shaped jack for this operation. It needs to be installed under the box; when lifted, the engine will move. Procedure:
- Disconnect the receiving pipe from the manifold, pull out the rods coming from the radiator and heater.
- Disconnect the gas draft loop located on the right, unscrew the casing from the stove.
- Pull out the oil dipstick. Disconnect the tube in which it is placed.
- Remove the clutch box, and then the shield located below the radiator.
- Disconnect the rear support post from the crossbar. Raise the box with a jack, then the handbrake drum will begin to rest against the body. The rear pillar will have to be supported.
- Place a jack under the crankcase and disconnect the cushions. Raise the engine until it stops.
- Place several planks between the motor feet and the cushions. Remove the jack and carefully secure the engine.
- Unscrew the fasteners that hold the crankcase in place. To do this you will need a key with a universal joint. To remove the tray, you need to pull it back.
If there is no jack, a traverse made of timber will do. The beam must be positioned parallel to the radiator. Next, the pin is attached to the engine and threaded through the yoke. Then you need to carefully tighten the nut on the stud. The motor will begin to rise slowly.
It happens that when you try to pry the pan with a screwdriver, it does not budge. In this case, the part gets stuck somewhere inside. First you need to check that all the bolts are unscrewed. In most engines, the cover is held on by 15 bolts, less often by 14. If everything is unscrewed, this means that the oil intake tube is stuck. To solve the problem, you will have to unscrew the tube from the pump.
Tips and tricks
It is possible to dismantle the part only if the preparatory work is carried out correctly. First, the car is placed above the inspection hole; if this is not possible, the body is raised with a jack. After this, it will be possible to get to the crankcase and adjacent parts.
To carry out manipulations, good lighting is required. Without illumination, it is difficult to remove a spare part from a hard-to-reach area. If you have a powerful lamp, it will be possible to inspect the pallet and make sure that there are no dents or holes on it. You will also have to check the condition of the gasket.
If a hole has formed in the housing, repairs can be made using argon welding. Minor cracks are repaired by cold welding, but before doing so, the oil is drained and the surfaces are degreased. Leaks at the junction of the engine block and the sump indicate the need to replace the crankshaft oil seal. Slight sweating around the drain plug is not considered a deviation from the norm.
Welded engine sump
The pan can be accidentally punctured when driving off-road, even with high ground clearance. Many car owners install protection that covers the pan from impacts and complicates access to it. The protection is dismantled in advance; it is usually held on by several bolts and can be unscrewed without any problems.
Crankcase protection
Before dismantling, it is advisable to wipe the tray and surrounding elements with a rag. This makes it more convenient to carry out work, and it is easier to see damage to the body. If oil spills out, the location of the leak is determined visually. To check the integrity, you need to turn on the engine at idle speed. In this mode, oil will quickly begin to flow out through the hole. If after removal you find damage to the gasket, do not throw it away. It is better to take the old seal with you when going to the store. Then it will be easier for the seller to select a similar spare part.
Consequences
Now, let’s take a look at the consequences that can arise when oil regularly leaks from under the crankshaft oil seal. The timing belt is located next to the front oil seal: if engine fluid gets on it, the belt may break faster during operation.
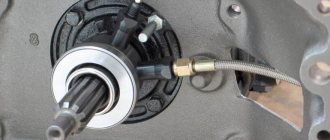
Installation of the front SCV
The clutch mechanism is located next to the rear oil seal, and if consumables get on it, the system will lose its friction characteristics. One way or another, in both the first and second cases, fluid leaks and engine contamination are inevitable,
There was a leak from under the front oil seal
It should be noted that a leak from under the oil pump gasket can also be confused with a leaking oil seal. These elements are located next to each other and the motor fluid in both cases will flow from one side. It is also worth adding that in this case the crankcase will be dirty, since any dirt that remains there will stick to the lubricant.
A broken timing belt is the worst outcome if the crankshaft oil seal leaks. Moreover, on many engine models, cases where engine valves were bent were recorded. In this case, the motorist will need:
- replace the timing belt;
- replace the cylinder head gasket;
- replace the valves, and grind them in;
- grind the engine cylinder head, since in 98% of cases it will be uneven and, accordingly, will not fit tightly to the engine, which will negatively affect the reliability of the power unit.
In addition, if the vehicle is regularly used, the pistons may be damaged by a leaking oil seal, since these are the elements that rub against the valves and can be damaged by them. Experienced car enthusiasts know that minor defects and irregularities on the piston surfaces will not in any way affect the operation of the power unit as a whole.
Installation of a new SCV
But in practice, there have been cases when the piston was simply pierced by the valve itself: in this case, the car owner will have to fork out for expensive repairs, almost a major one. After all, you will have to replace:
- directly failed piston;
- broken shaft valve;
- all liners around the circle will also need to be replaced;
- and change the crankcase gasket.
So, let’s summarize the total costs that a driver may experience in the event of a leak of engine fluid from under the oil seal:
- replacing the timing belt;
- changing valves, grinding them in;
- grinding the surface of the cylinder head;
- replacing the head gasket;
- adding lubricant to the engine, as well as antifreeze to the cooling system;
- It is also advisable to replace the cylinder head mounting screws;
- replacing the piston (if it fails);
- it may also be necessary to replace the piston rings;
- replacing the pan gasket.
This is what the new front SCV looks like
A motorist who operates his vehicle with a leaking oil seal may face such consequences.
Rear oil seal leaking
Now let’s look at the consequences that the owner of a car with a leaking rear oil seal may face. As in the case of the front oil seal, the car owner will not have such catastrophic problems, but a leak in itself is already a significant problem. To solve it you will have to:
- dismantle the gearbox;
- remove the clutch mechanism along with the disc;
- remove the flywheel.
All this is needed in order to simply get to the oil seal. As for the consequences, if the rear element leaks, motor fluid can flood the clutch mechanism, as a result of which the device will lose its frictional characteristics. In this case, the vehicle:
- will significantly lose power;
- fuel consumption will increase (the driver gives gas, and the car also drives, respectively, gasoline consumption increases);
- you will have to add a lot of lubricant to the engine (all of it, of course, will not leak out, but you will have to add enough).
Fluid leak through rear SCV