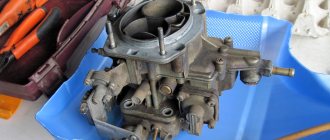
Owners of carburetor cars often encounter such a problem as carburetor overflow. The phenomenon occurs not only on models from AvtoVAZ, but also on carburetor foreign cars. Overflow is a significant re-enrichment of the mixture of fuel and air that enters the combustion chambers. The mixture is over-rich for one reason or another related to the carburetor. Sometimes, even with the naked eye, you can see how gasoline flows in a powerful stream from the diffuser nozzle. There is a persistent smell under the hood. Let's look at all the reasons that lead to carburetor overflow and learn how to eliminate them.
Signs
If the principles of preparing the fuel mixture in the carburetor towards enrichment are violated, then problems with starting the engine are observed. A hot engine starts especially hard. If the engine does start, the speed is unstable (often increased in idle mode). It is impossible to adjust or somehow stabilize the speed using conventional methods.
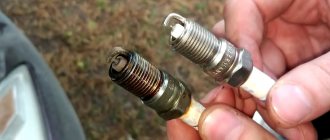
If the fuel mixture is too rich, black smoke will come out of the exhaust pipe - the mixture burns directly in the exhaust pipe. When you press the accelerator pedal, failures are possible - the rich mixture burns very poorly. There will be a thick layer of black carbon on the spark plugs.
Standard reasons why the carburetor overflows
The car stalls when braking: possible causes, solutions to the problem
When the carburetor is overfilled, the following deviations can be visually observed:
- difficult starting of the engine, mostly hot;
- Unstable high crankshaft speeds at idle, which cannot be adjusted;
- black combustion products coming out of the exhaust pipe due to the combustion of excess gasoline in it;
- dips in the accelerator pedal when you press it, as the enriched fuel-air mixture floods the spark plugs;
- spark plugs wet from gasoline, covered with black soot (see what spark plugs look like when the engine is not operating properly).
Fuel level in the float chamber
Having noticed one or more characteristic signs of overflow, the car owner must immediately take effective measures to eliminate it. If the carburetor overflows, adjusting and adjusting the metering systems is most effective.
Basics of fuel mixture dosage
The situation when a VAZ carburetor overflows happens especially often. Before examining the reasons, you need to learn a little about the principles of preparing the fuel mixture.
A mixture is considered normal when there are 14.7 parts of air to one part of fuel. All other ratios are a consequence of an incorrectly configured carburetor. If the ratio is from 7 to 1 to 12 to 1, then we can talk about overflow. In this case, difficulties arise in starting the engine. It must be remembered that too rich a mixture, as well as too lean, can be dangerous for the engine. It burns more slowly, which means there is a risk of valve burnout. But the combustion temperature is low.
Carburetor transition setting
While the engine is idling, the throttle valves are closed. A vacuum (vacuum) is formed under the dampers. Thanks to this vacuum, gasoline is sucked out through a small idle channel and nozzle, and the engine itself runs smoothly at idle. If you open the damper sharply, then the vacuum also weakens. Moreover, this vacuum is not enough for normal operation of the MDS (main dosing system) in the first chamber, and the idle system and accelerator pump are not yet capable of normalizing engine operation. In other words, when you sharply press the gas after idling, there is a delay in the response to pressing the accelerator pedal.
To minimize or completely eliminate this failure, a transition system is used in the carburetor device. This diagram is a hole-slot made above the throttle valve in the first chamber. At the moment you press the gas pedal, the slot-shaped hole appears in a zone of high vacuum, due to which intensive fuel suction occurs parallel to its supply through the idle jet.
Let's go back to the settings. After the carburetor has been installed, many cars experience a failure when starting from a stop, reactions to pressing the gas pedal are slow, and the engine may start shooting at the carburetor or stall. In such a situation, the transition system may be to blame. In order to normalize the operation of the carburetor, it is necessary to correctly select the cross-section of the “spout” of the accelerator pump and the size of the idle jet.
It is important to know that the nozzles in the first chamber do not need to be touched, and the indicated failures should not be attempted to be eliminated by replacing the nozzles of the main dosing system. To solve the problem, use the previously built carburetor to correctly select the idle jet and the accelerator pump nozzle
The selection must be made after the internal combustion engine has warmed up, the choke must be removed.
In practice it looks like this:
The level in the float chamber was previously set and the idle speed was adjusted. A warm engine idles normally without chugging. A stream of gasoline from the accelerator pump nozzle hits the manifold. Now you can sharply press the gas pedal. What is needed is the sharpness of the press, and not how hard the pedal was pressed (to the floor, half a stroke or ¼). Normally, the motor should immediately respond and spin up, that is, the speed increases without delays or failures. If the response to a sharp press on the accelerator is slow or there is a noticeable pause before the speed increases, then you should go to the settings.
To accurately determine the cause, you need to press the gas pedal again, but this time smoothly, not sharply
If in this case there is an even increase in speed (without pauses, dips or delays), then you should pay attention to the idle jet and the pump spout, since the main dosing system has nothing to do with the failure. If, when you gently press the gas, the engine spins up poorly, the unit itself begins to work jerkily, hums, vibrates strongly, etc., then the problem lies in the selection of jets for the first chamber
In other words, excessive enrichment or leanness of the mixture occurs after the carburetor switches to power mode after pressing the accelerator. An indirect sign of a too “rich” mixture during operation in transition mode is that the engine emits black smoke and the smell of gasoline comes from the exhaust system. The specified smoke and smell appear after sharp throttling.
To remove the dip, you must carefully select the idle jets to match the pump spout or vice versa. This is done until the delay disappears when you sharply press the accelerator pedal. In parallel with this, it may be necessary to re-adjust the idle speed, since replacing the XX jet will make changes to the operation of the idle system. Let us add that if the mixture remains lean and there is a dip, and the idle jet is too large and it is not possible to adjust the idle speed, then you can install a paired pump spout, after which both tubes are bent into the first float chamber.
Needle valve leaking
In some cases, the valve gets stuck in its seat. To eliminate such a malfunction, lightly tapping the carburetor cover with a hammer is sometimes enough. Experts also recommend paying attention to the tightness of the valve body. There is an O-ring underneath on most carburetor models - you need to make sure that it is there.
To check the needle valve, it is necessary to create a vacuum by blowing with your mouth or a rubber bulb through a hose placed on the fuel supply fitting. A valve with a defect cannot withstand vacuum. If it is faulty, it should be replaced with a new, working one. It is better to choose spare parts for carburetors wisely - lately there have been a lot of defective products in stores.
Why does gasoline leave the carburetor overnight?
Gasoline is leaving the carburetor
A situation familiar to many owners of used cars is that the engine will not start due to lack of fuel in the carburetor. Where does it go, because there is fuel in the gas tank, and the pump is also working.
Without superficial data on the functioning of the fuel system of your car, it is extremely difficult to draw any conclusions. On the contrary, if you know, at least in general terms, the list of main faults that create such a situation, you can quickly and effectively correct problems on the spot.
ATTENTION! A completely simple way to reduce fuel consumption has been found! Don't believe me? An auto mechanic with 15 years of experience also didn’t believe it until he tried it. And now he saves 35,000 rubles a year on gasoline! Read more"
So, here are the main reasons that affect the fact that the engine does not start in such a situation.
- There is no pressure in the fuel supply system.
- The gas filter has worn out.
- A blockage of debris has formed in the supply pipe from the gas tank.
- There are problems with the vacuum hose.
- Gasoline leaves the carburetor.
EMR or economizer
The last point is discussed quite often. Well, how can you not be surprised? You park the car overnight or during the day, generally for 10-12 hours. There is fuel in the line and tank. The filter is installed before the pump, higher up, it is also full. All attachments are new, there are no leaks, the clamps are fresh and well tightened. Every time before starting the engine, you have to pump gasoline again by hand, since it evaporates from the float chamber for unknown reasons.
Operating principle of the economizer
Motorists have heard about the power mode economizer. It is installed on various carburetors, including Solex. Designed for additional enrichment of fuel assemblies entering the carb at peak engine operating conditions. Thanks to the EMR, it is possible to increase the power and throttle response of the power plant when pressing the accelerator pedal.
This is all good. Only many owners of carburetor cars forget that there is a diaphragm on the EMR, which can allow gasoline to pass through over time. So the cause of the malfunction was found without any problems. You just need to disassemble the device and see if the membrane is intact. If it is torn and leaks, then the carburetor will periodically dry out, no matter how hard you try.
Microcrack
This is also a very familiar situation. A microcrack is not noticeable on its own and can greatly fray the driver’s nerves. He thinks there are no leaks, but gasoline is running out. Typically this can be checked as follows.
- Stop the engine and make sure the float chamber is full. To do this, it is not at all necessary to remove the top part of the carburetor. It is enough to pump it manually with a pump (you will hear it).
- Wait until the engine cools down. Try again to inflate the carb chamber to full, leave it as it is until the morning (for 12 hours).
- Check how much more fuel you can pump.
Crack in carburetor
This method makes it easy to check not only the presence of a microcrack, but also the intensity of gasoline evaporation due to high temperature. Often the fuel is of poor quality or the carburetor for some reason quickly and severely overheats.
Now about what conclusions can be drawn if the fuel evaporates on a cold engine. In this case, it is recommended to dismantle the carburetor and place it on a clean sheet of white paper. The float chamber must be full. After this, you need to periodically lift the device and see where it gets wet (i.e., there is a crack). It is advisable not to turn the carburetor over so that the channels and cavities remain full.
Needle valve sticking
It was written above that the first suspicion always falls on the fuel pump. It definitely needs to be checked. This is done manually: you need to pump up the pedal while listening to see if the fuel is flowing. In the situation we described, fuel will be supplied, but after several swings. Then the engine will start, but after a while the problems will start again.
Needle valve sticks
In any case, it is not related to the fuel pump. The problem must be looked for in the carburetor itself. It is possible that the needle is frozen or stuck. This often happens in winter or on dirty fuel tanks, when sticky liquid gets inside along with gasoline. It affects the needle valve and it can no longer work properly.
When a valve sticks, gasoline either does not get into the float chamber at all, or gets into the float chamber intermittently. This is clearly noticeable; if you move the needle with your hands, it will start working. The fault appears again after a certain time, since the cause of the sticking has not been eliminated.
One of the surest and most effective solutions in this case is to treat the locking needle with diamond paste. It's easy to rub in and that's it. It won't stick anymore. As a last resort, if this does not help, the needle valve can be replaced with a new one. Solex carburetors especially often suffer from this problem.
Strong vacuum in the tank
Gasoline can evaporate quickly inside the float chamber. This happens in most cases due to high vacuum in the gas tank. If you listen in the area of the fuel tank after stopping the engine, you will notice a dull knock with a frequency of 1/sec. After opening the filler cap, air is noisily and forcefully sucked in.
The problem is solved by cleaning the valve. Or rather, it needs to be washed.
- Disconnect the hoses and power connector.
- Bend the middle bar and move it to the left.
- Plug the tube going to the crankcase ventilation adapter. This can be done by using the correct size bolt.
- Wash the valve.
The valve needs to be washed
Now you need to arm yourself with carburetor cleaner and a piece of vacuum hose (50 centimeters).
- Place the valve vertically.
- Connect the power connector to it.
- Pour carb cleaning fluid into the fitting, then put the hose on top.
- Start the car engine (it is advisable that the engine is not cold).
- Blow into the hose while accelerating the accelerator pedal.
- The valve will begin to gradually open, liquid will come out under pressure.
- Repeat the procedure with the other fitting.
It is recommended to blow out the vacuum hose with a compressor. At the final stage, it is important to correctly assemble all the hoses back. Place the canister ventilation tube on the upper fitting, and the crankcase ventilation tube on the lower fitting.
The jets are clogged
Rapid evaporation of gasoline may also indicate clogged nozzles. In this case, you need to blow out the carburetor device. This is influenced by several circumstances, including the presence of excess impurities in the fuel, rust and debris that came from the tank through a damaged filter mesh. Debris can also be sucked in through the gap formed between the filter frame and the carburetor device.
Which jets need to be cleaned
In addition to the situation described above, signs of clogged jets include:
- power drop;
- poor response to the accelerator pedal;
- unstable operation in idle mode;
- detonation.
The best way to clean the carb in this case is to remove it. You will need a set of wrenches and screwdrivers to disassemble the carburetor. The channels and jets are purged with compressed air from the compressor.
The device can also be cleaned without removal. This method is quite effective if the level of contamination is not so great. Carbcleaner is used - a spray for quickly cleaning carburetors.
- It is necessary to remove the VF housing using a wrench.
- Apply a jet of carb cleaner to noticeable traces of dirt, cleaning with a wet rag if possible so that during the blowing process dirt does not get inside the engine.
- Start the engine, warm up to 90°.
- Increase the speed by pressing the accelerator pedal all the way to the floor. Spray a stream of cleaner into the carb.
Cleaning and adjusting the carburetor
It is recommended to repeat this procedure several times. At the same time, it is advisable to clean the pan. Remove it, clean it thoroughly and blow it out.
And finally. No matter how trivial it may sound, it is recommended to always check the simplest thing first - whether fuel is flowing to the carburetor. It is quite possible that the fuel pump will make noise, but in vain.
In principle, an experienced motorist will distinguish the sound of incoming fuel, however, it will be difficult for a beginner to do this. Therefore, it is advisable to remove the hose through which fuel enters the carburetor, substitute any empty container, and then pump it up by hand. If the fuel liquid flows out in a normal and strong stream every time the pedal is lowered, it means that everything is flowing normally, and the cause must be looked for elsewhere.
Didn't find the information you are looking for? on our
forum
.
If you find an error, please select a piece of text and press Ctrl+Enter.
Leaking floats
Floats are needed to adjust and maintain the fuel level in the carburetor float chamber. This is an element made of plastic or metal, hollow inside. If the float is defective or damaged, then instead of floating, it will sink in gasoline. The float is connected to a needle valve. As the part floats up, it closes the valve, cutting off the supply of gasoline to the chamber. If the float sinks, the needle element is constantly open. Fuel is supplied into the chamber without any restrictions. As a result, the carburetor overflows.
Manufacturer and type of carburetors
Metering elements prepare a mixture of fuel and air, then help distribute it evenly throughout all cylinders of a car engine. Gasoline and air can be mixed in two different ways. Carburetors with a membrane-needle device have one operating principle, float carburetors have another. In the VAZ-2107 car it belongs to the second type of design.
The manufacturer of the mechanism is the DAAZ enterprise, or Dimitrovgrad Automotive Assembly Plant. Correct configuration and adjustment of the “seven” dosing systems is the most important means of ensuring long-term operation and maintaining the operating condition of the engine throughout its entire service life. To understand why the carburetor overflows, you need to understand how the mixture formation process is carried out.
IMPORTANT! Before starting the adjustment, it is necessary to establish exactly what type of device is used in the engine design. This will make it easier to determine why the carburetor is flooding. If it has a vacuum ignition corrector, it means the car is equipped with the latest model VAZ-2103 or VAZ-2106 engine. Carburetor modification 2107-1107010-20.
It may be that the “seven” has a six-wheel engine. In this case, the dosing system will not have a vacuum ignition corrector. A similar modification of the carburetor is 2107-1107010-10. These two designs differ slightly, but each model has its own subtleties of adjustment and tuning. Knowing them, you can understand the reason why the VAZ-2107 carburetor overflows.
Useful information for adjusting the DAAZ carburetor
Summary table of parameters of carburetors manufactured by DAAZ.
| Carburetor designation | VAZ engine | Mixture sprayer chamber I | Mixture sprayer II chamber | ||
| Designation | Marking | Designation | Marking | ||
| 2101-1107010-02 | 2101; 21011 | 2101-1107410 | 4,5 | 2101-1107410 | 4,5 |
| 2101-1107010-03 | 2101; 21011 | 2101-1107410-10 | 4,0 | 2101-1107410 | 4,5 |
| 2101-1107010-30 | 2101; 21011 | 2101-1107410-10 | 4,0 | 2101-1107410-10 | 4,0 |
| 2103-1107010 | 2103; 2106 | 2101-1107410 | 4,5 | 2101-1107410 | 4,5 |
| 2103-1107010-01; 2106-1107010 | 2103; 2106 | 2101-1107410-10 | 4,0 | 2101-1107410-10 | 4,0 |
| 2105-1107010-10 | 2101; 21011 | 2105-1107410 | 3,5* | 2101-1107410 | 4,5 |
| 2105-1107010; 2105-1107010-20 | 2101; 21011; 2105 | 2105-1107410 | 3,5* | 2101-1107410 | 4,5 |
| 2107-1107010; 2107-1107010-20 | 2103; 2106 | 2105-1107410 | 3,5* | 2107-1107410 | 4,5* |
| 2107-1107010-10 | 2103; 2106 | 2105-1107410 | 3,5* | 2107-1107410 | 4,5* |
| 2108-1107010 | 2108 | 2108-1107410 | 2108-1107410 | — | |
Marking of DAAZ carburetor jets (Table 1).
| Carburetor designation | Econostat jet | Pneumatic drive jet | Starter damping jet | Throttle opening at startup (dimension A), mm | Slight opening of the air damper with the starting device (size B), mm | Fuel level in the float chamber, mm | |||
| 2101-1107010 | 150 | 90 | 170 | — | — | 70 | 0,75-0,85 | 7±0,25 | 7±0,25 |
| 2101-1107010-02 | 150 | 90 | 170 | — | — | 70 | 0,75-0,85 | 7±0,25 | 7±0,25 |
| 2101-1107010-03; 2101-1107010-30 | 150 | 120 | 150 | — | — | 70 | 0,75-0,85 | 7±0,25 | 6,5±0,25 |
| 2103-1107010 | 180 | 120 | 160 | — | — | 70 | 0,8-0,9 | 7±0,25 | 7±0,25 |
| 2103-1107010-01; 2106-1107010 | — | — | — | — | — | 70 | 0,8-0,9 | 7±0,25 | 6,5±0,25 |
| 2105-1107010-10 | 150 | 120 | 150 | 120 | 100 | 70 | 0,7-0,8 | 5±0,5 | 6,5±0,25 |
| 2105-1107010; 2105-1107010-20 | 150 | 120 | 150 | 120 | 100 | 70 | 0,5-0,8 | 5±0,5 | 6,5±0,25 |
| 2107-1107010; 2107-1107010-20 | 150 | 120 | 150 | 150 | 120 | 70 | 0,9-1,0 | 5,5±0,25 | 6,5±0,25 |
| 2107-1107010-10 | 150 | 120 | 150 | 150 | 120 | 70 | 0,9-1,0 | 5,5±0,25 | 6,5±0,25 |
| 2108-1107010 | 60 | — | — | — | — | — | 0,85 | 3±0.2 (bottom) | 25.5±1.0 (remainder) |
Marking of DAAZ carburetor jets (Table 2).
| Carburetor designation | Fuel main system | Air main system | Fuel idle | Air idle | The jet will speed up. pump | |||||
| I Kam. | II Kam. | I Kam. | II Kam. | I Kam. | II Kam. | I Kam. | II Kam. | fuel | bypass | |
| 2101-1107010 | 135 | 135 | 170 | 190 | 45 | 60 | 180 | 70 | 40 | 40 |
| 2101-1107010-02 | 130 | 130 | 150 | 190 | 50 | 45 | 170 | 170 | 40 | 40 |
| 2101-1107010-03; 2101-1107010-30 | 130 | 130 | 150 | 200 | 45 | 60 | 170 | 70 | 40 | 40 |
| 2103-1107010 | 135 | 140 | 170 | 190 | 50 | 80 | 170 | 70 | 50 | 40 |
| 2103-1107010-01; 2106-1107010 | 130 | 140 | 150 | 150 | 45 | 60 | 170 | 70 | 40 | 40 |
| 2105-1107010-10 | 109 | 162 | 170 | 170 | 50 | 60 | 170 | 70 | 40 | 40 |
| 2105-1107010; 2105-1107010; 2105-1107010-20 | 107 | 162 | 170 | 170 | 50 | 60 | 170 | 70 | 40 | 40 |
| 2107-1107010; 2107-1107010-20 | 112 | 150 | 150 | 150 | 50 | 60 | 170 | 70 | 40 | 40 |
| 2107-1107010-10 | 125 | 150 | 190 | 150 | 50 | 60 | 170 | 70 | 40 | 40 |
| 2108-1107010 | 97,5 | 97,5 | 165 | 125 | 42±3 | 50 | 170 | 120 | 35/40 | — |
The float touches the chamber walls
This is another popular reason. Nail Poroshin, in his numerous videos on setting up carburetors, always shows how to do it. Not everyone watches these videos and when adjusting the floats they do not pay attention to their position relative to the walls in the chamber. If adjusted incorrectly, the float will touch the walls of the chamber, and as a result, overflow.
Check the position of the floats as follows. You need to unscrew the screws on the cover and remove the cover. Then they look at how the floats are located. There is a gasket installed on the lid, and impressions of the walls are visible on it. The floats must be installed in such a way that there is a distance between them and the chamber wall. This can be seen from the print. It is also worth checking whether the float moves easily on the axis.
How to set up a Solex carburetor
This can be done without removing the device from the car. However, in some cases you have to do this to configure some parameters. Both options are considered further. How to adjust the carburetor directly on a car?
Setting levels in float chambers
Before making adjustments, start the engine and warm it up for 10 minutes, then turn off the ignition. The following actions:
- disconnect the fuel hose from the device;
- unscrew the 5 screws securing the carburetor cover;
- disconnect the choke control cable;
- lift the lid evenly and slowly so as not to deform the floats;
- Using a caliper, measure the distance from the plane of the cover to the surface of the fuel - it should be 23-25 mm;
- if the value is incorrect, bend the float tongue in each of the chambers in the desired direction;
- At the same time, clean the cameras from dirt;
- put the cover in place, then you need to install the dismantled elements.
Adjusting the needle
Place the Solex lid on a horizontal, flat surface. Now, by bending the metal “petals”, adjust the stroke of the valve needle, which should be equal to 2 mm. At the same time, check the tightness of the fuel valve. To do this, take a rubber bulb, insert it into the tip of the inlet fitting and squeeze so that it is deformed. At the same time, close the return fitting channel very tightly with your finger. When you turn the lid over, the bulb will become normal in shape, which indicates that the valve is opening, i.e., working.
Idle speed setting
Start the car and warm up the engine to operating temperature of 85-90 degrees, and then turn it off. Further:
- at the bottom of the Solex, find the mixture quality adjusting screw and screw it in completely (but not with excessive force, so as not to strip the thread);
- “back up” by unscrewing the screw 4-5 full turns;
- start the engine, press the choke handle all the way;
- by rotating the quantity screw, achieve stable operation of the internal combustion engine at minimum speed (according to the tachometer this is 700-1100 rpm);
- screw the quality screw back in until the engine begins to try to stall, and unscrew the hardware 1-1.5 turns;
- tighten the quantity screw until it reaches 900 rpm - if the motor starts to work unstably, slightly unscrew the quality screw again.
What to do if the motor does not respond to the rotation of the propellers
It’s quite a common situation: you turn the quality or quantity screw, but the engine does not change speed. The reason for this phenomenon is poor flow of gasoline into one of the idle channels (ICH). At the same time, the hardware responsible for the quality of the mixture simply does not have time to shut off the gasoline supply. This is due to:
- incorrectly sized jets: check their diameter and install standard products;
- the seat for these parts is loose;
- The XX solenoid valve (the “barrel” or cylinder to which the electrical wire fits) or the plug in its place is not screwed tightly enough.
How to set the transition mode
It is he who is “responsible” for the failure of the accelerator pedal when it is pressed sharply. Here the main role is played by the hole located above the throttle valve (spout). After sharp pressure on the gas, an additional portion of gasoline begins to be sucked in. In order to avoid failures, it is necessary to carefully select the XX jet and the spout that sprays fuel. Work algorithm:
- start the car and press the choke handle all the way;
- gently press the gas pedal: if there are dips, the nozzle located in the first chamber is to blame; with a normal set of revolutions, proceed to the next point;
- sharply press the accelerator: if there is a failure, you need to select the spout (optimal dimensions 40*40) and the jet (39-40).
High fuel level
If the carburetor overflows, the reason may be due to an overestimated fuel level. When engineers created these carburetors, they expected that the level of fuel in the chamber would be strictly defined. But in reality the level is adjusted differently. There are templates for setting the fuel level for Solex and DAAZ, but few people use them. If the level is too high, the mixture will be enriched.
To check the fuel level, you must remove the carburetor cap. But before that you need to pump gasoline into the chamber. On models Ozone-2105, 2107, the correct fuel level is in the middle of the inclined plane on the front wall. On Solexes for front-wheel drive VAZs, the normal level is 29 millimeters to the bottom of the chamber.
If, as a result of the check, the level does not correspond, then it is necessary to adjust it. This can be done by bending the floats.
More reasons
There are not only situations when gasoline trimmers do not start, but also cases when, after starting, they work for a couple of seconds and immediately stall. Inspect the spark plug again: if it is “flooded”, and this situation is repeated even after wiping and drying it, proceed to “inspecting” the air filter.
Most likely, it is completely oily and needs to be replaced. If everything is fine with the filter, it may be that the ignition coil has failed.
If gasoline trimmers do not start, and you have done everything described above, the muffler may be clogged. It needs to be dismantled, burned on a burner, after which all carbon deposits can be easily shaken out.
Gasoline pump
If the fuel pump operates with increased productivity, then more fuel is supplied to the carburetor float chamber than necessary - it is forced through the pressure. This problem is especially relevant for cars whose carburetors are not equipped with a so-called return line for dumping excess fuel. This is true for electrical and mechanical units.
In a mechanical fuel pump, the valves, diaphragm and return spring are checked. Faulty elements are replaced with new ones - repair kits are available for sale.
Debris that can cause gasoline to enter the air filter
The main sources of debris in the fuel system are:
- gasoline filled at an untested station, especially immediately after the fuel truck has left;
- rust from the inside of the tank, for example, coming off after hitting the gas tank;
- carburetor gasket elements crumbling due to physical aging;
- dirty fuel filter;
- the external environment, or rather a careless attitude towards the refueling process, when foreign debris gets into the gas tank.
This problem is especially relevant for scooters and motorcycles not equipped with fuel filters.
The debris, following into the carburetor, falls under the shut-off needle located in the float chamber. As a result, it does not descend into its seat and is not able to block the fuel channel.
To correct the problem, you need to disassemble the carburetor. After removing the float, remove the needle and put it in a dust-free place. Using compressed air, you need to blow out the carburetor. When reassembling the fuel system, it is important to protect it from debris, otherwise gasoline will end up in the air filter again.
To facilitate diagnostics, if possible, you can install a similar carburetor on your vehicle. If gasoline gets into the air filter even with a new unit, you should continue troubleshooting without wasting time disassembling the carburetor.
Carburetor return
This is only relevant for some Solex and DAAZ models intended for installation on front-wheel drive VAZs. If the fuel drain line is faulty, deformed, or clogged, there will be an overflow. It is also recommended to check the return check valve.
The problem is that the carburetor overflows gasoline due to the difficulty of dumping excess fuel into the tank. It has nowhere to go, and gasoline enters first the float chamber and then into the cylinders. To troubleshoot the problem, you should carefully visually examine the entire line. You also need to blow it out along with the check valve.
How to fix the problem
Now you need to understand what to do if the spark plugs are filled with gasoline or other technical liquid.
In a situation where the spark plugs are flooded, it is unlikely that you will be able to start the engine easily. If the first few attempts are unsuccessful, further launches will only make the situation worse. Therefore, first you need to eliminate the provoking factor, and then try again.
We will tell you in more detail about how to start a car if the spark plugs are flooded heavily and the ignition system does not want to work. Again, it all depends on the specific liquid.
Petrol
It is recommended to find out why the engine is actively flooding the spark plugs when starting the internal combustion engine. To begin with, motorists are advised to blow out the cylinders for 10 seconds using an open throttle. This will create the leanest possible mixture.
Next, the spark plugs are unscrewed, cleaned, dried, and the gap is checked for correctness and damage to the body or electrode. If you have a multimeter, measure the voltage on the battery. It is possible that the battery simply died.
What you definitely don’t need to do is continue to unsuccessfully try to start the engine. Otherwise, there will be even more fuel on the spark plugs.
If you don’t know how to dry the engine cylinders and start it when the spark plugs are flooded, use these instructions:
- If the motor is silent after the 3rd attempt, let it rest for about 10 minutes. Then the operation can be repeated.
- Charge the battery. This is done with a charger or using another machine using the lighting method.
- Unscrew the spark plugs and insert new ones in their place. If there are no new ones, the old ones will need to be wiped and dried.
- Try starting again when the spark plugs are dry and the battery is charged.
There are other recommendations that may help.
We are talking about such manipulations:
- If your battery is charged, press the gas pedal to the floor and try to start the internal combustion engine. If you have a manual transmission, depress the clutch as well. Relevant if the engine is fuel injected.
- When the engine is carburetor, similar actions are performed. The effect varies, but it can help.
- When mixing fuel with water, you can completely drain the bad fuel and dry the tank, the system, or add a drying additive.
It is possible to solve the problem, but you must act carefully and consistently.
Oil
If the engine is cold or hot, and it is filled with oil, then the following actions may be required:
- if the oil in the crankcase is more than normal, drain to the required level;
- remove oil using napkins, rags or a syringe;
- burn out the remaining oil, clean the candle if you plan to reuse it;
- replace seals, guides, piston rings;
- clean the ventilation system;
- replace the intake manifold gasket.
Guides can sometimes be repaired or replaced. Oil seals are also replaced when there is severe wear, but always together with worn bushings.
Here everything depends on what kind of malfunction we are talking about. Having diagnosed why exactly when starting the engine the spark plugs are actively filled with engine oil, the cause is first eliminated, after which new or restored spark plugs are installed.
Antifreeze
Typically, coolant getting into the oil and its further penetration onto the spark plugs is associated with burnout of the block gasket, or with a change in the geometry of the block head. This problem is solved by replacing the gasket and grinding the surface. No other way.
If the geometry of the cylinder head is violated, you will have to contact the service. Machines are used there and the shape is restored. It will not be possible to restore the heat exchanger or gasket. Replacement only.
It is extremely rare for motorists to encounter changes in the geometry of the block itself. Again, without the help of specialists and equipment, the problem cannot be solved on your own. And even they are not omnipotent, which is why it is often necessary to completely change the engine.
Flooded spark plugs are not uncommon among motorists. Basically, the filling occurs with fuel. In case of more serious malfunctions, the spark plugs may contain motor oil or antifreeze.
Economizer malfunction
This is again relevant for Solex, which is installed on front-wheel drive VAZs. If the economizer diaphragm is damaged, the fuel will not be restrained by anything and will flow directly into the second chamber of the carburetor. If a ball jams in the economizer, the situation will be similar.
To find out exactly why the carburetor is overfilling with gasoline, you need to check the economizer.
Adjusting the second chamber of the Solex carburetor
Let's start with the fact that when adjusting the carburetor, the second chamber is usually not touched, since often standard jets will be sufficient. The carburetor also has an econostat that can correct possible nuances. The econostat is a tube located in the second chamber at a slight angle.
The purpose of the econostat is that when the throttle is fully opened, the vacuum in the carburetor allows fuel to be sucked through the econostat. The econostat is activated when the engine is running at high speeds and allows the fuel-air mixture to be enriched. To refine the second chamber, which allows for “pick-up,” jets are installed to enrich the mixture. The selection of jets in this case is no different from the selection for the first chamber.
GDS air jet of the first chamber
The mixture of fuel and air may become over-rich in fuel due to a decrease in the volume of air entering the carburetor. What is the problem? This could be because the fuel jet is too large or the air jet is too small. Sometimes when inspecting carburetors, the jets of the first and second chambers are confused. This is what causes the carburetor to overflow.
What to do in such a situation? Everything is very simple. Here's how to fix carburetor overflow in this case. Remove the carburetor cover, remove the jet and clean it. If you have an aerosol can with a cleaning liquid, then you don’t have to take out the nozzle. As a result, the operation of the power unit will be stable and smooth, not only at idle.
Fills spark plugs with gasoline, carburetor, possible causes, troubleshooting methods
If you get behind the wheel and find that the engine won’t start, don’t be discouraged. Maybe your spark plugs are just flooded. This problem especially often arises in the winter season, which already causes a lot of trouble for motorists. Most often, spark plugs are filled with gasoline, sometimes with oil. You need to understand how and why this happens, then you can act proactively and avoid a situation where the car cannot be started. Well, if everything has already happened, then it would be nice to know how to return the spark plugs to working condition and start the engine.
Symptoms and mechanism of flooding
When it comes to flooded spark plugs, it does not matter what we are dealing with: a carburetor or an injector. Both engine types are not protected from flooding. Its consequences are unpleasant because they do not allow the engine to start. At the same time, it may smell like gasoline, the starter may crank, but most importantly, traces of a foreign substance can be easily detected on the spark plugs themselves: gasoline, oil or carbon deposits. To assess the condition of the spark plugs, they must be unscrewed.
The filling mechanism is quite simple. The fuel supplied to operate the engine does not ignite. The spark plugs get wet, and this prevents the engine from starting normally.
Seven reasons to fill candles when cold
If you decided to start the engine, but nothing happened, and instead you found spark plugs stained with gasoline, then this could happen for the following reasons:
- Insufficiently charged battery. Even if at positive temperatures the battery coped with its tasks without problems, the onset of frost could radically change the situation. It is enough for the battery to be discharged by 50%. Even with this indicator, there may not be enough power to start the engine.
- Cylinder wear. A worn-out engine cannot run perfectly, so it is not surprising that new engines have insufficient cylinder compression. In combination with other factors, this can lead to flooded candles.
- Old spark plugs. It is not for nothing that this part is consumable and requires regular monitoring and, if necessary, replacement. If you do not change the spark plugs for a long time, then defects appear on them, which can prevent spark formation, which is so necessary to start the engine.
- Malfunction of structural elements of the ignition system. Faulty wires and soured contacts can be one of the reasons that causes spark plugs to flood.
- Poor quality fuel. This does not mean that you were deceived and sold bad gasoline. The point is that in winter there are a number of factors that can negatively affect the quality of fuel.
For example, the formation of condensation in the fuel tank and its entry into gasoline. As a result, the fuel does not ignite at the right time, which becomes one of the reasons for “wet” spark plugs.
- Unsuitable oil in the engine. If we are talking about winter, then you need to use oil with a viscosity that will not load the engine, otherwise this will become another factor creating conditions for flooding.
- Accumulation of carbon deposits in the combustion chamber. Short trips in the city do not allow the engine to “breathe”. As a result, carbon deposits form, which settles in a thick layer on the walls of the combustion chamber. The mobility of the piston rings decreases, and with it the compression in the cylinders. As a preventative measure, it is necessary to run the engine at high speeds. Sometimes, to return the piston rings to mobility, special flushing of the system is required.
Sometimes it happens that there is a spark and the starter rotates normally, but gasoline still pours out. In this case, it is necessary to carry out diagnostics to determine the serviceability of the spark plugs. In rare cases, the problem may be in the ECU itself.
Engine oil on spark plugs
Gasoline is not the only liquid that can be found on spark plugs. Sometimes they are filled with motor oil. Again, this can happen to both the injector and the carburetor. It is important which part of the candle contains traces of oil. If the top of the spark plug is dirty, the problem is most likely related to the valve cover gasket. If oil is observed at the bottom of the spark plug, then you need to take care of the condition of the engine and the compression in it. Read about the reasons for the appearance of oil on candles in the article
First aid when pouring candles
If you follow the manufacturer's instructions, the entire procedure for solving the problem can be presented in a few steps.
Step 1. Unscrew the spark plugs.
Step 2. Dry the wet part.
Step 3. Crank the engine without spark plugs for 10 seconds.
Step 4. Put the dry part in place.
Step 5. Trying to start the engine.
But the driver does not always have time for these simple actions. Flooding of spark plugs is an unexpected situation, and what to do if you don’t have time to tinker with wet parts?
Car enthusiasts have one more method in stock for such a case: starting the engine with cylinder purging. It is performed as follows. We are talking about an injection engine.
Screw quality
Most often, the fuel mixture is enriched with a quality screw to compensate for the suction of excess air. This prevents the mixture from becoming too lean. The screw is turned out more than necessary.
You should check the carburetor for possible air leaks and eliminate it. You can check it with a spray bottle. With the engine running, spray on the base of the carburetor, on the connection between the cover and the lower part. If the car starts to stall, then there is an air leak. You can also screw the quality screw back in. But then you can lose stable idle.
Gaskets
Through the cracks in the gaskets, due to the vacuum, fuel can be sucked in, thereby greatly enriching the combustible mixture. It is necessary to carefully visually check the condition of the gaskets and replace if necessary.
The gasket between the bottom of the carburetor and the manifold may also be worn out. On Ozones, experts recommend checking the gaskets between the housing and the throttle valves.

