What needs to be certified
Vladimir Volkov, director of the FSUE NAMI ITsPA:
A modern car is a complex structure, many components and assemblies of which directly affect the level of safety of the driver and passengers. Only certified components can provide it. The work on certification of motor vehicles and their units is carried out by the Testing Center for Automotive Products (ITsPA FSUE “NAMI”).
Our specialists, in particular, conduct certification tests of brake systems, steering systems, anti-toxic systems, transmissions and suspension systems, including ball joints or joints.
The center has a staff of highly qualified specialists with extensive experience in the automotive industry. The testing base of the Center includes 18 laboratories, 14 motor and specialized boxes, 21 aggregate boxes, a stand with brake drums and gas analyzers and other equipment. Over the 10 years of the Center’s operation, our specialists have carried out almost 4,700 certification tests, including tests of ball joints. The work of our experts in certifying them allows us to block the path to the Russian market for low-quality components that do not ensure not only the safety of passengers, but also the safety of the vehicle itself, the operation of which may be impaired due to their use.
I cannot help but note that in recent years, a powerful production base has been formed in Russia and the CIS countries, ensuring the production of a wide range of ball joints of very high quality, capable of competing with the best foreign models.
Diagnostics of the condition of ball joints
Diagnostics of ball joints is required if the following symptoms of malfunction appear:
- when driving, a knocking and grinding noise is clearly audible from the wheel side, which intensifies when driving over uneven road surfaces;
- the increase in speed is accompanied by the wheel rim swinging in different directions;
- turning the steering wheel is accompanied by creaking and grinding sounds;
- uneven tire wear;
- noticeable heaviness when turning the steering wheel;
- the handling of the VAZ 2107 has deteriorated;
- the car has become unstable, which is especially noticeable when overcoming uneven roads.
If the above symptoms are present, the condition of the ball joint must be checked. The easiest way to identify a faulty unit is by ear. To do this, turn off the engine of the VAZ 2107 and, standing with an assistant on both sides of the hood, rock the car. If the ball is worn out or damaged, a distinct sound will be heard from the wheel arch, which will make it easy to identify the fault.
You can more accurately check the condition of the support by the presence of play. To do this, you need to use the instructions below.
- Jack up the front wheel.
- Depress the brake pedal all the way and hold it there until the test is completed.
- Rock the wheel forcefully in a vertical plane. Movements should be made initially up and down, and then left and right. The presence of minimal play indicates that the ball needs to be replaced.
Detection of ball joint play
The latest VAZ 2107 models have special inspection holes. Through them it is easy to check the wear of the ball pin without the need to disassemble the unit.
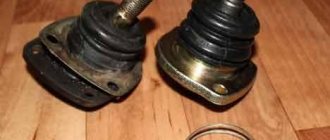
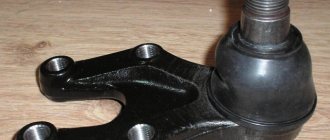
An indirect sign of ball failure is the rupture of the boot. The performance of the support directly depends on the quality and quantity of lubricant. If there is damage to the cuff, moisture and abrasive debris get underneath it. Therefore, if cracks, tears or other holes are found on the boot, it is recommended to replace the unit with a new one.
Damaged ball joint boot
When to change
The wear of ball joints largely depends on the intensity of driving, the loads being transported and the quality of the road surface. In addition to regular technical inspection at a service center, experts recommend inspecting the mechanism before a long trip or when a third-party knock appears in the wheel area. There is no point in delaying repairs, since if the ball is completely worn out, it can fly out even while driving, which will lead to the wheel turning out and uncontrolled skidding.
Signs of replacing ball joints are:
- knocking while driving on an uneven surface at low speed;
- squeaking around the wheels when turning the steering wheel;
- unstable movement in a straight line;
- uneven tire wear.
Tip: If there is no special indicator for checking the play, you can rest your palm against the body. An increase in free space will be felt when the wheel rocks.
Changing the ball joint on a Lada Kalina: photos and video
In the design of a car, the ball joint plays a very important role, since it bears all the load that the vehicle experiences
Also an important function is the level of inclination of the wheels. On the Lada Kalina, the factory ball joint is not very reliable, so many car enthusiasts replace the standard part with an analogue
to replace the ball joint
The material talks about replacing the ball joint of the Lada Kalina and the features of the process.
Ball joint replacement process
When you have decided on a spare part, you can carry out the replacement operation. So, let's look at the step-by-step process of changing the ball joint on Kalina:
- We dismantle the wheel.
- We clean the ball joint and all surfaces that connect to it.
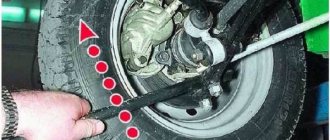
- Unscrew the fastening of the ball joints.
The ball mount is marked with an arrow. - The stabilizer link also needs to be unscrewed for easy replacement.
We unscrew the stabilizer mount for easy replacement of the Kalina ball joint - We bend the lever down.
- We take a special puller for balls and press it out of the lever seat.
- Installation is carried out in reverse order. Using a jack, raise the lever and tighten the stabilizer mount Installed a new ball joint on Kalina
Peculiarities
Consequences of untimely replacement of the ball joint
Harsh operating conditions, poor road surfaces, loads and passengers place a lot of stress and responsibility on the ball joint. Therefore, the condition of this node must be monitored regularly.
The entire load does not go to the ball joint itself, but to a small ball, which can fall out if worn out and worn out. If you remember, not so long ago you could see a Lada car on the road with a fallen ball joint.
Reasons for failure
There are several reasons why a ball joint may fall out. Let's consider the main ones:
- Wear. The most common malfunction that occurs on cars.
- Insufficient lubrication in the boot leads to the fact that the finger begins to creak and may eventually simply break.
- The penetration of dirt and water into the ball contributes to the development of corrosion, which can affect the operation of the vehicle. At best, a wedge and the inability to turn the wheels; at worst, the car will fall onto the asphalt.
To avoid consequences, it is necessary to regularly diagnose and maintain ball joints.
Diagnostic operations
How can you diagnose the condition of ball joints on a Lada Kalina:
The first thing you need to pay attention to is the condition of the boot. If it has cracks or is torn, then it must be removed and the ball should be inspected. We hang the wheel a little and swing it up and down with our hands.
If there is play, then it’s time to replace the ball. The presence of a squeak, as well as heavy turning of the steering wheel, can also be signs that the ball joints are in critical condition. Instability in control, namely departure from the trajectory of movement to the left or right, with the steering wheel in a level position, indicates that the ball joint has failed.
It is almost impossible to determine the exact condition of the ball joint, but the above facts indirectly indicate the condition of the supports.
Ball selection, articles
The choice of ball joints for the Lada Kalina should be treated carefully, since it determines what loads the car can withstand:
Original
If you believe the spare parts catalog, then the original catalog number of the Lada Kalina ball joint is 2108-2904185. The average cost is 1000 rubles per piece.
Original Kalina ball joint produced by AvtoVAZ
Analogs
Belmag ball joint is an excellent option for replacing original spare parts
Let's consider possible options for replacing the original spare part:
| Weber | SS 2108-4185 | 500 |
| Master-sport | 1545601/E-PCS-MS | 500 |
| SCT | RM 485 | 500 |
| Denckermann | D110112 | 500 |
| Monroe | L70003 | 550 |
| Ruville | 917210 | 600 |
| Delphi | TC583 | 600 |
| Patron | PS3101 | 600 |
| Pekar | 2108-2904185 | 600 |
| Moog | LA-BJ-0063 | 650 |
| Pilenga | TS-P 3142 | 700 |
| TRW | JBJ 156 | 800 |
| Optimal | G3-199 | 1000 |
As you can see from the table, you can buy an analogue cheaper than the original. But don’t go to extremes and buy the cheapest.
TRW ball joint recommended for installation on Kalina
conclusions
The process of replacing ball joints on the Lada Kalina is quite simple and easy
But, it is worth paying attention to the choice of part, since it depends on its quality how long and the quality it will hold the suspension
Causes and signs of ball joint failures
Let us list the main reasons due to which the service life of ball joints is significantly reduced. Here they are:
- severe shock loads. This is the main reason for hinge failure. And it is especially relevant if the driver constantly drives on dirt roads or on roads with dilapidated asphalt pavement;
- lack of lubrication. If the driver does not carry out systematic maintenance of the ball joints and does not lubricate them, then the lubricant exhausts its service life and ceases to perform its functions. This usually happens within six months. After this, the destruction of the ball pin is only a matter of time;
- boot breakage. The purpose of this device is indicated by its name. When the boot fails, dirt begins to accumulate in the pivot joint. Over time, it begins to work as an abrasive material, which gradually damages the ball pin.
Now we list the main signs that clearly indicate a broken ball joint:
- suspension rumble. It is heard especially clearly when the driver goes over a speed bump at a speed of 20–25 km/h. If the suspension rattles, it means that the grease has been completely squeezed out of the ball joint;
- When driving at high speed, one of the wheels begins to sway from side to side. This indicates that there is a lot of play in the ball joint. The situation is very dangerous, since the swinging wheel can turn almost perpendicular to the body of the car at any moment. After this, the car is guaranteed to lose control, which can lead to a serious accident;
Malfunctions
During the operation of the car, especially on our roads, the suspension is subjected to significant load, most of which falls on the ball joints. Naturally, over time they wear out, which leads to an increase in the gap between the spherical surface of the finger and the bottom of the case. The reasons for premature failure of ball joints are:
damage to the anthers, resulting in moisture and dirt getting inside the structure;
- lack of lubrication inside the support;
- high dynamic loads when driving off-road.
You can determine that the ball joint has failed by the following signs:
- knocking in the front suspension while driving on rough roads;
- difficulty turning the steering wheel, accompanied by creaking;
- “wobble” of the steered wheels when driving, vibration in the steering rack, and as a result, uneven tire wear.
How to independently determine the malfunction
If your car shows signs of ball joint malfunctions, have them diagnosed. There are two ways to do this at home, but it is better to approach this issue comprehensively, using them in turn.
First, let's look at the most accurate method. The cover of the original VAZ ball has a technological hole at the bottom, through which you need to measure the distance between the surface of the cover and the edge of the spherical surface of the finger. This can be done using a special depth gauge or an ordinary thin rod and ruler. If the depth gauge enters the support more than 11.8 mm, it is time to change the support.
The next method is to determine the amount of play between the finger and the cover without any tools. You just need to touch the support body and your finger with your hand at the same time, and loosen the front part of the car. If there is play, you will definitely feel it.
Do I need to change ball joints and when to do it?
The average service life of ball joints for the VAZ 2107, depending on their quality and operating conditions, is 30-100 thousand kilometers. If the car has traveled 100 thousand km and the supports have not made themselves known, it is still better to replace them. Replacement is also necessary if any signs of malfunction appear.
Untimely diagnosis and replacement of these suspension elements will lead to the fact that at one point the wheel or wheels of the car will simply turn outward and lay the car on its “belly”. In this case, the entire suspension will have to be repaired.
How much do ball joints cost, and how much will it cost to replace them?
If one ball is faulty, it is recommended to replace all the others. Prices for a set of supports, depending on the manufacturer, can vary from 1100 to 3000 rubles
When choosing a kit, pay attention to the manufacturer, and do not skimp. Catalog number of the original upper ball joint for VAZ 2107 is 21012904192, for the lower one – 21012904082
The cost of replacing 4 balls at a service station is from 800 rubles.
Malfunction in the lever system
Very often the problem is wear of the silent blocks of the levers. As a result of their wear, the system begins to “play” and knock. At the same time, the car’s controllability deteriorates, and accordingly, traffic safety is greatly reduced. To troubleshoot silent blocks, you will need a jack and a pry bar.
First of all, you need to jack up the wheel to hang it completely. Then use the pry bar as a lever, applying load to the suspension arms in different directions, i.e. shaking them from side to side. If play with a dull tapping sound is detected, then your diagnosis is correct. In the same way, you need to check the levers of the second wheel.
You can even replace the hinges yourself. To do this, first of all it is necessary to dismantle the levers. To remove the old joints from the arms and install new ones, you will need a special tool designed specifically for your make and model of car.
Malfunctions
During the operation of the car, especially on our roads, the suspension is subjected to significant load, most of which falls on the ball joints. Naturally, over time they wear out, which leads to an increase in the gap between the spherical surface of the finger and the bottom of the case. The reasons for premature failure of ball joints are:
damage to the anthers, resulting in moisture and dirt getting inside the structure;
- lack of lubrication inside the support;
- high dynamic loads when driving off-road.
You can determine that the ball joint has failed by the following signs:
- knocking in the front suspension while driving on rough roads;
- difficulty turning the steering wheel, accompanied by creaking;
- “wobble” of the steered wheels when driving, vibration in the steering rack, and as a result, uneven tire wear.
How to independently determine the malfunction
If your car shows signs of ball joint malfunctions, have them diagnosed. There are two ways to do this at home, but it is better to approach this issue comprehensively, using them in turn.
First, let's look at the most accurate method. The cover of the original VAZ ball has a technological hole at the bottom, through which you need to measure the distance between the surface of the cover and the edge of the spherical surface of the finger. This can be done using a special depth gauge or an ordinary thin rod and ruler. If the depth gauge enters the support more than 11.8 mm, it is time to change the support.
The next method is to determine the amount of play between the finger and the cover without any tools. You just need to touch the support body and your finger with your hand at the same time, and loosen the front part of the car. If there is play, you will definitely feel it.
Do I need to change ball joints and when to do it?
The average service life of ball joints for the VAZ 2107, depending on their quality and operating conditions, is 30-100 thousand kilometers. If the car has traveled 100 thousand km and the supports have not made themselves known, it is still better to replace them. Replacement is also necessary if any signs of malfunction appear.
Untimely diagnosis and replacement of these suspension elements will lead to the fact that at one point the wheel or wheels of the car will simply turn outward and lay the car on its “belly”. In this case, the entire suspension will have to be repaired.
How much do ball joints cost, and how much will it cost to replace them?
If one ball is faulty, it is recommended to replace all the others. Prices for a set of supports, depending on the manufacturer, can vary from 1100 to 3000 rubles
When choosing a kit, pay attention to the manufacturer, and do not skimp. Catalog number of the original upper ball joint for VAZ 2107 is 21012904192, for the lower one – 21012904082
The cost of replacing 4 balls at a service station is from 800 rubles.
Procedure for replacing ball joints
Replacing ball joints does not require any unique qualifications and is accessible to anyone who knows how to use a wrench. Before starting work, it is necessary to hang the car on a lift or turn on the handbrake and install wheel chocks.
The removal procedure is as follows:
- Loosen the wheel bolts.
- Jack up the car by hanging the wheels (or lift it on a lift).
- Unscrew the wheel bolts and remove the wheel.
- Clean the threads on the pins and ball joint bolts with a wire brush.
- Treat threaded connections with solvent or WD-40 to make loosening easier.
- Using a 22mm wrench, loosen the nuts on the pins of the upper and lower supports.
- Install the puller according to the instructions.
- Press out the supports (if you don’t learn how, you need to “help” with a hammer and drift).
- Unscrew the nuts on the ball pins and remove the pins from the front wheel mechanism knuckle.
- Unscrew the nuts and pull out the bolts securing the support to the lever.
- Remove the ball joints.
Installation of ball joints occurs in the reverse order of removal. Before installation in the balls (under the boot), it is necessary to add lubricant
Particular attention should be paid to the tightening torque of the ball nuts and the integrity of the boots of the ball joints. If the boot is torn, dirt will get between the pin and the ball joint liner and the supports will very quickly fail
Now you know why ball joints are needed on a VAZ 2107, which ones are best to buy, and how to replace worn out ball joints with new ones yourself.
The suspension of any car consists of a huge number of different parts, which are assigned different functions. One of these parts is the ball joint, which is a connecting part, due to which the front wheels rotate in different directions. If a part malfunctions, severe consequences occur, so let’s figure out how to check the ball joint of a VAZ 2107, and what is required for this purpose.
A ball joint is a joint that is one of the fundamental parts of the front suspension of a car. In the design of the car, these elements are provided so that the front wheels can move to the left and to the right. The hinge is subject to enormous loads, so it has a short service life, which means it often needs to be replaced.
Ball joints on Russian cars began to be used relatively recently, and previously the ability to move the front wheels in a horizontal plane was realized using pins. The pivots require frequent lubrication, and with the slightest lack of lubrication, the mobility of the joints decreases, and this means the maneuverability of the vehicle is aggravated. In the design of the VAZ-2107 car, king pins are not used, but instead they are used with ball joints, which are structurally simpler and 10 times smaller.
The design of the ball joint is as follows:
Replacement instructions
It is most convenient to carry out repairs in an inspection pit or on a lift. This will ensure that you have a good overview for inspection and will have the necessary access to the mechanisms.
What tool will you need?
From the tool you will need:
- metal brush;
- solvent;
- a set of keys;
- puller for supports;
- adjustable wrench;
- medical syringe;
- lubricants.
Step-by-step description with photos
Before starting the replacement, make sure that the car is on the handbrake and the protective flaps under the wheels are installed correctly.
- We remove the wheel.
- Clean the ball joints with a metal brush.
- To prepare connections for disassembly, we use a solvent that will remove coked dirt and rust.
It will be much easier to remove nuts if you pre-treat the joints with WD-40.
Using a 22 wrench, remove the nut from the lower ball joint
We install the puller in a certain position and press out the support with it
Using a wrench, unscrew the nut on the upper ball joint
We use a socket wrench to remove the fastening bolt.
After unscrewing the bolt, the ball joint can be easily removed
Video of replacing ball joints on a VAZ 2107
Market overview of manufacturers of ball joints for VAZ 2107
- "BelMag" - produces parts of several series ("Original", "Comfort", "Favorite"), their characteristics:
- the lubricant is included under the protective cover at the factory;
- The part is designed for use in difficult road conditions.
- "Cedar":
- have a solid forged body;
- labyrinth design of protective boot;
- cold landing of the ball pin;
- rolling the ball surface with diamond rollers;
- anti-friction liner to preserve lubricant;
- It is not equipped with factory lubricant, so before installing it on the car it must be placed under a protective cover.
- “Track” produces parts from several series – “Classic”, “Champion”, “Sport”, “Master”, “Style”. Their features:
- suitable for use in Russian off-road conditions;
- have a reinforced structure;
- with additional aluminum coating.
- "BZAK" has established itself as a high-quality and reliable manufacturer, product features:
- reinforced ball joint housing design – all-metal, forged;
- with a warranty period of 50 thousand kilometers;
- increased anti-friction and wear-resistant properties, thanks to the patented additive “Lugam”;
- the finger is made using the cold heading method, which gives it additional strength;
- the presence of a rubber cover to protect the structure.
As you can see by reading the descriptions of ball joints from various manufacturers, their quality largely depends on the production technology of the structural components. Therefore, try to also visually inspect the part: it should not contain sharp edges, especially on the ball pin. Be careful in your choice, as your safety depends on it.
https://autoflit.ru/1817-kakie-luchshe-sharovye-opory-postavit-na-vaz-2107-beskonechnyy-remont.htmlhttps://bumper.guru/klassicheskie-modeli-vaz/hodovaya-chast/sharovyie- oporyi-na-vaz-2107-kakie-luchshe.htmlhttps://pol-z.ru/zamena-sharovyih-opor-na-vaz-2107/https://zapchasti.expert/podveska/sharovaya-opora/sharovaya- opora-na-vaz-2107.htmlhttps://ladaautos.ru/vaz-2107/kakie-sharovye-opory-na-avtomobil-vaz-2107-luchshe.html
The main function of the ball joint on the VAZ 2107
The task of a ball joint on any passenger car comes down to selectively limiting the movement of the wheel. Under no circumstances should it swing in a vertical plane, but at the same time it should move freely in a horizontal plane.
Ball joints limit the swing of the car wheels in the vertical plane
If this principle is not followed, the driver will have serious problems with driving the car. And if one of the ball joints is damaged too much, an extremely dangerous situation can arise: the wheel at full speed turns out at a right angle to the engine.
The car wheel turned out at a right angle due to a broken ball joint
After this, the car almost always skids, and the driver will be very lucky if at that moment he is alone on the road and does not collide with other cars.
Design of ball joints for passenger cars
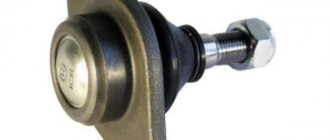
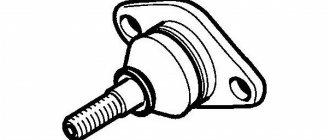
As you can easily guess from the name, a ball joint is a regular joint installed behind a car wheel. The main element of any ball joint is the ball rod. There is a thread at one end of the rod and a ball at the other. It is pressed into another important part of the support - the eye. It has a hemispherical recess, ideally adjusted to the size of the ball on the rod. The resulting structure is covered with a so-called boot. In modern supports, this is the name given to plastic caps that protect the hinge joint from dust and dirt. Today, more and more often, boots are made of translucent plastic, which is quite convenient: the car owner does not have to remove the boot to assess the degree of damage to the hinge. Supports with an opaque boot often have another design feature: a technological hole near the ball rod. It allows you to assess the wear of this part without removing it.
The ball pin is the main element of the ball joint
It should also be noted here that on the very first VAZ 2107 models, the ball joints were equipped with pressure springs designed to increase the reliability of the articulated joint. But in later models of the “seven” it was decided to abandon springs.
About other manufacturers
As mentioned above, the production of high-quality ball joints requires serious costs. And this cannot but affect the final cost of the product. Therefore, there are only four large manufacturers of supports for the VAZ 2107, and all of them are listed above. Of course, there are smaller companies that offer car enthusiasts ball joints at almost half the price. But any sane person understands: if a ball joint costs half as much, it means that the manufacturer saved on something during its manufacture. Most often, savings are made either on ultrasonic analysis of rod blanks or on heat treatment. Neither the first nor the second bodes well for the buyer of the support.
Cheap ball joints have a very short service life
And if the car owner is of sound mind, then he will not react to a temptingly low price and save on a detail on which his life literally depends. It is for this reason that little-known manufacturers of cheap supports will not be considered in this article.
Here we should mention another unpleasant thing: fakes. Recently, ball joints from well-known brands have begun to appear on the shelves of car dealerships, costing suspiciously cheaply. Upon closer examination, the vast majority of them turn out to be fake, and often the fakes are made so well that only a specialist can recognize them. For an ordinary car enthusiast, the criterion for selecting supports is still the same: price. It should be approximately the same as indicated above. And if a ball joint from a well-known brand costs half as much, then buying such a part is categorically not recommended.
Video: about fake ball joints
Repair
Replacing ball joints on VAZ 2101, 2102, 2103, 2104, 2105, 2106 and 2107
Now these critical parts are considered consumables. But even relatively recently, during times of total shortage, balls were dismountable and craftsmen restored them for reuse. Such balls on classics lasted up to 40-45 thousand. Restored parts are slightly smaller. Modern ball bearings can last up to 60-65 thousand km, but this is in the factory version and on relatively good roads. But if you come across the wrong product, you will have to change the supports much more often. And in the worst case, you have every chance of standing in the middle of the road with a twisted wheel.
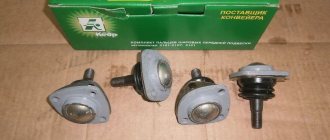
We bought products made by BelMag.
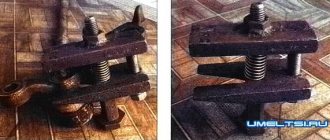
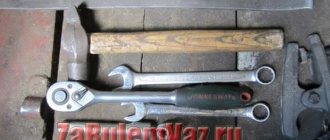
The company has been well known for a long time, and the packaging box with details and a security hologram gives hope for their authenticity. The standard tool for the job is quite enough: a jack, a hammer (weighing at least 0.8 kg) and a reliable stand. Those who oppose sledgehammer methods will also need a special puller (see below).
The main thing is to choose the most suitable replacement method for you.
When pressing out ball joints on a VAZ 2101-2107, it is possible to use the three most common methods.
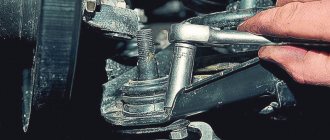
Using an x22 open-end wrench, unscrew the nut securing the ball joint pin.
Then, we apply several blows to the body of the steering knuckle, as a result of which the finger should jump out of the socket.
For safety reasons, the rationalization shown in this photo is unacceptable! Pieces of hardening from an anvil hammer can riddled your face like bullets!
It is possible that working in the second way with a puller is easier than swinging a sledgehammer. But we didn’t like this option - it’s very inconvenient to turn the screws in a tight space.
But with such a device it’s both easy and pleasant. The third method turned out to be the most successful!
And the result was not long in coming.
All that remains is to unscrew the fasteners using two x13 keys.
and remove the ball joint.
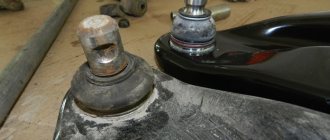
Attention! Do not forget to remove the additional plate from the upper support and put it back in place when reassembling, otherwise there will be a gap between the cover and the support body. We remove the lower support in the same way. But the pin nut cannot be unscrewed completely, since the rotary lever is in the way
Therefore, all remaining turns will have to be done after pressing out the finger. Remember that in a worn body, nothing holds the finger and, if the nut is screwed together with resistance (for example, the thread was not cleaned of dirt and rust before this work), the finger will rotate in the body, and it will be very difficult to hold it with anything. Now, even if you decide to clean the thread, you will face the problem of how to screw the nut back on? WD-40 won’t always help here either! In such a situation, it is most reasonable to hit the cone of the finger into the hole of the steering knuckle. Now you can return the nut to its original place. Do not tighten too tightly! And then a thorough cleaning of the thread, after which the nut can usually be unscrewed.
But the pin nut cannot be unscrewed completely, since the rotary lever is in the way. Therefore, all remaining turns will have to be done after pressing out the finger. Remember that in a worn body, nothing holds the finger and, if the nut is screwed together with resistance (for example, the thread was not cleaned of dirt and rust before this work), the finger will rotate in the body, and it will be very difficult to hold it with anything. Now, even if you decide to clean the thread, you will face the problem of how to screw the nut back on? WD-40 won’t always help here either! In such a situation, it is most reasonable to hit the cone of the finger into the hole of the steering knuckle. Now you can return the nut to its original place. Do not tighten too tightly! And then a thorough cleaning of the thread, after which the nut can usually be unscrewed.
We carry out assembly in reverse order. And do not forget to put grease in the case before installing the ball. The mileage will be longer.
Sources
- https://www.avtorem.info/stati/vaz-2101-vaz-2106-vaz-2107/zamena-nizhnej-sharovoj-opory-na-avtomobilyah-vaz-2101-vaz-2102-vaz-2104-vaz- 2105-vaz-2106-vaz-2107-zhiguli-klassika.html
- https://spike.su/index.php/Ball-joints-VAZ-2101-2106-2107.html
- https://remontysvoimirukami.ru/remont-vaz-svoimi-rukami/remont-sharovyh-opor-vaz-2101-svoimi-rukami.html
Replacement of ball joints VAZ 2107
If when driving over bumps you are haunted by an unpleasant sound in the front of the car, then there is no need to bring the matter to a critical moment. To find the cause of the knocking, you need to understand the structure of the suspension, both as a whole and its individual parts. In this article I will talk about one of the causes of knocking and how to replace ball joints on a VAZ 2107.
Ball joint device for VAZ 2107
The ball joint consists of a pin inserted into the body. Between them there is a plastic liner, which wears out over time. A rubber cover placed on the body and fits tightly to the finger protects against dust getting inside the insert. The ball joint housing has a hole for lubrication and checking the condition of the part. But not all manufacturers do this.
Diagnostics of ball joints VAZ 2107
If there is a knocking sound on bumps in the front part of the car and a beating in the steering wheel, as well as increased sensitivity of the car to the ruts, you should check the condition of the suspension and one of the points will be checking the ball joint of the VAZ 2107. How to check the ball joint on the VAZ 2107? Very easy! There are several ways to check ball joints.
If you have an inspection hole or overpass, then we go there and begin inspecting the car
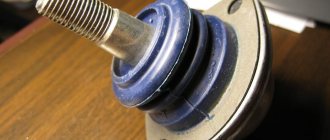
First of all, you should pay attention to the condition of the ball joint boots. Using them you can determine the first signs of a malfunction of the ball joint of the VAZ 2107
If they are torn, then most likely this is the reason for abrasive getting into the body and increased wear of the part.
If the boot is intact, and you have a ball with a technological hole in the body, as in the diagram above, then cut a piece of thin straight wire, mark 11.8 mm on it and insert it into this hole. If the tag is immersed in the ball, then it’s time to change it.
If you do not have access to the overpass, simply turn the steering wheel and hang the wheels on the jack one by one. Next, we hold one hand at the junction of the body with the finger, and with the other we shake the wheel.
To check the upper ball joint, you should rock the wheel while holding its upper part, and to check the lower ball joint, you should apply force to the very bottom part of the wheel.
You can also simply rock the upper and lower parts of the wheel toward and away from you, but this may not give accurate results, since in this case the silent blocks of the levers may still make a sound.
Replacement of ball joints VAZ 2107
When, during the diagnostics of the suspension, a faulty ball joint was identified, we are faced with the question of how to replace the ball joint on a VAZ 2107? I will answer it for you now. But before repairing, you need to decide on the tool.
A long and painful replacement of ball joints on a VAZ 2107 without a puller is possible, because almost no one manages to do this without a puller.
Advice
Or you can immediately buy a special tool and then I will show you how to use a VAZ 2107 ball joint puller.
We will look at how to dismantle the upper ball joint of a VAZ 2107 without a puller, and I will show how to remove the lower ball joint of a VAZ 2107 in a version with a device designed for this.
Replacing the upper ball joint of a VAZ 2107
Replacement of VAZ 2107 ball joints occurs with the wheel removed.
To remove the upper ball joint, for example, on the left side without a puller, we must perform the following actions: turn the steering wheel as far as possible to the left, loosen the ball nut, put something under the hub, so that when lowering the car from the jack, the hub fits tightly on this object, take a hammer and point it at the tide on the fist (just below the ball nut) and with a sledgehammer or an ax we hit the hammer sharply, but not too hard. After a few tries the ball will come out. To make the process go faster, you can pour hot water on the hub in the ball area.
As soon as the pin comes out of the hub, unscrew the 3 bolts and dismantle the part.
But this case does not help in all cases. It happens that the ball simply rusts to the hub and there is no way to remove it except a puller.
Replacing the lower ball joint of a VAZ 2107
Using a puller, the balls can be pressed out of the hub in less than 5 minutes. To do this, unscrew both ball pin nuts a couple of turns. Next, we insert the puller between the upper and lower ball pins and begin to unscrew the puller bolt as shown in the photo below.
Next, all we have to do is unscrew the bolts securing the balls to the arms and install new balls.
Assembly is carried out in reverse order.
During assembly, it happens that when you tighten the nut onto the ball pin, it begins to rotate. To avoid this situation, wipe the ball pin and its seat in the hub with a dry rag. And after inserting the ball into the hub, lightly but firmly hit the ball with a hammer a couple of times. After these procedures, the finger will not turn when screwing the nut.
How to extend the life of ball joints
Bearing manufacturers do not always put enough lubricant in the ball housing. Over time, this lubricant is washed out if the boot is damaged or normal wear occurs during operation due to a lack of lubricant.
To extend the life of the ball joint, this also applies to the steering ends, you need to add a small portion of fresh lubricant. Some ball designs have a hole at the bottom of the body. It is usually closed with a plug bolt. It is needed not only for diagnosing the wear condition of the liner and the hinge ball, but also for its maintenance.
Unscrew the plug bolt. Instead, screw in an oil nipple with a diameter of 6 mm. In different car models, due to the design features of the hinges, the diameter of the oil nipples may be different, and in some there are none.
We take a grease syringe and put lubricant in it; it is recommended to use “CV joint” lubricant, it is more heat-resistant and water-repellent. We place the syringe on the grease fitting and “fill” the lubricant into the ball joint body. How to do this correctly, using the VAZ 2106 as an example, is shown in the video below. You don’t need to add much lubricant so that the support boot doesn’t “inflate” too much; you can feel it with your hand to ensure there is free space for its working stroke. Otherwise, it will break when driving.
How to lubricate the lower ball joint with a syringe press:
If squeaks have already appeared, and you don’t have a special press syringe with an oil can at hand, then you can extend the service life by making an “injection” into the ball. Take a five-cc medical syringe, the main thing is that the needle is thin, fill it with motor oil, and pierce the boot of the support. A small amount of motor oil is poured into it through a syringe; as before, we test it with our hand to see if it is full. Two cubes are enough to revive the ball joint. After this, you should rock the car several times by the wing, on the side where the injection was made, so that the lubricant penetrates into the volume of the ball and liner.
Replacing ball joints for VAZ 2114
You need to look after the ball joints on VAZ cars very carefully. If a faulty ball joint is not replaced in a timely manner, it may simply be torn out and the car wheel will start floating freely, the car will lose control and all this can lead to very sad consequences.
Consequences of untimely repairs. This car “vomited” the ball joint.
In order to avoid such troubles, it is enough just to maintain the ball joints in good condition. In this article we will figure out how to diagnose and replace ball joints on a VAZ 2114-2115.
Diagnostics of ball joints VAZ 2114
So, the first thing you need to start with is diagnosing ball joints. Faulty ball joints have the following symptoms:
- When driving over small uneven surfaces at low speed, a characteristic knocking sound appears.
- When you turn the steering wheel, a characteristic creaking sound appears (not to be confused with a crunching sound when driving)
- When driving straight the car "sags"
- Uneven tire wear
If you think these symptoms are too indirect, then there is a more accurate way to diagnose ball joints:
Hang the wheel on which the diagnosis is planned above the ground. Place the mounting blade (or just a pry bar) between the lever with a steering knuckle in the area of the ball joint and rock it up and down. If you feel or hear knocking noises, it’s time to change the ball joint.
The only disadvantage of such diagnostics is, perhaps, that it requires a place to hang the car. You can, of course, perform this operation using hemp or bricks (you can use a rolling jack), but you will have to crawl under the car while lying down. In this case, you need to be very careful so that the car does not jump off and injure you.
How to replace a ball joint on a VAZ 2114?
Once we have determined that the ball joint is faulty, it must be replaced. To do this we will need the following tools and spare parts:
- Jack (rolling or regular)
- Hammer
- Mounting blade or pry bar
- Wrenches or sockets with ratchet for 17 and 19
- Special ball joint remover (there are several types of them. It’s up to you to decide which one to take)
According to reviews from owners of VAZ 2114-2115, ball joints from such manufacturers as Belmag, Trek, Kedr, Kraft have proven themselves to be quite good. Which manufacturer to choose is a topic for a separate article, so you will have to choose yourself. The main thing is not to take the cheapest Chinese balls of the noname type (from unknown manufacturers).
Replacing ball joints VAZ 2114
- First, loosen the wheel bolts and hang the wheel on which the replacement will be made. Then we put the car on the handbrake, install wheel chocks (ordinary bricks are also possible), jack up the wheel and remove it
- After this, we are given room to maneuver and we can begin to unscrew the nut securing the ball joint to the lever. To do this, use a spanner wrench or a ratchet head.
- Now we need to use a puller so that the ball pin pops out of its seat.
After this, start unscrewing the 2 bolts securing the ball to the steering knuckle with a 17 wrench. It is possible that you will have TORX bolts there. They are the ones that come from the factory.
Next, we need the ball pin to finally come out of the seat. To do this, you need to place a stop (for example, a brick) under the brake disc and lower the car a little with a jack.
Then we take a new ball joint for the VAZ 2114-2115, fill it with grease under the boot and install it in place. All work on installing the ball joint is done in reverse order.
So, it’s not at all difficult to replace the ball joint on a VAZ 2114-2115. This will take an experienced motorist 20-25 minutes. If you have little experience, then you will need a little more - 45-50 minutes.
How to change the lower ball joint on a VAZ 2106
From below everything is more problematic, although the meaning remains the same. Unscrew the fastening to the hub:
It is quite difficult to knock it out, since there is practically nowhere to insert the pry bar, so you can do it in the following way - by hitting the place where the support pin is inserted with a hammer. After prolonged blows, it should pop out. Then it remains to unscrew the three bolts securing the lever:
Installation occurs in reverse order. The price of new parts is about 500 rubles per pair.