Signs of a bad ball joint
The suspension transmits all the bumps and potholes of the road, taking the entire blow upon itself - it serves as protection against the constant rocking of passengers and drivers in the cabin, creating conditions for a comfortable trip. Therefore, in order to understand that something is faulty in the suspension, it is not necessary to go to a service center for diagnostics. Separately, the causes of ball malfunction include the following symptoms:
- The rubber on the tires eats up more (you can blame the wrong wheel alignment, but if the car doesn’t drive, it’s most likely the fault of the ball joint);
- When driving over uneven surfaces, unusual sounds are heard, and the car becomes less stable, it “throws” at the slightest bumps - this is how the support fingers slowly “die”;
- When turning, the car does not seem to react to the steering wheel and does not turn immediately; and at speeds above 30 km/h a knocking sound begins in the front suspension;
- It’s as if the car doesn’t “hold” the road, and the steering wheel turns harder and harder, with very unpleasant sounds. It seems that the wheels are starting to play, which indicates the urgency of the repair.
Check it seven times...
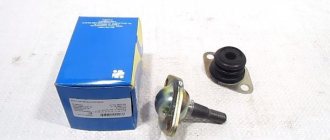
Unfortunately, Russian sellers are not always honest with their customers - there are cases of selling outright defects or fakes in original boxes. Therefore, when purchasing, you need to not only look at the beautiful packaging with a familiar logo, but also check how well the ball joints work.
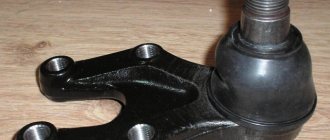
Take them out of the box and try to spin them - they should rotate with noticeable force, but not lock up or slip in certain areas. If the seller claims that you will receive solid forged parts, pay attention to their body. It should not contain welds or a sloppily rolled flange - otherwise you are looking at cheap ball joints with low strength and short service life.
Detailed manual for replacing ball joints
We will need 17 and 19 mm wrenches, preferably socket wrenches so as not to tear off the nuts, WD40, a ball joint remover, and a hammer. So, jack up the car, put stops under the rear wheels and remove the wheel.
Next, using WD40, we spray the bolts securing the ball joint to the lever and the ball joint nut itself so that there is no difficulty in unscrewing them. Let’s wait a few minutes until they “dissolve” and get to work.
Using a 19mm wrench, unscrew the ball joint nut and a 17mm wrench to unscrew the nuts securing the ball joint to the lever.
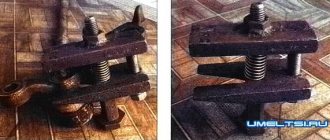
Now we need a ball joint remover, it can be of several types, the principle is the same - remove the ball joint from the lever.
We take a new ball joint and, for our own peace of mind, check the grease under the boot. Carefully remove it and check - if there is no grease, fill the boot with Litol or similar grease. Be careful not to damage the boot.
Now install the new ball in the reverse order. You will have to tinker with the installation when screwing the ball to the lever.
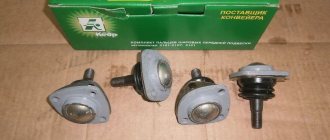
We advise you not to install cheap balls of questionable quality, as they will affect the performance of the suspension and handling in general. A good option for ball conveyor BELMAG or TRACK.
Replacing ball joints Lada Priora - step-by-step instructions
1. First of all, tighten the handbrake, put wheel chocks under the wheels, jack up the car and remove the wheel. I think everything is clear here, no need to describe it!?
2. Using a “19” wrench, loosen the ball pin nut.
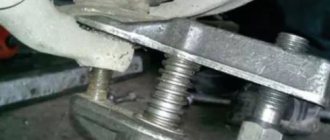
3. Using a ball puller, press the support out of the lever.
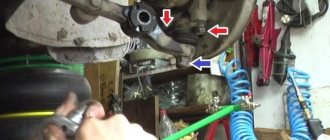
4. When the finger comes out of the seat, unscrew the two mounting bolts, which are indicated by a yellow pointer.
Use a pry bar to remove the ball joint.
The support is now released and can be removed.
Take a new Priora ball joint, remove the boot from it, then fill it with lubricant, for example Litol.
Reinstall the boot, then reassemble everything in reverse order.
What is a ball joint?
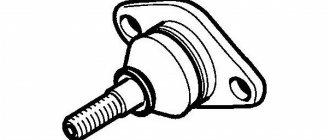
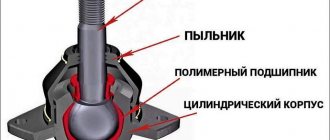
The ball joint is a vehicle suspension element that provides a rigid and reliable fastening, while maintaining limited mobility of the arms relative to the wheel hub. When you are driving a car, the front wheels have two functions: to ensure that the car moves along the road, and also to provide the ability to maneuver - turning left and right. To maneuver and move correctly, the wheels must be positioned correctly relative to the road, that is, they must be level, freely roll back and forth, freely controlled by the steering wheel, and also firmly attached to the axle. To meet these requirements, a suspension was developed in which ball joints play a very important role. They connect the suspension arms and the steering wheel hub.
Initially, the ball joint was installed only in front-wheel drive cars, thanks to which the wheels could be turned around the vertical. Since the invention of the ball joint some 40 years ago, little has changed in its design.
The ball joint mainly ensures that the wheel remains in a fixed position horizontally while it rotates vertically. The ball joint pin can move in a circle in the body, while it will swing at a small angle. That is, the ball joint performs both rotational and limited movements of the finger in the plane where it is fixed.
Often, all elements of the ball joint are made of steel. In order to reduce friction between surfaces that are in contact, the surface of the spherical recess is coated with plastic or other polymer. But there are also ball joints that are devoid of this polymer coating. Often, such elements are installed in “older” domestic cars. Such models were equipped with collapsible supports; the gaps in them were removed by tightening the lid.
There are two known ways to install ball joints. The first method is to attach it to the lever using bolts. The second way is to press it into it. If a ball joint secured with bolts breaks, then only it can be replaced. If the pressed ball joint fails, then it will be necessary to change the suspension arm itself, in which the pressed ball joint will be in good working order. But the financial expenses in this case will be much greater, since you will have to buy not just a new support, but an entire lever.
Due to its functions, the ball joint experiences significant loads. Most machines rest on a very small surface area of the ball. Considering the total weight of cargo and passengers, poor quality of roads and decent speed, the load on the ball joint increases significantly. For these reasons, the unit wears out and fails. When you buy a new ball joint, it is better to choose a part from the original manufacturer. The market is filled with a large number of brands that produce something similar to the original ball joints, but your choice should fall on products only from trusted manufacturers.
The most common option is the front suspension, which has two ball joints, one per wheel. Most SUVs are equipped with four ball joints in the front suspension, with two of them per wheel. A very rare situation is when there are three balls. Modern cars with independent multi-link rear suspension also have ball joints on the rear wheels.
How to remove a ball joint without a puller?
Removing and replacing the ball joint is a fairly common task, which, although unpleasant, is doable.
It is impossible to change the support on a modern car and on a classic one using the same steps. The reason for this is the different design. Modern cars have more advanced ball joints. Still, if a problem arises, you must first of all understand the question: “Do I need to repair the ball joint or replace it?” In order to give the correct answer, you need to diagnose the chassis; you can do this yourself, but only if someone helps you. First you need to understand what diagnostics are. Method number one is to determine the condition of the support: lift the wheel, grab the bottom and top with both hands, and then try to shake it. This will make it possible to determine whether there is any play. The second method is more reliable. Use a crowbar or pry bar to try to get under the car. Fix it in the center between the lower lever and the edge of the support, then push it up. This way you can see the play. The third method is the most correct and accurate. You need to do the following:
1) Dismantle the ball joint and check it in your hands;
2) Clamp it in a vice, and then check the radial and axial play of the pin. Malfunctions will be indicated by the ability to move the finger without much effort. This is a signal that the ball joint needs to be replaced.
The ball joint wears out faster due to:
1) Lack of lubrication;
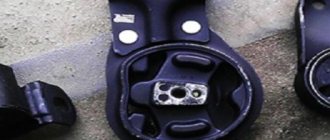
2) Gusts in the boot;
3) Excessively long operation;
4) The presence of a defect in one of the parts.
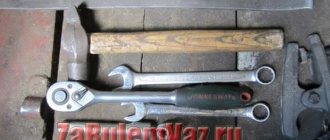
Before you start work, prepare all the necessary tools. You will need:
1) Socket wrenches for “17” and “19”;
2) Mounting;
3) Hammer;
4) Rust remover;
5) Metal brush;
6) Lift and stand for the car;
The process of removing a ball joint without a puller
The likelihood that you will cope with the procedure for removing the support yourself without a puller is extremely high, so get down to business quickly so as not to waste time.
You need to do the following: 1) Using a jack, lift the car and place it on some stationary object.
2) Put the car on the handbrake or place bricks under the wheels to prevent the car from rolling away.
3) Remove the wheel from the side where the broken ball joint is located.
4) In order to have the best access to the junction of the ball and the lever, you need to turn the steering wheel accordingly.
5) Clean the joints using a metal brush.
6) Coat the ball joint pin with anti-rust agent, after which you will have a few minutes to rest while it takes effect.
7) Using a wrench set to “19”, unscrew the pin nut and remove it. Next, you would need a puller, but if you don’t have one, proceed as follows.
 Take a pry bar and secure it so that when you press on one end, it presses on the suspension arm. The mount can be installed in the steering knuckle.
9) If there is a lot of rust on the parts, remove it with a product.
10) After the lever is under the required pressure, try to knock it out with a sharp blow of a hammer at the junction of the lever with the ball.
11) After disconnecting the lever and the ball joint, press the lever with a pry bar and move the steering knuckle.
12) Using a key set to “17”, remove the pair of bolts that connect the ball and steering knuckle.
13) The ball joint is free.
Diagnostics, removal and replacement of the Lada Priora ball joint
The service life of ball joints on a Lada Priora depends on the operating conditions of the vehicle, and on the quality of the part itself, that is, the ball joint. They can cover several thousand km and 30-40 thousand. Factory installed parts last quite a long time. For example, the average service life of factory ball joints is 50-70 thousand kilometers. In this article we will take a detailed look at the issue of not only replacing ball joints, but also tell you which ones are better to buy and how to check them.
How to check a ball joint on a Priora
So, to make sure that the support needs to be replaced, it needs to be checked in several simple ways. Jack up the wheel and, placing your hands on the top and bottom points of the wheel, try to shake it. If you feel play, the ball joint may be faulty. Also, the cause of play may be the tips or stabilizer struts.
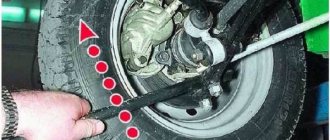
Another way to check is to drive into an inspection hole or overpass and use a mount or pry bar to check the ball play. Place the pry bar between the ball and the lever and try to shake it. A faulty ball will play easily, which indicates either high wear or lack of lubrication.
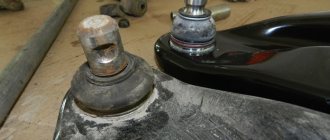
Carefully inspect the support, its boot should be intact, and it itself should be without chips or signs of deformation.
Signs of a bad ball joint
- When driving over small potholes and bumps, a distinct knocking sound is heard in the suspension.
- When turning, you may hear a grinding or squeaking sound, and the steering wheel may also be harder to turn.
- The car holds the road poorly, the wheels seem to blur on the asphalt.
- If you notice that there is “rubber”, one of the reasons may be the failure of the ball joints.
In order to accurately verify the malfunction of the ball joints, you must contact either specialists or independently, according to the instructions indicated above, carry out inspection and diagnostics. If during a visual inspection you find that the boot on the ball joint is torn, this basis is sufficient to replace it. Because dust and dirt get on the ball pin, mix with the lubricant and it fails.
Which ball joint to choose for Lada Priora
Today, a fairly large selection of balls is offered, from Chinese to conveyor and even reinforced ones. The choice is up to the buyer.
- BZAK BA08-2904192-01 from 250 rub. piece
- TRACK BJ70-107, 2108-2904192 from 300 RUR
- LADA IMAGE 2110-2904192-82 from 400 RUR
- AMT-Miass AM08-2904192 from 220 rub.
- BELMAG BM10-2904192-01 reinforced with fastening (conveyor) from 500 rub.
- VAZINTERSERVICE /OAT/ VIS08-2904185-10 sunset - from 350 rub.
- ASOMI, Tolyatti A110.2904.193 Comfort PRO from 500 rub.
The most expensive conveyor ball joints are from the BELMAG company; also in terms of price, the ball joints from ASOMI, which also produces front and rear struts, as well as support bearings, stand out.
Detailed manual for replacing ball joints
We will need 17 and 19 mm wrenches, preferably socket wrenches so as not to tear off the nuts, WD40, a ball joint remover, and a hammer.
So, jack up the car, put stops under the rear wheels and remove the wheel.
Next, using WD40, we spray the bolts securing the ball joint to the lever and the ball joint nut itself so that there is no difficulty in unscrewing them. Let’s wait a few minutes until they “dissolve” and get to work.
Using a 19mm wrench, unscrew the ball joint nut and a 17mm wrench to unscrew the nuts securing the ball joint to the lever.
Now we need a ball joint remover, it can be of several types, the principle is the same - remove the ball joint from the lever.
We take a new ball joint and, for our own peace of mind, check the grease under the boot. Carefully remove it and check - if there is no grease, fill the boot with Litol or similar grease. Be careful not to damage the boot.
Now install the new ball in the reverse order. You will have to tinker with the installation when screwing the ball to the lever.
We advise you not to install cheap balls of questionable quality, as they will affect the performance of the suspension and handling in general. A good option for ball conveyor BELMAG or TRACK.
Checking the condition of the chassis and transmission
We check the condition of the chassis and transmission every 15 thousand kilometers. The parts of the chassis (wheels, suspension arms, anti-roll bar, rear suspension beam, shock absorbers and suspension springs) and transmission (front wheel drive shafts) must be free of deformations, cracks and other mechanical damage that affect the shape and strength of the parts. Hanging the front wheels one by one (while the car must be securely fixed on the support stand), we check the condition of the wheel hub bearings.
Use only factory-made support stands. The wheel should rotate evenly by hand, without jamming or knocking.
Holding the wheel in a vertical plane, we alternately sharply pull the upper part of the wheel toward ourselves, and the lower part away from us, and vice versa. We make sure there is no play (knock). If there is a knock on the front wheel, ask an assistant to press the brake pedal. If the knocking noise disappears, then the wheel bearing is faulty, and if the knocking noise remains, then the ball joint is most likely worn out. The hub bearings of the front and rear wheels are not adjustable and must be replaced if there is play. To check the serviceability of the ball joint, insert a mounting blade between the suspension arm and the ball joint housing. Be careful not to damage the ball joint boot.
While pressing the lever with a mounting blade, we monitor the movement of the lever head relative to the ball joint housing. If there is play in the connection, replace the ball joint.
We check the condition of the protective covers of the ball joints. We replace ball joints with torn or cracked covers. To check the silent block of the front suspension arm...
...insert a mounting blade between the body bracket and the lever head... ...and try to move the lever along its axis and along the axis of the bolt. If the lever moves freely, without effort, it means that the silent block of the lever is badly worn or damaged and needs to be replaced. Ruptures, cracking and swelling of the rubber bushing of the silent block are unacceptable. Checking the condition of the silent blocks...
... and the back ends of stretch marks. Tearing, cracking and swelling of rubber silent blocks are unacceptable.
Inspecting the anti-roll bar cushions...
...and rubber bushings for stabilizer struts. If ruptures, cracks or severe deformation are detected on the rubber pads and bushings, they must be replaced. Lifting the rear wheels one by one, we check the condition of the rear wheel hub bearings. The wheel should rotate evenly by hand, without jamming or knocking. To check the condition of the silent block of the rear suspension beam arm...
...we insert the mounting blade between the body bracket and the lever head and try to move the lever in different directions. If the lever moves freely, without effort, it means that the silent block of the lever is badly worn or damaged and needs to be replaced.
We check the condition of the springs, telescopic struts and shock absorbers of the front and rear suspensions. The suspension springs must not be damaged. Tearing, cracking and severe deformation of rubber bushings, cushions and compression buffers of shock absorbers are unacceptable. Liquid leakage from shock absorbers is not allowed. A slight “fogging” of the shock absorber in its upper part, while maintaining the characteristics, is not a malfunction. If the rubber element of the upper support of the front suspension telescopic strut settles or is destroyed, the support must be replaced.
We check the condition of the hinges and the protective cover of the gear shift rod and jet rod. Alternately rotating and turning the front wheels (with the front of the car hanging out)…
...we inspect the protective covers of the outer...
...and internal hinges of the front wheel drives, check the reliability of their fastening with clamps. Covers that are cracked, torn or have lost elasticity must be replaced. We check that there is no oil leakage from the gearbox through the seals of the internal drive joints. If there is a leak, replace the seals.
Replacing a ball joint on a Lada Priora
Checking and replacing the ball joint of the Lada Priora
Before changing the ball joint on a Priora, you should worry about safety: apply the handbrake, securing the rear of the car and preventing a rollback. Additionally, you can put anti-roll bars or bricks. Before installing a new spare part, check it - if the boot is at least half empty, it needs to be filled with lubricant, otherwise the life of the part will be significantly reduced. For these purposes, lubricants for CV joints, graphite lubricants or lithol are suitable.
After this, you can get to work and start changing the spare part:
- We jack up the front of the car, put a support on it for safety - you can’t rely only on a jack for any job;
- We unscrew the bolts with a gas wrench and smoothly remove the wheel;
- Inside, lower the two fastening bolts on the ball joint and remove the ball pin nut;
- Use a special puller to press out the finger. Of course, it will work without a puller, but you will have to use force;
- We free the structure from the two mounting bolts of the support. Now you can remove the part with a pry bar;
- Install a new part in place of the old one. Reassemble the suspension.
It is highly advisable to go through the wheel alignment again: this is not necessary, but incorrect installation will force the driver to again encounter symptoms of malfunctions. Even if the part is lubricated and in perfect condition, any inaccuracy during installation will disrupt all wheel alignment settings. In addition, you should not risk your safety: driving somewhere in a faulty car is not the best idea.
Replacement, selection and check of ball joints Lada Vesta ⋆ I Love My Lada
There are plenty of complaints about the Lada Vesta suspension. Ball joints are, perhaps, first in line for replacement in every second car. Nevertheless, there are several ways to extend their life, and if the question of replacement arises, we will figure out how to change it and how to choose the best ones on the market.
Ball joints Lada Vesta: resource and design
As a rule, the service life of Lada Vesta ball joints does not exceed 50-60 thousand km , which is strange, since the front suspension, and the supports themselves, almost completely repeat the design of some European cars. There they don’t even know about replacing ball joints, although the roads there are different.
The task of the ball joint is, on the one hand, simple, but on the other hand, you can’t envy it. All that is required of it is to prevent the steering knuckle from moving in the horizontal plane and provide vertical displacement.
How to replace a Lada Priora?
In this case, the role of a puller can be performed by a hammer and a reinforcement rod. To remove a worn or broken ball joint, you will need:
- The car is raised using a jack.
- The front wheel is removed.
- The two ball mounting bolts are unscrewed and the fastening nut is unscrewed (wrench 17 and 19).
- The reinforcing rod is inserted between the lever and the support body, and then pulled down.
- The pin must be hit from bottom to top in different directions so that the cone of the ball pin pops out of the lever.
- Once the cone is out, the support turns away from the steering knuckle.
- To prevent the ball from being pressed against the fist by means of a lever, the hub is supported, or the wheel is placed and the jack is lowered.
- Next, the ball joint, which is attached to the lever and knuckle, is replaced.
Video instruction.
What sound does the ball joint make?
Clanging or squeaking sounds
in the front suspension.
When play appears between the pin and the support
, the suspension parts rub against each other when moving. As a result, clanging, creaking and knocking noises will be heard. The more wear, the louder this unpleasant “music”.
Interesting materials:
How to remove system apps on Windows 10? How to remove system applications with root rights? How to remove system applications from Xiaomi? How to remove Xiaomi system apps from root? How to remove system programs on Android? How to remove Windows 10 system disk? How to remove Windows 10 system partition? How to delete a system partition on a hard drive? How to remove a system from the boot list? How to delete downloaded Spotify music?
Article number and price for the original ball joint
The original ball joint of the Lada Priora car has article number 21082904185. The price for the product varies from 150 to 420 rubles. The quality of auto parts varies from batch to batch.
Ball joint for Priora
When purchasing an original product, special attention should be paid to the presence of lubricant under the boot. In some cases it is completely absent. Such a ball can last no more than a couple of thousand kilometers.
Article number and cost of ball joint analogues
There is a constant debate among car owners about which ball joints are best to install. Some drivers believe that original parts are optimal in terms of price to reliability ratio. Other owners claim that the instability of the quality of their original balls completely eliminates the possibility of purchasing them. They advise buying analogues from third-party manufacturers, especially since the cost of non-original components is quite attractive. According to driver reviews, below is a list of pole brands that they recommend as an alternative to the original.
Table - Good analogues of the Lada Priora ball joint.
| Manufacturer | vendor code | Approximate cost, ruble |
| Delphi | TC583 | 340-400 |
| Denckermann | D110112 | 210-250 |
| Teknorot | L303 | 230-280 |
| Lemforder | 1545602 | 420-500 |
| TRW | JBJ156 | 445-490 |
Diagnostics of the ball joint condition
Signs that you need to diagnose a ball joint malfunction are:
- the intersection of small holes and bumps is accompanied by distinct extraneous sounds from the front suspension;
- decrease in vehicle controllability when entering a turn;
- turning the steering wheel becomes more difficult and is accompanied by a creaking or grinding sound;
- it feels like the wheels are blurring on the asphalt, which is why the car doesn’t hold the road well;
- driving over uneven road surfaces is accompanied by poor vehicle stability;
- on the tires it is clearly noticeable that the rubber is being “eaten up”;
- cornering at speeds over 30 km/h is accompanied by a knocking sound coming from the wheel arches.
One way to monitor the condition of the ball joint is as follows:
- Jack up the front of the Priora.
- Hold the wheel firmly with your hands at the top and bottom points.
- Shake the wheel rim. If play is noticeable, the ball joint most likely needs to be replaced. It should be borne in mind that the cause of play can also be stabilizer struts or steering ends.
Checking the condition of the ball joint by shaking the wheel
Another method of control can be used if there is an inspection hole, overpass or lift. It is necessary to gain access to the bottom of the Priora. Using a pry bar or other metal rod, you need to check the play in the ball. To do this, insert the assembly between the support and the lever, and then shake it. If the ball is faulty, an easily noticeable play will be observed, which indicates the need to replace it.
During diagnosis, it is important to visually inspect the condition of the anther. The performance of the ball directly depends on the lubrication. If there are cracks, tears or other mechanical damage to the cuff, moisture and abrasive debris get under it. If an unsatisfactory condition of the boot is detected, replacement of the support is mandatory.
If it is impossible to determine the malfunction of the ball or if you have doubts about its failure, it is recommended to contact a service station, where technicians using special equipment will check the condition of the support. For example, diagnostics on a vibration stand allows you to find a defective unit with 99% confidence.
Required tools and materials for replacement
To replace ball joints on a Priora with your own hands, you will need the tools from the list below.
Table - Tools and materials required to replace the ball joint.
| Name | Note |
| Jack | To lift the car |
| Mount | Can be replaced with a durable rod |
| Hammer | Medium size |
| Spanners | “at 17”, “at 19” |
| Socket head | TORX E12 |
| Vorotok | Preferably with a ratchet |
| Balloon wrench | For mounting and removing the wheel |
| Grease | Special for CV joints or graphite |
| Penetrating lubricant | For example, WD-40 |
| Rags and wire brush | To clean dirt |
| prop | It is prohibited to carry out repair work on a vehicle that is only supported by a jack. |
A set of tools needed to replace the ball joint
Replacing a ball joint on a Lada Priora
Replacing the ball joint on a Lada Priora car with your own hands is carried out according to the step-by-step algorithm presented below.
- Secure the vehicle with the parking brake.
- Place wheel chocks under the rear wheels.
- Jack up the vehicle on the side from which repair work is planned.
- Remove the wheel.
Jacked Priora with a removed wheel
- Loosen the two ball joint mounting bolts.
Location of fasteners
- Unscrew the ball stud nut.
Unscrewing the ball pin nut
- Press the support out of the lever. This operation can be performed without a puller, but having one will greatly simplify the procedure.
Pressing the ball out of the lever using a puller
- Unscrew the two support mounting bolts.
- Using a pry bar, remove the ball.
Dismantling process Removed old ball
- Install the new support into the seat. It is recommended to fill the boot with grease first.
Installation of a new ball joint
- Reassemble everything in the reverse order of removal.
- Checking the toe and camber angles on a stand is not a mandatory procedure when replacing ball joints, but experienced car owners still recommend checking them.
Ball joint of a Priora car: tips for checking and replacing
The connecting part of the front suspension that allows the wheels to turn is a ball joint. On a Priora car, this part becomes a consumable item if the driving style is harsh. Replacing a ball joint on a Priora can become almost a regular procedure. You need to monitor the condition of your car, and even better, treat it with care, because the car struggles with the unevenness of Russian roads every day. The ball joint on the Priora consists of a boot (rubber gasket), a metal cylindrical body, a metal rod (pin), a pressure washer, rolling and a polymer liner. The price of a ball joint for a Priora car is not high, but removing the part requires experience. Replacement will be easier if you have already done it.
With the introduction of front-wheel drive in Russian cars, ball bearings received a new, more important purpose, because instead of simple levers driving the front wheels into turning movements, complicated mechanisms appeared, and the part received a somewhat greater load. Replacing a ball joint on a Priora is not done so often if it is installed correctly and sudden maneuvers are avoided if possible. As you drive, change it often. Before changing a part, you can check it in 3 steps, read about them below. It is not necessary to install original ball joints - in the article you will find other manufacturers that will fit the Priora.
- Standard support - article number and price
- Signs of a bad ball joint
- Manufacturers and prices of supports
- Diagnostics of the condition of the ball joint - how to check
- Required tools and materials for replacement
- Replacing a ball joint on a Lada Priora
- After this, you can get to work and start changing the spare part:
Additional recommendations for replacing the ball joint
When purchasing original ball joints, it is extremely important to control the amount of lubricant in them. Many car owners complain that the boot is completely empty. The quantity and quality of lubricant directly affects the service life of the unit and its performance characteristics.
Completely dry original ball joint
Filling the boot with lubricant
If an insufficient amount of lubricant or its absence is detected, it is necessary to fill the boot completely. Special means for CV joints are optimally suited for these purposes. In extreme cases, you can use Litol 24 or graphite lubricants. If there is a small amount of substance under the cuff, it is recommended to dispose of it first to prevent mixing.
How to check a ball joint on a Priora
So, to make sure that the support needs to be replaced, it needs to be checked in several simple ways. Jack up the wheel and, placing your hands on the top and bottom points of the wheel, try to shake it. If you feel play, the ball joint may be faulty. Also, the cause of play may be the tips or stabilizer struts.
Another way to check is to drive into an inspection hole or overpass and use a mount or pry bar to check the ball play. Place the pry bar between the ball and the lever and try to shake it. A faulty ball will play easily, which indicates either high wear or lack of lubrication.
Carefully inspect the support, its boot should be intact, and it itself should be without chips or signs of deformation.
How to check the front suspension
Checking the front suspension should be carried out in the engine compartment and from below the car, mounted on an inspection ditch or supports (with the front wheels hanging out).
The condition of the protective covers of the suspension ball joints (they should not be mechanically damaged) should be checked during each maintenance and repair of the vehicle.
Check the condition of the rubber-to-metal joints, rubber cushions, suspension ball joints and the condition of the upper suspension strut mounts.
Rubber-metal hinges and rubber cushions must be replaced in case of ruptures and one-sided bulging of rubber, as well as when their end surfaces are trimmed.
Suspensions on rubber parts are not allowed:
- signs of rubber aging;
- mechanical damage.
Pay special attention to mechanical damage (deformations, cracks, traces of contact with road obstacles, etc.) of suspension elements, especially levers.
1. Check the tightness of the shock absorber rod mounting nut.
2. Check the tightness of the nuts securing the upper strut support to the body. Similarly, check the fastenings of the rod and the upper support of the second rack.
3. Check the condition of the protective covers of the ball joints. If the boots are damaged, replace the ball joints.
4. Check the ball joints for play. To do this, measure the distance H (see Fig. 7.1) between the transverse arm 17 and the brake disc 21. Insert the mounting blade A (see photo) between the steering knuckle and the suspension arm and, leaning on the lever, try to swing the steering knuckle. If this distance changes by more than 0.8 mm when the suspension is rocked, replace the ball joint.
5. If the ball joints are in good condition, rock the wheels in a vertical plane and make sure there is no play in the hub bearings. The maximum permissible axial clearance is no more than 0.015 mm. If the gap is greater than the specified value, replace the bearings.
Signs of a bad ball joint
- When driving over small potholes and bumps, a distinct knocking sound is heard in the suspension.
- When turning, you may hear a grinding or squeaking sound, and the steering wheel may also be harder to turn.
- The car holds the road poorly, the wheels seem to blur on the asphalt.
- If you notice that there is “rubber”, one of the reasons may be the failure of the ball joints.
In order to accurately verify the malfunction of the ball joints, you must contact either specialists or independently, according to the instructions indicated above, carry out inspection and diagnostics. If during a visual inspection you find that the boot on the ball joint is torn, this basis is sufficient to replace it. Because dust and dirt get on the ball pin, mix with the lubricant and it fails.
What are ball joints needed for?
On Samara and VAZ-2110 cars, the ball joint of the lever is designed to ensure that the shock absorber strut rotates when the steering wheel is turned. In this case, the wheels rotate around their axis. The element is attached:
- To the lower suspension arm using two bolts.
- To the steering knuckle of the hub using a nut on the pin.
The movable connection ensures a smooth ride, ease of turning the steering wheel, and ease of driving. But all this is possible only on the condition that a high-quality element is used, free of internal defects, made of durable and wear-resistant materials. You need to buy only the best VAZ-2110 ball joints.
Which ball joint to choose for Lada Priora
Today, a fairly large selection of balls is offered, from Chinese to conveyor and even reinforced ones. The choice is up to the buyer.
- BZAK BA08-2904192-01 from 250 rub. piece
- TRACK BJ70-107, 2108-2904192 from 300 RUR
- LADA IMAGE 2110-2904192-82 from 400 RUR
- AMT-Miass AM08-2904192 from 220 rub.
- BELMAG BM10-2904192-01 reinforced with fastening (conveyor) from 500 rub.
- VAZINTERSERVICE /OAT/ VIS08-2904185-10 sunset – from 350 rub.
- ASOMI, Tolyatti A110.2904.193 Comfort PRO from 500 rub.
The most expensive conveyor ball joints are from the BELMAG company; also in terms of price, the ball joints from ASOMI, which also produces front and rear struts, as well as support bearings, stand out.
Detailed manual for replacing ball joints
We will need 17 and 19 mm wrenches, preferably socket wrenches so as not to tear off the nuts, WD40, a ball joint remover, and a hammer.
So, jack up the car, put stops under the rear wheels and remove the wheel.
Next, using WD40, we spray the bolts securing the ball joint to the lever and the ball joint nut itself so that there is no difficulty in unscrewing them. Let’s wait a few minutes until they “dissolve” and get to work.
Using a 19mm wrench, unscrew the ball joint nut and a 17mm wrench to unscrew the nuts securing the ball joint to the lever.
Now we need a ball joint remover, it can be of several types, the principle is the same - remove the ball joint from the lever.
We take a new ball joint and, for our own peace of mind, check the grease under the boot. Carefully remove it and check - if there is no grease, fill the boot with Litol or similar grease. Be careful not to damage the boot.
Now install the new ball in the reverse order. You will have to tinker with the installation when screwing the ball to the lever.
We advise you not to install cheap balls of questionable quality, as they will affect the performance of the suspension and handling in general. A good option for ball conveyor BELMAG or TRACK.
Replacing a ball joint on a VAZ 2109 car.
This process is carried out not only when the ball joint is worn out, but also when there is a breakthrough in the boot. This cannot be ignored, as it poses a danger to passengers and the driver.
It is most advisable to use a lift or inspection hole for work. If you don't have one, you can use a jack. What you need to do:
- Remove the wheel on which the diagnostics revealed problems with the wheel brake.
- All structural parts are cleaned of dirt. Plus, the fastening elements are treated with a special rust removing compound. This will make installation and dismantling easier.
- Using a 19mm wrench, unscrew the nut that secures the ball joint to the suspension arm.
- Using a hammer and a pry bar, the SHO pin is pressed out of the suspension arm. To do this, the nut is not completely unscrewed, but several strong targeted blows are applied to the lever.
- Using a pry bar, the suspension arm is moved down to free the SHO pin from the lever.
- The bolts connecting the ball joint and the steering knuckle are removed using a 17mm wrench.
- The damaged ball joint is removed.
- The condition of not only the support, but also the boot is checked. Sometimes replacing the latter may be enough to fix problems. If obvious damage is detected, the ball joint is removed, a new one is installed, and the unit is put back together.
- It is necessary to pay attention to the condition of the finger. It should contain a spacer sleeve. If it is missing, it should be returned to its place, otherwise the updated SHO will not work correctly.
- The rubber boot is lubricated with grease before the reassembly process. Plus, grease will need to be applied to the installation site of the boot in the ball joint.
Question answer
Is it possible to restore the support?
If the performance of the ball was restored using the above method, it is worth considering that it will not be possible to extend it for a long time. In cases where there is a high degree of wear, adding lubricant will not change the situation. A replacement part will be required.
The condition of most domestic roads means that car suspensions cannot last for a long time, as a result of which regular and frequent replacement of its elements is required. As for the ball joint, removing it without a puller is not a big problem. This process requires a minimal set of auxiliary tools. At the same time, the absence of a professional tool will not have a negative impact on the parts of the mechanism.
How to check a ball joint?
The ball is very easy to check. It is enough to get to the part and check it for play. At the slightest play it should be replaced. You can even try to shake the ball with your hand, and then everything will become clear. It is best to replace in pairs, since taking everything apart and then reassembling it twice in a short period of time is a dubious pleasure.
Signs of a faulty mechanism are as follows:
Generally speaking, the car will immediately signal if the ball joint needs to be replaced urgently. In some cases, work has to be done every 30 thousand kilometers; much depends on the quality of the road surface.
How to choose spare parts?
You can use parts designed for installation on all front-wheel drive models of the ninth and tenth VAZ families. Here are the requirements for parts and their features:
- On new supports the pin should be made of hardened steel. The color of the metal is gray, scale may be present. Be sure to make sure there is no paint on it. The thread of these products is rolled.
- The body is made of two halves. Please note that the welding seam is visible only on one side.
- When scrolling, you need to apply a lot of effort. Make sure there is no snacking. This is the first sign that the part is of low quality. It is impossible to manually scroll on new products, so you need to use a crank. This indicates that the product is of good quality.
- It is best if the ball joint comes with a boot and a nut. If it turns out that these components are missing, it is better to choose another option.
- There are a lot of manufacturers of these elements, but, as a rule, there are three on sale - “Trek”, “BelMag” and “Trial-Lux”.
Which ball joints are better for the VAZ-2110 is up to you to decide. But if you have to choose from the above trinity, then they are approximately the same in quality.
Sources
- https://RetroTruck.ru/obsluzhivanie-avto/zamena-sharovoj-na-priore-svoimi-rukami.html
- https://gil-service.ru/ts/sharovyj-na-prioru.html
- https://o-ladagranta.ru/kak-snjat-sharovuju-na-priore-bez-semnika/
- https://zapchasti.expert/proizvoditeli/sharovaya-opora-na-lada-priora.html
- https://remontautomobilya.ru/proverka-i-zamena-sharovoj-opory-lada-priora.html
- https://prometey96.ru/tyuning/sharovaya-opora-priora.html
BZAK and FENOX
The design feature of the element produced by BZAK is a forged all-metal body. Due to this, the hinge has high strength; it is almost impossible to tear the finger out of the holder. Ball joints have very high resistance to loads acting in the vertical plane. The VAZ-2110 ball joint race is very strong and does not collapse during long-term use.
FENOX produces various models of ball joints for front-wheel drive VAZ cars - rolled, stamped, solid forged. The body is maximally reinforced, so it can withstand heavy loads when moving. But, according to reviews from car owners, this manufacturer does not shine with quality, despite the fact that the passport indicates such good characteristics.
Most modern cars use ball joints to turn the wheel. Previously, in some models, in particular domestic ones, the task of maintaining the entire suspension was also assigned. Due to the high degree of wear and tear during such operation, leading manufacturers abandoned such designs. Ball joints, even without additional tasks, are subject to very serious strength requirements. In addition, they must have a high coefficient of friction of the liner. This characteristic allows you to significantly increase the service life. The liner must be made of high-strength material and, thanks to the nuances of its design, retain lubricant. Another important element is plain bearings.
The quality of the support depends on its design, manufacturing technology and materials used. The hinges, serially installed on the AvtoVAZ assembly line, most fully meet the technical conditions and GOSTs. Ball joints come in two types: filled and with sintered metal bearings. The first ones work mainly on compression and are installed as upper ones on front-wheel drive cars, as well as on classic models - from “kopek” to “seven”. The second ones work in tension and are used as lower ones. The design also differs accordingly. A characteristic external feature of the lower support is the presence of an oval hole for the finger. This solution (if the required swing angle is provided) allows you to increase the contact area of the bearing with the housing.