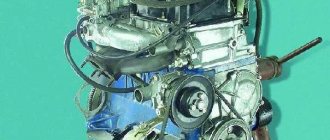
Engine repair is considered the most difficult thing in a car, because no other part contains such a huge number of interconnected elements. On the one hand, this is very convenient, because if one of them breaks down, there is no need to change the entire assembly; it is enough to simply replace the failed part; on the other hand, the more component elements, the more complex the device and the more difficult it is for those who I'm not very experienced in car repairs. However, with a strong desire, anything is possible, especially if your zeal is supported by theoretical knowledge, for example, in determining the tightening torque of the main and connecting rod bearings. If for now this phrase is a set of incomprehensible words for you, be sure to read this article before getting into the engine.
Description of the cylinder head of the VAZ 2106
The cylinder head (cylinder head) is an integral part of any internal combustion power unit. This mechanism controls the supply of the combustible mixture to the cylinders and the removal of exhaust gases from them. The unit has inherent faults, the detection and elimination of which are worth dwelling on in more detail.
Purpose and principle of operation
The main purpose of the cylinder head is to ensure the tightness of the cylinder block, that is, to create sufficient obstacles for gases to escape outside. In addition, the block head solves a whole range of tasks that ensure the functioning of the engine:
- forms closed combustion chambers;
- participates in the work of the State Russian Museum;
- is used in the engine lubrication and cooling system. For this purpose, the head has corresponding channels;
- participates in the operation of the ignition system, since spark plugs are located in the cylinder head.
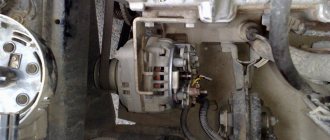
The cylinder head is located on top of the engine and is a cover that ensures the tightness and rigidity of the engine
For all of the above systems, the cylinder head is a housing element that ensures the rigidity and integrity of the power unit structure. If a malfunction occurs with the cylinder head, normal engine operation is disrupted. Depending on the nature of the breakdown, there may be problems with both the ignition, lubrication and cooling systems, which require prompt repair.
The principle of operation of the cylinder head comes down to the following steps:
- The camshaft is driven from the engine crankshaft through a timing chain and sprocket.
- The camshaft cams act on the rockers at the right moment, opening and closing the cylinder head valves at the right moment, filling the cylinders with the working mixture through the intake manifold and releasing exhaust gases through the exhaust.
- The valves operate in a certain sequence, depending on the position of the piston (intake, compression, stroke, exhaust).
- The coordinated operation of the chain drive is ensured by a tension device and a damper.
What does it consist of?
The cylinder head of the “six” is 8-valve and consists of the following structural parts:
- head gasket;
- timing mechanism;
- cylinder head housing;
- chain drive;
- the combustion chamber;
- tension device;
- spark plug holes;
- planes for mounting intake and exhaust manifolds.
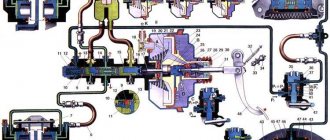
Design of the VAZ 2106 cylinder head: 1 - spring plate; 2 — guide sleeve; 3 - valve; 4 — internal spring; 5 - outer spring; 6 — lever spring; 7 — adjusting bolt; 8 — valve drive lever; 9 - camshaft; 10 — oil filler cap; 11 — cylinder head cover; 12 — spark plug; 13 - cylinder head
The node in question is common to four cylinders. Cast iron seats and valve bushings are installed in the body. The working edges of the seats are processed after they are installed in the body to ensure a clear fit of the valves. The holes in the bushings are also processed after pressing into the cylinder head. This is necessary so that the diameter of the holes in relation to the working planes of the seats is accurate. The bushings have spiral grooves to lubricate the valve stem. On top of the bushings are valve seals, which are made of special rubber and a steel ring. The collars fit tightly onto the valve stem and prevent lubricant from entering the combustion chamber through the gaps between the bushing wall and the valve stem. Each valve is equipped with two cylindrical springs, which are supported by special washers. On top of the springs there is a plate that holds two crackers on the valve stem, shaped like a truncated cone.
The valve mechanism ensures the intake of the working mixture into the cylinders and the exhaust gases
Cylinder head gasket
The head gasket ensures a tight fit of the cylinder head to the cylinder block. The material used to make the seal is reinforced asbestos, which is able to withstand the high temperatures that arise during operation of the power unit. In addition, reinforced asbestos can withstand high pressure under different engine loads.
The cylinder head gasket ensures a tight connection between the cylinder block and the head
Timing mechanism
The gas distribution device consists of a valve mechanism and a chain drive. The first of them is responsible for the operation of the valves and consists of direct intake and exhaust elements, springs, levers, seals, bushings and a camshaft. The design of the second includes a double-row chain, a sprocket, a damper, a tension device and a shoe.
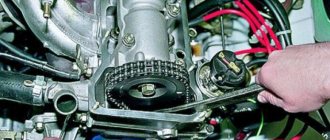
Diagram of the camshaft drive mechanism and auxiliary units: 1 - camshaft sprocket; 2 - chain; 3 — chain damper; 4 — oil pump drive shaft sprocket; 5 — crankshaft sprocket; 6 — limit finger; 7 — tensioner shoe; 8 — chain tensioner
Cylinder head housing
The cylinder head is made of aluminum alloys and is fixed to the cylinder block through a gasket using ten bolts, which are tightened in a certain order and with a given force. The cylinder head has spark plug wells on the left side into which the spark plugs are screwed. On the right side of the body there are channels and planes, to which the intake and exhaust system manifolds are attached through a seal. The head is closed on top with a valve cover, which prevents oil from leaking out of the engine. The tensioner and timing gear drive are mounted at the front.
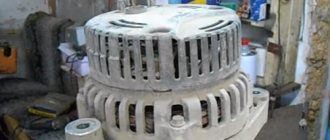
The cylinder head housing is made of aluminum alloys
Why do you need to observe the tightening torque?
Installation of new bolts is carried out in compliance with the diagram and tightening torque. It is important to follow the instructions for the following reasons:
- an incorrect sequence will lead to deformation of the middle part of the block;
- Excessive force causes cracks in the cylinder head metal;
- Insufficient tightening may result in the need for engine overhaul.
In order to do this job accurately and correctly, you will need to have a torque wrench on hand. This tool will allow you to maintain the tightening torque. It cannot be replaced by a regular gas wrench, since you cannot use it to determine how many kilograms of force were applied to the screw. If you often repair your car yourself, this special tool is best to buy. For one-time use, it is better to rent it at the nearest service station.
Cylinder head repair
If problems arise with the cylinder head of the sixth model Zhiguli that require removal of the unit from the car, then repair work can be carried out in a garage, having prepared the appropriate tools and components.
Removing the head
To remove the cylinder head you will need the following tool:
- knob with extension;
- a set of keys;
- ratchet handles;
- heads for 13 and 19.
The sequence of actions for dismantling the unit is as follows:
- Drain the coolant from the cooling system.
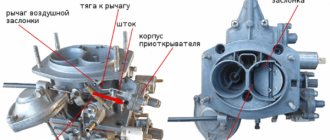
- We remove the air filter with housing, carburetor, valve cover, disconnect the intake and exhaust manifolds, moving the latter to the side along with the “pants”.
- We unscrew the fastening and remove the sprocket from the camshaft, and then the camshaft itself from the cylinder head.
Disassembling the block head
Complete disassembly of the cylinder head is required for repairs such as replacing valves, guides or valve seats.
If the valve seals have failed, then there is no need to remove the cylinder head - the lip seals can be replaced by only removing the camshaft and drying out the valves.
Tools you will need:
- key to 17 and 21;
- desiccant;
- oil seal remover;
- tweezers;
- tin solder rod d = 8 mm;
- hammer;
- long-nose pliers or magnetic handle.
We disassemble the node in this order:
- We dismantle the rockers along with the locking springs.
Valve lapping
When replacing valves or seats, it is necessary to grind the elements together to ensure tightness. To work you will need:
- diamond paste;
- electric drill with speed control.
We grind the valves as follows:
- Apply rubbing paste to the valve plate.
Replacing saddles
To replace the seat, it will need to be removed from the cylinder head. Since in garage conditions there is no special equipment for these purposes, welding or improvised tools are used for repairs. To dismantle the seat, the old valve is welded to it and then knocked out with a hammer. The new part is installed in the following sequence:
- We heat the cylinder head to 100˚C, and cool the seats in the freezer for two days.
- Use a suitable tool to drive the parts into the head body.
Video: replacing the cylinder head valve seat
Replacing bushings
Valve guides are replaced using the following set of tools:
- hammer;
- mandrel for knocking out and pressing in bushings;
- development at 8.025 mm;
- open-end wrench for reamer.
The bushing replacement process consists of the following steps:
- We knock out the old bushing using a hammer and a suitable adapter.
Video: replacing valve guides
Malfunctions when removal and installation of the cylinder head are required
There are a number of malfunctions due to which the cylinder head of the VAZ “six” has to be removed from the car for further diagnostics or repairs. Let's look at them in more detail.
Gasket burnt out
The following signs indicate that the cylinder head gasket has failed (burnt out or was punctured):
- the appearance of leaks or gas breakthrough at the junction between the engine block and the head. With this phenomenon, extraneous noise appears in the operation of the power plant. If the outer shell of the seal ruptures, traces of lubricant or coolant may appear;
- formation of an emulsion in motor oil. This happens when coolant gets into the oil through the gasket or when a crack forms in the BC;
Video: Damage to the cylinder head gasket
Damage to the cylinder head mating plane
The following reasons can lead to the formation of defects in the mating surface of the block head:
- long-term operation of the power unit;
- motor overheating;
- poor quality coolant.
Defects of this kind are eliminated by processing the plane, with preliminary dismantling of the head.
Cracks in the block head
The main reasons that lead to the appearance of cracks in the cylinder head are overheating of the engine, as well as improper tightening of the mounting bolts during installation. Depending on the nature of the damage, the head can be repaired using argon welding. In case of serious defects, the cylinder head will have to be replaced.
Wear of guide bushings
With a high mileage of the engine or the use of low-quality engine oil, the valve guides wear out, which leads to a violation of the tightness between the seat and the valve plate. The main sign of such a malfunction is increased oil consumption, as well as the appearance of bluish smoke from the exhaust pipe. The problem is resolved by replacing the guide bushings.
Valve seat wear
Valve seats can wear out for several reasons:
- use of low quality fuel;
- long engine mileage;
- Incorrect ignition setting.
The malfunction can be solved by straightening or replacing the saddles. In addition, the ignition system must be checked.
Broken spark plug
Quite rarely, but it happens that as a result of over-tightening the spark plug, a part breaks off on the thread in the spark plug hole. To remove the remains of the cylinder head spark plug element, you need to dismantle the threaded part and unscrew it using available tools.
CPG malfunctions
If there is a problem with the cylinder-piston group of the engine, the cylinder head also has to be removed. The most common failures of the CPG include:
- increased wear of cylinders, rings and pistons;
- piston damage;
- occurrence of rings.
If the cylinders are worn excessively, the engine is completely disassembled to replace the piston group, as well as to bore the internal cavity of the cylinders on a machine. As for the damage to the pistons themselves, although they rarely burn out. All this leads to the need to dismantle the cylinder head and replace faulty parts. If the rings are stuck, normal operation of the cylinder and the engine as a whole becomes impossible.
Ring sticking - rings are stuck in the piston grooves due to the accumulation of combustion products in them. As a result, compression and power are reduced, oil consumption increases and uneven cylinder wear occurs.
When Bolts Need Replacement
Before you begin tightening the bolts, you should inspect them. A visual assessment of the condition is not enough; it is necessary to check the fastener parameters. He must:
Some mechanics recommend regularly screwing new bolts into the cylinder head. Others adhere to the rule that replacement should only be carried out if the fastener is screwed into the socket tightly. It is best not to skimp on bolts, since using a component that is obviously stretched increases the risk of its metal breaking. The consequences of this are almost unpredictable; in most cases, it will be possible to restore the operation of the power plant only with the help of specialists.
Self tightening
As mentioned earlier, tightening the cylinder head bolts is not that difficult. However, so that this process does not turn out to be difficult for drivers, it is necessary to take into account the importance of this procedure and carry it out strictly according to the scheme, which can be found on the Internet resource.
To get started, you will need to prepare only one, but very important tool (a torque wrench), without which it will simply not be possible to tighten the bolts. Of course, such a tool cannot be in the arsenal of every car owner, so you will have to buy it or rent it at a service station. The bolts are tightened in the following sequence:
- First of all, you need to inspect the external condition of the fasteners. If their condition does not satisfy the car owner, then experts do not recommend tightening them, but using a new set of pins, which can be purchased both on the automotive market and in a specialized store. You need to choose bolts from a reliable manufacturer; when purchasing, be sure to pay attention to the quality of the thread. Before starting the procedure, the threads of the pins are lubricated with automotive lubricant, regardless of which element will be used: new or used.
- The tensioning process itself for the VAZ-2106 is similar to other VAZ models, but if you are considering a Niva, then experts recommend carrying out such work in two stages, after first familiarizing yourself with the diagram, which can be downloaded on the Internet. The diagram shows the exact sequence of tightening the bolts; all pins have their own individual number, so that car owners independently and strictly in order tighten the required elements.
- Using a torque wrench, you need to tighten all the bolts strictly according to the diagram. When performing this action, you should monitor the pulling torque, the indicator of which can vary from 3.4 to 4.0 kgf*m:
- The first to be tightened are the two elements located in the center of the head;
- then tighten the two upper bolts and two lower ones, which are located on the side of the middle clamp;
- The left outer bolts are tightened, and then the two right ones. You should not tighten only the element that is marked No. 11.
- After the first stage of tightening, according to the diagram, is completed, experts recommend repeating the entire operation again in exactly the same sequence. Making sure that when tightening the bolts, the tightening torque does not exceed 11.5 kgf*m.
- At the end of the tensioning process, you need to tighten the pin at No. 11, using the same torque wrench, making sure that the tension of this element does not exceed 4.0 kgf*m.
At this point the tightening process is considered complete. It’s quite simple to do this work yourself, but if during tightening some element is overtightened, a crack may form on the surface of the cylinder head, which, in turn, will cause a new breakdown, so the entire repair process will have to be repeated again. To avoid such a situation, you need to monitor the moment and perform the work strictly according to the scheme. And the video tutorial, which you can watch at a time convenient for you, will help you find the answer to any question on this topic and will further simplify the process of tightening the VAZ-2106 cylinder head pins.
Each car owner who is faced with repairing the cylinder head will have to put this element in place after completing the task. This procedure involves tightening the cylinder head bolts. If this is not done, the seal of the unit may be compromised. Below we will look at what torque of the VAZ 2106 block head is most important and what to consider when installing the device.
When is it necessary to puff?
How to tighten correctly?
Tools and materials
Comments and Reviews
Recommended tightening torque
Before you begin tightening, several conditions must be met:
- Clean the working surface of the hole and the threaded connection of the screw as much as possible. Before this, you will need to remove contaminants from the intake manifold, block and the cylinder itself. Be careful not to damage the surface of the parts, especially if you use a wire brush. In most cases, it is better to use a simple rag for cleaning.
- Lubricating the screw holes is mandatory. Before screwing the bolts into the blind sockets, you need to take a small amount of lubricant, otherwise you will not be able to screw them in all the way.
- If you are installing new bolts, lubricate the threads with a small amount of clean engine oil. For old fasteners, simply clean it.
You need to tighten the cylinder head fasteners of a VAZ-2106 car according to the following diagram:
- central (1 and 2);
- two at the top and bottom, located on each side of the center (3, 4, 5, 6);
- extreme right (7, 8);
- extreme left (9, 10);
- 11 screw (only on the third circle).
You need to work in accordance with the diagram using a torque wrench. That is why it is so important to observe the tightening torque, as in the table:
| Circle number | Required tightening torque, kgf/m |
| 1 | 3,5-4,1 |
| 2 | 10,5-11,5 |
| 3 | only 11 screws are tightened with a torque of 3.5-4 |
It is necessary to do the work in three steps to avoid deformation of the cylinder block. On the first lap you fix the cylinder head cover, and on the second you finally tighten it. On the third circle you will not need to touch the main fasteners, but only deal with the eleventh, located outside the main group.
In order for the VAZ-2106, like any other brand of car, to function perfectly and not let the driver down on the road, you need to regularly inspect the technical condition of the car in order to be able to correct any breakdowns in a timely manner.
The operation of each automotive component must be carefully configured, including the operation of the cylinder head. Quite often, the head bolts become loose after using the machine for a long time, so they need to be tightened periodically. Since this process is not so complicated, you can handle it yourself if you know the procedure and pattern for tightening the cylinder head for a VAZ-2106 car. How to tighten bolts according to the rules and how to cope with this task on your own? Let's try to analyze it in this article.
How to tighten correctly?
You can tighten the bolts with the help of specialists or yourself. If you have never encountered the need to perform this task before, then below we will look at how tightly you should tighten the screws and in what sequence you should do it.
Be sure to strictly observe the tightening torque, since if the head bolts are overtightened, this will lead to cracks and damage to the cylinder head. If this happens, the car owner will have to carry out major repairs to the unit. The working surface of the hole, as well as the threaded connection of the screw, must be as clean as possible. A wire brush can be used to clean the cylinders. If during the task you find “blind” holes for the head screws, use a cleaning lubricant carefully. If the volume of the substance is greater than required, it will be difficult to install the pin all the way.
Before tightening, it is necessary to visually diagnose the condition of the bolts. If the fastening elements are damaged or worn out, their quality is generally low, then it is better not to tighten them with these screws; it is recommended to replace them with new ones.
It is recommended to lubricate the threads of new bolts with a small amount of engine oil or another type of lubricant.
Tools and materials
To tighten the cylinder head, prepare only one tool - a torque wrench, which will allow you to determine the tightening force of the screws. It is best to purchase a key in a specialized store or rent it at a service station, since this tool can only be used for tightening and tightening. Using a regular wrench will not allow you to determine how many kilograms the tightening force is.
When purchasing bolts, it is recommended to give preference to branded parts. Be sure to look at the threaded part - it must be intact, without damage or defects; if any, the fasteners are replaced.
Channel “Engine Repair! And interesting!” published a video that describes all the nuances of the stretching process.
Algorithm of actions
The order and strength required when pulling the cylinder head bolts is as follows:
- In accordance with the diagram below, tighten all bolts using a torque wrench. The tightening torque on the first round of tightening the fasteners will be about 3.5 - 4.1 kgf/m. First, the bolts are tightened, which are located in the center of the block head - top and bottom. After this, the two upper and lower fasteners are screwed in, installed on the side of the screws located in the center. Then the two outer bolts are tightened. Please note that you need to tighten the left pins first, and then the right ones. Screw number 11, located at the bottom left, does not need to be touched.
- This is the first stretch circle. At the second stage, the bolts are tightened in a similar order. Only the force with which the fastening elements are tensioned by the tool will be 10.5 - 11.5 kgf/m.
- At the third stage, the bolt is tensioned, which is marked with number 11 in the diagram. The tightening force of this screw should be 3.5 - 4.0 kgf/m.
What signs will indicate that the cylinder head bolts need tightening?
Not all VAZ-2106 car owners, unfortunately, pay due attention to this process, believing that this point is not so important. Of course, this judgment cannot be correct, because if tightening is delayed for a long time, an important automotive component called the cylinder head will soon fail. And in order to fix problems in this unit, you will not only have to spend a lot more free time, but also allocate a lot of financial savings for repairs.
As mentioned earlier, car owners can solve this problem without the help of service station workers if they know what the procedure is for performing this procedure and use a special scheme.
Drivers will be able to understand that they need to tighten the bolts on the cylinder head by the following signs:
- If a car oil leak is noticed at the junction of the block and the head. This sign of malfunction can appear both from loosening of the clamps and from worn-out sealing gasket. Therefore, during repairs, you need to pay attention to the condition of the bolts and sealing gasket.
- Troubleshooting and replacing a failed element will only be possible after disassembling the engine. And when tightening the bolts, you need to take into account the significance of this moment and be sure to follow the rules for performing the work in order to avoid numerous problems that may threaten the passenger car in the future.
- According to drivers with considerable experience, car owners should tighten the bolts after 3 thousand miles, explaining this by the fact that the clamps are constantly weakening, since the VAZ-2106 engine is constantly functioning.
Having disassembled the head yourself and seen an oily stain at the junction of the block, the fasteners need to be tightened, and as quickly as possible, in order to prevent a more serious breakdown.
We do everything with our own hands
Sometimes inexperienced motorists perform actions that require certain knowledge and skills. And very often such repair work turns out badly for car owners. We strongly advise that you only tighten the cylinder block pins if you have already performed this procedure. Let's consider the process for a VAZ 2106 car. But keep in mind that each individual engine has its own specific operation.
What to prepare?
In general, you won't need anything other than a torque wrench. When tightening, this special key will be simply necessary, since only with the help of this tool can the torque be determined. You are unlikely to find this key in home tools, so you should purchase it at an auto store or borrow it from a service station. Of course, it’s unlikely that anyone will give it to you for free, since its cost varies from 1,200 rubles (350 hryvnia) and more.
Special torque tool
It is also worth noting that very often “garage specialists” recommend using a regular wrench. Like, “Well, what’s going to happen with this, after all, Petrovich, a neighbor in the garage, actually tightened the bolts on his “cop” by eye, without any of these modern gadgets.” To avoid negative consequences, it is better not to listen to such people, since not everyone understands the importance of this procedure.
Step by Step Actions
First, perform a visual inspection of the pins. If you see that the quality of the bolts is unsatisfactory, then, according to the recommendations of experienced specialists, it is better to refrain from tightening them. Also pay attention to the quality of the thread itself. Before tensioning, it should be lubricated with engine fluid or other lubricant. In addition, if the screws have already been used, then in any case they need to be replaced with new ones. These, again, are recommendations from experienced automotive technicians.
In general, the procedure for tensioning the bolts is similar to other VAZ models, but in the case of 2106 it occurs in two stages. As for the diagram, you can see it below.
- Take a torque wrench and tighten all the pins in the order shown in the diagram. In this case, the pulling torque should be 3.5 - 4.1 kgf*m. First of all, you need to tighten the two screws located in the middle. Then, in order to maintain the correct order, two upper and lower pins are tightened, located on each side of the middle elements. Next, the two outer pins are tightened - first the left ones, then the right ones. In this case, the element numbered eleven does not need to be touched.
- After these steps are completed, you need to tighten the pins again, in the same sequence. Please note that now the tightening torque with a torque wrench should be 10.5 - 11.5 kgf*m.
- After these steps, you only have to tighten screw number 11. Do this using a torque wrench, and the torque should be 3.5 - 4.0 kgf*m.
Actually, at this point the stretching procedure can be considered complete. Be careful when carrying out this work, since incorrect actions can lead to negative consequences in the work. 2106 Once again, it is necessary to remind you to respect the timing. If elements are overtightened, cracks may appear on the cylinder head. This, in turn, will cause the need to re-dismantle the cylinder head and correct the breakdown.
Installation of cylinder head
When the cylinder head repair is completed or the gasket is replaced, the mechanism must be reinstalled. The cylinder head is mounted using the following tools:
- heads at 13, 17, 19;
- knob with extension;
- torque wrench.
The installation procedure is as follows:
- We wipe the surface of the cylinder head and block with a clean rag.
- Place a new gasket on the cylinder block.