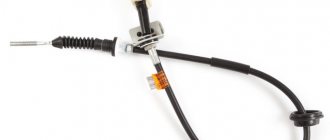
Automatic tension cable
The design of the clutch cable with automatic tension differs from the usual one only in the tip attached to the pedal. Otherwise, the entire structure remains unchanged. Installation of a tip with auto tension first appeared in 2007 on the Lada Priora. Subsequently, such a cable was borrowed by Niva, Grant, Kalina and Vesta cars.
The principle of operation of such a tip is based on a ratcheting mechanism; over time, when the cable is stretched, the spring of the tip automatically jumps over the “tooth” on the ratchet mechanism, thereby producing tension.
This design principle allows the car owner not to resort to adjustments for a very long time.
The cost of the cable in stores starts from 400 rubles and above, depending on the manufacturer and store.
Flaws
The main disadvantage of the cable is the increased noise level. According to reviews from owners of cars with an automatic clutch tension adjustment mechanism, the cable can make cracking and grinding noises when pressing the pedal.
Correctly adjusting the cable or replacing it with a new one will help get rid of this symptom.
Symptoms of a problem
The main symptoms of a malfunction are:
- Hum, whistle and other unnecessary sounds when pressing or releasing the pedal;
- “Push” even if the working moment was caught on time.
If there is a suspicion that the clutch is faulty, then diagnostics can be done using traditional methods, without disassembling the engine compartment internals.
Slip check
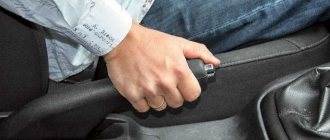
We fix the car with the handbrake, engage third or fourth gear, slowly (slower than usual!) depress the leftmost pedal and press the gas at operating torque. If everything is fine with the handbrake, then the test will be true. The car has stalled, which means it’s time to change the pressure plate.
Clutch cable adjustment
Before making adjustments, you need to prepare the car. For convenience, it is recommended to remove the air filter housing.
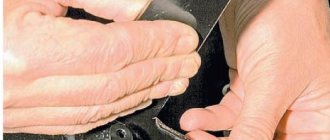
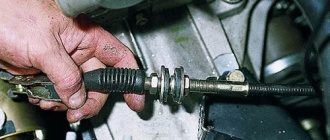
- Pull out the clutch cable with force and hold it in this position.
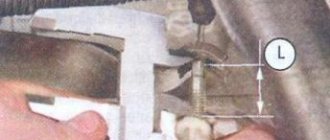
- We measure the distance with a caliper or a ruler between the plastic nut of the clutch guide and the release bearing drive fork. The distance should be exactly 27 mm.
- When taking measurements, there is very little space in the engine compartment and it is quite difficult to measure accurately, so it is recommended to prepare a 27 mm stick in advance and measure using it.
- Adjustment is carried out by tightening or unscrewing the plastic nut of the leash, depending on the distance between the parts.
- After completing the work, you must press the clutch pedal several times. This is necessary for the auto-adjustment mechanism to select the correct cable tension.
When adjusted correctly, the leash will fit snugly against the fork, and the clutch pedal will be 20 cm from the floor or at the level of the brake pedal
Source
Step-by-step instruction
Disassembled clutch pedal
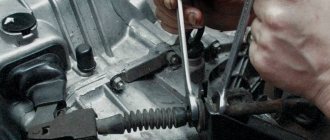
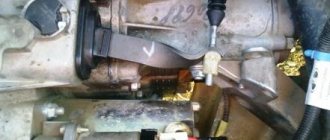
To change the clutch cable, you will need a set of screwdrivers and wrenches. Initially, the air filter, which is located in the engine compartment, is removed. The clutch cable is pulled forward. Then it is removed with a leash from the groove of the lever.
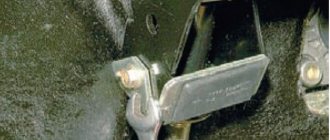
Using a “17” wrench, unscrew the nut securing the tip of the shell of this unit to the bracket several turns. You will need to hold it with a hex wrench. The tip is removed from the bracket. The last element is located in the Priora's interior.
The nut that secures the bracket is unscrewed with an “8” key. Since replacing the cable on a Priora is carried out in difficult conditions, to facilitate the work, it is recommended to firmly pull the clutch pedal. Using a screwdriver, pry up the rear edge of the last element. Then the pedal is dismantled.
The next step involves pulling the cable sealing boot out of the hole. After dismantling it, turn away and remove the leash from the tip. If the Lada Priora clutch sensor fails, it is replaced with a new device. As for installing the clutch cable, this procedure is carried out after checking the condition of the plastic bushing on the corresponding pin. If it is worn out, a new unit is installed. The pin and bushing will need to be lubricated with a special substance.
Basic principles
Replacing the clutch cable on a Priora involves subsequent adjustment of this unit. Auto mechanics know how to adjust the clutch. If the Lada is a front-wheel drive car, then the clutch pedal should be at the same level as the corresponding element of the brake system. In this case, the full stroke of the first device should fluctuate between 125-135 mm. Oscillations up to 160 mm are allowed.
Clutch adjustment involves loosening the 1st clutch cable adjusting locknut. It is located in the engine compartment on a bracket. By tightening the 2nd locknut, the pedal travel is adjusted. In this way the desired value is achieved. Upon completion of this procedure, the 1st locknut is tightened.
If complications occur, you will need to seek help from specialists. Often, adjusting the cable does not solve the existing problem. It should be noted that after installation, the gearbox is mounted manually (on weight and without various devices). When performing this work, a slight misalignment of the first shaft is allowed. But this factor can lead to breakage of the cermet bushing and loss of the driven disk.
How to adjust the cable
To prevent the bushing from breaking on the Priora, it is recommended to use a device that allows you to mount the input shaft and gearbox correctly, taking into account the splines, eliminating distortions. Clutch adjustment is carried out taking into account the characteristics of the vehicle's transmission.
Carrying out such an operation as adjusting the clutch on a Priora is of interest to many novice motorists. The fact is that this technical problem occurs quite often when operating a car. Clicking noises may be heard while driving. The cause of the sounds is a malfunction of the clutch drive. It is not difficult to get rid of this problem with your own hands.
Self-diagnosis
Most often, problems with clutch operation are associated with the pedal. The pedal is loose, squeaks, or is too tight. A tight clutch can also be mitigated by adjustment.
But the problems that occur during operation of the lever already relate to the mechanism itself: clutch disc, basket, fork. The sensor is in between and rarely shows the real problem. If the problems inside are more serious and the best solution is a trip to the service center, then we can correct the symptoms of the pedal ourselves.
Adjustment begins with inspection. We take a regular ruler and measure:
- Cable clamp and fork. There should be a standard 27 millimeters between them. Plus or minus 2 millimeters. If the distance does not match, then you need to adjust
- Pedal travel. We rest one edge of the ruler against the floor, under the pedal assembly, and with the other we measure the distance to the pedal while parked. Here she should be from 12.5 to 13.5 centimeters. Ideally, it should be flush with the brake assembly. Permissible overshoot - up to 16 centimeters (160 millimeters)
If your pedal assembly or engine compartment elements do not correspond to these numbers, then you need to make adjustments. Let's talk about it further.
Removing clutch pedal clicks
How to adjust the clutch? If the clicking becomes constant, then you can get rid of this problem in a simple way, showing a little ingenuity, and you need to use an ordinary ruler. As a rule, clicking sounds come from the clutch control unit. You need to do the following: open the hood of the car and inspect the area to the left of the battery. This is where the clutch cable goes into the fork. To inspect it you will need to pull it out of the plug.
Using a ruler, measure the distance from the base of the cable to the adjusting screw. The distance must be exactly 27 mm. The main factor in adjusting the Priora clutch is accuracy. It should be noted that this indicator should in no way increase or, conversely, decrease with a deviation of even one millimeter.
Otherwise, the pedal will continue its annoying clicking. Now you need to put the cable back. After adjusting the distance, you need to depress the clutch pedal several times. Having eliminated this problem, the softer operation of the clutch release pedal will immediately become noticeable, compared to how it worked before the adjustment.
Features of the Lada Priora clutch
Any motorist interested in how to adjust the clutch on a Priora should know about the presence of the drive cable auto-adjustment function. That is, VAZ designers took care of the owner and saved him from the need to constantly adjust the clutch drive mechanism during operation. The same ratchet-type system is installed on Kalina, but both there and on Priora it is impossible to do without periodic adjustments. This factor has been proven by practice and forum discussion pages.
How does an automatic cable tensioner work?
In the release drive on the VAZ 2170, there are no gaps as a concept, hence the name - backlash-free clutch. The ratchet mechanism serves to compensate for the working length of the cable as the driven disk linings wear out. To understand the process, it is important to accept the following data:
- During operation, the driven disk wears out and its linings become thinner - as a result, the release bearing and basket springs shift towards the gearbox.
- Accordingly, the fork at the place where the cable is attached moves towards the radiator.
- The spring located on the bushing of the adjusting mechanism is compressed at this time and tightens the clamps of the cable tip.
- As a result, the tip is pulled out of the driver, due to which the wear of the disc linings is compensated.
Causes of breakdowns and solutions to problems
Domestic automakers are not particularly reliable and durable in their parts and assemblies. It is not surprising that many car components quickly fail and are no longer suitable for further use. All this causes many car owners to have characteristic problems in the operation of the clutch mechanism on their car. However, you should not blame only car manufacturers for all the problems that arise, since many malfunctions are the result of careless operation of the car by the car owner himself.
Replacing the clutch cable and clutch sensor
Carrying out such a technical operation as replacing the clutch cable on a Priora must be performed in the following cases:
- breakage of a spare part;
- tight action in the shell.
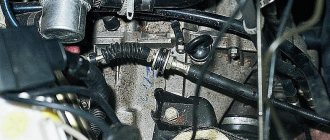
To replace the clutch cable on a Priora, you need a certain set of screwdrivers and wrenches. The first part that needs to be removed is the air intake filter located in the engine. In this case, the clutch cable must be pulled forward and then removed from the cell of the lever system.
This is done using a key number 17, making a certain number of turns of the nut, which secures the tip of the part in question directly to the bracket itself. To perform this operation, you must secure it firmly with a hexagon. The tip is removed directly from the bracket itself. This element is located in the interior of the Lada Priora. This nut securely fixes the bracket and is turned using a number 8 wrench.
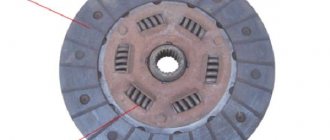
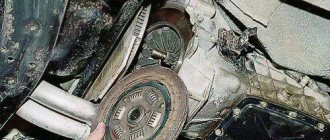
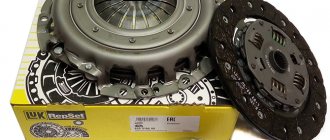
Clutch: 1 – cable tip guide; 2 – clutch release fork lever; 3 – clutch casing; 4 – bolt securing the clutch to the flywheel; 5 – pressure disk; 6 – flywheel; 7 – driven disk; 8 – gearbox input shaft; 9 – front cover of the clutch housing; 10 – clutch housing; 11 – pressure spring; 12 – clutch release bearing
Considering that replacing the cable itself on the Lada Priora is carried out in a hard-to-reach place, to make the work easier, it is recommended to apply a little effort, and you will need to push the pedal itself. Using such a simple tool as a screwdriver, you need to pry off the back side of the pedal. After this, the part is dismantled.
The next step is to pull the cable out of the hole in the sealing cover. Immediately after dismantling, you need to unscrew and remove the so-called leash from the tip. If the clutch sensor of the vehicle in question has lost its performance, it is replaced with a new unit.
As for the installation of the clutch cable itself, this action must be carried out after diagnosing the condition of the plastic bushing. If this part has exhausted its service life, it is replaced with a new one. It is recommended to treat the pin, like the bushing, with a special lubricant.
Installation of the clutch cable part on a Priora car is carried out in a hole located in the shield and passing from the passenger compartment to the engine compartment. First, the cover for the seal is installed, then the mechanism body itself is installed on the cable pin. After fixing it, it is necessary to secure the cable sheath.
The tip of the wiring is rotated in a certain way, so that its end is at the level of the leash, the latter must be installed in its place. The next step is to regulate the clutch drive itself on the Priora. This operation helps to pull the cable forward by its tip until it stops completely. In this arrangement, it is possible to measure the distance from the lever itself to the end. This distance should be 27 mm.
The required dimensions can be achieved by rotating the wire. Its adjustment allows you to remove the load by pressing tightly against the lever, and at the same time, the gaps are removed. After this, you need to press the clutch pedal three times. This action allows the automatic distance control mechanism to begin to operate. You also need to take into account that the full pedal travel should not exceed 146 mm.
It wouldn't hurt to know
What do most owners of new Lada Priora do? Naturally, they treat the body with Movil or something similar against corrosion; they don’t have any more problems at the initial level. However, there were complaints about squeaking when pressing the clutch pedal; sometimes it was present when the engine was warm, sometimes only when it was cold - the essence is that there is a problem.
Of course, everyone immediately starts reading the “primer book” on how to correctly adjust the clutch on their Priora, which sometimes helps, but the fact of the matter is that sometimes. After this, owners can try several more methods, after which the squeak may disappear:
- Replace the drive cable, some drivers praise the “tenth”.
- Check the presence of a spring in the automatic tension mechanism; sometimes the effect can be achieved after replacing the standard part with a spring with greater elasticity.
- A certain percentage of car enthusiasts get rid of the crackling noise by lubricating the fork and the plastic cable nut.
- Lubricate the installation site of the plastic bushing on the pedal bracket with lithol.
- Remove the boot from the fork lever and lubricate the gearbox input shaft with graphite grease from a can.
It is worth considering another effective method, shown in the video, which is used by experienced car enthusiasts. Its essence is as follows:
- Disconnect the mass air flow sensor and remove the air filter.
- Remove the clutch release rod plug.
- Release the cable from the clutch fork.
- Pour 30-40 ml of gear oil from a syringe.
- Move the fork back and forth 10-15 times.
- Reinstall the cable, plugs and filter.
Using the example of the second part of the article, it becomes clear that adjusting the clutch drive does not always bring the desired effect in the fight for acoustic comfort. Although, from a technical point of view, the procedure is necessary, since it ensures productive operation of the car.
Source
How to adjust the Priora clutch: removing clicks
To adjust the clutch, when clicks are constantly heard while driving, you need to use a seemingly simple object - an ordinary ruler. Mostly the clicks come from the clutch control unit. To prevent this you need to do the following:
- open the car hood;
- inspect the area to the left of the battery;
- to inspect it, you need to pull it out of the plug;
- using a regular ruler, you need to measure the distance between the base and the adjustable screw;
- the distance must be 27 mm, if more or less, the clicking will continue.
After adjusting the clutch, you need to depress the pedal several times.
Having solved this problem, a softer operation of the drive pedal will be noticeable, unless, of course, it is sagging. Then you will have to adjust the height of the device.
What to pay attention to
There are certain signs that the clutch on the Lada Grant has failed and action needs to be taken. It is worth paying attention that if the car has just been purchased, the pedal will be pressed quite easily. If this requires great effort, then this is the first evidence that the clutch needs to be adjusted or replaced.
It is also worth paying attention to the appearance of extraneous squeaks at the moment when the driver presses the pedal. In addition, it should not twitch when the car owner does not touch it.
What could be the reasons for the problems?
Domestic manufacturers are not known for their high-quality and durable automotive equipment. Car parts, as a rule, have to be replaced after 1-2 years of driving. Many car components often fail and cannot be repaired. You just have to get new ones. However, you shouldn’t blame everything on the creators, since improper operation and poor care often lead to the machine functioning poorly. Quite often, the problem of insufficient clutch pedal travel occurs. This problem usually occurs due to damage to spare parts. In order to avoid such a problem, it is necessary to regularly carry out preventive work.
When to replace the cable
- when a part broke;
- when tight action occurs in the shell.
To replace the cable, you must have the appropriate tools. A large set of screwdrivers and wrenches will come in handy. If they are not in stock, you can buy them at any spare parts and tools store. The procedure is performed like this:
- First you need to remove the air intake filter located in the engine.
- At the same time, the clutch cable is pulled forward and then the leash is removed from the cell of the lever system.
- Key 17 performs this procedure.
- The tip is removed from the bracket.
- The nut that secures it is carefully unscrewed.
- Then remove the sealing covers.
- After this, the cable is removed.
To install a new cable, you need to check the condition of the plastic sleeve.
Only masters can perform this procedure efficiently, so it is better to contact technical service for installation. In general, it is better to carry out diagnostics constantly in order to avoid unpleasant situations. Some inexperienced car owners believe that the parts on new and old VAZ cars are very different. If the model is new, then it does not need to be diagnosed and checked. This is not true at all. In general, almost all elements are similar. The only thing is that the clutch cable is slightly different. In new cars it is equipped with an automatic tensioning device. Thanks to it, you can adjust the clutch parts with your own hands. However, this does not mean that the car does not need to be looked after and taken to a technical inspection on time. Only with careful and proper use will the car serve for a long time and properly.
Source
| Insufficient pedal travel causes the clutch itself to “drive” | To eliminate this defect, it is necessary to regulate the mechanism drive itself. Car service station professionals can help solve this problem. |
| Clutch pedal sticking | This problem usually occurs when parts of the drive mechanism are damaged. This can be resolved by replacing the damaged part. |