There are two cuffs: front and back. To replace them, it is necessary to disassemble several bulky components, for example, the timing mechanism or clutch assembly. Depending on which of the seals leaked, the work occurs according to different algorithms. Let's figure out how to replace the crankshaft oil seal on a VAZ-2109, depending on its location.
Signs of malfunction and methods for checking VAZ 2109 oil seals
The main sign indicating a malfunction not only of the crankshaft oil seals, but also in general of a violation of the tightness of the oil system is the appearance of oil smudges at the junction of various elements, such as the oil pan, in the front or rear of the engine, where the oil seals are actually located .
If you find oil leaks, then:
- check the crankcase ventilation system;
- see if the system hoses are kinked;
- check the system pressure.
If during the inspection no other leaks are detected, then replace the oil seal. To replace the front crankshaft oil seal of a VAZ 2109, you need to prepare a standard set of tools.
We will need:
- open-end wrenches or a set of heads “10”, “13”, “19”;
- large screwdriver;
- new o-rings;
- clean rags;
- container or bucket for draining lubricant.
Nine carburetor engine
If the speed of the VAZ 2109 carburetor fluctuates and you are adjusting the idle speed of the car in your own garage, in the yard of your house, and are not in a hurry, you can try to understand why the speed is floating and adjust the carburetor with your own hands. You will need a slotted screwdriver.
The procedure is as follows.
- Warm up the engine to operating temperature of 90 degrees.
- Set the quality screw to the original position for adjustment. To do this, screw it all the way and unscrew it back 6 turns.
- Set the quantity screw to the initial position for adjustment. To do this, screw it all the way and unscrew it back one and a half turns.
- Start the engine.
- If the engine speed exceeds 800 rpm, turn out the speed screw and bring it to 800.
- By turning the quality screw clockwise and counterclockwise, select its position in the middle of the engine’s stable operation zone.
- By turning the quantity screw, bring the crankshaft speed to 900 rpm.
If the idle speed of the "nine" began to float while you were on the road, it is better not to try to adjust the carburetor in the field. Pull the choke control lever towards you to slightly increase the idle speed. The car will not stall while driving. Fuel consumption will increase slightly, but you will have to put up with this in order to get to the service center without any problems.
Causes of crankshaft oil seal failure
Traces of oil drips are the main and main sign that indicates wear of the crankshaft oil seal. The presence of traces of oil indicates that the tightness of the engine lubrication system has been compromised.
Oil seals can be destroyed under the influence of several factors:
- Natural wear and tear, aging of the rubber used for the manufacture of crankshaft oil seals;
- Incorrect installation, which led to premature wear and loss of functionality. This usually happens during repairs at dubious service stations or when an inexperienced car owner does the replacement with his own hands;
- Mechanical damage to the element;
- Use of a defective, counterfeit oil seal.
The blame should not always be placed solely on the cuffs, which come in front and back. Before you suspect seals, make sure that other potential causes are not to blame.
Checking the condition of the crankshaft oil seal
By checking all elements of the lubrication system, you can make sure that the cause really lies in worn out, deformed oil seals. And then they can be replaced with new elements.
| Object to be checked | Peculiarities |
| Engine oil level | Oil can leave the system for various reasons, including the oil seal. Therefore, it is recommended to be patient and check the level every day, adding a little oil while actively maintaining it. The sensors do not always work correctly, so you need to make sure that there is no pressure violation yourself |
| Crankcase ventilation system | If the ventilation system is clogged, this will lead to active accumulation of crankcase gas. By creating pressure, it pushes the oil through the seals. In this case, simply replacing the cuff will not do anything, since it will be necessary to clean the ventilation |
| Oil hoses | They can bend, become deformed, or crack. As a result, oil comes out and the engine loses lubricant. |
| Lubrication system pressure | If the pressure increases, it causes oil to be pushed out through all sorts of passages. There are quite a few reasons for an increase in pressure, so check why exactly this indicator is increasing |
If problems are detected with the crankshaft seals, the only correct solution is to replace them.
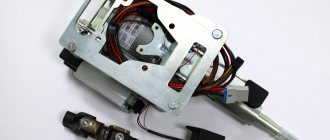
Video How to properly disassemble and sort through a unit with your own hands
Instructions for disassembling and reassembling the generator unit for a VAZ are presented in the video below (the author of the video is Denis Legostaev).
Replacing the VAZ 2109 generator pulley is simply necessary if it is broken, as otherwise the generator will fail. And this will lead to the fact that it will be almost impossible to use the machine, since it does not work without a dynamo. If any defects are noticeable in the operation of the generator pulley, then they urgently need to be eliminated by repairing or replacing it. Otherwise, the scale of work will increase greatly. Replacing the generator pulley on a VAZ 2109, it is worth noting, can be done on your own without much difficulty.
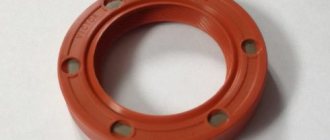
Which crankshaft oil seal to install on a VAZ 2109, when to change it?
Original number 2108-1005034, average price 62 rubles.
Analogues:
- Elring 546.968 — 57 rub.
- Reinz 80-33653-10 — 49 rub.
- Corteco 12016518B — 83 rub.
Replacement frequency : every three years or every time the timing belt is replaced.
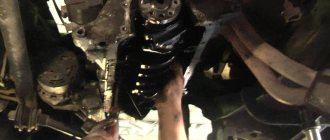
1. Using a 17 key, unscrew the oil pan plug and drain the oil into a container with a volume of at least 4 liters. The duration of draining the oil is at least 10 minutes. We wrap the drain plug.
2. Using a 10mm wrench, unscrew the two side bolts of the front timing cover.
3. And another one in the center. Remove the timing cover. Remove the generator drive belt.
4. Remove the right wheel and the plastic shield of the engine compartment. Using the “19” head, turn the crankshaft clockwise by the pulley mounting bolt.
5. Rotate the lower pulley until the mark on the camshaft toothed pulley aligns with the installation tab on the rear timing cover.
6. By removing the rubber plug in the upper part of the clutch housing, we make sure that the mark on the flywheel is located opposite the slot in the clutch housing cover.
7. This is where the mark is located on the engine flywheel with the gearbox and cylinder head removed.
8. We fix the crankshaft from turning by inserting a screwdriver through the hole in the clutch housing between the flywheel teeth.
9. Unscrew the bolt securing the generator drive pulley.
10. Remove the generator drive pulley.
11. Use a 17mm wrench to loosen the nut securing the tension roller. Turn the tension roller to a position in which the belt will be loosened as much as possible. Remove the timing belt.
12. Use two screwdrivers to pry up the crankshaft toothed pulley and remove it from the crankshaft toe.
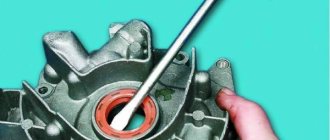
14. Use a screwdriver to pry up the oil seal and remove it from the cover.
16. Lubricate the working edge of the new oil seal with engine oil and press it in with a suitable piece of pipe.
17. We assemble and install the timing belt in the reverse order. Add oil.
Acquaintance
Maximum speed of VAZ 2109
VAZ 2109 is a front-wheel drive car. Unlike its fellow “eight”, the “nine” is considered as a more solid and stylish car. The presence of five doors already speaks in favor of the car, an ideal option for a family man. The VAZ 2108 is held in high esteem by single drivers (this explains the passion for tuning the V8 to a sporty version).
Note. Despite its less expressive appearance, the VAZ 2109 did not escape the fate of being called a “chisel”, due to the characteristic wedge-shaped contours of the body.
Peculiarities
Important points regarding the “nine”:
- Since 1987, the VAZ 2109 began to be produced, but there can be no talk of a successful release yet;
- The so-called “successful” modification of the car was released only in 1990. Naturally, the price for it is already different, higher;
- The uniqueness of the new modification of the VAZ 21093 is given by a separate segment of the front part;
- As for the interior, the car is better designed than its predecessor in this regard: it is equipped with a more stylish dashboard, equipped with a tachometer and even a trip computer.
Maximum speed according to instruments VAZ 2109
Note. The on-board computer on the VAZ 2109 reminded of a key left behind, forgotten in the lock, unfastened seat belts, and so on.
- The most significant change between the modifications concerned the dynamic performance of the engine. Fuel efficiency is improving, but this does not in any way affect the power and maximum speed, which increase significantly (on the first modification of the VAZ 2109, the speed was 148 km/h, and now it is 156 km/h);
- The standard “nine” was equipped with a 1.3 liter carburetor 4-cylinder power unit. The engine power was 65 hp. A fully loaded “nine” could accelerate to 100 km/h in 18 seconds, and the maximum speed was 156 km/h;
- A new restyling occurred after 1997, when instead of the 1.3-liter engine, they began to install a 1.5-liter one. This unit already produced 72 hp. and he had the best acceleration result from a standstill.
Maximum speed of VAZ 21093i
Note. Later this version became standard. Unless a new version appears with an injection unit, but again a 1.5-liter one.
Another replacement method
First way
The method invented by the car owners themselves is as follows:
- Remove the timing belt;
- Using two screwdrivers/winders, remove the toothed pulley from the crankshaft, do not forget about its key;
Removing the crankshaft pulley and its key
- Using a hook or screwdriver, tear out the old cuff;
Taking out the old cuff
- We put the new cuff in place, and to make installation easier, lubricate its surface with oil;
- Using a mandrel, hammer it in until it stops.
Installing a new oil seal
Poor quality gasoline is harmful
Many problems when operating the propulsion system of a VAZ car are associated with the use of low-quality gasoline. Leftover gasoline at unreliable gas stations is very dangerous. The entire fuel line, carburetor, and possibly even the engine may need to be flushed. It is quite possible that the units will have to be disassembled, washed, soaked and blown with compressed air.
If circumstances force you to refuel in an unfamiliar place, use caution
| What to worry about | What results will this give? |
| Try not to use fuel filled in a proven location until the tank is empty. | Let there be at least a mixture of good and risky fuel in the gas tank, and not just questionable fuel - this will reduce the risk. |
| Fill only the minimum amount of fuel. | One that will allow you to get to a proven gas station worthy of your trust. |
| On long trips, carry a cleaning additive with you to add to your gas tank. | It is likely that you will be able to get away with adding the appropriate additive to the fuel tank when using questionable gasoline. It's like getting a flu shot - it boosts your immunity. |
One gas station at an untested gas station, and you face the prospect of serious repair work.
What's next?
After draining the oil from the car engine, unscrew and remove the pan. Then the two bolts securing the middle main bearing cover are unscrewed. It is removed and the gap between the bearing and the half ring is measured using feeler gauges. You should add to it the standard parameter of 2.31 mm.
As a result, the required size of the new half ring will be obtained. After this, by displacing the old half-ring, they are installed in their nests. It is important that the new element fits in freely. After the work has been done, all removed parts are installed back.
Changing half rings
To do this, you do not need to remove the crankshaft of the VAZ 2109. Replacing the oil seal, half-rings, liners (the crankshaft sensor, we note right away, must also be removed) begins with searching for the location of the elements. These parts are located on the sides of the central (third) main bearing. A yellow ceramic-metal half-ring is installed on the side of the middle crankshaft support. On the other hand - steel-aluminum. The elements must fit tightly, and depending on the wear of their sockets, they come in three sizes:
- standard;
- first repair;
- second repair.