The VAZ crankshaft sensor synchronizes the valve timing for precise supply of the fuel mixture to each engine cylinder; it applies to both the control elements of the internal combustion engine system and the executive elements. Among a dozen control and transmission devices of the internal combustion engine, a malfunction of the crankshaft position sensor will lead to the engine stopping and a malfunction of all fuel system equipment, since the balance of fuel supply, spark distribution, etc. will be disrupted.
Description of the crankshaft sensor
So what is this controller and what is its purpose? Where can I find the device in order to replace it? What are the main signs of a device malfunction? We will give answers to these questions below.
Functions and purpose
On an engine with 8 or 16 valves, the DPKV is designed to perform not control options, but to implement phase synchronization for gasoline injection. Also, the crankshaft sensor on the VAZ 2110 transmits an impulse to ignite the air-fuel mixture in the combustion chambers of the power unit. Therefore, if the controller breaks down, this can lead to various vehicle systems not functioning coherently. This means that normal operation of the engine will be impossible.
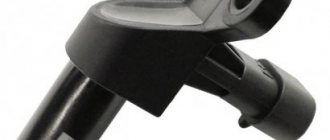
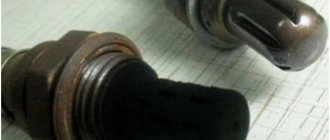
VAZ 2112 crankshaft sensor
The VAZ 2110 crankshaft sensor itself is an inductive type device; this controller must respond to the passage of teeth on the master disk. This disk is mounted on the generator drive pulley, and the controller itself is installed next to it. There are 58 teeth on the pulley, between which there is a cavity the size of 2 teeth. This cavity allows synchronization with the top dead center of the engine pistons. The moment the depression passes the controller, a corresponding signal is sent to the engine control unit.
There are quite a few designs of devices of this type; the principle of their operation is based on a regulator such as the VAZ 2110 Hall sensor. In the latter case, the regulator also responds to a rotating shaft, but its operation is carried out as a result of the passage of a permanent magnet.
Where is?
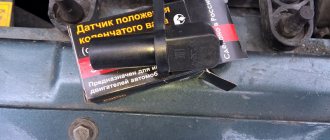
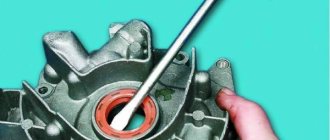
If malfunctions are noticed in the operation of the engine, then before you begin to identify the breakdown and signs of malfunction, you need to find out where the regulator is located. Where is the crankshaft position sensor located on an 8- or 16-valve “ten”? If you open the hood, you will notice that the regulator can be found directly on the oil pump cover. As you can see, the location of the regulator is not particularly convenient. VAZ engineers thought through this point, thinking about the convenience of replacing the controller, so they equipped the DPKV with a long 80 cm wire.
Location of the DPKV under the hood of the car
Signs of trouble
If the controller located on the oil pump fails, the driver will not be able to start the engine. In the event of a breakdown, only replacing the regulator will solve the problem of the inability to start the motor. It should be noted that on 8- or 16-valve engines the problem of complete failure of the controller does not often occur; as practice shows, in most cases the problems accumulate.
So, what are the signs of a faulty DPKV:
- Reduced engine power when driving. When the driver presses hard on the gas, power loss may be felt. Note that in carburetor engines this can occur if the accelerator pump does not operate correctly.
- In some cases, engine detonation may occur, especially if it operates at high speeds. Sometimes this problem can be caused by the poor quality of the fuel used.
- It may be difficult to start the engine.
- Another sign of a malfunction that requires replacing the crankshaft sensor on the “ten” is increased gasoline consumption (the author of the video about replacing the crankshaft sensor on the domestic Lada is the IZO channel)))LENTA).
Functionality check
If you decide to check the serviceability of the sensor yourself, treat this procedure responsibly and carry it out correctly. On a VAZ 2114 car, the crankshaft sensor is checked in several ways.
- Using a multimeter. The serviceability of the induction sensor can be assessed by the resistance of its coil. In a working product it is 500-700 Ohms.
- On the multimeter, set the measurement limit to 200 millivolts, connect the probes to the terminals (where the standard wires are connected). Pass a steel object several times in front of the core. The working sensor will “see” the metal and there will be voltage spikes on the multimeter display. If there are none, replace the part.
- But the most accurate results when checking are provided by an oscilloscope. When using this device, one hundred percent results can be guaranteed; it reads all the information from the sensor while the engine is running. It can be observed on the device screen. The engine, during tests, should operate at different speeds. They start with eight hundred revolutions, then two thousand, and raise it to six thousand. If the lines (on the device screen) are of different lengths, you need to look for the cause of the malfunction. Remove dirt, check the pulley for defects, and so on.
Oscillogram of a working sensor
Oscillogram of a working VAZ 2114 crankshaft sensor
It should be noted that these verification methods work on all VAZ models with DPKV. If you have any doubts about your own abilities, then contact the service. Thanks to specialized equipment, the result will be more accurate, and the check will not take much time.
Remove from the engine
The malfunction has been identified. Let's start eliminating it. Let's look at this operation using the VAZ 2114 as an example.
Turn off the car ignition. We open the hood, fix it firmly, and visually determine where the VAZ 2114 crankshaft sensor is located. Before removal, it is advisable to remove all contaminants in the area where it is located. Next, carefully remove the block with wires from the connector.
Using a “10” wrench, unscrew the fastening bolt.
Removing the crankshaft sensor on a VAZ 2114
After dismantling the sensor, it is advisable to check the generator drive toothed pulley for defects. Since its damage can introduce errors into the operation of the entire system.
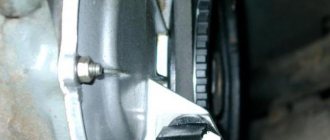
After we are convinced that there are no defects of any kind, we proceed to assembly. The seat must be clean. We install the new part in place and fasten it with a bolt (the tightening torque should not exceed 8-12 Newton meters). In this case we use adjusting washers. They are sold complete with a new sensor. Thus, using a special probe, we ensure that the gap between the pulley and the sensor core is one millimeter. The permissible error is 0.41 millimeters in the larger direction.
The gap between the pulley and the crankshaft sensor core on a VAZ 2114
We connect the block with wires into place.
After installation and checking the gap, we try to start the engine. With a confident start and stable operation of the engine, we can say that the repair was carried out successfully.
Despite the fact that the breakdown of the synchronizing sensor is not frequent, knowledge of its symptoms and consequences, as well as methods of elimination, will be useful to the car enthusiast.
New sensors are available in almost any auto parts store. The price of DPKV can vary between 200-400 rubles. How much a VAZ 2114 crankshaft sensor costs depends on your region, the location of large spare parts stores nearby (usually cheaper there) and the greed of the seller. Can be ordered in the online store. When purchasing, take the old one with you so as not to make a mistake in choosing a model. To avoid defects and repeated purchases, it is advisable to purchase from well-established sellers.
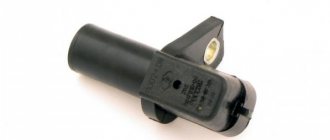
The crankshaft or crankshaft position sensor is an electromagnetic device that transmits data about the current position of the crankshaft to the electronic engine control unit. It is difficult to overestimate the importance of this device, since the correct operation of the injectors responsible for supplying fuel, as well as the entire ignition system as a whole, depends on its performance.
Diagnostics
The diagnostic procedure for a device consists of checking the resistance parameter of its windings; an ohmmeter is used for this. If, as a result of diagnostics, the tester showed values other than 550-570 Ohms, this indicates a failure of the controller. To prevent damage to the sensor, its installation site must always be kept clean. In addition, it would be a good idea to check the integrity of the wiring; very often the quality of the connections plays an important role. As for repairs, the DPKV cannot be repaired; the regulator can only be replaced with a functional one.
Sorry, there are no surveys available at this time.
Principle of operation
The design of the DPKV is very simple. This part is an electromagnet that generates pulses as a result of the metal teeth of a special disk mounted on the crankshaft passing past its core. More precisely, an electrical signal is generated at the moment when there are no protrusions on the gear wheel.
To ensure the stability of pulse formation, it is important to correctly set the gap between the DPKV core and the gear wheel. The optimal value of this parameter for the VAZ 2112 car is 0.8 - 1.0 mm.
Replacement Guide
How to replace the crankshaft position sensor on a VAZ 2110? To complete the task you will only need a 10mm wrench.
Step-by-step instructions for this process are presented below:
- First you need to turn off the ignition. Just in case, to prevent possible short circuits in the vehicle's on-board network, you can disconnect the negative terminal from the battery.
- Then open the hood and find the location of the controller. You need to disconnect the connector from the regulator.
- Using a 10mm wrench, you need to unscrew the bolt that secures the device. Remove the DPKV from its installation location on the oil pump cover, and then replace it with a new regulator. Before installation, you must be sure that problems in the operation of the power unit are not caused by poor quality wiring. Otherwise, the replacement will not give the necessary results. Clean the connector and installation location of the device from dust and dirt, this will avoid possible malfunctions in its operation in the future.
Dismantling and installation
So, you have determined that the DPKV has failed. Therefore, there is nothing left to do but replace it. To do this you will have to dismantle the old device.
- Turn off the ignition and open the hood. Securely secure it to avoid unpleasant blows to the back or head.
- Remove any dirt from around the sensor so that it can be removed and visually inspected.
- Disconnect the wiring block from the corresponding connector.
- Using a 10 mm wrench, you can easily remove the crankshaft sensor mount.
- Remove the damaged device.
- At the same time, be sure to check the generator drive timing pulley. It is not uncommon for damage to appear on it, due to which the device cannot operate correctly. These teeth cause error codes to appear on the on-board computer.
- If there are no defects and nothing prevents the installation of a new device, begin assembly.
- If necessary, clean the installation site of the DPKV.
- Place the new measuring device in the socket and tighten the mounting bolt. In this case, do not exceed a tightening torque of more than 12 N m.
- Be sure to use the adjusting washer, which is already supplied by responsible sensor manufacturers.
- Using a special feeler gauge, make sure that there is a gap of 1 millimeter between the pulley and the DPKV core.
- The gap error can be no more than 0.41 millimeters in the upward direction. Under no circumstances should the gap be less than the required 1 mm.
Price issue
As we have already noted, VAZ 2114 owners are not often faced with the need to change the DPKV. But always be prepared for such troubles.
You don’t have to spend a lot of money purchasing a new sensor. The price depends on the store and region where car parts are sold. On average, a recreation center costs about 200-400 rubles.
Replacement at a service station is still a cost around the cost of several sensors. Therefore, think about who exactly will do the work - you or the car service specialists.
Source
Repair of VAZ crankshaft sensor wiring - A116.RU Kazan
Repair of wiring connector of the Crankshaft Position Sensor (CPS) VAZ.
Quite often, the cause of the car jerking and its complete stop is an open circuit of the DPKV (error P0335 or P0336)
A wire break most often occurs at the base of the sensor connector. The connector needs to be replaced with a new one. In the article we will look at how to do this most correctly, and you will also learn how you can repair the old sensor connector if you suddenly cannot purchase a new one.
Everything was done indoors, so the part with attaching the restored connector to the car wiring is for demonstration, that is, you need to do everything the same, only not on the table, but on the car).
We cut off the connector from the car wiring at a distance of 3-5 cm from the connector. We remove the plastic wire retainer (to be honest, it doesn’t really prevent the wires from breaking at the root - so you don’t have to put it back if you’re too lazy...)
Using a wire with a diameter of 0.8 mm (we used a piece of welding wire from a Kempy semi-automatic machine) we press the fixing stops of the contacts through a special groove (it’s enough just to insert the wire until it stops).
Use the remaining wires to pull the contacts out of the connector. They come out quite tightly due to the rubber seals. We open the contact petals around the rubber seals and break off the old wires at the root.
We find a couple of pieces of wire 10-15 cm long, suitable in cross-section and color. Don't forget to put rubber seals on the wires.
We strip the ends of the wires by 3-4 mm and carefully solder them to the contacts. We used a 25-watt soldering iron, POS-61 solder and active flux based on zinc chloride.
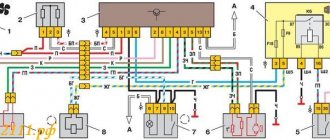
Features of injection systems
The injection system operates thanks to a sensor system and a control unit. All signals are input to the microprocessor unit, which regulates the operation of the actuators. The following sensors are responsible for the correct operation of the engine:
- Crankshaft positions.
- Camshaft positions (not on all versions).
- Intake manifold pressure.
- Lambda probe.
- Speed.
- Mass air flow.
- Throttle position.
And the main role is played by the VAZ-2110 crankshaft sensor (8 valves or 16), since the moment of injection and supply of high voltage to the spark plug electrodes depends on it. The design has a temperature sensor, but it has virtually no effect on operation. It is necessary to control the engine temperature and send a signal to the dial indicator (or to the on-board computer). But it will be indispensable if it is necessary to implement automatic switching of fuel types (from gasoline to gas and back).
Algorithm of operation of the injection system
The microprocessor has several inputs and outputs. The inputs receive signals from all sensors. But first, these signals are converted and, if necessary, amplified. The microcontroller is programmed to work with sensors and actuators. Programs (firmware) can provide various engine characteristics.
You can achieve an increase in power (gasoline consumption will increase) or a decrease in consumption (power will suffer). But most motorists prefer programs that provide work with average parameters. In this case, the signal from the VAZ-2110 crankshaft position sensor does not change; only the reaction of the actuators to changes in input data is adjusted.
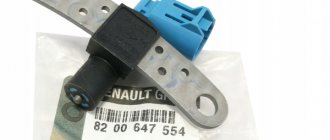
Crankshaft sensor wire VAZ 2110
All about the crankshaft sensor VAZ 2110, VAZ 2111 and VAZ 2112
| The crankshaft position sensor (CPS) provides the ECU (electronic engine control unit) with information about the angular position of the crankshaft and the moment the pistons of the 1st and 4th cylinders pass TDC. If the sensor malfunctions, problems with engine operation occur. Let's consider the appointment, testing and replacement of DPKV. |
What does the crankshaft sensor do?
Symptoms of a faulty crankshaft sensor
Where is the crankshaft sensor located?
Replacing the crankshaft position sensor VAZ 2110
How to check the crankshaft position sensor yourself
Signs of a malfunction of the crankshaft sensor VAZ 2110 and 2112. Accurate diagnosis
Symptoms of a problem
Your car may indicate in different ways that there is a problem with the DPKV or just the DC. Let's name the main ones.
- It is not uncommon for dirt to form on the end of the sensor, causing the device to transmit information incorrectly.
- At idle, the engine behaves unstable.
- The power level of the power unit drops noticeably.
- The revolutions can spontaneously increase or, conversely, fall.
- During acceleration, dips are noticeable.
- When you turn on the ignition, problems are felt and it can be difficult to start the car.
If you discover such problems, most likely you will have to replace the DPKV. In addition, we are talking about a consumable that will not cost you a fabulous amount of money.
This crankshaft position meter cannot be repaired.
Additionally, we advise you to pay attention to the error codes that appear. Codes with designations 0336 and 0335 indicate that a wire break may have occurred near the connector. This problem can be easily determined by visual inspection.
Location
Many VAZ 2114 owners prefer to carry out repairs with their own hands. This allows you to save significantly.
But in order to replace the DPKV, you need to find out exactly where it is located.
The desired object is located on the engine. To be more precise, on the oil pump in the immediate vicinity of the generator drive pulley. Look for the sensor on the pump cover. Fastening is carried out with one bolt.
Reasons for failure
There are several main reasons why the DPKV may eventually fail and lose its functionality.
- Physical deformation of the body has occurred. It is made of plastic, so such breakdowns are not uncommon.
- A short circuit may occur between the turns of the winding, which changes the generation frequency, which is transmitted to the electronic control unit. Such a breakdown is typical if a frequency-type DC is used.
- Simple wear or breakage of pulley teeth is another common reason why the crankshaft sensor needs to be replaced.
To change or not to change?
Let’s make a reservation right away: before deciding that the DPKV needs replacement, you need to check:
- Condition of the wiring going to the DPKV;
- Availability of high-quality contacts in the circuit;
- No damage to wire insulation;
- No oil on the crankshaft position sensor. Since the oil pump is located next to the DPKV, oil leakage can also cause its malfunction.
Functional crankshaft position sensor
If you have already examined everything, you need to check the sensor itself. But to do this you need to remove it.
A little about the crankshaft
The crankshaft is the most important element of any internal combustion engine. It is driven by the starter (at the moment of starting) and the pistons (in operating mode). From it, torque is transmitted to the gearbox, gas distribution system, and auxiliary mechanisms. And in order for fuel injection to be carried out in a timely manner, a spark to form at the right moment, a VAZ-2110 crankshaft sensor is needed.
It monitors the position of the pulley and transmits a signal to the electronic control unit. The pulley has teeth, the distance between them is the same. But in one place there is a gap - two teeth are missing. The position sensor reacts to the approach of metal. When an empty area passes near the sensor, a signal is generated - the control unit is notified that one revolution of the crankshaft has occurred.
How to check DPKV on Priora yourself
You can check the serviceability of the crankshaft sensor on a Priora with your own hands. First you need to dismantle it. Then carry out a visual inspection. Remove all excess dirt, and especially from the end side of the device (not only dirt, but also metal shavings accumulate there). After this, you can continue the verification procedure:
- Check the integrity of the winding. There is a winding inside the sensor, so first we check its integrity. To do this, switch the multimeter to the “testing” mode and touch the leads with the probes. If there is a characteristic sound from the device, then everything is in order with the winding.
- Measure the winding resistance. To do this, switch the resistance measurement mode on the multimeter (up to 2000 Ohms), and touch the output contacts of the device with the probes. The approximate resistance value is 500-700 Ohms. Anything above or below these limits indicates a device malfunction.
- Measuring voltage at the sensor terminals. If previous measurements have shown that the product is in good condition, then it would not hurt to check the integrity of the steel core. This can be done using a multimeter. It is necessary to check whether voltage is induced in the winding when touching the steel core of a metal part. To do this, we connect the probes to the sensor terminals, and set the multimeter to the DC voltage measurement mode (the minimum value on the device is 200 mV). Next, we bring a metal part to the end side of the sensor and look at the multimeter readings. A change in the device readings indicates that the sensor is working.
These are the main ways to check the crankshaft position sensor on a Priora. Do not forget that the Priora uses an inductive sensor, not a semiconductor one (it is checked in other ways). Depending on the type of device, the verification method differs.
If, after checking, you put the sensor in place, but the car does not start or there are interruptions in the operation of the engine, then it is also important to check the condition of the wires and chips that are connected to the element. A multimeter, which can be used to test the wires, will also help in this matter. It is necessary to find the wire leads from the sensor on the ECU unit and check the wiring. It is also important to understand that there is no voltage on the DPKV chip, so do not try to connect the multimeter probes to detect voltage there.