How to replace an unusable part yourself
Before you begin, you should prepare the following tools:
- assorted car keys;
- a special device called a jack;
- reliable mount made from high-quality base;
- a new CV joint that is suitable for the VAZ-2110, and lubricant for it.
After all the tools are prepared, you can begin step-by-step replacement of the CV joint boot:
- the machine wheel is removed and the steering knuckle is removed from the support;
- Using a car key of the appropriate size, the CV joint is unscrewed and removed from the hub. In order for this process to be effective, it is recommended to use a rubberized hammer or a special drift, which is made in a soft design;
- the retaining clamps are unscrewed, and the worn part is cut off using a sharp tool. After removal, you should thoroughly wipe the entire surface so that no old grease remains, turn the CV joint until the stop ring connects;
- If the turn is made correctly, then separating the CV joint from the axle will be quite easy and simple. Next, you should simply remove the worn boot, install the connecting clamp in its original place;
- before installing a new element, you should prepare it, that is, you need to fill the installed stopper with automotive lubricant, develop the part according to the instructions;
- the developed element must be correctly installed on the axle using a rubberized hammer. The CV joint must be carefully secured to the stupor;
- the remainder of the automotive lubricant should be squeezed into the boot of the VAZ-2110 CV joint, put a connecting clamp on top and securely fix it.
The replacement will be finally carried out only if you install all the removable parts of the machine in their original places and securely fix them. That is, it is necessary to install the steering knuckle in its original place and securely screw it with the connecting nut to the ball joint. All connectors are put back in their original places and securely fixed to the support.
This replacement of the CV joint boot is not the only one; there are several other options for carrying out the work. However, this method is the simplest, and even a novice car enthusiast can cope with it.
The CV joint on a VAZ 2114 is replaced after diagnosing its malfunction. As a rule, this unit reliably serves for 100 thousand km. The CV joint can fail earlier if the car owner does not monitor the integrity of its boots and does not change them on time. Then, through cracks or breaks, a lot of dirt gets into the hinge mechanism, as a result of which the unit very quickly becomes unusable. Signs of a faulty part are a knocking and crunching sound when the front wheels turn in any direction.
- a set of spanners or sockets;
- pliers;
- hammer;
- puller for pressing out the ball stud;
- vice;
- wheel wrench and jack;
- screwdriver;
- thick lubricant “CV joint-4”;
- rags.
Summarize
Now we can safely state that the replacement process is complete. As it turned out, the work did not cause any difficulties, but it did require stocking up on some special tools. Buy bearings for LADA Granta cars that are of only high quality and from trusted manufacturers in order to have confidence in your safety on the road.
A wheel bearing malfunction is a common failure during the operation of a technical device. The reason for premature wear is poor-quality road surface and aggressive driving style.
Front wheel bearing
Replacing a wheel bearing is done independently, without special equipment, experience, or skills. Subject to the availability of spare parts, the replacement process will take no more than an hour, without the cost of car service.
How to replace the suspension bearing on a VAZ-2107
Every car owner in his life has encountered the fact that some part of the car has become unusable and needs to be replaced. Some people simply went to a service station for this (the price for this type of service is quite low), and some do it themselves.
How much oil to fill in VAZ 2107
Spare parts
As for parts and spare parts for the VAZ-2107, it is better to buy a new outboard bearing (propeller shaft support) than a factory-made one. All this is because there are a lot of low-quality products on sale now, and buying a factory suspension bearing from a VAZ will help avoid getting a pig in a poke. To get a factory part, you just need to contact the sellers who sell goods from the manufacturer. Finding such a person is not difficult, you just need to try.
In order for the part to function well in the future on your VAZ-2107, when purchasing the selected outboard bearing, you should check its movement, that is, the movement of the outboard bearing must be smooth with elastic adjacent rubber. Rotating the outboard bearing from its hooks is a bad sign, and it is better not to take such a part. Otherwise, the cost of your negligence will result in unpleasant noise in the cabin of the VAZ-2107.
In the case when a replacement is necessary, but you do not have experience in such matters, you should take care of purchasing one cross with an outboard bearing already present. The purchase will be made with the intention that when a replacement is made, one crosspiece will need to be removed and it may be damaged.
- If you don’t have to replace the entire propeller shaft support, for example, because only the outboard bearing was broken, and it’s a pity to throw away the rubber, then only the bearing is bought and replaced.
- To do this you will need:
- ⦁ remove the support ring;
- ⦁ knock out the old bearing;
- ⦁ carefully hammer in a new one.
- How to change ball joints on a VAZ 2107
- So, to begin with:
- ⦁ it is necessary to unscrew the cardan shaft. Using a 13mm wrench, remove the bearing mount that secures it to the transverse support (a pair of bolts);
- ⦁ now unscrew the nuts with which it is attached to the shank.
To further avoid vibration of the cardan and its beating on your VAZ-2107, it is best to place marks on all joints of the cardan before removal. And assembling according to your marks will save you from such unpleasant moments. A chisel can be useful when placing marks.
- Replacing the cross:
- ⦁ it is more convenient to remove all available retaining rings using round pliers with a bend;
- ⦁ knock out the cup of the cross with a hammer;
- ⦁ turning over the cardan shaft, take out the cup;
- ⦁ knock out the next cup and the remaining ones;
- ⦁ we clean all the recesses and everything else from dirt and rust.
- Installing the cross:
- ⦁ it is necessary to remove two bowls on both sides of the cross;
- ⦁ the crosspiece must be placed in the eyes;
- ⦁ put on the cup, to do this you should move everything to one side;
- ⦁ Next, you should push the cup until a groove for the retaining ring appears;
- ⦁ install the retaining ring;
- ⦁ now, having turned the cardan over, you need to direct the cross towards the cup, put it on, also until the groove appears;
- ⦁ install the retaining ring.
- Assembling the second part may be a little more difficult:
- ⦁ after removing the crosspiece, it is necessary to insert the splined end of the cardan shaft into the flange of the elastic coupling;
- ⦁ using a 27 wrench from the opposite end, unscrew the fastening of the fork to the front shaft;
- ⦁ it is necessary to tighten the hinge fork using a puller;
- ⦁ remove the suspension bearing from the shaft.
- How to change brake pads on a VAZ 2107
- When removing the bearing, you can simply try to knock it down.
- This is where the replacement for the VAZ-2107 ends, but the assembly is done directly in the reverse order.
List of tools
It is advisable to carry out repair work in the garage of a pit, overpass or lift. Changing an outboard bearing using a jack is inconvenient and unsafe.
Required tool set:
- Set of heads.
- Ratchet driver.
- Open-end wrench (No. 13, 17).
- Chisel.
- Hammer.
- Impact screwdriver or chisel.
- Mount.
- Shoe knife.
- Round nose pliers.
- Pliers.
- Stationary vice.
What you need to replace tie rods and ends
To carry out this type of work you will need some equipment and tools:
- The first tool is a twenty-two open-end wrench;
- A puller that will help you remove the ball joint;
- Pliers;
- A hammer, this tool should definitely be in every owner’s home.
Symptoms of faulty steering rods
There are two symptoms that indicate that the steering rods of the VAZ 2107 are faulty:
- The first reason is a knocking sound from the front suspension. Quite a bad symptom with serious consequences. This knocking noise is especially audible when the car is driven on bad sections of the road and at low speeds. It is worth noting that this symptom may also indicate other problems with your car. For example, some suspension elements, ball joints, stabilizer struts and more.
- The second reason that may indicate this malfunction is when the free play of the steering wheel increases. This is noticeable to the naked eye when, when the steering wheel is turned, the wheel itself remains in place and does not move. This makes it very difficult to drive a car at high speed, and especially on bad roads.
If you want to check the serviceability of the steering rods on your VAZ 2107 yourself, there is a way by which you will not need to contact professionals to diagnose the car. You just need to put your car in a pit. Next, you will need to take this rod from below and try to sharply move it up and down, and if you manage to do this with your hands, then you should change the tips.
Next, let's move directly to the process that interests us, this is replacing the tie rod ends of a VAZ 2107 car.
P O P U L A R N O E:
Antiradar circuit.
Converting the valve from a washing machine to 12 volt DC power supply
Electric valves are required to automatically control various hydraulic systems. Finished products are quite expensive. Let's look for a cheaper solution.
Recently, amendments to the traffic rules were introduced in Russia, one of which is: driving during the day with low beam headlights, fog lights or daytime running lights on. Now you need to drive with lights on during the day. Driving with low beams or fog lights on additionally creates a load on the generator, reduces the service life of the lamps, and also increases fuel consumption (more than 0.5 liters per 100 km). Therefore, it is better to drive during the day with the running lights turned on, the light-emitting element of which is LEDs, which consume much less power than incandescent lamps. You can buy DRLs, or you can make them yourself from scrap materials.
Replacing the suspension bearing on a VAZ 2101-VAZ 2107
Welcome! Bearings - they come in two types, the first type is sliding bearings, and the second type is rolling bearings, which are most often found in all components and assemblies; in general, bearings play a very important role if they are used in any mechanisms, and the outboard bearing plays a significant role when the driveshaft is operating, if it is worn out and the rubber is hard as a rock, then large vibrations will appear in the body, which will occur both during driving and when the car is running, and of course, if the car is heavily loaded or if it even had a slightly lower ground clearance, then the suspension bearing plays a very important role in this and if it is damaged, then be prepared for the fact that even with the slightest drop in the car’s suspension, the cardan will begin to hit the body.
Note! To replace this bearing on a car, you will need quite a few tools, the most important thing is to stock up on: Wrenches, spanners and the same kind of wrenches, if you have a wrench with spanner heads in your arsenal, then take that too, and you will also need a soft metal hammer, kerosene or something like that, in addition special. You will need pliers with which you will have to remove the retaining rings of the cups of the crosses, as well as an inspection hole, a universal puller and Cobra-type pliers!
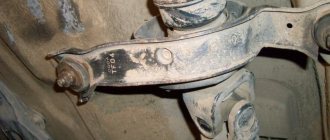
Where is the outboard bearing located? The suspension bearing is located in the very central part of the propeller shaft (see photo below), and it is secured with a cross member to the car body (It would be more correct: the cross member is screwed to the body with nuts, and the bearing is already attached to the cross member using two central bolts) so that To remove this bearing, you will have to take care of the propeller shaft (It must be removed, otherwise you will not replace this bearing), and then, armed with a puller, the bearing can be easily pressed off the shaft on which it is located and replaced.
Types of balancing
- Static. It is used to determine and eliminate rotor imbalance without taking into account the forces arising during rotation. To statically balance the rotor, you need to shift its center of gravity so that the axis of rotation passes through it. Used for disc-shaped rotors with a length-to-diameter ratio of no more than 1/4. This balancing is carried out in one correction plane and is not suitable for cardan drives.
- Instant. To perform this balancing, the main moment of shaft imbalance is determined and reduced, which is an indicator of the moment imbalance of this rotor. This operation is performed in at least two correction planes.
- Dynamic. Includes static and instant. Used for long rotors. Best suited for balancing driveshafts. Therefore, balancing the cardan is done on equipment that uses this method.
When observing the balancing process on a bench, it is impossible to understand which method is being used. The operation of all stands looks the same - the shaft rotates, and the display shows the location and magnitude of the imbalance.
Disassembly and assembly of the cardan
To avoid the need to balance the driveshaft after repairing it yourself, you need to mark the position of the shafts of which it consists relative to each other. And when assembling the cardan, be sure to match the marked marks. You can see how to do this in the video.
- When modifying the driveshaft (shortening, lengthening, etc.).
- After eliminating significant deformation of the cardan, which is a consequence of, for example, a strong impact.
Diagnostics
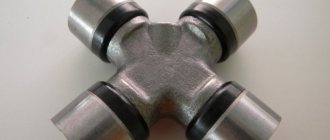
In order to identify faults in the crosspiece, appropriate diagnostics are carried out. To do this, the following type of operations is carried out:
- the car is driven into a viewing hole;
- we grasp the driveshaft with one hand, and with the other we hold the flange of the drive gear, which is located near the gearbox;
- holding the connection tightly, we try to turn or twist the parts in different directions.
Attention: If you can turn it even an iota, then there is play in the connections and, accordingly, the crosspiece has a defect. It is clear that there is no point in delaying repairs and, as happens with a sick person, the car should be urgently put in order. If everything is done on time, you will only have to change the cross
Otherwise, this can lead to more expensive repairs, which include replacing the outboard bearing.
If everything is done on time, you will only have to change the cross. Otherwise, this can lead to more expensive repairs, which include replacing the outboard bearing.
Vibration
Vibration occurs at speeds of 60-80 km/h and 90-120 km/h. The solution is to balance the cardan.
The vibration started suddenly at a certain speed and is only increasing. Possible solutions to the problem:
- It is necessary to check the crosspieces for play. If there is a malfunction, replace worn hinges.
- A small foreign body got on the body of the cardan flanges and the receiving flanges of the car.
- Play in the splines. The solution is to replace the spline connections.
- Corrosion or separation of balance plates.
- The pipe was bent when the bottom hit a hard object. Solution: if the deformation is less than 1.5 mm, then straightening it using a hydraulic press; if more, replace it.
Keep in mind that the car may vibrate and not because of the driveshaft. If vibration occurs at the same speed, then you need to look for the problem elsewhere.
What is a shock absorber
A shock absorber is a component of the suspension that acts as a damper for vibration impulses. The scope of work tasks for shock absorbers includes the following:
- elimination of vertical swing;
- ensuring vehicle stability while driving;
- ensuring good grip on the road surface.
As you can see, this part is very significant, and when it fails, it has the most negative impact not only on driving comfort, but also on driving safety, because faulty shock absorbers invariably lead to an increase in braking distance and worsen traction, which becomes very dangerous along the way.
In addition, when worn out, they cause rapid wear of other parts and systems, in particular the brake system components.
That is why it is so important to carefully monitor the condition of the suspension, and, after the working period has expired or in the event of a malfunction, replace the defective part with a new one.
We'll talk about this later, but for now let's figure out what kind of shock absorbers there are, and, since we decided to talk about such a domestic model as the VAZ 2107, which of the existing components are suitable for this car.
Types of shock absorbers
Today, three types of shock absorbers are used for VAZ cars:
- Oily. This type of unit is suitable for calm, comfortable driving for drivers who primarily value order and regularity. They work well on city roads, where traffic speed is limited and there are no treacherous potholes or potholes. But, if you prefer speed or extreme driving on country roads, then you need to look for something else.
- Gas-oil classic option. This option is ideal for speed lovers. The design of the device itself provides better protection against impacts falling on the lower part of the car during high-speed driving. True, such units are thirty percent more expensive than just oil ones, but the quality is much higher.
- Gas-oil with variable hardness coefficient. When you want to drive on the roads of distant provinces without worrying that the road will turn into a nightmare, then you should give preference to a gas-oil shock absorber of increased rigidity.
It is also worth noting that both versions of gas-oil units guarantee better controllability and the ability to maneuver on sharp turns than oil units.
The quality of the components also depends on the manufacturer’s brand: each company tries to introduce technical innovations into one or another option that significantly improve the characteristics.
So, having decided to replace shock absorbers in order to improve the technical characteristics of the VAZ-2107 car, you can turn your attention to:
Seller's comment
Special conditions: • Discount for purchases on credit up to RUB 15,000. • Discount for CASCO insurance up to 20,000 rubles. • Discount for trade-in up to 15,000 rubles. • Maximum discount of 50,000 rubles.
ID-1594/№44 The car is in excellent condition. Timely service. Careful operation. The salon is clean, well-groomed, and smoke-free. Pre-sale preparation and technical diagnostics have been carried out, no additional investments are required!
Call, or better yet, come right now! We are glad to see you! Become part of our large family of regular customers! UNIQUE OFFER FOR ALL CARS. When you return your car under the Trade-in program, an additional discount of up to 50 thousand rubles * According to our expert assessment, the mileage of this car is not confirmed.
The AUTO-FULL car dealership invites you to pick up your new used car!
Opening hours: Every day from 9-20.
Advantages of our car dealership: - Convenient free parking for our clients. — There are always more than 100 used cars on sale — Cozy customer area. Children's corner with photo studio. — Upon receipt of the warehouse, all cars undergo a thorough check and pre-sale preparation at 103 points. — Guarantee of legal purity for each car. — Applying for a loan within an hour using 2 documents. More than 10 partner banks. — Free test drive before purchase. — At your request, our manager will send you additional photos and videos in any convenient way. — Profitable exchange of your car using the TRADE-IN system. — Purchase of any cars, incl. pledged by any bank in the Russian Federation.
Unlike the front, it has undergone virtually no changes. Here, just like on the first Soviet G8s, a semi-independent beam is used. It is attached to the body on hinges (fortunately, there are no “crabs” in the design). A helical spring with constant stiffness is used as an elastic element. To dampen vibrations and prevent swinging, two shock absorbers are used.
- High reliability. The design does not have additional levers, which, in addition, can bend when falling into a large hole.
- Energy intensity. The Lada Granta absorbs all bumps perfectly, especially if oil shock absorbers are installed at the rear.
- Cheap maintenance. Due to its simple design, this pendant can be rebuilt even with your own hands. And the cost of new rubber-metal elements is unlikely to empty the pockets of even the most stingy car owner.
The main difference between the “Grant” suspension is the wheel alignment angles.
Replacing the suspension bearing and universal joint in VAZ cars
Despite the abundance of foreign-made cars, a considerable number of car enthusiasts are owners of the familiar Zhiguli cars. One can argue for a long time about the positive and negative qualities of this brand, but many will unite in matters of repair - this is not the most difficult process, but it also requires skill. Let's take a closer look at all the intricacies of repairing the driveshaft crosspiece, as well as the outboard bearing for VAZ-2101, VAZ-2102, VAZ-2104, VAZ-2105, VAZ-2106, VAZ-2107.
Purchasing spare parts that will be used during repairs is a very important point. For an outboard bearing that you plan to purchase, an important factor will be the smoothness of its movement, as well as the degree of elasticity of the rubber. Various failures and “clinging” when checking its operation only indicate that it is better to put such a bearing aside - it will not work. The rubber used in the suspension bearing must be sufficiently elastic and soft. If it is very rigid, then by installing a driveshaft with such an outboard bearing, the driver will encounter body vibration when driving. This is caused by the transmission of vibration from the driveshaft. In addition, such tires will require replacement very quickly. It is best to purchase a VAZ crosspiece from the manufacturer
It is also important to buy retaining rings, since old ones can very quickly break or become damaged, which will require repairs to be carried out again
As for the set of tools that need to be used when repairing the driveshaft crosspiece on a VAZ-2101, VAZ-2102, VAZ-2104, VAZ-2105, VAZ-2106, VAZ-2107, it includes:
open-end wrenches (for 12 and 13)
· socket wrench (13 and 27)
· aluminum (or copper, if necessary) hammer attachment
In the event that it is necessary to replace the driveshaft outboard bearing, a shrink puller and the old flexible coupling flange are added to the tool kit.
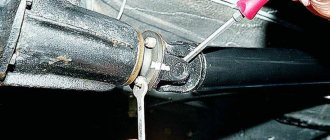
Initially, you should understand that bearing replacement is best done on an overpass, or in a garage above a pit. In the latter case, for greater simplicity and convenience in unscrewing the nuts attached to the rear axle shank, one wheel is lifted using a jack.
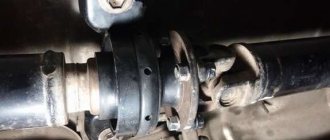
The first point is to remove the VAZ driveshaft. To do this, use a 13mm wrench to unscrew 2 bolts that secure the suspension bearing to the transverse support. Then unscrew the nuts securing the propeller shaft to the rear axle shank. It is best to change the mounting locations. Often these fastening nuts are too difficult to unscrew and are cut with a chisel. Therefore, it is better to initially stock up on a set of nuts to replace broken ones.
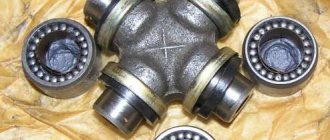
All parts of the cardan must be marked in order to assemble it correctly, otherwise vibration and beating of the cardan cannot be avoided. They can be set with anything - chalk, chisel, core. After this, the cardan crosspieces are directly replaced. It is installed in the “suspended” position, after which the cup of the cross is knocked out using a hammer and a mandrel. The remaining cups are also knocked out, the cardan eyes and grooves for the retaining rings are cleaned.
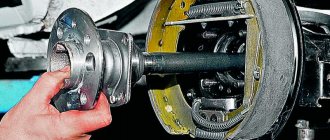
The next step is to insert the splined end of the universal joint into the flange of the elastic coupling, and from the other end unscrew the nut that attaches the universal joint fork to the front shaft using a 27mm wrench. Remove the joint fork with a puller, after which the bearing is also removed. This is done either using a puller, cutting off the outer ring of the outboard bearing, or knocking it down with a chisel.
We install the crosspiece: two cups are removed, the cardan crosspiece is set into the eyes, after which the cup is put on and the locking ring is installed.
https://bumper.guru/klassicheskie-modeli-vaz/zadnij-most/zamena-podvesnogo-podshipnika-na-vaz-2107.htmlhttps://semerkavaz.ru/transmissiya/zamena-podvesnogo-podshipnika-na-vaz- 2107/https://ladaautos.ru/vaz-2107/kak-zamenit-podvesnoj-podshipnik-na-vaz-2107.htmlhttps://vaz-russia.com/remont/zamena-podvesnogo-podshipnika-na-vaz- 2101-vaz-2107.html
Weak points of the cardan
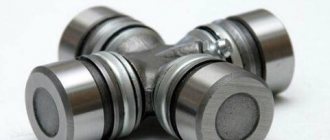
Most often, joints, crosspieces and bearings break on the propeller shaft. Mainly due to wear and tear. As a rule, the listed parts are designed for a mileage of 60-70 thousand km, but it is likely that it will be less. This value is influenced by:
- features of the car transmission;
- machine drive type;
- product quality;
- modes used when driving;
- travel conditions.
Sounds or vibrations that are unusual for a working driveshaft indicate problems among its constituent hinges, bearings and crosspieces. Especially if at the start of the trip or when changing speeds there are knocks or clicks.
If the mentioned components of the propeller shaft are worn out, it is recommended not to repair them, but to replace them with new ones. Moreover, such products are quite easy to install and are relatively inexpensive. The approximate prices for them are as follows:
- cardan joint – from 160 rubles;
- cardan shaft cross - from 280 rubles;
- cardan bearing – from 300 rub.
A car enthusiast with the necessary skills can replace such elements of the driveshaft independently. For those who are not “specialists” on this topic, it is better to entrust the process to car service specialists.
Replacement
It is recommended to drive the car onto an inspection hole or overpass, put the handbrake on, engage the gears and support the rear wheels with wheel chocks to ensure safety during repairs.
We arm ourselves with the following tools: wrenches 17.19, socket 30 and 13-17, mount, wheel wrench, wrench, lift (jack), lubricant and pliers.
Both hinges, internal and external, are located on the shaft drive, which means replacing them is identical and the point is to get to this very drive.
- At the rear on the crankcase protection we unscrew two nuts with a 19mm wrench, and at the front there are also two, but with a 17mm wrench.
- Drain a little oil (less than half) from the box.
- From the required side we tear off the wheel bolts with a balloon.
- Unscrew the nut of the outer grenade using a 30mm socket.
- We lift the vehicle using a jack.
- We remove the wheel by unscrewing it first.
- Find the bolts on the hub that secure the CV joint and unscrew them using a 13mm wrench (only two bolts).
- Use a pry bar to move the hub away from the reaction rods.
- We take the grenade pin out of the hub, to do this we pull the stand towards ourselves.
- We move the shaft drive aside.
- Now you need to remove the inner hinge from the box. To do this, open the hood and, using a pry bar inserted between the parts, jerk it towards the box. The CV joint must move, otherwise we repeat the action. As soon as it works, we go down to the wheel arch and remove the shaft drive with two CV joints.
- Remove the clamps (large and small) of the protective cover from the hinges. If damage to the anthers is detected, we replace them; if the condition is satisfactory, we move them to the side.
- Using a hammer, we hit the inner clip of the inner grenade with force, making sure that it flies off. We repeat similar actions on the other side.
- We remove the old rings from the shaft drive, put on new ones and a boot.
- We install the new hinge using a hammer and lubricate it and the boot with grease.
- Using clamps, we fix the protective cover on the grenade and the shaft. We do the same with the second part.
- We drive the shaft drive into the box, having first screwed the nut onto the CV joint.
- We collect spare parts in reverse order.
We are studying the gearbox design to change the input shaft bearing
Before changing the bearing, familiarize yourself with the design of a four-speed gearbox (in a five-speed gearbox, the arrangement of the primary ball bearing is similar). Position No. 4 must be replaced; to do this, you first need to dismantle the gearbox.
Required repair tool:
- A set of spanners or ratchet heads;
- Two wide flat-head screwdrivers;
- Round nose pliers;
- Hammer, vice, wooden block;
- Torque wrench.
How to remove the gearbox and input shaft bearing on a VAZ 2107
The operation of replacing or dismantling the gearbox is carried out in a pit or on a lift; in exceptional cases, use strong supports with a jack, but this is not safe. Stops are installed under the rear wheels, and the handbrake is engaged with a neutral gear. To make the replacement safe, disconnect the negative terminal from the battery and perform further operations according to the instructions.
- We remove the cardan from the gearbox and coupling; read how to do this in the article on replacing the VAZ 2107 suspension bearing.
- Now we dismantle the exhaust (reception) pipe of the manifold; it is held on by three bolts.
- Find the clutch slave cylinder on the gearbox housing and unscrew it.
- Next, disconnect the cable with ground, as well as the reverse lights terminal.
- Now remove the speedometer cable (the so-called speed sensor) and unscrew the lower clutch housing.
- We proceed to dismantling the gearshift lever. First, we remove the leather boot, then the handle itself - to do this, use a screwdriver to remove the plastic retaining sleeve.
- We unscrew the lower and upper bolts securing the gearbox to the engine with a 19mm wrench.
Advice:
It is more convenient to approach the upper bolts from above using a long spanner. Loosen the thread, then unscrew the bolt by hand.
- The rear part of the manual transmission is supported by a traverse (swallow), to dismantle the support we unscrew two nuts from the studs. How to do this is described in our article “How to Unscrew the Nuts”.
Important advice:
Before unscrewing the rear support (traverse), you should place a block between the engine protection and the engine itself so that it does not sag after removing the manual transmission.
- Don’t forget to unscrew the starter, now we dismantle the gearbox, the whole procedure is shown in the photo.
- It is possible to remove the input shaft bearing on a “classic” without disassembling the manual transmission, but it is impossible without unscrewing the clutch bell. Having unscrewed the 8 bolts, we disconnect the nodes from each other; it is more convenient to use a wrench with a 17 mm head.
- Having gained access to the assembly, first remove the bearing retaining ring using pliers.
- Then we take out the bearing assembly itself, for this we use two flat-head screwdrivers. We pry the part on both sides by the locking groove (groove).
Note:
Replacing the intermediate shaft bearing is carried out using the same technology.
- Now remove the small retaining ring from the annular groove, which secures the ball bearing to the shaft.
- Using a vice, press the part from the seating surface (neck), as shown below. If you use a steel hammer, then hit the end through a copper mandrel or a wooden block.
How to replace the VAZ 2107 input shaft bearing with a new one
- To install the input shaft with a new rolling support, first wipe the housing from dirt and oil, then insert the spring ring into the groove (groove) of the ball bearing.
- Clean and lubricate the seating surface. Next, without distortions, we place the end of the shaft into the hole of the ball bearing (there are mounting chamfers for this), and press the parts together with uniform blows.
- We put the small retaining ring back on, then we insert the assembled structure into the gearbox housing, tapping it through a wooden block.
Attention:
Before mounting into the housing, ensure that the shaft is correctly mated to the secondary assembly inside the gearbox.
- After replacement, install the clutch bell back. Then we install the gearbox in the reverse order.
It is important to know:
Don't forget to put a pressure spring ring between the clutch housing and the PPV (see diagram).
Gearbox (Gearbox) for Lada Granta 2190
(the starter is attached to 3 studs)
Order by phone
To avoid bank commissions or cash on delivery fees, pay for your order with a bank card, using Yandex.Money, QIWI wallet or WebMoney. Your savings will be from 3% to 5%.
- Description
- Reviews (0)
- Payment and delivery
Buy the auto spare part “Gearbox (Gearbox) for LADA Granta 2190 (the starter is attached to 3 studs) with delivery throughout Russia and the CIS countries.”
Standard 5-speed gearbox.
.
Gearbox warranty is 180 days.
After assembly, all gearboxes are tested at a specialized stand to check for defects and acceptable noise levels.
Weight: 32.7 kg
What is a wheel bearing and why is it needed?
The bearing consists of outer and inner rings, a cage and rolling elements.
The structure of all rolling bearings is the same, with the exception of the rolling elements, the type of which depends on the design of the vehicle.
Most often, single-row tapered roller bearings are installed on driven axles. This is due to the fact that they are small in size and durable.
However, they require careful installation and periodic adjustment, otherwise they quickly fail.
Double-row tapered roller bearings are installed on the drive axles, which can withstand a load twice as large as single-row bearings.
In addition, they have a closed design, so they can be used until they are completely worn out without maintenance.
The operating conditions of these bearings can be confidently classified as severe. And if you add frequent acceleration and braking, road surface defects and bad weather, it becomes obvious that you cannot skimp on the quality of this part.
During normal operation, the service life is 100-130 thousand km. Sooner or later on VAZ 2114, 2115, 2110 there is a need to replace the bearing.
Reasons when repair and restoration of cardan shafts is necessary
- Long-term operation without preventive maintenance or replacement of crosspieces, which led to complete unsuitability of the fingers and their destruction.
- Negative consequences of an accident, accident, collision when the body part of the metal plating is damaged.
- Manufacturing defect.
- Prevention was carried out improperly by previous craftsmen.
To increase the service life of the unit, it is necessary to systematically carry out maintenance and apply lubricant to the bearing and crosspiece. When the first signs of a malfunction appear, promptly contact a car repair shop for diagnostics.
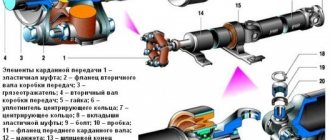
Suspension support design
Where is the outboard bearing located?
Basic dominant
the object is a rolling or sliding bearing of a specific design, inserted into a metal frame. The free zone between the outer race and the inner sphere of the housing is covered with a rubber ring designed to dampen vibrations of the cardan. The leakage of lubricant and the penetration of dust are prevented by rubber bands with sealing covers that cover the gaps between the rings of the product.
The purpose of the bearing bushing is to hold the joint shaft in a calculated position with allowable displacement.
The structure, assembled into a single load-bearing unit, is attached to the machine frame through the mounting brackets of the base support.
Recommendations from professionals for repairing CV joints
In this subsection, we invite you to familiarize yourself with practical advice from professional craftsmen:
- If it is necessary to change the hinge, perform a complete replacement. The only exception may be the reinstallation of anthers and other small parts from this category. In addition to lubricants in the CV joint, you need to change all the clamps and, with a certain degree of perfectionism, monitor cleanliness during assembly;
- A hammer and a wooden stand are perfect for installing the CV joint in place. Carry out installation work carefully - movements should be smooth and not forceful. In other words, you place a wooden attachment against the part and knock until everything falls into place. If you do not use a “gasket”, there is a high probability of damage to the part, which will become unusable;
- Once the CV joint is installed, install the boot. First, use pliers to clamp the clamp onto the shaft. Equalize the pressure in the part - use a screwdriver to hook the edge of the boot and unscrew it. Now clamp the clamp from the outside. A plastic plug is placed at the end of the shaft.
All other steps are performed in reverse order, as during disassembly.
As a result, performing repair work when it is necessary to replace the VAZ 2109 CV joint may seem labor-intensive. If you have enough free time, try to figure it out yourself. Otherwise, it is better to turn to professional craftsmen. Any service station will replace your CV joint or boot in a short period of time, because this is a fairly common problem on any car.
Sources
- https://mylada.net/remont/zamena-granaty-na-vaz-2114.html
- https://mylada.net/remont/zamena-granaty-na-vaz-2110.html
- https://ladaautos.ru/vaz-2109/kak-zamenit-shrus-na-vaz-2109.html
conclusions
Replacing the steering tips on a VAZ-2114 car is quite simple, but the process itself can take a lot of time and effort, since the fixing nut will not always be unscrewed easily. If the described process seems complicated to the motorist, then you need to contact a car service center, where they will always help with replacement. Separately, it is worth noting that the chassis parts must be changed on time to avoid the tragic consequences described in the article.
Sources
- https://provaz07.ru/hodovaya/zamena-rulevyx-nakonechnikov-vaz-2107-svoimi-rukami.html
- https://carfrance.ru/zamena-rulevyx-nakonechnikov-vaz-2114-svoimi-rukami/