One of the relatively simple types of repairs on any car can be considered replacing the driveshaft crosspiece. This procedure is performed not only when absolutely necessary, but also as part of scheduled maintenance. If desired, each driver can make a similar replacement in his garage. Next, we will talk about how to determine the need for repairs, what tools you will need, and also in what order to proceed in the process of replacing the universal joint or steering shaft.
We also recommend reading the article on how to replace the fuel pump yourself. From this article you will learn about the main nuances when removing and reinstalling an electric fuel pump, as well as how to correctly connect electrical connectors and fuel lines.
Replacing the crosspiece on the cardan shaft
Good afternoon to everyone who reads me, today I’ll tell you how to change the crosspiece on the cardan. This is a relatively simple repair that any car owner can handle. Perform it as needed or during scheduled maintenance. With a cardan cross, it is not recommended to bring the situation to a critical level; the cardan may jam. If it jams at high speed, then this threatens an accident, a break in the cardan, and a breakdown of the gearbox and drive axle.
- What is the cardan used for?
- Cross device
- Signs that replacement is needed
- Causes of backlash
- We carry out replacement
- Removing the cardan
- Removing the cross
- Installing a new one
Principle of operation
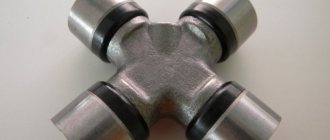
It is very, very simple. All work of the shaft to transmit torque is performed using articulated joints. Thus, rotational energy can be transferred from the gearbox shaft to the axles if the shafts are in different planes. The hinges are crosspieces. It is thanks to them that rotation occurs at variable angles. This part often fails and requires repair. Replacing the cardan crosspieces is necessary if the angle of rotation is more than 20 degrees. The part is subjected to enormous loads and wears out very quickly. As a result, the shaft loses its balance, knocks and vibrates.
The replacement operation is quite simple, and the shaft itself is one of the most repairable mechanisms in a car. Removing this structure is very simple. Repair consists of installing new components.
From the history of the cardan
If you remember, the car that the characters in the film drove was a VAZ 2103 - with rear wheel drive. The driveshaft that the hero-lover is talking about is a transmission unit of the “troika”, which was also installed on cars with all-wheel drive. For front-wheel drive vehicles, such a transmission unit is not needed - torque from the engine to the front axle is transmitted through the main gear and differential, which are located in the gearbox housing.
Rear-wheel drive and all-wheel drive vehicles cannot do without a driveshaft: with its help, torque is transferred from the gearbox or transfer case (for all-wheel drive) to the front and rear axle gearboxes. The principle of operation of this mechanism was first described by the Italian Girolamo Cardano, after whom the shaft was named. Cardan shafts began to be used in the automotive industry at the end of the 19th century. For example, one of the pioneers in installing a driveshaft on a car was the founder of the French company of the same name, Louis Renault. On his cars, the cardan has proven itself to be the best: thanks to the introduction of this unit into the transmission, engineers were able to solve an important problem - transmitting torque from the gearbox to the rear axle without failures while driving on uneven roads, thereby ensuring a smooth ride. Since then, the driveshaft has evolved slightly - the torque transmission mechanism has remained the same, but the design of the unit has improved depending on which specific car model it was installed on.
What is a driveshaft and what function does it perform?
The transmission of a car performs an important function - it transmits the rotation of the crankshaft to the wheels. The main elements of the transmission: clutch - we talked about it on Vodi.su, it connects and disconnects the gearbox and the crankshaft flywheel; gearbox - allows you to transform the uniform rotation of the crankshaft into a specific driving mode; cardan or cardan drive - used on cars with rear-wheel drive or all-wheel drive, used to transfer torque to the drive axle; differential - distributes the moment of movement between the drive wheels; gearbox - to increase or decrease torque, ensures constant angular speed. If we take an ordinary manual gearbox, we will see that it contains three shafts: the primary or drive shaft - connects the gearbox to the flywheel through the clutch; secondary - rigidly connected to the cardan, it is intended to transmit torque to the cardan, and from it to the drive wheels; intermediate - transmits rotation from the primary shaft to the secondary one.
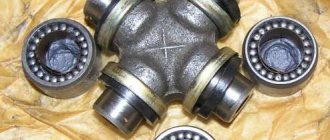
Possible crosspiece malfunctions:
- Cross play
- Needle bearing wear
- Wear of the cross itself
- Leakage and lack of lubrication
- O-ring failure
- Metallic ringing when moving
- Noise and crackling in the cardan area
Theoretically, the crosspiece is a very reliable part, the service life of which should be about 500,000 kilometers. But in practice, replacing the universal joint cross occurs after a mileage of 50-100 thousand kilometers. This is influenced by factors such as operating conditions, the manufacturer of the part, and the quality of the materials used in the manufacture of the part. If your car is often used in rural areas, then dirt and various bumps will shorten the life of your cross by several times. A common reason for crosspiece failure is simple inattention during routine maintenance. Often, no attention is paid to the lack of lubrication until the crosspiece makes itself known by vibration, noise or ringing.
How to replace the driveshaft spider
If characteristic knocking noises occur from under the car and vibrations in the cabin, there is a possibility that the driveshaft crosspiece will have to be replaced. An experienced driver will always notice unusual car operation, while beginners are recommended to undergo regular diagnostics at a service station.
Self-diagnosis
You can check the condition of the driveshaft yourself. To do this, you will need to place the car in the “pit” and carry out a test: hold the shaft with one hand, and the flange of the drive gear of the gearbox with the other, while trying to rotate them towards each other. If even a slight play occurs, the cause of the malfunction lies in the crosspiece.
Important: when working with the driveshaft crosspiece, it is recommended to mark the forks of the crosspieces so that subsequent installation can proceed without problems.
How to remove and install the universal joint
First of all, use sharp pliers to remove the retaining rings. Using a hammer and a soft drift, remove the bearings from the fork.
During the extrusion of the bearings, burrs may have formed, which should be removed with a file. The grooves and mounting holes are cleaned using fine sandpaper.
Secondly, a new cross is installed, for which both cups are removed, the new part is tucked into the “eye” and one cup is put on, but it is important not to scatter the needles.
Using a drift, push the cup until the retaining ring is recessed, after which it is installed and the driveshaft is turned over.
The third step is pressing the cups, for which the cross is moved towards the cup and proceeds similarly to the manipulations described above. According to the assurances of experts. Installing a second cup is difficult, but accessible.
Important: when installing the cardan crosspiece, be sure to lubricate the parts except the studs themselves, as an air cushion may form.
Recommendations for dismantling and installing the universal joint
When assembling the hinges, it is important to avoid distortions, otherwise you will have to remove the cross again.
When working with a drift and hammer, do not be zealous so as not to damage the cross.
Installation of the cardan is carried out in the reverse order, and it is worth using the left marks. To locate the cardan in the coupling onto the splines, you need to lightly tap the end of the flange.
The list of tools needed to replace the driveshaft spider includes a hammer, pliers, open-end and socket wrenches, screwdrivers and a metal drift made of copper or aluminum.
- Exactly those feelings. Experience with Bridgestone Turanza T005 tires.
See all photo news >>
Diagnosis of a breakdown, how to diagnose it yourself
To carry out self-diagnosis, you need to crawl under the car. Secure the shaft with one hand and the drive gear flange with the other. Then turn them towards you.
The presence of even the slightest backlash proves that the matter really is in the cross. Although, if only one bearing is worn out, there may be no play.
In this case, the condition can only be checked visually; to do this, disconnect the drive shaft from the gear flange using the “13” key and check the condition. Marks before disassembly to avoid incorrect assembly.
Procedure for replacing the crosspiece
It is better to carry out the work on an overpass, lift or pit. The work includes several stages:
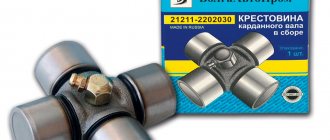
- Preparatory work. Purchase of a crosspiece and everything necessary for replacement. You can view our range of cardan shafts on this page, and crosspieces here,
- Removing the shaft. It can be removed in several ways. You can first disconnect the rear part, then remove the intermediate support bolts and the coupling. Another way is to use a screwdriver to bend the tabs that secure the casing on the cuff. The shaft is easily removed from the flange.
- Removing the cross. First you need to remove the retaining rings, then rotate the driveshaft so that the part is visible from above. In this position it is more convenient to remove it. To do this, it is better to use a hammer and a mandrel. It is necessary to knock out the bowl of the cross with gentle blows, gently tapping it with a hammer. When the bowl starts to move, you need to take pliers and pull it out. Repeat removing the second bowl in the same order. We must not forget about cleaning the cardan from grease and dirt. It is also necessary to clean the grooves for the retaining rings. Now the old crosspiece is no longer needed; it is a non-repairable part.
- Installing a new driveshaft crosspiece. This work must begin by dismantling the cuff from one tenon, and so on. You need to act carefully, carefully, without damaging the parts. Each part is subject to abundant lubrication. It is recommended to replace old fasteners with new ones. During installation, distortions should not be allowed to avoid additional costs of money and time.
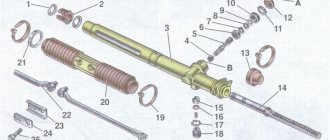
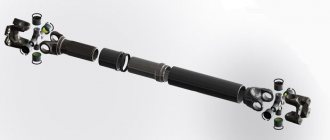
Purpose and design of the VAZ 2107 driveshaft
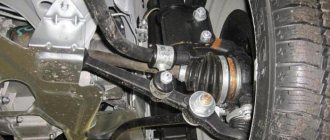
The driveshaft is a mechanism that connects the gearbox to the rear axle gearbox and is designed to transmit torque. This type of transmission is most widespread on vehicles with rear-wheel drive and all-wheel drive.
Cardan device
The VAZ 2107 driveshaft consists of the following elements:
- one or more sections of thin-walled hollow pipe;
- splined sliding connection;
- fork;
- crosspiece;
- suspension bearing;
- fastening elements;
- rear movable flange.
The driveshaft of the VAZ 2107 has a fairly simple device
The cardan transmission can be single-shaft or double-shaft. The second option involves the use of an intermediate mechanism, to the back of which a shank with splines is attached to the outside, and a sliding sleeve is fixed to the front through a hinge. In single-shaft structures there is no intermediate section.
The front part of the cardan is attached to the gearbox through a movable coupling with a spline joint. To do this, there is a hole with internal splines at the end of the shaft. The cardan design involves longitudinal movement of these splines at the moment of rotation. The design also includes a suspension bearing attached to the body using a bracket. It is an additional attachment point for the cardan and is designed to limit the amplitude of its movement.
The cardan is unified for all classic VAZ models.
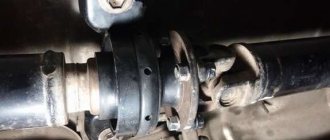
Replacement of VAZ 2107 cardan crosspieces
Faulty crosspieces cannot be repaired. Theoretically, the universal joint is considered a very reliable part with a service life of more than 500 thousand km. In reality, even the highest quality crosspiece requires replacement after 50–70 thousand km. The reason for this is bad roads, intensive use of the car, etc. To replace the VAZ 2107 CC you will need the following tools and materials.
- set of wrenches;
- hammer and spacer made of soft metal;
- the spacer is slightly smaller than the diameter of the crosspiece lugs;
Dismantling the VAZ 2107 cardan
Before replacing the CC, it is necessary to dismantle the cardan drive. This is done as follows.
- If the car has been in use for quite a long time, the cardan mounting nuts are filled with WD-40 or kerosene. After that they can be easily unscrewed.
- Use a sharp chisel or other tool to place marks on the flanges of the cardan and axle. This is necessary to ensure mutual alignment during subsequent installation of the cardan.
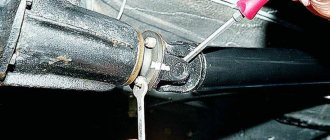
- Using a 13-mm wrench or socket wrench (preferably curved so as not to damage the threads of the nuts), unscrew the cardan mounting nuts. If the bolts start to spin, you should fix them with a screwdriver.
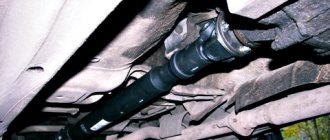
Removing the VAZ 2107 cardan cross
The cups and bearings can be removed from the driveshaft clamped in a vice using a special puller. However, this device is not very convenient and is used extremely rarely. Usually a standard set of tools is used. Dismantling the cross is carried out in the following order.
- Using round-nose pliers or pliers, remove the retaining rings from four sides of the cross.
Before installing new CCs, the lugs, fork and grooves for the retaining rings are cleaned of dirt and rust with a metal brush. The installation itself is carried out as follows.
- Any two cups facing each other are removed from the new crosses.
- The crosspiece is inserted into the eyes of the end of the cardan.
- Cups with bearings are generously lubricated with grease or G' Energy grease and installed in place.
- Using a hammer and a soft metal spacer, the cups are driven in until a groove appears for the retaining ring.
Installing the cardan
When installing a cardan with new crosspieces in place, you must:
- lubricate all connections with grease;
- make sure that the lubricant does not get sand or dirt;
- check the condition of the crosspiece seals and, if necessary, replace them;
- install parts in accordance with the marks made during dismantling;
- First insert the splined part into the flange, and then tighten the cardan bolts.
Video: replacing the VAZ 2107 universal joint
Thus, to replace the cardan cross, all you need is the car owner’s desire to do it himself and a standard set of mechanic’s tools. Carefully following the instructions of specialists will allow you to do the work efficiently and avoid possible mistakes.
DIY washing machine cross repair
The process, regardless of the cause of the breakdown and the method of eliminating it, begins with disassembling the tank. In different SMs, the tank is reached in different ways - through the top or from the facade. It is more difficult if you have to dismantle the facade panel. Before removing the cross from the washing machine drum, you have to disassemble the SM. Sequencing:
- Turn off the water supply.
- Disconnect the SMA from the power supply.
- Drain the remaining water in the tank. Unscrew the inlet hose. Remove the drain filter.
- Move the machine away from the wall - you need space to disassemble the device.
- Start disassembling. Start by removing the top cover - unscrew the screws and push it away from you.
- Remove the front wall. It is necessary to dismantle the control panel, cuff, UBL.
- Remove the back wall. Remove the drive belt (if the SM has a commutator motor and a belt drive).
- Disconnect the electric motor and remove the tank. Disassemble it into two parts - if the tank is collapsible. Non-removable is a big problem. You will have to either give up the idea of repairing the broken unit - then the tank will be scrapped, or cut it with a hacksaw.
- Examine the bearings, if they are the cause of the failure, replace them. You'll have to try hard here. Usually they are tight and you have to knock them out with a chisel. It happens that you even use a drill to make cuts in the bearings, and then, inserting a chisel there, knock them out. Replace the old bearings with new ones. Also replace the old oil seals with new ones - since you had to tinker so much, do as many useful things as possible.
If the bearings are to blame for incorrect operation, the repair is complete. You can reassemble the machine in reverse order.
What to do if the part itself needs to be replaced? Before removing and replacing the washing machine crosspiece, you need to unscrew a couple of bolts - they attach it to the outer surface of the drum. Remove the deformed or worn part and replace it with a new one. That's it - assemble the washing machine and check its operation.
Useful video:
Now you know how to change a worn crosspiece. Replacing the part itself is not particularly difficult - just two bolts separate the old part from the scrap. The difficulty lies in disassembly and diagnosis. Disassembly takes a lot of time and effort, and to make a correct diagnosis of a worn-out unit, you need the experience of professionals.
Bad 1
Interesting
Super
The main stages of repair work on the cardan shaft
Removing a Worn Cross
Before you begin the process of dismantling the old cross, you should make notes about the clear location of the forks. As a result of incorrect installation, you will also not have to expect a high-quality result.
Having marked the necessary places, the retaining rings are dismantled in conjunction with the removal of the bearings. The bearings are knocked out using a hammer and a metal drift. Professional specialists for this type of activity use a special puller, the presence of which in private hands is quite rare. As a rule, ordinary car owners use their own funds. By dismantling the crosspiece, the joints and holes are freed from foreign elements that could damage the new part in the future.
Replacing the front universal joints of the CF500-A ATV
A cardan is a hinge mechanism for transmitting torque from one shaft to another. The ATV uses two driveshafts, rear and front. The mobility of the shafts is ensured by the so-called cross. There are two crosspieces on each cardan shaft. At one point, the crosspieces (one or both) will reach a significant degree of wear and will need to be replaced with a new part. Is it possible to do this yourself and do without special tools? Can.
It is very easy to determine that the crosspieces are worn out. Firstly, when moving, a distinct rattling (clanging) of metal will be heard. Secondly, you can simply reach up to the driveshaft with your hand and pull it from side to side in the transverse direction. If the shaft dangles with noticeable play, as in the video below, it’s obvious that it’s time for the crosspieces to go to the trash heap.
That’s how I did it: I drove around and thought that the clanging was a normal phenomenon. I don’t even remember when this sound began to appear - it feels like it has always accompanied me. And when I pulled the front driveshaft, I made an amazing discovery for myself: it turns out that it should have been repaired a long time ago. At the same time, the rear driveshaft was in perfect order.
The CFMOTO CF500-A all-terrain vehicle uses two 25×64 crosspieces in the front cardan shafts, catalog number 7020-290130, price around 450 rubles. These are not cheap and not particularly high-quality Chinese crosspieces, the metal from the Chinese is always not strong enough, the rubber cuffs are generally below any criticism, so there is no point in buying the original. Instead, you should purchase Japanese crosspieces from GMB, catalog number GUM-81. These parts are used in Mitsubishi Pajero cars, are made of good steel, have a grease nipple for lubrication, and cost only 250-300 rubles.
Tool
To replace the crosspieces you will need the following tool:
- jack, wrench 17 for wheel removal
- ratchet wrench for 12 with extension
- circlip puller
- hammer
- mandrel for knocking out the cross (old 15 head, for example)
In addition to the hammer, it would be nice to have a large vice, but if you don’t have one, like me, it’s okay. Of course, instead of a vice, it’s even better to have a crosspiece puller, but... it seems to me that my article is not for those who already have a puller