Design and principle of operation
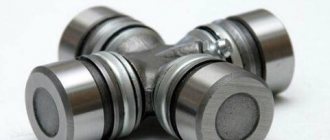
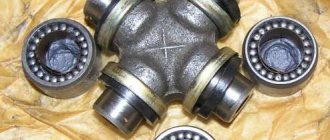
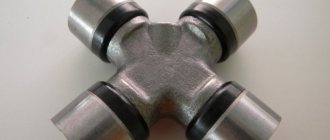
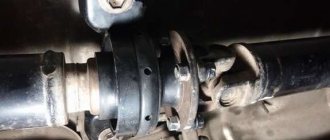
The part is a cross-shaped joint, which is responsible for the alignment of the rotating parts of the cardan. Two propeller shaft forks are attached to its four ends.
The movable connection is ensured by needle bearings inserted into cups placed on the crosspiece.
Fixation of parts is ensured by locking rings, which determine the size of the gap and backlash. On some vehicles, driveshaft vibration can be eliminated without replacing the U-joint.
To do this, you just need to install larger width retaining rings. However, on the Chevrolet Niva, as on most passenger cars, the problem is solved by replacing the crosspiece.
Which crosspieces are better for Niva?
Having identified the faulty crosspiece, you need to buy it. Before you buy, you should decide on prices. After all, they will depend on the company.
Are the crosspieces 2123 (Chevrolet Niva) and 2121 (“Short”) different? The crosspieces should be the same , article number for Chevy Niva and 2121 21212202025 , but practice has shown that there were cases when the crosspiece did not fit. This happens if the cardan has been repaired or the Niva is very old with cardans for the Zhiguli cross. In any case, it is better to measure the old crosspieces in advance and only then buy new ones.
At the moment, the following options can be distinguished:
- VolgaAvtoProm - price 500-700 rubles.
- AUTO DETAIL - price 420 rubles.
- AVTOVAZ - price 600-800 rubles.
These are perhaps the best options that you can install on your car without worrying. However, beware of fakes, of which, unfortunately, there are a lot.
Symptoms of a problem
Wear on the crosspiece manifests itself in the form of knocking when the car starts and vibration when driving. However, such signs are also typical for some other transmission malfunctions. To check the condition of a part, you must:
- Place the car on a pit, overpass or lift.
- Turn on neutral.
- Grasp the cardan shaft with your hands and sharply twist it in different directions.
If there is play in the needle bearings, the cross joint must be replaced. You can do this yourself.
Important: untimely replacement of the cross joint can lead to accelerated wear of bridge parts due to vibration.
Lada 4×4 3D › Logbook › Replacing the front driveshaft crosspiece and transfer case oil seal
Back in the spring, I noticed a strange clanging sound when starting off, I thought it was a cross! And later there was a loud rumble in the bridge, apparently all the needles were falling out - like a crosspiece
!
Well, what can we do, we’ll change it. I performed the procedure for the first time on this car back in late spring. In my boyish youth
there were no classics, but before there was a Moskvich 412 in the family, and I don’t remember my father and I changing the crosses.
And the replacement procedure turns out to be extremely simple...
One problem: there is a garage, but no pit. It doesn’t matter, BSTM has a lot of them left in the garage cooperative after people handed over their “ tin cans”
“. That's where we're going.
runs quite briskly with rear wheel drive
, but somehow it rides uncertainly above 70 and is a bit scary when cornering. Or so it seemed to me.
He brought the cardan to the tool room, filled it with a bucket and began to disassemble it. A cheap circlip puller, previously purchased from Leroy Merlin, came in handy. When the stoppers were removed, it was necessary to clamp the cardan in a vice, which I don’t have...
Without thinking of anything else, I put the cardan on 2 blocks and started knocking the cups out of the forks. I didn’t have to knock hard or for long—everything came out very easily.
The crosspiece was in the stash and I didn’t have to buy it ( that’s great, I thought
), and I got 2 of them from my neighbor in the garage a long time ago, when I
didn’t even have
.
But after comparing them in size, I realized that something was wrong here
. And after opening the spare parts catalog and poking around the Internet, I realized what was going on. It turns out that until 1988, the Niva had cardans with “penny” crosses, then they came with “Nivov” ones and there were also cardans with “Moskvich” crosses.
I threw the Niva crosses back on the shelf and went to the store to look for “classic” crosses. The choice in our village is not great: the vaunted Syzran crosses were not available, on the windows there was all sorts of crap like Krafttech and Hofer. In the end I took the most expensive one: Finwhale UJ201
. The kit included retaining rings, but no grease seal. And you can drill through hardened metal at home without a vacation. Well, it wasn’t, let’s go put it
I cleaned the cardan forks with sandpaper, lubricated them with lithol, cleaned the seats for the stoppers with an awl and began to put them back together. I read earlier that some people have difficulty filling the cups, the stoppers won’t fit, etc. I installed everything without problems
and it rotated well.
Put it all together. I noted the location of the forks in advance in order to assemble them more or less correctly. Everything would be fine, but the splined connection of the sliding fork is broken: the cardan is still original. I put it back according to the old marks.
But I was in no hurry to put the cardan back in place; I decided to change the transfer case flange seal. He didn’t dig much, but when the grass was wrapped around him, he began to drive the oil very hard. It turned out to be much easier to change it on the transfer case than on the axles. Because there is no need to fuss with preload. I bought a red Balakovo oil seal, a new nut and some sealant. Voila, you're done!
I put the cardan in place. The knocks and rumbles disappeared, the transfer case became dry and without snot. All that remained was the nasty ringing of the transfer case flange boots. What to do with them
? Weld or hammer on them and drive?
Crosspiece Finwhale UJ201 - 340 RE Right-hand rotation oil seal 2101-2302052-01 - 35 RE Flange nut M16x1.5 - 40 RE Cardan bolts 2101-2201107/1610 - 15 RE x 8 Sealant Kazan - was Tad 17 - also available
Source
labavto.com
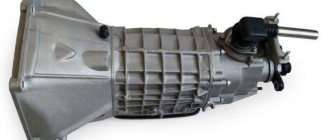
The Niva car is equipped with two driveshafts that are part of the all-wheel drive system. They transmit energy to the front and rear axles and are a prefabricated structure with crosspieces as their central link. If the crosspiece fails, it must be replaced immediately. This will prevent damage to the driveshaft and failure of the car’s drive system.
Causes and signs of part malfunction: how to detect
The crosspiece is the key link of the driveshaft. Thanks to it, torque is transmitted from the gearbox, causing the shafts to rotate. Usually one of the crosspieces fails, of which there are four in Lada 21213. If it is not replaced in time, the steam room will quickly become unusable. The crosspieces allow the driveshaft to rotate evenly; if they break, play appears and the car loses power.
To avoid any unpleasant surprises on the road, you need to monitor the condition of the crosses. Carry out a thorough inspection of them regularly, clean and apply lubricant at least every 10 thousand km. If a part has become unusable, it must be replaced in a timely manner.
Parts in the drive system become unusable due to play in the units, which is caused by increased loads and mechanical stress. The wear of the crosspiece is facilitated by its unfavorable location. It is located close to the road surface, so it often gets sand, dirt, water and dust. Wear depends on the following factors:
- quality of parts manufacturing;
- driver's driving habits;
- sudden temperature fluctuations;
- the quality of roads, which leaves much to be desired;
- operating conditions;
- ingress of dust, sand, dirt, stones and water.
The main signs of a faulty crosspiece:
- the appearance of grinding, creaking and crackling sounds in the area of the cardan while driving;
- knocking sound when the car starts;
- extraneous sounds when driving on uneven roads.
The crosspiece is one of the parts that have a high margin of safety, but when exposed to a large number of mechanical influences and operation in an unfavorable environment, it quickly wears out.
Inspection and replacement of the crosspiece on the VAZ 2121
To carry out a correct diagnosis, you must perform the following steps:
- Place the machine on a lift to allow access to the bottom.
- Having found where the propeller shaft is located, we hold on to it with one hand, and with the other we take hold of the drive gear hinge. It is located near the gearbox.
- Now, holding the connection with both hands, we try to turn it. If this succeeds, then there is backlash. Its presence requires mandatory replacement of the crosspiece. If this is neglected, the car may fail while driving, as control will be unreliable.
If the decision is made to replace, we purchase the necessary consumables. To carry out the work, we prepare the tools:
- jack;
- spanners;
- Phillips screwdriver;
- attachment made of aluminum or copper;
- hammer;
- thin pliers;
- tool to remove the retaining rings.
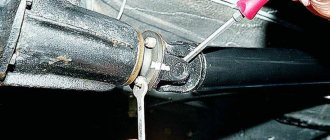
Repair work on joints can only be carried out on a removed cardan shaft. We place the car on a viewing hole or lift it using a lift. We fix the wheels with supports, turn on neutral and the handbrake.
First of all, you need to dismantle the driveshaft. We clean the removed structure from dirt and begin disassembling and replacing parts:
- Using narrow pliers, remove the four retaining rings.
- We use a chisel to mark the relative positions of the parts to each other on the cardan and the hinge body so as not to confuse them in places during assembly.
- Now we press the bearing out of the flange using a piece of pipe of a suitable diameter or a union head. Or use a puller. It is better to fix the cardan in a vice.
- We hit the mandrel until the fork hits the cross. Now remove the lower bearing bowl. We carry out a similar operation with the top one.
Creating conditions for changing the driveshaft crosspiece
Carrying out any operations with hinges is possible only with the “cardan” removed, for which it is necessary:
- put the gear in neutral, release the handbrake;
- lift the car on a lift or hang out the front/rear axle (depending on the type of driveshaft: front/rear), installing wheel chocks;
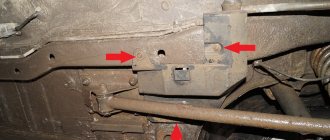
- make two marks with a chisel at the junction of the “cardan” flanges with the bridge and transfer case;
- unscrew the four nuts securing one flange connection, turning the shaft, and remove the three bolts from their seats, repeat the range of actions for the second element;
- remove the remaining bolts;
- bring both parts of the “cardan” closer to each other along the spline connection;
- remove the assembly unit.
14.4. Disassembling the universal joint
EXECUTION ORDER
If there is no puller, we rest the driveshaft flange yoke on the support (vice jaws)…
...and through a suitable section of pipe we strike the propeller shaft fork with a hammer, moving it down until it stops at the crosspiece.
Similarly, we press out the bearing housing located on the opposite side of the propeller shaft fork. Leaning the propeller shaft fork on the jaws of the vice, we press the bearing housings out of the flange sockets one by one. With both methods of pressing out, the bearing housings do not come out completely from the fork holes...
...therefore, even if you move the crosspiece all the way into the fork, the spike of the crosspiece is not removed from the bearing housing.
For final pressing, the bearing housing must be clamped in a vice. So that it does not turn in the jaws of the vice...
... using a cutting machine (“grinder”) we grind flats on the bearing housing.
Now the bearing housing can be securely clamped in a vice by its flats.
By rotating the propeller shaft around the bearing axis, remove the fork from the bearing housing.
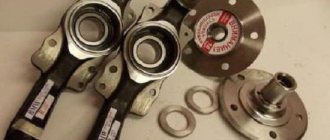
| We disassemble the universal joint only to replace the cross assembly with bearings. Remove the driveshaft (see Removing the driveshaft). Using round nose pliers, remove the four retaining rings. We mark the hinge parts so that when assembling they are placed in the same position. We apply paint marks... |
...or a chisel.
We install the puller on the hinge flange fork.
We press the bearing housing out of the driveshaft fork seat until the crosspiece stops in the fork.
Remove the flange with the cross.
We press out the housing of one of the crosspiece bearings installed in the flange in the same way as the bearing housing of the propeller shaft fork.
We take out the cross.
Holding the propeller shaft fork in a vice, use a drift to knock out the housing of the other bearing remaining in the fork. Similarly, we knock out the bearing housing remaining in the flange. Before installing a new crosspiece, we make sure that there is grease in the bearings - 0.8–1.2 g of Fiol-2U grease is placed in each bearing. We put oil seals on the spikes of the crosspiece and insert the crosspiece into the sockets of the propeller shaft fork.
In a vice with soft metal jaw pads, press the bearing into the fork socket until its end stops against the vise jaw.
At the same time, we insert the spike of the cross into the bearing socket so that the bearing needles do not fall out. During the pressing process, by rocking we control the ease of rotation of the crosspiece in the bearing.
Using a suitable piece of pipe, we press the bearing into the fork seat deeper than the groove under the retaining ring.
Using round-nose pliers, install the retaining ring into the groove of the fork.
Similarly, we press the bearing into the other seat of the shaft fork until the opposite bearing stops at the end of the retaining ring and install the second retaining ring. Orienting the flange along the marks relative to the propeller shaft fork, insert the spikes of the cross into the sockets of the flange.
We press the two bearings into the flange seats one by one...
...and install the retaining rings in its grooves. After assembling the cardan joint, we strike the fork and flange with a hammer with a plastic striker in order to select the gaps between the ends of the bearing housings and retaining rings (for selection of the thickness of retaining rings, see the design description). We check the ease of rotation of the cardan joint.
| Tool for disassembling cardan joints: 1 – bolt M14x70; 2 – upper support plate; 3 – coupler (2 pcs.); 4 – lower support plate; 5 – M12 nut (2 pcs.); 6 – pipe sections |
Tool for disassembling universal joints
Disassembling cardan joints will be easier and more convenient if you use the device shown in the figure. The distance between the support plates is selected depending on the dimensions of the hinge.
| « previous page 14.3. Removing the driveshaft | to contents | next page » 14.5. Replacing the sliding fork oil seal |
| Copyright © 2007-2020 All rights reserved. All trademarks are property of their respective owners. |
Vehicle Features
The Chevrolet Niva has the factory designation VAZ 2123. This car was conceived to replace the obsolete VAZ 2121 model. However, both cars are produced today at the VAZ plant and each of them finds its buyer. The Chevrolet Niva VAZ 2123 has more comfort for the driver and passengers. The older Niva VAZ 2121 performs better on serious off-road conditions. In addition, it has a higher front overhang, so it can tackle fairly steep climbs.
Both cars have permanent all-wheel drive and a transfer case with a reduction gear. Structurally, the Chevrolet Niva VAZ 2123 and the regular Niva VAZ 2121 have many common components. The cars are quite easy to maintain, and replacing some parts that have failed is not an impossible task for an experienced motorist.
Today, the Chevrolet Niva VAZ 2123 is available with modern additional equipment. In particular, they put on the car:
- ABS;
- Airbags;
- Power steering;
- Air conditioner.
In its price category, this car has practically no competitors with identical off-road potential. However, many criticize the low-power engine inherited from the VAZ 2121 model. It was only slightly modified. This motor clearly lacks power. It is only 80 horsepower, which by modern standards is not enough even for a compact city car, not to mention a full-fledged SUV. Hence the rather high gasoline consumption. In addition, efficiency is negatively affected by the fact that all-wheel drive is permanent.
The build quality of the Chevrolet Niva VAZ 2123 has improved significantly in recent years. Spare parts are always available, and there are plenty of services throughout the country ready to service this car.
Replacement
Before starting work, you need to provide access to the bottom of the car by placing it on a pit or overpass.
To replace the cross joint you will need:
- 13mm wrench.
- A puller or pliers for removing the circlips of the cross.
- Wire brush.
- Gas key.
- WD-40 product.
- Fiol 2U grease or similar.
- Chisel.
- Hammer.
Keep in mind that the chisel is only needed to mark the relative positions of the transfer case and cardan flanges.
Operating procedure:
- Secure the vehicle with wheel chocks.
- Turn on neutral speed.
- Use a chisel or metal marker to mark the relative positions of the flanges.
- Using a 13mm wrench, unscrew the nuts securing the propeller shaft.
- Remove the cardan.
- Use a wire brush to clean the attachment points of the cross joint.
- Treat with WD-40.
- Remove the retaining rings.
- Using a gas wrench, remove the bearings one by one.
Tip: parts can be knocked out of the holes in the cardan forks using a socket head of a suitable diameter as a stop.
- Thoroughly lubricate the bearings of the new crosspiece.
- Install the cross joint into the fork and secure it with retaining rings.
After this, all that remains is to tighten the nuts securing the propeller shaft flange.