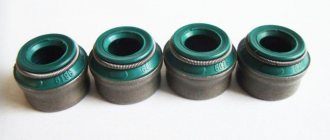
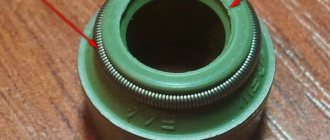
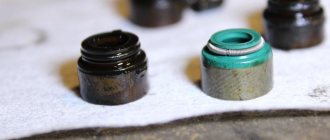
Oil scraper caps on Niva are parts of the gas distribution mechanism of a car engine, the task of which is to prevent lubricant from entering the combustion chamber. Made of metal and special rubber, these elements fit tightly to the valves, but over time they wear out and break down.
Their rubber part becomes less elastic and may separate from the base. Oil begins to pass through, and the consumption of lubricants by the engine increases. This means that the oil on the Niva’s removable caps needs to be replaced.
This process is complex, but can be done on your own if you familiarize yourself with the stages of the work and prepare the appropriate tools.
Reasons for replacement
On average, on domestic cars, such as the VAZ 21214 and other models, they are replaced approximately every 80,000 km. For modern imported cars, the interval approximately doubles or triples.
Signs of the need to install new caps on the Niva may include:
- high oil consumption;
- the appearance of blue smoke when the engine accelerates sharply or, conversely, when braking using the engine;
- an unreasonable increase in gasoline consumption (when traveling the same sections of the route and under similar driving conditions).
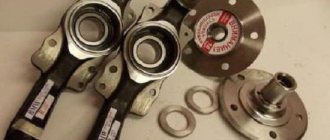
Fake and original
Be careful when buying, there are a lot of fakes. Usually, when you look at a photo of the packaging on the Internet, you already understand that it’s crap. There isn't even a verification code. Since I bring spare parts from European warehouses and Scandinavian warehouses, I have nothing to be ashamed of. I will list several features of original products:
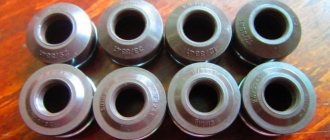
individual code
- EACH package of caps has its own individual code. Even if you don’t have a computer at hand, just take two packages; the codes should not match.
- There is a hologram stuck on the packaging; it’s not just “glitter.” The four digits from the hologram must match the outermost digits of the digital code.
- If you have a computer, on the manufacturer’s page, you can enter a digital code and verify the originality of the product.
https://anticounterfeit.federalmogul.com/default.aspx?Language=Russian
You can purchase Niva valve stem seals in the appropriate section of the website.
Preparing the tool for work
List of necessary equipment:
- screwdrivers and wrenches;
- desiccant;
- torque wrench;
- tweezers;
- inertial removable device;
- rod (d = 8 mm) made of tin.
During preparation, the battery is disconnected and the spark plugs are removed. It is also necessary to dismantle other parts in turn - from the bearing housing and camshaft to the drive levers, springs and valves.
When dismantling the shaft, set the pistons of cylinders No. 1 and 4 to TDC (the conventional position of zero degrees of crank rotation), preventing the loosened valves from falling inward.
What are valve stem seals used for?
In internal combustion engines, lubrication is combined, that is, oil enters the camshaft journals under pressure, and the remaining parts of this design are lubricated by splashing.
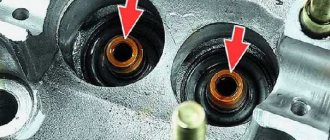
When the engine is running, so much engine oil collects in the top of the cylinder head that it even coats the top of the valve guides.
The function of valve stem seals is that they prevent the oil accumulated at the top of the head from flowing down the valve stems. If the caps are worn out, then the oil flows through the valves directly into the working combustion chambers of the cylinders, hence the thick smoke from the muffler.
The wear of the caps occurs gradually. Due to the high temperature of the engine, over time the rubber caps do not fit tightly to the walls of the valve rods and the oil begins to flow down.
Which valves burn out?
The exhaust valve operates at a higher temperature. Therefore, when the valve stem cap is worn out, oil flows onto the facet of the valve cap and at high temperatures it burns, forming carbon deposits on the valve cap. Then this carbon deposits fly off and sometimes the valve cap gets holes or breaks off at the edges. As for the intake valves, even if the caps do not hold the oil, it simply flows into the cylinder without any consequences for the valves. The operating temperature of the intake valves is not so high, so the intake valves do not burn out.
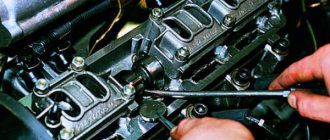
Main stages
The next point of work is to install the rod in the spark plug hole. Thus, it is located between the piston plate and the valve.
This is followed by placing the pressure bracket of the desuction tool on the spring plate and securing the support bracket using a nut located on the mounting pin.
Now required:
- compressing the valve spring with a depressurizer;
- removing two crackers (using tweezers);
- removing the desiccant;
- removing the spring plate;
- removing both springs, both lower and upper;
- removing the support washer from the intravalve spring;
- installing the collet of the removable device on the part being removed;
Using the upper striker of the puller, compress the collet (by hitting the lower striker with it) and compress the cap (impacts are applied to the nut).
To protect the replacement part from damage during pressing, a special installation sleeve must be located on the valve stem. Usually it comes with new consumables.
Now, having applied lubricant to the inner surface of the cap, it is pressed down along the bushing (all the way).
After this, install the valve elements back and proceed to the next stage - removing the rod and installing the crackers in place (lightly hitting the end of the rod with a hammer). Now we need to replace the parts of the remaining valves, turn the shaft half a turn and install the pistons of the two remaining cylinders (No. 2 and 3) at TDC.
In the same way, change all the caps, and then turn the shaft another one and a half turns.
Signs for concern
There are signs that will indicate that replacement is needed:
- A characteristic sign that the time has come to perform such an operation as replacing the valve stem seals of the VAZ 21213 is the appearance of bluish exhaust smoke under load on the engine, that is, when the engine sharply picks up speed.
- Symptoms indicating that the valve stem seals on a VAZ 21213 require replacement are increased fuel consumption and the short-term appearance of bluish-blue exhaust smoke during engine acceleration or braking.
To solve this problem and perform such an operation as replacing the valve stem seals on a VAZ 21213 with your own hands, we will need repair manual instructions and tools. Although, you can entrust this matter to professionals in specialized service centers who will do everything quickly and efficiently, by the way, and Their prices for work are quite reasonable. But it’s better to try to fix everything yourself. So let's get started.
Work process
- It is necessary to disconnect the negative cable terminal from the corresponding terminal of the battery.
- Then you should unscrew all the spark plugs.
Note. When performing the following procedure (after removing the camshaft bearing housing), it is necessary to note the position of the actuator valve arms.
- Along with the camshaft, remove the bearing housing, as well as the springs and valve actuator arms. When dismantling the camshaft, the pistons of the fourth and first cylinders must be installed at TDC (top dead center). This measure will prevent the valve from falling into the valve cylinder after the first one has been dried out. In the top dead center position, the oil seals of the fourth and first cylinders are changed.
- Install a tin rod through the spark plug hole between the valve plate and the piston; its diameter should be about 8 millimeters.
Replacing valve stem seals on a VAZ 21213
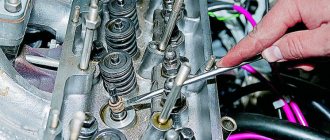
- Install the depressurizer pressure bracket on the spring plate, using a nut that is screwed onto the camshaft bearing housing fastener pin, secure the support bracket.
- Afterwards, you need to compress the valve spring using a desiccant, and then remove two crackers from the groove. Unscrew the fastening nut and remove the desiccant device.
- Remove the spring plate.
- Then you will need to remove the inner and outer springs.
- Next, you need to remove the valve inner spring support washer.
- Install the collet of the removable inertial device onto the oil deflector cap. To compress the collet, hit the upper striker against the lower one. Perform a crimp test of the oil deflector cap with the valve guide bushing; to perform this task, use the upper striker to strike the nut of the removable structure.
Note. Now let's talk about choosing oil seals. A large number of counterfeit caps are sold on car markets, and most of them are questionable in terms of quality, and replacing valve stem seals is not so easy. The oil seal must be reliable and of high quality; it has a difficult and responsible job.
- Firstly, it must allow oil to pass through so that it lubricates the valve stem, and secondly, it must not allow oil to enter the combustion chamber. Quality and its service life depend on the quality of materials and manufacturing precision. A valve seal made of low-quality rubber will very quickly harden and begin to leak oil, which will result in the release of bluish smoke from the exhaust pipe, and in addition, oil will appear on the spark plugs and subsequently they will have to be changed frequently. It won't do you any good to install valve seals of the wrong size. You need to choose those valve stem seals that have proven themselves to be the best, and most importantly, you need to make sure that the product you purchased is not a counterfeit.
- If the installation sleeve is included in the set of new oil seals, then it must be placed on the valve stem. This measure will make it possible to prevent damage to the working edge of the cap during installation.
- It is necessary to apply engine oil to the inner surface of the valve stem seal, and then move it down into the valve guide until it stops along the installation sleeve.
- Using the specialized mandrel included in the puller kit, press the oil scraper cap onto the valve guide.
- Reinstall the removed valve parts in reverse order.
- Pull out the tin rod and give a couple of light blows to the end face of the valve stem with a hammer. This is done so that the crackers sit in place.
Replacing the oil seals of the valve timing mechanism VAZ 21213
- Replace the oil seals in the remaining valves of the fourth and first cylinders in a similar way.
- Replace the oil seals of the third and second cylinders as you previously did on the fourth and first cylinders.
- After replacing the valve stem seals of the third and second cylinders, turn the engine crankshaft one and a half turns (540 degrees). This is required in order to set the piston of the fourth cylinder to the top dead center of the compression stroke.
- Install the camshaft assembly with the bearing housing on the engine cylinder head. And then you need to tighten the fastening nuts evenly.
- Untie the wire from the sprocket-pulley with the chain, install the sprocket on the camshaft (at this time there should be a timing chain on this sprocket). Then you need to tighten the fastening threaded element and lock it, for this you need to bend the petals of the lock washer of this bolt.
- Check if the marks match.
- Then you need to charge the tensioner of the timing mechanism of the drive chain, then put it in place, and then discharge it again.
- It is necessary to adjust the clearance in the valve drive.
- Perform further assembly in reverse order.
Also, if something is not clear to you or you want to study the process in more detail, then on the Internet there are a huge number of photos and videos of replacing valve stem seals on a VAZ 21213. In them you can study this process in detail. Although, in principle, there is nothing complicated about it, you just need to start, do it, and everything will work out. The main thing is to have all the necessary tools at hand.
Source
How to identify a malfunction
Engine oil entering the engine combustion chamber causes blue smoke to appear, especially when using engine braking. There may be several reasons:
The first reason is less common and is caused by the use of a non-standard brand of gasoline or oil, violation of engine operating conditions, or the approaching period of major repairs. The second reason, the most common, and easy to fix with your own hands, is what we will consider
Set of tools
To replace the caps you will need the following tool: