Print this article Font size 16
In spring and summer, the lack of heated seats is not particularly noticeable. But with the onset of cold weather, many drivers want to sit in a seat, feeling warm and comfortable. For VAZ 2110 owners, this opportunity is not always available, so many decide to eliminate this drawback on their own. How? By installing heated seats.
What is needed for this?
The first thing you need to figure out is what elements, materials and tools will be useful to you during the heating installation process.
| Element | Explanation |
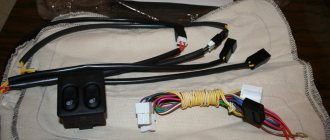
| Heating elements | They are required for backs and seats. Experts recommend choosing the standard ones provided for the VAZ 2110. They are sold in sets for two seats. Their cost ranges from 1000 to 1400 rubles. The kit also includes wiring and buttons to turn the heating on and off. |
| Buttons | They are not always included. They are used to turn the seat heating system on and off. |
| Wiring | It serves to connect the heating to the vehicle’s on-board network |
| Foam rubber | If the seats are already quite worn, it would not hurt to replace the foam rubber, which is short-lived |
Choose only high-quality materials, purchase kits from trusted retail outlets. Heating is carried out by electricity, which is always dangerous to human life and health.
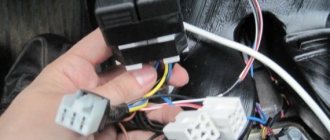
On/off buttons
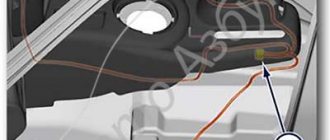
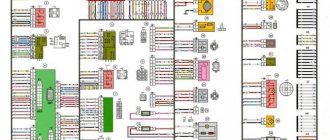
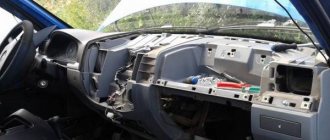
Location of additional fuses and relays
In the figure below we see how to get to the additional fuses of the car. Located to the right of the central panel, the screws are twisted and the cover is easily removed.
Removing the cover for diagnostics and replacement of additional fuses and relays
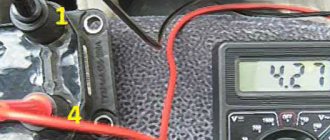
Below we see the fuses themselves, there are 6 of them, 15 Amps each.
Location of additional fuses
- Ignition controller,
- Sensors for oxygen, air flow, speed calculation,
- Fuel pump and relay, injectors,
- Fan,
- Gasoline pump,
- Ignition.
We remind you that F1-F20 are so-called fuses. This means that jumpers and other “tricks” are not acceptable when working. If you replace such a fuse with a jumper yourself, you risk system failure.
Dismantling works
To install heating elements, you first need to carry out a dismantling procedure. It includes the following activities.
- Unscrew the plastic fasteners that connect the seats to the body of your car.
- Remove the skids. Two pieces are located in front, and two more are located in the back.
- Remove the chairs from the interior, otherwise it will be extremely uncomfortable to work.
- Separate the back from the chair. To do this, there are bolts on the sides, which can be removed with a 10 mm wrench.
- On the back there is a plug for the headrests, which can be removed.
- The upholstery is removed from the hooks below. To do this, the hooks are slightly unbent.
- Now you can completely remove all the trim.
- Carry out a similar procedure with the second seat if you plan to install heating on it too.
While you are installing the heating, throw the upholstery into the washing machine. This will not harm her, and the interior will look newer and nicer.
Question/answer on fuses for VAZ 2110, 2111, 2112
We answer some questions sent on the topic.
Tell me, the left turn signal and high beam headlights on the VAZ 2110 stopped working, what could be the reason? Open the fuse and relay box, the contact may have come loose, move the wires, look and check, and if necessary, replace the fuses yourself.
Please tell me I'm already tired of it, the washer motor shorts, the light in the cabin with the clock and fuse F17 blows? Install a light bulb instead of a fuse, turn off all devices that are connected to this fuse. Turn on the ignition. If the lamp does not light, connect everything back one by one. Whichever one lights up, that's where the problem lies. If it lights up immediately, there is a short in the wiring.
Tell me what could be wrong, the reverse lights are dimly lit, if you remove one bulb, the second one starts to burn normally, put them back in place, both light up at half power. The brake lights on the same board light up normally. This problem is due to poor ground contact.
Why does fuse F8 melt? Look under the cover on the driver's side. If the catalyst was clogged, then the wires that go to heating were broken.
Why is the stove turned off, but hot air comes in? If the air is hot, but the switch is set to cold, then the electric drive of the faucet has soured.
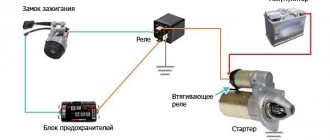
The car starts only periodically when I turn on the ignition and the lights come on. I put the starter on direct and it starts. Tell me what is the problem? Place a relay between the lock and the starter, it won't help - it's the ignition switch.
Installation of heating elements
Many people forget about the need to securely fix the elements responsible for heating the seats. As a result, over time they can shift, thereby disrupting the performance of the system.
To avoid such situations, experts advise sewing heating elements directly to the inside of the upholstery. Although today some car owners prefer another option, which uses double-sided tape. The elements are held on it quite reliably, and the tape is attached to the foam rubber itself.
Connection process
Regardless of the chosen fixation method, reverse assembly looks the same for all options. This is the most difficult stage, so strictly adhere to the specified sequence of operations.
- Pull the covering back onto the back, where the heating was already fixed.
- Using a mallet, the plugs are driven into place. We are talking about plugs for headrests.
- Next, the fabric is stretched. The front one is pushed through the hole, and the back one is straightened down.
- The fabric from the front is draped over the hooks and then stretched. Just watch the degree of tension so that the fabric does not tear.
- Now you can put the rear trim element on the hooks.
- The next step is to insert the wire into the front and tension the sheathing.
- If you plan to change the foam rubber, cut out the new elements in strict accordance with the dimensions of the old material.
- Pay attention to the areas where the spring contacts the body and seat ties. To avoid squeaks, use pieces from the washer tube, or simply wrap several layers of electrical tape.
- Heating for the lower part of a car seat is often mounted using double-sided tape or sewn to the trim on the inside. You can use plastic clamps or wire brackets, which will prevent the heating elements from moving from their installation locations. After this, the plastic fasteners are tightened.
- Connect the backrest and seat.
- A wire is pulled through the hole in the frame and the foam rubber, with which the heating will be connected to the on-board network.
- The wiring connection is carried out strictly according to the diagram. It is necessarily included with the set of heating elements, so you don’t have to look for anything additional.
- The standard location for installing heating on and off buttons is the area near the handbrake. Although you can place them as you wish.
- It’s not uncommon for car owners to take an alternative route, installing a standard heating system on top of the seats, after which they put car covers on top.
There is a modern and very simple solution - heated capes that can be put on in winter and removed during warm periods. Their disadvantage is that the wire runs freely, which can interfere with the driver. Plus the capes do not fit tightly to the chairs.
Option with capes
Dismantling
We begin tuning and repairs with the removal and subsequent disassembly of the seats, which is carried out as follows:
- We unscrew the plastic fasteners with which the seats are attached to the body;
- Unscrew the slides (2 each in front and back);
- We take the seats out of the cabin;
- Separate the backs. To do this, you need to unscrew the bolts on the sides with a 10mm wrench;
- Directly on the bottom of the seat you need to pull out 4 plastic fasteners and remove the trim;
- On the backrest you need to remove the plugs for the headrests. Then, at the bottom, remove the upholstery from the hooks, which will require slightly straightening them. Now you can remove the casing completely.
When making such repairs, it would be very good to wash the upholstery in a regular washing machine at the same time. This will not harm her, and driving a VAZ 2110 clean is somehow more pleasant.
Hello everyone! At the beginning of last winter I installed heated seats from a VAZ-2110. The thing is cool and necessary in winter, but it has one drawback: a couple of minutes after turning it on, it starts to fry your butt, and if you turn it off in cold weather, the seat cools down instantly and also becomes not very comfortable. I decided to upgrade the control unit to eliminate these shortcomings. I used the eight-bit AVR Attiny2313 microcontroller for which the firmware was written and a board was made for installation in a standard ten-pack case. Heating is regulated using PWM: current is supplied with a constant voltage in the form of pulses, and the wider they are, and the shorter the pauses between them, the more the element heats up. The power part of each channel is made of a MOSFET transistor; the operating mode is indicated by a combination of two LEDs, red and green. The connector terminals for connection, as well as the buttons themselves, are taken from the standard unit. The unit has three heating modes: 30%, 60% and 100% of full power. Each channel operates independently of each other, the last selected operating mode is stored in non-volatile memory (EEPROM) and is selected automatically the next time it is turned on. When you turn on the heating, the intensive heating mode at full power is first switched on for a while, after which the last memorized mode is automatically switched on. The intensive heating time can be adjusted during operation; for this, when the heating is turned off, the driver's seat switch is pressed for 2 seconds, after which the unit turns on the driver's heating at full power. As soon as it starts to get hot, turn off the heating, the unit remembers the time and switches to normal mode. In the future, it will turn on exactly for this time. Each channel is indicated by two LEDs: 30% - green, 60% - yellow, 100% - red. The intensive heating mode is indicated by blinking red, the time setting mode is indicated by blinking green. I wanted to make sure that the updated unit would fit without modifications to the existing wiring, but since the installation space in the unit is very limited, I had to use the simplest circuit for connecting a power transistor, which involves controlling the load minus and the constant presence of a plus on the second load terminal, but in the standard one it was the other way around: one terminal is constantly on ground and the plus is switched. Therefore, minor wiring alterations are inevitable. Schematic diagram:
In the final version, there were minor deviations from this scheme in case of interference from the ignition, generator, etc. (MK is very sensitive to power supply interference), but practice has shown that everything works fine without them.
While working on the device I came across this solution: https://www.drive2.ru/communities/e-stuff/blog/636105 The idea and implementation are interesting, due to the fact that they abandoned the original buttons, which eat up 60% of the usable area boards, in favor of mikrikov from ordinary household equipment, we managed to free up enough space for additional wiring of the MK, but we had to collectively farm our own stands for rockers made of PCB. I hoped that it would be possible to remove the original ones and put them on a new board, but I was mistaken, the quality of their manufacture left much to be desired and they were tightly rolled on the board and I had to make one stand of the same homemade kind. I also doubted that the microphones would provide sufficient pressing force in such a design; my fears were partially confirmed in the comments on the drive. In addition, the author of the device used a more expensive microcontroller, while at the same time my experience has shown that a cheaper and more compact one is quite sufficient.
Health issue
Today, medical professionals are still actively arguing about the harm of heating seats inside cars. Some believe that heating is harmful to men's health. Others, on the contrary, consider this a normal and even useful addition to the car.
The decision is yours in any case. But we recommend not to get carried away with high temperatures. Just warm up the seat a little before you hit the road. And then turn off the system.
Didn't find the information you are looking for? on our forum.
Necessary equipment
To install the heating you will need:
- Special heating elements for the backrest and the seats themselves. Preferably standard ones, for the VAZ 2110. It is also possible to install heating not only for the driver, but also for the front passenger. Then you will need two sets. As a rule, a heating kit is sold immediately with heating elements for the two front seats, i.e. only 4 pieces. The price of a standard kit for a VAZ 2110 ranges from 1100 to 1300 rubles, the kit also includes wiring and on/off buttons; Set of standard seat heating
- Buttons that will be used to turn the heating on and off;
- Wires for connecting heated seats to the on-board network of the VAZ 2110;
- Tools: screwdriver, 10mm head;
- If your seats can no longer be repaired, then buy new foam rubber for them.