Question about glass color for fog lights
On older cars, the fog lamp glass had a yellowish color. therefore, many believe that this should be the case at the moment, it is more accurate and more effective.
In essence, everything is different. Nowadays, the leaders of the auto industry use only transparent glasses for foglights, which are better than yellowish ones in almost all components.
Tools and materials
If you decide to use xenon fog lights, then you will also need a xenon kit in addition.
Varieties
There are many types of fog lights on sale.
They are equipped with both ordinary incandescent lamps and halogen, LED and, of course, xenon lamps.
We will not consider the last option, since it is difficult to come up with a more stupid implementation of gas-discharge light.
There are combined fog lights . which have built-in daytime running lights. Not a bad economical option.
Fog lamp combined with daytime running lights.
Of course, there is plenty to choose from in terms of shape - classic round and rectangular, oval and square, eagle and angel eyes. Here only a sense of proportion and an instilled taste in fine arts lessons will be our advisor.
Fog lights divided according to the type of diffuser - lensed, corrugated, transparent.
fog lamps Automotive Lighting LLC (Ryazan) and Osram All Season lamps Super H3.
For fog lights there is not much difference, although everyone has their own preferences, as is the case with the color of the lens. It can be either classic white or yellow. As for prices, for example, here are several sets, imported and domestic:
- a pair of PTF Bosch manufactured in Ryazan, included only headlights, without wiring, ;
- DLAA LA-519. similar to the previous set, but with a transparent shade, per pair;
- combined Chinese lanterns ZFT 162A. 1000 rubles per pair, there are LED daytime running lights, a corrugated lampshade;
- DLAA PL519DB. China, built-in LED backlight, for H1 lamp,
There are also fog lights for sale from the Avtosvet plant (Kirzhach), as well as from well-known global manufacturers (Hella, Valeo, Sirius, Farren, Sho-Me) with prices ranging from two to five thousand.
Original fog lights "Kirzhach".
What does the manufacturer offer?
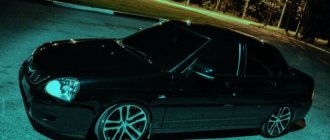
AvtoVAZ
Initially, a platform was launched into the series, which should already have fog lights in the front bumper. But due to various circumstances, among which the lack of rhythm in the supply of high-quality PTFs played an important role, the plant in Togliatti produced cars in different configurations.
Fog lights 2110 “received” at the design stage
And, nevertheless, the company prefers a classic rectangular headlight with a reflector and specially selected glass lenses that perform the following functions:
- Devices that distribute luminous flux;
- Protecting internal components from moisture and dust.
Bulbs for this headlight are suitable with socket H1 and H3
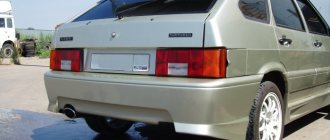
Bogdan
Ukrainian assembly of VAZ 2110 cars is carried out at the Bogdan enterprise. It was organized to reduce the retail price on the Ukrainian market and offers cars from imported car kits.
VAZ 2110 comes off the assembly line with standard PTF
The Ukrainian automaker gives preference to Russian suppliers:
- "Autolight";
- "Automotive Lighting" (Ryazan);
- "Ray".
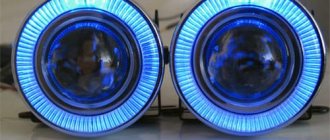
In the photo - xenon in PTF from the Ryazan manufacturer
How to properly mount and connect fog lights on a VAZ 2110, 2111, 2112
In bad weather, when fog spreads over the road or heavy precipitation falls, the main vehicle lighting does not do its job well. The reason is that the main headlights were designed for clear, good weather. Fog lights are installed for use in bad weather conditions. That is why they are indispensable in the cold season. To install the PTF, it is not necessary to contact a car service; experienced VAZ owners can easily do it themselves.
Optics installation
- First you need to choose a place for installation - as a rule, this is a special compartment under the front bumper. In the case of the “ten” there are several options for fog lights. They can be corrugated, which diffuse the light, or transparent, in the latter case the light will come out in spots. The transparent option today is more fashionable and in demand among our compatriots, but it is less useful.
- In the engine compartment, disconnect the wires that are connected to the fluid control regulator and the washer expansion tank. To do this, unscrew the washer fixing nut and remove the block with wires, which is located under the left side member.
- For the Ш-1 connector you will need three cables - one yellow and two black-yellow.
- After this, you will need to cut two pieces from the yellow cable - they should be pulled into the vehicle interior. The wiring is thoroughly cleaned and male terminals are connected to it. Having completed these steps, the connectors must be connected to the block in such a way that the marked cable is connected to the black and yellow wire. Next, the block must be connected and two yellow cables attached to the harness. Having done this, the washer reservoir can be installed in place.
- After this, you will need two more pieces of wire, each should be 0.5 m long. You need to connect a ground terminal to these wires, and then fix it to the stud along with the ground cable from the optics.
- The cable from the PTF must be pulled from the front side member and brought out to where the lamp itself will be fixed. A ground terminal must be connected to each cable.
- After these steps, the brackets are mounted on the bumper itself, and the terminal blocks are connected to the wires. The final stage will be the installation of light bulbs in the lanterns (the author of the video is the proVAZ-2110 channel).
READ Which springs are better to put on a VAZ 2107
How to upgrade them
- The good news is that we will no longer need conductive tape - neither new nor old. In any case, AvtoVAZ itself abandoned this “karmically” unsuccessful detail in the design of the rear lights of the VAZ 2114 or VAZ 2115 models.
- The bad news is that your car with such tape in the headlamp unit may present an unexpected and unpleasant surprise at the most inopportune time.
But there is a way out - to modernize it yourself, and in fact simplify the design of the rear lights.
Penny purchases
As you know, the best improvement is the one that:
- costs less than the original. And the proposed method will allow you to keep it within 250 rubles;
- simplifies the design. That’s how it will be, because it’s not for nothing that this method is used everywhere.
The proposed method will not lead to the disassembly of half the car. So, go to the nearest auto store and purchase:
- a set of single sockets for direction indicators;
- double sockets for brake lights and parking lights;
- male-female copper connectors;
- high-quality wire 2-3 meters.
Independent steps
Having removed the rear lights from the car, we begin to modernize them. To do this, you will need instructions that will show you how to remove the lighting fixture.
Don't forget that modern cars are full of plastic parts that can easily be broken due to carelessness.
When dismantling, try to do everything carefully
Note! You will need a wiring diagram for the VAZ 2112 injector, and the good news is that it is posted at the beginning of the article.
Locksmith stage
We arm ourselves with cutting tools and begin the alteration:
- in the plastic panel of the headlight housing we mark places for cartridges;
- then we cut holes for them;
- We fix them with self-tapping screws.
This is what the first stage of the remodel looks like
Electric stage
An equally important process for connecting electrical components is as follows:
- We cut off a piece of wire and use it to make a common “ground”. To do this, we connect the “-” terminal of all cartridges in series, having previously secured the male-female connector to the wire;
- Cut the wire again and connect it to the “+” turn terminal;
- Using the next piece of wire we connect the “+” terminal of the side and stop lights in series;
- Referring to the diagram, we connect the connector block with the free ends of the wiring.
This is what the inside of the headlight will look like after your modifications
Tip: be sure to test the assembled circuit to identify a short circuit.
How to make fog lights on lenses in a VAZ with your own hands?
This example shows how to modify VAZ fog lights to fit lenses with your own hands. to install the lens into the standard PTF housing; the very large dimensions of the structure will not allow them to be put in place. But it is possible to do this:
As a lens, we used lenses from the headlights of a VAZ Kirzhach car.
to install them, but without the headlight housing itself, because in order to prevent water from penetrating, it was decided to cover the back of the headlights with silicone. The lens mounts are made by hand.
With halogens, the fog lights got very hot and after a while the lenses cracked. To eliminate this unpleasant moment in the future, 4300K xenon lamps are replacing halogen lamps. tests.
Let's look at the second option, when the factory headlights were replaced with fog lights . The 1st photo was made using standard lamps, and the 2nd - with xenon 4300K:
As the author writes: “The xenon light is significantly brighter, but the camera simply lowered the shutter speed on the mobile phone and therefore the brightness seems similar.”
Another example when DLAA LA 1696 lens fog lights were installed to replace the standard fog lights, and the standard halogen lights were changed to xenon 4300K (H3 bulbs).
The last example is when the so-called “Auto VAZ 2110 lenses” were combined with xenon.
Now about the question that worries most: is it possible to install xenon in fog lights?
Fog lights are a headlight, and if so, it means there is a designation on it (similar to the main light headlights), which encodes in letter form the type of lamps used:
the presence of the letter “H” means that halogen bulbs must be used for this type of headlights.
the presence of the designation “D” indicates that gas-discharge (xenon) lamps are used for lighting.
The problem with new headlights
It happens that after installing new headlights, purchased for a lot of money from a reliable, excellent manufacturer, the quality of the glow leaves much to be desired.
Inexperienced drivers attribute everything to a defect or the purchase of a fake disguised as a trusted company. But in reality everything is completely different.
Headlights shine efficiently and efficiently not only depending on the manufacturer. Settings that someone doesn’t know about or simply forgets play a big role.
Headlights that have just been removed from the factory packaging and installed in place of the old optics do not have the adjustment required specifically for your car. You can do it yourself, but this will require a perfectly flat area, a similar wall and the skills of a draftsman. In practice, this is quite difficult to implement, so the optimal solution is to entrust the adjustment to specialists from a service station.
Alas, the VAZ 2110 is not a modern, advanced car in which the headlights are automatically adjusted electronically. Here everything has to be done manually.
When is xenon in fog lights allowed?
If the car is equipped with fog lights specially designed for xenon installation (for example, HellaMicroDE lensed fog lights).
If the car is equipped with xenon fog lights from the factory (class D).
Thanks to the usual installation of xenon in the PTF, this modification of the fog light is becoming increasingly popular, and with the correct settings you can drive without fear of fines. If you are thinking about installing gas-discharge lamps in the PTF, then it is important to determine for yourself what goal you are pursuing: to improve the illumination of the road or simply to attract attention?
In the first case, you need to look towards improving the main light. Also check out the test of fog lights, perhaps xenon in the fog lights is not what you need?
In the 2nd case, we must not forget about the other participants in the movement. “Collective farm” xenon in fog lights is not the best choice, because you can also draw attention with the help of DRLs in fog lights.
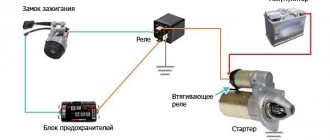
Instructions for connecting fog lights on a VAZ-2110
To avoid having to redo a lot later, during connection, follow the sequential instructions:
- Open the fuse box cover, unscrew 1 screw and open the power supply.
- Find 2 wires, the length of which reaches 15 cm; the cable connectors are called “mother”. Determine which wire is permanent - checked with a test lamp, the cable should be pulled to the relay on the leg.
How to proceed when installing PTF
- To install fog lights in a car bumper, you first need to remove the plastic plugs from the front bumper. that is, to free up seats for PTF. We carefully lay the wires included in the PTF kit in the area of the front bumper, both on the right and on the left, using the existing standard outputs to the PTF. which are located next to the radiator on both sides, respectively.
- The wires can be attached to the body using clamps. All wire connections must have reliable contact and be thoroughly insulated to avoid contact with the body and moisture ingress.
- The length of the wires must be chosen so that the headlight can be easily removed if necessary. Standard headlights are easy to install and connect. We connect our laid wires to the sockets and screw in the lamps. We mount the headlight in its regular place with two self-tapping screws and close it with a plastic plug. Next, we connect the electrical part using the standard wiring diagram of the car.
- According to safety requirements, when carrying out installation and dismantling work related to electricity, it is necessary to remove the voltage from the current-carrying circuits, which means that first of all you need to disconnect the battery.
- The next step is to work with the fuse block (FB). For your own convenience, you should completely remove the block from the instrument compartment and open it.
- We add two cables approximately 15-18 cm long to the connectors (red and white), with female connectors on both sides.
- One cable in a red plug (BP) is connected to a permanent “” (check), drag it to the thirtieth (30) leg of the relay (look on the back of the relay). The second cable is “” from the relay with the eighty-seventh (87) leg back (BP) in a white plug.
- We turn the power supply over and find fuse links F4 and F14 (10 A each) - they are the ones that protect the electrical circuits of standard PTFs from short circuit currents. The positive wire goes to the fuses and is divided into two wires, respectively, for each fog light according to the “plus”.
- Based on the standard electrical wiring diagram of the car, further wiring of the wires to the fog light connectors is carried out. For ease of installation, some wires can be extended by 20-30 cm.
- The black negative wire, which comes to the eighty-sixth (86) leg of the relay, is the wire that controls the inclusion of the fog lights.
READ Continental Cuts Car Production for 2022 Due to Chip Shortage Automotive News Europe
There are several options for where to get the “mass” from:
- You can connect the fog lights directly, which means that when you turn on the ignition or press the side lights button, the fog lights will also turn on.
- Or the option is through a button, that is, the positive wire goes from the ignition switch or the button for turning on the side lights to the button for turning on the fog lights and the PTF is turned on when the button is pressed.
It should be noted that the connection method through the ignition switch is the most effective, as it has a number of advantages during installation and during operation.
There are two modifications of the VAZ 2110: with a standard instrument panel and a Europanel. Their difference is in the location of the buttons. Attention should be paid to this and allowance should be made for the length of the installation wires.
After completing all the installation work, close the fuse box and return it to its place.
We put the terminals on the battery and check the operation of the car's lighting devices. If everything works fine, it means that the installation has been completed correctly, and we thoroughly tighten the battery terminals.
PTF service
At the same time, many owners of the first ten cars do not know where the fog lamp fuse is located. And if it malfunctions, they don’t know how to replace it.
To get to the PTF fuse, you need to remove the mounting block from the instrument panel niche with your own hands
On models after 2000. fuses are grouped in a single block.
Their technical parameters are as follows:
- The rear PTF fuse is marked F20 and is designed for a current of 7.5A;
- Fuse F4 at 10A is responsible for protecting the front right fog lamp;
- Fuse F 14 at 10A is responsible for protecting the front left fog lamp.
Side of VAZ fuses of the tenth family
The algorithm for the operation of fog lights has also been changed.
In particular :
- The headlights are turned on by pressing a button that supplies power to a relay type 113.3747 installed in the mounting block;
- Turning on the PTF on VAZ 2110 cars is only possible if the headlight switch is set to the exterior lighting position.
In other words, PTFs are activated only with side lights or low beam headlights. At the same time, the activation is indicated to the driver using a light indicator on the button and on the instrument panel.
There are no particular problems with replacing lamps in the headlights, since they were installed in an open position for service. But with the rear lamps we had to struggle a little, since the entire structure of the headlight unit was located in the trunk lid.
To replace a burnt-out lamp, you must remove the entire unit
How to install fog lights on a VAZ 2110
b Installation and connection of PTF/b in the VAZ 2110.
Diagram of the fog lamp button for VAZ 2115.
b Installation and connection of PTF/b in the VAZ 2110.
Fog lights for VAZ 2114: Installation.
3) lensed PTF "" clear focused light, the ability to
Fog lights for VAZ and foreign cars in the city of Kazan, photo 7, Auto parts.
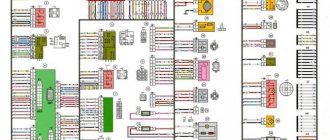
Wiring diagram for fog lights VAZ 21124.
how to properly connect fog lights on a VAZ 2107.
Scheme for switching on the rear fog lights of the VAZ 2110.
affection: installing fog lights on the VAZ-2114 bumper.
So I decided to post a diagram and procedure for connecting fog lights on a VAZ 2.
How to connect fog lights on a VAZ 2110 photos and pictures.
installation of PTF VAZ 2112 (Europanel).
Pictures upon request: wiring diagram for fog lights VAZ 2110.
Installation and connection of PTF on VAZ 21099.
Each “correct” kit contains a diagram for connecting the fog.
Installation diagram of fog lights Today is the installation diagram of fog lights.
How to connect fog lights on a VAZ 2110.
How to connect halogen headlights to a VAZ yourself.
Connection to standard mounting block 2109. connection of fog lights to.
DRL connection diagram. VAZ Auto Club Here is a simple connection diagram.
The third diagram for connecting headlights
It consists of 3 images, where you can see the connection features of the VAZ-2110 fog lights, the relay block, connectors Ш1 and Ш2, which makes up the PTF.
- Taking the headlight block, run the pink wire directly to the black box, where it needs to be added to the relay block numbered 85 (see picture).
- Provide power to contact number 3 of the block, designated Ш1, from terminal 0, located on the relay block.
- During installation of lighting devices, terminal 87 must be connected to contact 5 from block Ш1.
- Armed with a connector, connect the black cable located on the relay block 6 and on the contact to each other. taken from block Ш2.
- Check if the key backlight is working.
- The fog light on indicator implies exactly the same check.
Connection options and diagrams
If the car does not have wiring for the PTF, you will have to lay the necessary wires yourself. There are two options - through a relay and through a button.
Via relay
To connect fog lights via a relay, you need to stock up on cutting tools and a terminal block. You will also need corrugation, heat shrinkage and electrical tape.
Installation rules via relay:
- Find a place in the car to mount the relay. Attach it so that it can be easily reached in case of replacement or repair.
- Find a place for the button.
- Prepare the power cables. The length should be such that the wires can be laid freely, without tension.
- Install a 10 A fuse. From pin No. 30, lay the finished wire to the “+” terminal of the battery.
- From pin No. 85, take the wire to the power button.
- Connect ground to the relay using pin No. 86.
- Place the PTF on the bumper.
- Connect the “–” wire from the body and the “+” wire from contact No. 87.
- Turn on the headlights and check their operation.
It is not recommended to connect the PTF autonomously. They will drain the battery in a matter of days.
Via button
If the PTF is connected via a button, any wire with voltage is sufficient. As a rule, power is taken from the “+” dimensions or from the ignition system wiring.
The red wire carries “+”, the black wire carries ground connected to the body. Find a place on the panel that your hand can easily reach, and place the button there.
This connection scheme for PTFs is recommended for motorists who tend to forget to turn them off when stopping the car. They turn off when the driver, having finished driving, takes out the ignition key.
Installing PTF on a VAZ 2110 with your own hands
Scheme for switching on the rear fog lights of the VAZ 2110.
Circuit with one fuse (protects the circuit to the relay and headlight).
Knock sensor VAZ 2112 16 valves price.
So I decided to post a diagram and procedure for connecting fog lights on a VAZ 2.
Fog lights for VAZ 2114: Installation.
VAZ 21099 engine layout diagram. VAZ 2110 fog lamp diagram.
modification and tuning of fog lights Encyclopedia of tuning and.
replacement of the front headlight of VAZ 2113, 2114, 2115.
Wiring diagram for fog lights in VAZ 2110 World of circuits.
3) lensed PTF "" clear focused light, the ability to
DRL connection diagram. VAZ Auto Club Here is a simple connection diagram.
look at fog lights in VAZ 2114.
Wiring diagram for fog lights VAZ 21124.
Each “correct” kit contains a diagram for connecting the fog.
Pictures upon request: wiring diagram for fog lights VAZ 2110.
installation of PTF VAZ 2112 (Europanel).
Installation and connection of PTF on VAZ 21099.
Fog lights for VAZ and foreign cars in the city of Kazan, photo 7, Auto parts.
DIY installation of universal, round fog lights.
Connection to standard mounting block 2109. connection of fog lights to.
How to connect fog lights on a VAZ 2110 photos and pictures.
installation of PTF VAZ 2112 (Europanel).
b Installation and connection of PTF/b in the VAZ 2110.
affection: installing fog lights on the VAZ-2114 bumper.
how to properly connect fog lights on a VAZ 2107.
DIY installation of universal, round fog lights.
Basic misconceptions
Before giving comparative characteristics regarding certain lighting devices, it is necessary to clearly define the terms found in the automotive environment.
Lensed ones do not have a reflector
So, lensed headlights on the VAZ 2110 mean that the headlight itself has a lens (glass or plastic), which allows you to get a light beam from the smaller surface of the built-in reflector that is superior in power to the traditional one.
The instructions for branded products always contain information about the structure of the lensed headlight
In other words, a reflector (reflector) is an integral part of any headlight, since it is it that collects light into a single stream. But the lens is responsible for its direction, therefore, it is more correct to call such a headlight projection lighting technology.
The main advantage of lensed headlights is their compactness.
Fog lights can be installed in headlights
Another misconception that exists among car owners of the VAZ 2110 and other models of the Volzhsky Automobile Plant. It was formed due to the compactness of lensed headlights and their small dimensions, allowing them to be installed instead of standard lighting equipment.
Factory classic optics VAZ 2110
In fact, any lighting devices will not be effective when working in fog for one simple reason:
- the milk veil contains a high concentration of water droplets;
- they refract light, scatter it and reflect it back, blinding the driver.
This is why PTFs should be located below the standard headlights, because:
- warm air from the ground and road surface dries the air;
- the fog does not touch the surface and remains above it at a distance of 30-50 cm;
- It is in this narrow space that fog lights should work.
Fog lights should only shine yellow
The lenses installed in the headlights of the VAZ 2110 can shine in both white and traditional yellow. There is no violation here, since everything depends on the technical features of the installed lamps. (See also the article Relay for fog lights VAZ 2110: features.)
The photo shows a projection of the dispersion of the light flux. The difference in the illumination distance of high beams and PTF is shown
Xenon can only be installed in lensed headlights
The source of any light beam is lamps, even if we are talking about PTF or traditional head optics. There is also a lot of confusion and misconceptions in this issue, which we will now dispel:
Today, 4 types of lamps are used in headlights:
- traditional incandescent lamps;
- halogen;
- xenon;
- LED
More than 40 types and types of lamps are used in modern cars.
We will not dwell on their technical details, but will only note the fact that the standard for fog lights is lamps with H and HB sockets.
In other words, if, when purchasing a PTF, you want to have the opportunity to experiment with lamps, or purchase lenses for headlights on a VAZ 2110, then you should choose those whose characteristics indicate this standard. (See also the article Adjusting fog lights on the VAZ 2110: features.)
Fog lights on VAZ-2110
If we start only from functionality, then these headlights are designed to illuminate the space only in bad weather.
It is not advisable to use them instead of headlights, since due to their lower location they will blind oncoming drivers. In addition, fog lights collect all the dirt and dust, splashes and winter powder from the road, and this also affects the dispersion of the light beam and interference for oncoming drivers.
Varieties
There are many types of fog lights on sale.
They are equipped with both conventional incandescent lamps and halogen, LED and, of course, xenon lamps.
We will not consider the last option, since it is difficult to think of a more stupid application for gas-discharge light.
There are combined fog lights. which have built-in daytime running lights. Not a bad economical option.
Fog lamp combined with daytime running lights.
Of course, there is plenty to choose from in terms of shape - classic round and rectangular, oval and square, eagle and angel eyes. Here only a sense of proportion and an instilled taste in fine arts lessons will be our advisor.
Fog lights divided according to the type of diffuser - lensed, corrugated, transparent.
Bosch fog lamps Automotive Lighting LLC (Ryazan) and Osram All Season lamps Super H3.
For fog lights there is not much difference, although everyone has their own preferences, as is the case with the color of the lens. It can be either classic white or yellow. As for prices, for example, here are several sets, imported and domestic:
- a pair of PTF Bosch manufactured in Ryazan, included only headlights, without wiring, ;
- DLAA LA-519. similar to the previous set, but with a transparent shade, per pair;
- combined Chinese lanterns ZFT 162A. 1000 rubles per pair, there are LED daytime running lights, a corrugated lampshade;
- DLAA PL519DB. China, built-in LED backlight, for H1 lamp,
READ Which Battery to Put in an Audi A6 C5
There are also fog lights for sale from the Avtosvet plant (Kirzhach), as well as from well-known global manufacturers (Hella, Valeo, Sirius, Farren, Sho-Me) with prices ranging from two to five thousand.
Original fog lights "Kirzhach".
Other manufacturers and types of lamps
Of course, many are trying to install other types of light sources and other types of lamps. All headlights discussed above have a halogen lamp. That is, it is actually the same incandescent lamp, but its filament operates in a gas environment (bromine or iodine halogens).
There are also alternative fog lights.
Xenon PTF
Difficult to install and expensive lighting devices.
Standard PTFs converted to xenon fog lights.
The old xenon PTFs worked on lamps D1 and D2, the new ones received lamps D3 and D4 without the use of mercury vapor. Theoretically, the efficiency of such fog lights and the luminous intensity are higher than those of halogen lights. However, do not forget about the specificity of PTF - not to cause reflection of the beam from the water suspension. And all inexpensive xenon headlights require very precise adjustment of the light beam and are not able to provide a low horizontal stripe to combat fog.
In addition, the maximum color temperature for the effectiveness of fog lights is 3000-4500 K , otherwise they will be of no use and blinding light will be provided for oncoming drivers. The prices of such foglights are not lower than 5-7 thousand ( Hella Micro DE , for example). Anything cheaper is useless and even dangerous.
LED PTF
Intelligent LED PTFs are very expensive, and it makes no sense to buy cheap ones.
The main disadvantage of effective LED fog lights is their huge price and low efficiency..
The low efficiency is explained by the fact that a conventional LED produces light that is bright and pleasant to the human eye with a temperature of about 6000 K. This is not bad for head optics, but not for PTF. However, there are exceptions. For example, Osram LEDriving FOG 101 . A high-tech device with LEDs of a proprietary proprietary design with a color temperature of about 3000 K, which is just suitable for PTF.
Price - no less than 16,000 rubles.
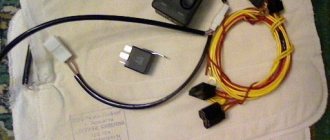
Required tool for installation
We will assume that the fog lights , all that remains is to select the appropriate lamps for them. There are complete installation kits on sale, and there are kits without fog lights, which include everything you need:
- Wires of the required cross-section, taking into account the power of the lamps;
- Switch (button) with LED indication.
- Connectors (detachable contacts).
- Fog light relay.
What are the button and relay for?
A special button and relay are a must - “ fog lights ” are very powerful equipment for car electrical wiring. The absence of such parts can provoke high current loads on the terminals and the ignition switch, which will cause burnout of contacts, damage and overheating of the insulation protection and short circuit with failure of the electrical network.
In order to install fog lights on a VAZ, you need to assemble certain parts in advance or purchase a ready-made kit.
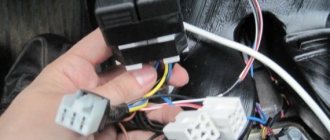
- wires with blocks and terminals for a specific VAZ model. There are three of them as standard: one connects the headlights, the second goes to the relay from the switch, and the third goes from the relay to the fuse box;
Set of wires with terminals and blocks for installing PTF
Fog lamp relay for VAZ 2113, 2114, 2115
Plastic ties and clips that secure wires
Which PTFs should you prefer? The headlights themselves are chosen by the driver to his taste, but the main thing when choosing is not to make a mistake with the power, so as not to overload the generator and the car’s electrical wiring. It is better not to purchase headlights with xenon: the generator has a certain power reserve, but is not designed for too high loads. Regular light bulbs will be sufficient.
Connection method for dual-mode LED fogs
VAZ 2110,11,12 how to connect dual-mode LED front fog lightsRead more
Connecting LED dual-mode PTF via a button, toggle switch. Read more
APPEARANCE TRANSFORMATION: Sport bumper, LED fog lights (2 modes) and how I screwed up with LampsRead more
Lada Granta, Kalina 2, one of the options for connecting two mode LED fog lightsRead more
Installing wiring for PTF on a VAZ 2110 | LED PTF from Sal-Man + Proper connection of FSORead more
PRIORA 2 Installation of LED FOG LIGHTS 2 modesRead more
Do-it-yourself dual-mode LED PTF for Mitsubishi ASXRead more
CONNECTING LED PTF 2 MODES SAL-MAN!YELLOW AND WHITE LIGHT ON VAZ 2114!DETAILS!RATTLE!More
Dual-mode LED PTF on Lada GrantuMore details
Be careful not to buy dual-mode LED PTFs for KalinaRead more
Source
What are fog lamps for?
The main task of the PTF is to illuminate the space in front of the car. Correctly adjusted “ fog lights ” are capable of illuminating a section of road 10–15 meters long. This distance is quite enough for safe movement by car in poor visibility conditions. The switching on and off of such lighting devices must be fully controlled by the driver.
Adjustment of fog lights is carried out during their installation. The procedure does not take much time, but requires care and precision. You can install the rear and front PTFs yourself.
Installation and connection algorithm
- Installation of a power button in the car interior. In the case of the VAZ-2114, the place for the button is on the left side of the driver on the front panel. However, its placement can be arbitrary - the main thing is that it is convenient for the driver to drive the car. Often, PTF power buttons are installed instead of plugs on the control panel.
A PTF activation button is installed in the cabin in a place convenient for the driver.
The power button is connected, chips are connected to it
Under the hood there is a block to which the PTF relay will be connected
The wiring harness connects to the fuse box
The PTF relay is located in the engine compartment
Wiring diagram for connectors and terminals of fog lights
The functionality of the entire connection can be checked by turning on the side lights - only then will the fog lights work.
Fog lights only function when the side lights are on
After completing the installation of the PTFs on the car, they only need to be adjusted correctly. The flow of light should not blind drivers in the oncoming lane.
Features of PTF (difference from headlights)
Installing parking sensors with your own hands
So, the main task of fog lights is to illuminate the road in poor visibility conditions (rain, snow, fog, etc.). However, unlike the head light, there are features.
First of all, PTFs must have the clearest possible upper cut-off line, and the beam of light must be strictly below and be as wide as possible. If these conditions are not met, this can become a problem both for the driver of the vehicle and for other road users driving in the oncoming lane.
We also note that even if the headlights have the most powerful lamp, the features, purpose and installation location of such headlights do not allow them to effectively illuminate the road in fog or rain.
The fact is that the head light should illuminate the road as far as possible, not blind oncoming drivers and cover the side of the road. However, in conditions of limited visibility, neither high nor low beam can cope with this task. The reason is that a powerful luminous flux is reflected from moisture particles, causing a cloudy “wall” to appear in front of the driver. This is especially noticeable when the high beams are turned on.
In turn, high-quality PTFs are characterized by lower power, and the optics themselves are made and installed so that the light from the fogs literally “breaks through” moisture and fog. The main secret is that usually the fog does not touch the ground, and the fog lights are as low as possible.
On the one hand, fog lights do not shine as brightly and far as the headlights, but in poor visibility conditions they illuminate several meters of the road in front of the car. The main thing is to follow the rules for installing PTF and setting up such optics.
In a nutshell, there are clear norms and standards that must be adhered to during installation. Additional adjustments allow you to set the fog lights so that the light flux falls on the road, does not blind the driver, does not form a “wall” in the fog in front of the car, etc.
At the same time, it is important to understand that cheap and low-quality PTFs, as well as incorrectly installed fog lights of a VAZ or any other car, will blind oncoming cars, but are not able to fully illuminate the road
For this reason, when selecting fogs, first of all, you need to pay special attention to this optics.
How can you install PTF on a VAZ 2113, 2114, 2115
Installation of fog lights on a car can be done in different ways. The car owner chooses a specific option based on his own capabilities, preferences and wishes. There are three main ways to install PTF:
- Purchasing a bumper with pre-installed fog lights. Similar parts are presented in a wide variety at tuning studios, where they can be purchased and installed immediately. Adjustment and connection are carried out by service specialists. The disadvantage of this method is that the cost of the work is too high.
One way to install foglights is to buy a bumper with already built-in PTFs
Front bumper VAZ 2115 with holes for fog lights
Purchase and subsequent installation of a set of “fog lights” from the PTF kit
Mounting options
Before installing the PTF, an electrical wiring diagram is developed - it will eliminate unnecessary wiring and guarantee the functioning of the electrical circuit.
Bumper mounting
There are 3 installation options: in the openings provided by the manufacturer, on a bracket or in a blind bumper where there is no niche for PTF.
To configure, use a homemade template. It is installed at a distance of 5 cm from the PTF. During adjustment, the coincidence line is set at a distance of 10 cm below the center of the lamps. By adjusting the headlights, they provide increased visibility and minimize the likelihood of being dazzled by oncoming cars.
Installation in a blind bumper
This option is labor-intensive; you have to cut out holes for the PTF.
- Remove the bumper and mark where the headlights will be.
- Drill holes around the perimeter, and then cut out a piece of the bumper with a sharp knife.
- Attach the headlights with appropriately sized bolts. Mount the protective cover - attach it to the bumper.
The headlights are adjusted using a special key - it is included in the package.
Other installation methods
PTF can be placed on a bracket made of durable steel. The bracket is fastened in accordance with the PTF installation standards. The part is secured with self-tapping screws. PTFs are installed at the mounting points and the wiring is connected.
Installation in the opening provided by the manufacturer:
- Raise the car by placing a 20 cm thick wooden beam under the front wheels.
- Remove the protective shields that cover the bottom of the bumper.
- Unscrew the fasteners from the plugs provided by the manufacturer.
- After inserting the PTF into the guides, attach them with self-tapping screws.
If non-original headlights are installed, the dimensions and mounting points may not match. Then the elements have to be adjusted.
How to connect fog lights with your own hands
Before directly installing the headlights, their location is determined. In the case of the VAZ 2115 car, the bumper already has standard holes for installing additional lighting fixtures. Similar ones can be cut in the bumpers of VAZ 2113 and VAZ 2114.
There is no need to spoil the appearance of the bumper - fog lights are easily installed on special brackets. Many PTF kits contain special decorative plugs that add attractiveness and neatness to the installed headlights and facilitate the installation process.
Requirements for installation of PTF
Fog lights are installed according to certain rules:
- quantity - 2 pieces;
- no closer than 25 cm to the surface of the road surface;
- no more than 40 cm from the outer contour of the headlights;
- sockets for fog lights should be located below the top point of the low beam headlight socket;
- PTF line-of-sight angles should be: in the vertical plane 5o+5o, in the horizontal plane - 45o+10o.
The location of two PTFs in the front lower part of the car must meet the requirements of GOST 41.48–2004 (clause 6.3)
The fog lights turn on only at the same time as the side lights.
Modern brands of vehicles, as a rule, are equipped with PTFs, which are installed by the manufacturers themselves. For this purpose, special sockets are provided on the front bumper. If the fog lights are not installed there, the holes are closed with plugs that can be easily removed.
The first editions of the VAZ 2110, 2111 and 2112 were not equipped with holes for installing fog lights, so the sockets must be marked and cut out with your own hands, taking into account the above requirements.
Installation diagram of fog lights
The connection of fog lights is carried out according to certain rules. They, first of all, relate to the placement of PTF on the car. The locations for installing headlights are strictly defined.
Layout of daytime running lights
Manufacturers of modern car models pre-mark the PTF installation locations on the bumpers. As a rule, such lighting elements are most often available in the luxury version of the car. If the headlights themselves are missing, then their installation sites are closed with special plugs.
Distance at which fog lights
Sources:
https://xenon-kiev.com.ua/kak-sdelat-protivotumanki-na-linzax/ https://hot-hatch.ru/raznoe/kak-ustanovit-protivotumannye-fary-na-vaz-2110-kak- podklyuchit-i-ustanovit-protivotumanki-na-vaz-2110.html https://carfrance.ru/podklyuchaem-protivotumanki-na-vaz-2110-svoimi-rukami/ https://vazweb.ru/desyatka/osveshchenie/kak -podklyuchit-protivotumanki-na-vaz-2114.html
Connection diagrams
The connection diagram for fog lights is chosen by the car enthusiast at his own discretion. There are two options - serial or parallel connection.
Parallel circuit
In a parallel circuit, the potential difference is supplied only when the engine is started or the ignition is turned on.
The “+” wire is connected to the headlights from the relay element contact. The latter is recorded through a 15 A fuse - its limit is quite enough for most foglights. It is recommended to install the fuse link closer to the battery terminal.
Legal requirements
When purchasing headlights, an auto parts store offers a huge variety of fog components in different formats and sizes. GOST 8769-75 forces VAZ-2110 drivers to control themselves and install headlights that meet certain legal requirements:
- You cannot install just one fog light; fixation involves installing a kit consisting of 2 parts.
- If you measure the distance from the side marker, the headlight is in 400 mm increments, and the measurements are taken along the outside of the diffuser.
- The step from the road surface to the bottom edge to the dissipative product cannot be less than 150 mm.
- It is not permissible to install headlights higher than the headlight.
Tools and materials required for installation
To install the PTF, you must purchase in advance the entire set of materials and tools:
- A set of fog lights, note that the VAZ-2110 dashboard is an older model, so the headlights for Euro models should be put aside.
- Lamp for monitoring the procedure.
- A multimeter that allows you to test the correctness of individual stages of work.
- Double connectors, among experts they are also called “mother and father”, 1 set is enough.
- 8 pieces of female connectors.
- Insulating tape.
- Packaging material for heat shrinking.
To correctly install fog lights on a VAZ-2110, you need to start from the electrical diagram; it can be taken from KGPTF.