Let's say you installed fog lights and you need to figure out the connection. I hope we can help with this, there is nothing complicated in this situation.
First of all you need:
- minimal knowledge in electrical engineering (find +12v and ground);
- tools - knife, wire cutters, pliers, terminal block;
- consumables: blue electrical tape, heat shrink of suitable diameter, plastic clamps, automotive corrugation, mass and connecting terminals.
Select appropriate basic materials:
- 2-wire wire with a cross-section of 1.5 mm2 – approx. 6m;
- power relay with connector (regular light relay from VAZ 2108) - 1 piece;
- remote fuse 30A - 1 piece;
- power button (design to choose from, preferably backlit);
- connectors for fog lights (if not) - 2 pcs.
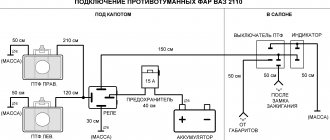
Now that everything is ready, let’s assemble such a circuit, Fig. 1.
What to have on hand
To carry out the work, we will arm ourselves with the following items:
- keys 8 and 10;
- flat and Phillips screwdrivers;
- a 6-sided key that regulates the spread of light;
- electrical tape, wire cutters, pliers (possibly a soldering iron);
- ties for fastening the wiring and a piece of strong steel wire;
- actually, headlights;
- The most important thing you will need for repairs is a kit for connecting fog lights to Kalina.
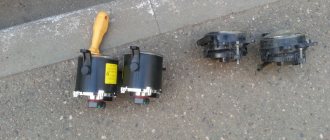
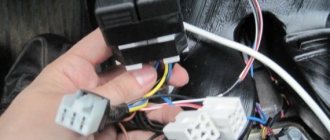
Button, relay and wires with connectors
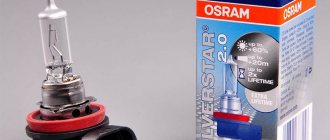
Although the plugs included in the package are usually black, you can paint them to match the body color whenever you wish. High-quality fog lights are usually equipped with Philips bulbs that are quite good in their characteristics.
The kit, which includes a button for turning on Kalina's fog lights, as well as wires, connectors and connectors, and a turn-on relay will need to be purchased separately. However, if your car has an air conditioner, then the space for the button is automatically occupied.
Tip: In this case, purchase a rectangular button separately and install it in the corresponding hole next to the cigarette lighter.
Parts for installation in the front bumper
Let's sum it up
Carrying out the steps we have considered to install such important elements in a Lada Kalina car, such as fog lights, does not cause any particular difficulties. The main condition is to purchase high-quality PTFs that will function for a long time, will not require additional steps during installation and will not bring unpleasant surprises.
A Chinese car will become more expensive than a Mazda if you persistently repair it
The main purpose of fog lights is clear to everyone - to illuminate the road in dense fog. Since they are located lower than conventional headlights, they make it possible to illuminate the road at a lower level. However, they can be useful not only in foggy conditions, but also in any poor visibility.
Fog lights for Kalina can be installed without the help of professionals, since the process is quite simple, and by following simple recommendations, you are guaranteed to achieve an excellent result. In this review, we will consider both the features of installation work and the criteria for choosing high-quality PTFs and the basic rules for setting the light so that it is as effective as possible and does not blind oncoming drivers.
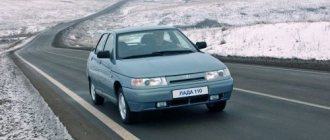
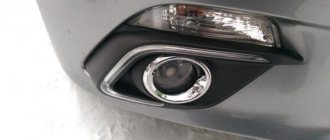
This example has PTFs already installed at the factory.
And if you have to at least periodically travel outside the city limits, then with their help you can identify your vehicle to other cars participating in traffic. The car gains visibility because the fog lights have a wide spectrum of light distribution. These principles will allow you to better understand how to independently connect fog lights to Kalina.
What can you buy for viburnum?
A wide variety of foglights for cars amazes the imagination with their appearance and shapes:
- Round;
- Oval;
- Square;
- Twin;
- Recessed;
- For outdoor installation, etc.
Not all PTFs are suitable for Lada Kalina, which forces owners to redo the mount themselves
However, only a few PTFs produced by different manufacturers are suitable for Lada Kalina.
In particular, these are:
- Bosch products, characterized by flat glass headlights and sold only in pairs;
- Fog lamps “Kirzhach” with lens-shaped (convex) glass;
- Fog lights “Luch” are an analogue of German products. The price is lower, but so is the quality;
- Products of Chinese companies under the ProSport brand.
Note! This list is not an expert list. Simply, the products of the listed companies are installed in the standard places of the Lada Kalina without any additional modifications. And the complete set of kits is selected exclusively for this AvtoVAZ model.
PTF ProSport in chrome configuration
Standard kit (complete set)
Standard kit for mounting fog lights
The headlight kit includes:
- Fastening frames.
- The headlights themselves (2 pcs).
- Bolts.
- Wires with connectors at the ends.
- Relay.
- On/off button.
- Connectors with which wires are connected.
- Self-tapping screws.
- Installation instructions.
The kit also includes a corrugation in which you can hide the wires. It will protect them from damage and negative external influences. The relay is installed in its standard location on the mounting block. It is marked 1119.
The mounting frames can be additionally repainted in any color. You can also immediately buy frames in the desired color. There are many colors of Kalina, but the frame companies also produce frames in all colors.
How can I install
There are 2 ways to install fog lights on a Lada Kalina car:
- Without removing the front bumper;
- With bumper removed.
Advice! If you do not have sufficient skills in working with plastic parts, then it is better to completely remove the bumper. In this way you will protect it from breaking off latches and fasteners due to negligence.
The factory instructions provide detailed information on all mounting points for the front bumper
Tips for choosing
I will say right away that the type of lamp itself does not play a primary role. In fact, any type of PTF, with proper installation and selection of the device, will work efficiently, reliably and efficiently.
That is, before thinking about how to include PTF in lighting equipment, I advise you to approach the issue of choice responsibly. The connection diagram is approximately the same for everyone and is not the most complicated.
- Frame. Look at the PTF body. It must be completely sealed, that is, protected from moisture getting inside the case. A friend once complained to me that his headlights weren’t working. For some reason, the fact that there was water inside the headlights did not bother him. Moisture not only spoils the equipment itself, because it is electrical and has wires. Condensation reduces lighting efficiency.
- Collapsible design. The frame, lining, plug and other elements responsible for fastening and removing must be dismountable. It is better not to buy PTF in a solid case.
- Lamp guard material. Thick glass or polycarbonate is used here. With a strong impact, each of the materials can crack, but really thick glass looks more reliable. Sometimes it is impossible to avoid cracks because the PTFs are located low.
- Case material. Heat-resistant plastic would be the best choice in this situation. Metal or aluminum are inappropriate here. Plus wiring, moisture, metal, conductors. Do you get the connection?
- Glow color. Everything is simple here - white or yellow. Don't take the blue or red options. They are like fog lights, useless and ineffective. That is, there will be no more help from such a glow than from a regular low beam.
How to install a set of fog lights with your own hands (diagram)
To save time on dismantling the bumper, we will show you how to replace it without removing it.
- When installing the right headlight, turn the steering wheel as far as possible in this direction - this increases the working space.
- Remove the front mudguard.
Turn the steering wheel to the right and remove the shield
- From the inside, we open the latches that secure the old PTF or plugs.
- We remove the plug.
- We fix the new headlight from the inside with 3 self-tapping screws.
Attach the headlight to 3 self-tapping screws from the inside
- Installing a new frame. To do this, press it firmly against the bumper until it clicks.
- We do the same with the left headlight.
New Lada: Viburnum does not open with the key
This completes the installation of the optics. Now we connect the headlights using the pre-purchased installation kit.
Replacing lamps in standard Kalina foglights
It is better to change bulbs in standard fog lights in the inspection hole. Sequencing:
- Fix the car and remove the wheel above which you need to replace the lamp.
- Unscrew the fastenings of the fender liner and dismantle it.
- Move the protective boot and disconnect the connector with the wires.
- Turn the PTF counterclockwise and remove it.
- Install the new one by turning it clockwise.
- Put on the connector and boot.
After replacing the lamps, all that remains is to check and adjust the fog lights.
Which headlights to choose
Factory technology provides for the installation of headlights in a luxury configuration. Indeed, today such products are produced by many manufacturers, large and small.
Advice: it is better to opt for products that are made in Ryazan and Kirzhach. They still have a longer service life compared to their Chinese counterparts.
If you want to install fog lights with your own hands, you will need a wiring diagram for fog lights on Kalina.
Color diagram of electrical equipment (clickable 2000x1340) Lada Kalina
We will delight car enthusiasts with the fact that there is no need to cut or drill the bumper. You simply remove the protective caps and the covers are designed to fit into the cutouts on the bumper.
Standard fog lights are equipped with an H11 type cartridge. Therefore, the entire installation will involve dismantling the front bumper, after which it will be necessary to pull the wiring in the car from the headlights into the interior. Install the headlight switch button and connect the power.
Installation Requirements
Installing or replacing old PTFs with new ones is often done with your own hands. If you wisely managed to choose a device and find a PTF part number that suits your car, then the right and left headlights can be supplemented with a neighbor in the form of foglights.
They are usually placed in the bumper, although for some the radiator grille is a more attractive option. A lot depends on the characteristics of your car. You cannot focus strictly on your own taste or how the PTF will look more beautiful.
The law does not prohibit installing additional lighting equipment yourself. Another question is whether you can make a mount and correctly adjust the front and rear fog lights. There are certain norms and rules. If you do everything strictly according to them, then there will be no complaints against you.
But I warn you right away. Failure to meet standards may result in problems during inspection. They simply won't approve of it. There have also been situations when, due to violations of the rules for installing PTFs, drivers were deprived of their rights and were not allowed to continue operating the car until the errors were corrected. This is more than serious, so treat the issue accordingly.
As for the installation rules, be guided by the following principles:
- the height of the PTF relative to the road surface is at least 250 millimeters;
- the fastening must be clearly symmetrical, that is, even the slightest deviation is considered a violation;
- the distance to the dimensions should not be more than 400 mm;
- the installed lamps are used in accordance with the markings on the housing (you cannot install an LED lamp if the headlight itself has halogen markings, for example);
- fog lights are used strictly in combination with dimensions.
If you use universal PTFs, which are marked with the letter H, then only LEDs or halogens are used here. By installing xenon, you are grossly breaking the law. Straight to the rhyme.
Which PTF is better to install?
Manufacturers offer different sets of optics in terms of price and quality. It is worth noting the most suitable options for Kalina:
- Bosch optics have flat glass and are sold in a set of 2 devices. Has high build quality and long service life.
- Kirzhach headlights can be purchased one at a time - they use convex glass in the shape of a lens.
- Luch foglights are of good quality, but the design does not include a fogging valve.
- ProSport headlights, despite the manufacturing country of China, are of good quality at a low price.
PTFs from different manufacturers differ in price and quality
Advice: It is worth noting that domestic manufacturers are practically not inferior in quality to foreign companies. They also offer a good warranty on their devices.
Main design options and criteria affecting quality
The following types of products can be found in the retail chain:
- Products under the Bosch brand are always sold as a set (2 pieces) and are distinguished by fairly durable glass and good quality luminous flux. We can say that this is the most reliable option, but its price is noticeably higher than all other analogues.
- Production PTFs are in many ways similar to those described above, but in fact their quality is noticeably inferior to the first option. The only advantage is lower cost.
- Kirzhach fog lights on Kalina have lens-shaped convex glass, which allows you to concentrate the light flux and direct it exactly where it is required. Quite a good and reliable solution.
- Products under the ProSport brand and other similar brands are produced by Chinese factories. It is difficult to judge their reliability and quality, since one option can be excellent, while the second one will fail in a very short time.
Installation of electrical components
More technically complex is the operation of installing and integrating electrical components into standard wiring.
To successfully complete the work, the owner must solve the following tasks:
- Correctly connect the PTF to the fuse block;
- Install a button for activating fog lights in the car interior.
Original wiring diagram for fog lights on Kalina
If you use the wiring and the attached electrical diagram from the PTF kit, the connection will be reduced to:
- Installing a fuse in the block;
- A relay responsible for the operation of the power button is also installed there;
- Connecting the fog lights themselves and the standard electrical wiring into a single electrical network;
- Outputting control of their work to a button.
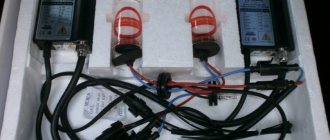
The photo shows a proprietary set of electronic components that does not require modifications. It is easy to connect to the standard electrical wiring system
Lada Kalina - fuse and relay blocks
Lada Kalina 1
The first generation was produced in 2004, 2005, 2006, 2007, 2008, 2009, 2010, 2011, 2012 and 2013 under the internal serial numbers
VAZ-1117, VAZ-1118, VAZ-1119
with sedan, hatchback, and station wagon bodies. In this article we will show a description of fuses and relays of the 1st generation Lada Kalina with block diagrams and photographs. Note the fuse responsible for the cigarette lighter.
The design of the blocks and the purpose of the elements in them may differ from those presented and depend on the year of manufacture and level of equipment of your Lada Kalina. Check the description with yours, printed on the back of the protective cover, or other technical documentation.
Connecting fog lights to viburnum
If there is no wiring for fog lights, then look for a wiring kit for PTF from Kalina or Priora (price 400 rubles), but keep in mind that this kit does not have enough wire length; the control wire from the button will have to be pulled to the relay through a plug above the gas pedal. Or we find wiring with a cross-section of at least 0.75 sq. mm.
New Lada: Lada Kalina since 2004 Operation, maintenance and repair manual
To route the headlight wiring from the engine compartment to the passenger compartment, you will need to remove the front left wheel and plastic fender liners (lockers). Using a wire, we drag the wires from the passenger compartment, above the clutch pedal.
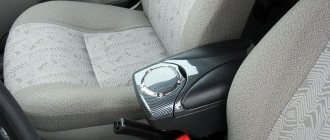
You can install the PTF button:
- In the tunnel between the seats (how to remove the Kalina tunnel). The PTF button from the VAZ 2115 is used here.
- On the panel, if the Kalina equipment is without air conditioning, then instead of the air conditioning button.
- In the external lighting control unit or, in other words, the light control module (LCM).
The diagram of Kalina fog lights according to the first and second options is as follows: One more relay in the last diagram will not allow the PTF to burn after the ignition is turned off. Kalina foglight diagram using the third method:
So that when the headlights are turned on, the PTFs do not light up when the engine is turned off, you need to connect contact No. 30 of relay K9 (“from the battery”) to the wire that comes out of the MUS contact: “Xz”.
Partial pinout of MUS contacts:
- Contact 1 - to the CPTO
- Contact 2 - control button
- Contact 3 - indicator (LED) of PTF status (on or off);
- Contact 4 - PTF relay enable pin
- Contact 30 - 12V (constant coming from the battery)
- Contact 31 - General minus (ground).
- Contact 56 - To low and high beam headlights.
- Contact 58 - To side lights.
- Contact 58b is an output (regulated voltage) for the illumination of knobs, buttons and instrument panel.
- Contact XZ - ( ) from ignition switch
Author
Just remember to adjust the PTF (adjustment circuit).
Main block
The main block with fuses and relays is located under the instrument panel on the driver's side, behind the protective cover.
Scheme Option 1
Scheme Option 2
Description of fuses
p, blockquote 10,0,0,0,0 —>
| F1 | 15A Electronic engine control unit, cooling fan relay, fuel injectors |
| F2 | 30A Electric windows |
| F3 | 15A Hazard alarm |
| F4 | 20A Windshield wiper, airbag |
| F5 | 25A Heater (viburnum heater fuse), Electric power steering control unit, Windshield washer |
| F6 | 20A Horn |
| F7 | 10A LCD instrument cluster indicator, Brake light switch and lamps, Interior lighting |
| F8 | 20A Heated rear window |
| F9 | 5A Side light bulbs on the right side, Glove box light bulb |
| F10 | 5A Side light bulbs on the left side, Outside lighting indicator in the instrument cluster, License plate light bulbs |
| F11 | 7.55A Rear fog light, Immobilizer control unit |
| F12 | 7.5A Low beam lamp right block - headlights |
| F13 | 7.5A Low beam lamp left block - headlights |
| F14 | 10A High beam lamp right block - headlights |
| F15 | 10A High beam lamp left block - headlights |
| F16 | 10A Right fog lamp |
| F17 | 10A Left fog lamp |
| F18 | 20A Heated front seats, cigarette lighter |
| F19 | 10A ABS |
| F20 | 15A Cigarette lighter , luggage compartment lock, diagnostic connector |
| F21 | 10A Transmission reverse lock circuit |
| F22 | 15A Security alarm control unit |
| F23 | 10A Electric power steering control unit |
| F24 | 7.5A Air conditioner |
| F25 | 10A Interior lighting, brake lights |
| F26 | 25A ABS |
| F27 | Spare |
| F28 | Spare |
| F29 | Spare |
| F30 | Spare |
| F31 | 50A Electric power steering |
| F32 | 30A ABS |
Connecting PTF to car wiring
Connection diagram of PTF to electrics on Lada Kalina
Initially, the wires must be connected to the headlights themselves. The “mass” is also screwed to the car body. “Plus” is connected to the battery according to the diagram. The wires are pulled through the engine compartment to the passenger compartment.
We pull the wiring into the salon
This must be done along the left wing, where the standard fastenings for the wires are located. Before doing this, you need to remove the fender liner to make work easier.
We will infiltrate here
Selection of PTFs and their prices
This set is sold in almost all VAZ auto stores.
Lada Kalina is equipped from the factory in some trim levels with domestic “fog lights”, which are manufactured in Ryazan. You can also find many other headlights on sale from different manufacturers. Kalin owners recommend paying attention to LED products - they are both modern and economical, because diodes consume less electricity.
LED PTF
Prices for LED fog lights start at 2000 and can reach more than 20 thousand rubles.
LED PTF in a standard location
LED PTF close up
LED PTF chip
LED PTF in the headlight
Sequence of work
So, below are detailed instructions, using which you can easily equip your pet with fog lights:
- as in a number of other electrical works, our actions begin by disconnecting the power from the battery (minus terminal);
- Now you can start dismantling the bumper. We need to unscrew the screws and remove the black plastic grilles. It may be necessary to remove the license plate;
We begin work on installing the PTF
- the grilles and bumper are attached with screws and self-tapping screws - you can feel them with your hands, even without a hole. When you remove the bumper, you will see that the mounting points are indicated by arrows. This will allow such work to be completed much faster in the future;
- the wheel arches additionally hold the bumper with 3 self-tapping screws - do not forget to unscrew them as well;
- Now you can carefully begin to remove the sides of the bumper from under the arches, using rocking movements, and remove it entirely. Bend the plugs using a flat-head screwdriver;
- The fog lights themselves are attached to three screws each;
- now we need to extend the wiring into the cabin (as the video in this article shows). Many people recommend removing the driver's wheel and arch protection at this point;
- where the clutch pedal is located, we will find the place where the wires are collected in a bundle and push the seal outward;
- Now you can stretch the wiring using rigid steel wire. The idea is to tighten the wiring from the interior into the space under the hood. You can immediately provide wiring for connecting LED parking lights, alarms, remote hood opening and everything else that has not yet been installed;
New Lada: Basic equipment Lada Kalina 2 standard (photos, features and options) » Lada.Online - all the most interesting and useful about LADA cars
PTF assembly
- Our new wire blocks will go along with the factory ones, after which they can be tied together with plastic ties like clamps. If there is a need, a wiring diagram for fog lights on Kalina can help with this;
Installation instructions
Here we consider a step-by-step algorithm of actions that will be required for execution so that the entire procedure is completed successfully.
1. First we remove the LADA Kalina bumper. To do this, unscrew the entire list of fastening components.
The screws are located on:
- lower bumper panel along the perimeter;
- in the wheel arches.
Now we remove the sidewalls of the element from the arched openings and completely remove the bumper from the car.
2. Next, remove the plugs by bending their latches. Here we use a flat screwdriver.
3. Unscrew the screws securing the fog lights. Each of the products is secured by three such fastening components.
4. We move inside the Lada Kalina salon. In the area of the pedal assembly we find a wiring harness. At this point we push out the sealing element and use a metal wire to pull out the wiring relating to the power supply to the fog lights. These cables are located next to the main trunk harness.
5. We connect the PTF wiring with the main wires.
6. Now we position and fix the power cables for the fog optics so that it is as convenient as possible to remove the connectors from the device terminals.
7. We attach the negative terminals to the screws of the LADA Kalina body.
8. The power consumed by anti-fog optics reaches 110 W, so we connect these devices using a relay with a button.
9. The button itself can be installed directly on the panel in the cabin, for example, next to the cigarette lighter.
10. To provide the lighting components with supply voltage, you will need to connect the pink wire to the relay. It is located in the safety block.
11. To protect the circuit of the headlights we are considering, you will need to use a fuse link with a rating of 15 A.
Installation of fog lights
First you need to purchase a set of PTF (2 headlights, 2 frames) and a kit for installing PTF (PTF relay, power button, wires, screws, connectors and instructions).
In addition you will need:
- Phillips and flathead screwdrivers;
- wrench for 8 and 10;
- forceps;
- insulating tape;
- nylon ties.
Universal step-by-step instructions for installing PTF on a Lada:
- Unscrew the fastening parts and pull off the bumper.
- Bend the latches with a flat-head screwdriver and remove the plugs. Attach each fog light with 3 self-tapping screws.
- Inside the car, under the clutch pedal, push out the seal and pull out the PTF wires.
- Add the PTF wires to the main ones, tighten the remaining wires with ties.
- We attach the negative terminals to the bolts on the car body.
- Install the control button with the relay on the dashboard, connect the pink wire from the fuse box to the relay.
- The fuse should be 15 A. We connect the power contacts of relays 30 and 87 to it and the PTF wires.
- Check that the installation is correct and turn on the headlights using the button. If everything is done correctly, the headlights are on.
- Carefully assemble the bumper so as not to snag the wires and lose parts. Recheck the functionality of the lighting system.
Features of installation and configuration
As noted above, you can install Lada Kalina fog lights with your own hands; this does not require special equipment and devices, everything is very simple.
Installation
We will consider the option of removing the bumper, as it is easier for novice craftsmen. In the future, if you suddenly need to replace the fog light on Kalina, you can do it without removing the bumper, since you will know how the element is attached and how it is connected.
In general, the installation instructions look like this:
- First, the bumper fastenings are unscrewed; all fastening points can be found in the instruction manual; the screws are located both along the grille and under the arches. To free the structure, the side parts are slightly removed from under the arches .
To remove the bumper fasteners, remove the latches securing the grille (green arrows)
- Next, using a flat screwdriver, the plugs are removed from the structure, after which you can attach the headlights themselves, which are most often framed according to the size of the hole. Fastening will not cause any difficulties, this is done using three self-tapping screws, the main thing is to do everything carefully so that the structure stands level and is fixed as firmly and reliably as possible.
- The next step is laying the wiring harness that comes with the kit. This is done from the interior: first, the carpet is removed, and in the area of the clutch pedal you can find a large bundle of wiring and a plug. The plug is pressed to clear the hole, after which the harness is tied to a piece of wire and pulled under the hood, the photo shows where the plug is located.
Finding a place to lay the wires under the hood is not difficult.
- Using plastic clamps, the wires are attached to the main bundle, after which the harness is pulled along the left side and along the front bumper so that the connection points are located near the location of the PTF. It is important that the wires are secured and not dangling.
- After laying the wiring in the car, you can connect the fog lights using connectors, and the negative wires are screwed to the nearest bolts on the car body.
Important! Don’t rush to screw the bumper on; if something is done wrong, you won’t have to disassemble the structure again.
- The system operates through a relay, which is best installed under the panel, and do not forget to securely fix the structure. Power is supplied through the pink wire from the fuse box, the fuse capacity should be 15A.
- To connect the PTF, pins 30 and 87 are used; all connections must be equipped with terminals to ensure the best contact.
Readiness of electrical equipment
The electrical wiring on the Lada Kalina met modern requirements.
Already in the basic version:
- double-filament fog lamps were installed in the rear headlight units;
- the electrical circuit included relays and fuses (see also the article VAZ wiring: the need for modernization).
The diagram roughly shows:
- PTF circuit fuse (F9 according to international classification);
- Electronic immobilizer (anti-theft system);
- Rear headlights with PTF sections;
- Vehicle lighting control unit (installed on the instrument panel);
- Egnition lock.
For reference: In the photo, the symbol “A” indicates the wire from the power source. “Mass” is indicated in black.