Replacing and adjusting the tension of the alternator belt and power steering pump
How often should you change the belt?
The manufacturer recommends changing the alternator belt every 60,000 km or 6 years of operation.
Checking the belt
Check the condition of the drive belts and their tension every 25 thousand km.
• Check the belt for signs of shine or cracks. A shiny belt will slip, while a good belt will have a faintly visible factory texture. Cracks usually start at the inside corner and spread outward. Replace the belt if the belt shows signs of cracking or is highly shiny.
• The belt tension should be without gaps or sagging. When pressing with your thumb on the belt in the middle of the two pulleys, a belt deflection of 8 mm is allowed. If any of the belts flex more than this amount, the belt tension should be adjusted. Incorrect tension will cause slippage and wear; excessive tension will cause bearing failure, belt cracking and chafing.
Typical belt problems
Cracking and erosion . There are deep cracks on the belt that cause kinks. Too much bending leads to overheating and premature wear. Cracks may be the result of using the wrong size belt on a pulley. The belt notch is designed for a smaller diameter pulley.
Softening (oiling). Oil and grease on the belt cause the material to soften and separate from the cord that strengthens the belt. The belt first slips, then fails altogether.
Shine. The shine is the result of belt slippage. A slipping belt can lead to undercharging of the battery, overheating, or poor performance of other systems. The more the belt slips, the more shine there will be on the surface of the belt. If the shine is not strong, tighten the belt.
Worn surface. The surface of the belt is worn and flaking. The belt cord begins to break down, causing the belt to break. If the belt surface deteriorates quickly or becomes nicked, check the pulley groove for nicks.
Delamination. This belt is on the verge of breaking and twisting. The belt layers separate and the belt cord breaks. You should not wait until the rupture is complete.
Wear of V-belts . V-shaped belts are very important for the engine - they drive various units. They require little maintenance (occasional tightening), but they don't last forever. A slipping or damaged belt will cause the engine to overheat and also cause a whistling noise.
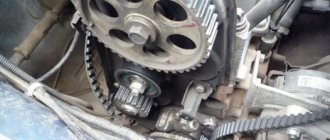
Removal and installation
You will need two 12mm wrenches.
2. Slightly loosen the bolt securing the generator to the tension bar...
3. ...and two nuts of bolts securing the generator to the engine cylinder block (photo taken from below for clarity)
4. Slide the generator towards the cylinder block. This will loosen the belt tension.
5. Remove the belt
6. Install a new alternator belt and adjust its tension.
7. Reinstall the air conditioning compressor belt.
Adjusting the tension of the generator and power steering belts
When pressed with a force of 100 N (10 kgf), the belt deflection should be 10–15 mm.
Control the tension with your thumb.
To adjust the tension of the generator drive belt, loosen the joint and the generator mounting bolts.
And
Using a wooden hammer handle, a stick or even a pry bar as leverage, turn the generator one way or the other until the desired tension (10 - 15 mm) is achieved.
Carefully tighten the mounting bolts. If a new belt was installed, check the tension again after 300 km.
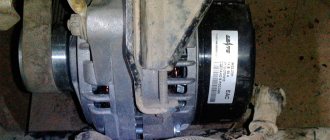
Do-it-yourself Nexia generator repair
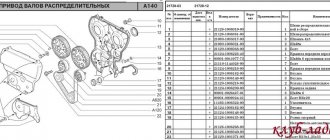
Most models of the Daewoo concern, including the Daewoo Nexia, are equipped with generators of the CS130 and CS121 types, which are interchangeable with each other and differ, by and large, only in the size of the stator.
As a result of this unification, when replacing the rarer CS121 with a “130”, you only have to change the belt together with the tensioner. As for the repair of such generators, its implementation requires certain knowledge and practical skills, however, given the far from low price of these units, such work is clearly justified. Removing the Nexia generator
Removing the Daewoo Nexia generator is performed in the following sequence:
- Disconnect the negative terminal from the battery;
- Using a “12” wrench, unscrew the fastening nut and remove the upper bracket of the generator;
- From the rear cover of the generator, disconnect the charging relay connector;
- Move the generator slightly and remove the belt;
- Using two “12” keys, unscrew the bolts securing the generator to the lower bracket;
- Having unfolded the generator, we disconnect the positive wire, after which we pull out the generator (you will have to work hard, performing several successive tilts).
Possible generator malfunctions and their causes
In general, the stator and rotor of the CS121 and CS130 generators are characterized by fairly high reliability and their failure, as a rule, is a consequence of mechanical damage. So, in frequency, quite often the rear cover bearing is destroyed, resulting in strong shock loads affecting the rotor and stator. In addition, such a malfunction can lead to a short circuit of the “plus” of the brushes to ground (with subsequent burnout of the relay-regulator), as well as a short circuit of the stator windings to the “housing” and failure of the diode bridge.
Burnout of the diode bridge is often caused by unprofessional engine washing, technical liquids and oils getting on the generator housing (and subsequently inside it), and clogging of the radiator of the rear cover of the generator with poplar fluff and other debris.
Of course, it cannot be ruled out that malfunctions in the operation of the generator are explained by natural operational reasons (deterioration of brushes, scorching of the working surface of the rotor, etc.).
Disassembly, defect detection and repair of the Nexia generator
- Using a suitable spanner wrench (usually with a “7” head), unscrew the three ties;
- Having installed the generator on a stable surface, and using a flat-head screwdriver, disconnect the front cover from the stator;
- Through the mounting slots in the back cover, use a screwdriver to squeeze out the plastic rods from the latches and remove the outer cover;
- Use a soldering iron to unsolder the stator leads and carefully bend the diode bridge plates that crimp the stator leads;
- Using a flat-head screwdriver, press the fixing rods out of the latches of the inner cover;
- Remove the stator;
- We control the absence of short circuit of the stator windings to the common ground. If such a malfunction is detected (as stated above, which occurred when the bearing on the rear cover was destroyed), you should not despair and you can try to restore the stator. For this purpose, using a screwdriver and a hammer, the stator plates are pressed into their original place with gentle blows. If the short circuit disappears, apply an additional layer of electrical varnish or epoxy varnish to the windings and wait for it to dry completely;
We unscrew the screws securing the diode bridge, brush assembly and relay regulator (you will need ring wrenches 5,8 and 10) and pull everything out of the cover;
- When checking, we ring the diodes in both directions. With one polarity, almost the same resistance should be displayed for all diodes; with reverse polarity, it tends to infinity.
- Check the smooth movement and operation of the brushes - the length of the brushes must be at least 8 mm, otherwise they should be replaced;
- We clean the stator and rotor plates with fine-grain emery cloth to remove burns and visible burrs;
- If, when checking the diode bridge stator and brushes, no problems are identified, it makes sense to replace the relay regulator.
The generator is assembled in the reverse order.
Before you begin repairing the Nexia generator, you should take into account that the only spare parts you can find on sale are a relay regulator, a diode bridge, as well as rear and front cover bearings. The rear cover bearing can be changed without any problems, but changing the front one is difficult and special tools will be needed for this procedure.
Replacement of timing belt, air conditioner and generator
“The last battle, it is the most difficult” (c)
Good day to all!
After reading a ton or two of instructions, I decided that the procedure was essentially not that complicated, and it was not necessary to contact service for this. All spare parts were pre-ordered from Exist. Well, here we go...
The timing belt on Chevrolet Lanos must be changed every 60 thousand km. In the event of a break, the valves meet the pistons, followed by repair of the cylinder head. A belt with signs of wear, abrasions, cracks and delamination (as well as if it gets in with oil) must also be replaced. It is better to do this on a viewing ditch, overpass, or, if possible, on a lift.
For work we will need:
— socket wrench “10” — ring wrenches or socket heads “12”, “17” — wrench “24” — hexagon wrench “5” — screwdriver with a flat blade — pliers — wrench or wrench with extension and socket head at "17"
Step 1:
remove the air pipe and air filter housing
We unscrew the three bolts securing the filter housing and pull out the pipe located at the bottom of the filter housing from the neck of the air duct.
Step 2:
Loosen the three bolts securing the power steering pump pulley.
Then unscrew the top bolt securing the generator, loosen the tension on the generator belt and remove it.
Then we remove the power steering pulley. In this sequence it will be easier to unscrew the bolts securing the pump pulley.
Step 3:
We unscrew the 2 “12” bolts securing the power steering pump housing to the cylinder block.
Step 4:
Unscrew the 4 “10” bolts securing the upper part of the timing belt cover and remove it.
Place the piston of the first cylinder at top dead center.
Step 5:
Now let's move on to the bottom of the engine. We remove the right front wheel and fender liner (it’s better to stock up on caps).
We remove the air resonator for convenience.
Unscrew the 3 “10” bolts to remove the plastic casing covering the engine belts from the bottom and sides. If there is a metal engine crankcase protection, then it must be removed before doing this.
Step 6:
Loosen the tension roller of the air conditioner drive belt 1 and remove the belt.
Using a wrench, unscrew the bolt securing the crankshaft pulleys. If this device is not available, you can unscrew this bolt with an assistant.
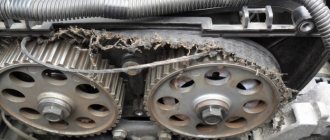
To do this, he must engage 4th or 5th gear and press the brake pedal firmly. At the same time, the crankshaft will be fixed and the bolt can be unscrewed using a good wrench with an extension and a socket head set to “17”. We are horrified by the condition of the belts
Step 7:
The following view will open. The crankshaft alignment mark should be in place unless you skipped Step 4.
We unscrew the three “10” bolts securing the lower part of the timing belt cover.
Step 8:
Let’s loosen the belt tension by using a screwdriver, overcoming the force of the spring, to turn the movable roller bar clockwise until the holes in it and the roller bracket align, then insert a pin of a suitable diameter into the holes, thereby fixing the roller.
Step 9:
We pull out the timing belt into the narrow slot behind the power steering housing. When installing, the procedure is reversed.
To replace the tension roller, unscrew the bolt securing it to the cylinder block and remove the roller; if we don’t change it, then leave it alone.
When installing a new belt, the pointer on the roller pad should coincide with the mating groove in the bracket.
If this does not happen, you need to loosen the 3 screws securing the water pump (2 are easy to find, the third is hidden behind the power steering generator on the left). We adjust the belt tension by turning the water pump housing, turning it clockwise and controlling the degree of belt tension according to the tension roller indicators. Be sure to check that there are no leaks from under the water pump housing and, in general, it’s a good idea to check the condition of the pump itself. If necessary, replace its O-ring or the entire pump.
Before installing the covers, check the alignment marks of the crankshaft and camshaft. To do this, screw the pulley mounting bolt into the crankshaft shank and turn the crankshaft two turns by the bolt. If there is a discrepancy, reinstall the belt.
Assembly is carried out in the reverse order, you just need to carefully tighten all the belts: Timing belt (if necessary) - with a pump, air conditioning belt (deflection should be 5-8 mm when pressed with a finger with a force of about 100N) - with the roller from Step 6, alternator belt (deflection the belt should be 10–15 mm when pressed with a finger with a force of about 100N) - the generator mounting bolt from Step 2.
Replacement procedure
Many drivers, especially those who have not previously had to deal with a timing belt drive, pay little attention to the technical condition of the parts of this unit. This is completely wrong, since the toothed belt experiences significant loads. It transmits rotation from the crankshaft to the coolant pump, camshaft
A broken belt or cut teeth will not allow the engine to start, so special attention should be paid to the condition of the drive parts
You can replace worn parts of the timing mechanism yourself. No special tools or equipment are required. The work can be done in a garage over an inspection hole, overpass, or lift. If your hands confidently hold a mechanic's tool, the car owner is familiar with the structure of the power unit, you can get to work.
Which belt to buy and what you need
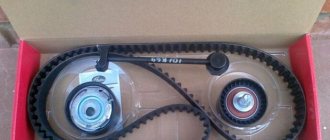
Today, managers of retail chains offer a large assortment of timing belts for driving the timing mechanism. If you ask repairmen for advice, they will advise using the original GM belt 96183353, but its cost corresponds to the reputation of the product and its quality. You can successfully use spare parts from Gates, Contitech. When choosing, you should carefully check the part you are purchasing, as you can buy a fake. In addition, experts recommend changing the tensioner roller and coolant pump at the same time as the belt.
From the tool you will need:
- Wrenches (open-end, box-end).
- Set of sockets with a knob.
- Hexagons.
- Screwdrivers with a flat, cross-shaped blade.
- Hammer, pliers, spatula.
- Car jack.
- Stand under the car body.
- Anti-recoil shoes.
- Rags.
If you plan to replace the pump, then you will have to stock up on antifreeze for topping up and a container for draining the coolant.
Step by step description
When the car is placed at the work site, the handbrake cable is tightened and wheel chocks are installed under the rear wheels. Work begins in the engine compartment. First of all, disconnect the battery terminals to prevent a short circuit in the electrical circuits. Next, the procedure will be as follows:
Unscrew the fasteners of the air filter housing and remove it along with the supply pipes.
Removing the air filter
- The next step is to remove the protection of the timing drive mechanism; to do this, you need to unscrew 4 screws, after which the casing is removed from the engine compartment.
- Next, you should remove the wheel bolts of the right front wheel.
- After this, the front part of the body is lifted with a car jack, lowered onto a stand, and the wheel is removed.
- Remove the plastic protection of the front wheel arch, gain access to the lower timing belt protection, and remove it.
Removing the lower timing cover
- Rotate the crankshaft until the installation marks coincide. It is convenient to work with a head with a long knob.
- The work will be hampered by the power steering and generator belt, which should be removed. To do this, loosen the tension of the generator, unscrew the fastening of the power steering pulley, remove the belt, then the pulley.
- Using an accessible method, secure the crankshaft from turning and remove the pulley from it.
Remove the crankshaft pulley
Release the fastening of the tensioner roller and remove the toothed belt.
Removing the tension roller
Installation of new parts is carried out in the reverse order of their removal. Before installation, you should check the alignment of the alignment marks; if they have not moved, you can install a new timing belt.
It is necessary to ensure correct belt tension in the drive. For this purpose, there are marks on the body of the tension mechanism. The roller should be turned until they are aligned. When the belt is tensioned, turn the crankshaft two turns and check that the alignment marks match. If they have not moved, you can complete the installation of the previously removed parts.
Correct tension
Alignment marks
To obtain maximum operating efficiency of the power unit, you should correctly configure the operation of the mechanism for distributing the intake of the combustible mixture and exhaust gases. For this purpose, there are installation marks on the engine, the coincidence of which guarantees that the piston of the first cylinder is at the dead center. Marks are placed on the crankshaft and camshaft pulleys, as well as on the rear cover of the timing mechanism and cylinder block. The shafts are turned until the mark on the camshaft pulley is strictly opposite the recess of the timing belt protective casing. The crankshaft pulley also has a mark, which is combined with the ebb on the cylinder block. With this arrangement, you can obtain the expected performance of the motor.
DIY repairs. Replacing the timing belt and pump on Daewoo/Chevrolet Lanos 1.5
On our agenda is the important work of replacing the timing belt and pump on a Lanos car. Since such cars produced by Daewoo and Chevrolet are equipped with Opel engines. And the peculiarity of these engines is that the timing belt is tensioned by a pump, and the designer also added a tension roller there. According to the regulations, as we know, the timing belt is changed every 50 thousand kilometers, and the pump every 100 thousand, that is, with every second belt replacement, we must change the pump. So, we prepare the tool, be patient and get to work.
If you plan to replace the pump, I advise you to drain the antifreeze in advance so that when removing the water pump you do not have to wash the entire engine and the floor in the garage with it. To do this, in the lower left part of the radiator, find the drain valve and unscrew the screw. If you don’t find it, maybe there is a plug there or it’s not there at all, then remove the lower radiator hose and drain the antifreeze from it. To make the coolant drain faster, unscrew the cap of the expansion tank.
From the hood side, remove the air filter housing by removing the top cover along with the filter itself and unscrewing the bolts securing the lower housing cover. For convenience, someone also removes the corrugation right up to the throttle valve, which by the way makes it possible to clean it. But I usually limit myself to removing the case.
Let's move on to removing the accessory belt. Depending on the configuration, Lanos come with power steering and air conditioning, so the work will be slightly different. If you have a car without an amplifier and air conditioning, unscrew the fixing nut on the generator bracket from the hood, thereby loosening it, and turning the generator towards the radiator, loosen the belt, which can ultimately be removed.
In the case of the hydraulic booster, it will need to be moved slightly so that the upper plastic timing belt protection can be removed. To do this, the bolts securing it are slightly unscrewed and the pump moves.
If you have a car with air conditioning, the compressor rotates with another belt. At the bottom you will see a tension roller on the bracket; by loosening its mounting bolt, you can move the roller and remove the auxiliary belt, after which you proceed to removing the generator belt. After turning the belts in the opposite direction, check for cracks; if there are, replace them.
Having removed the outer plastic engine protection and, if you have power steering, move the pump and unscrew the crankshaft pulley, which drives the accessory belts. To lock the crankshaft, have an assistant engage 5th gear and hold the brake while you unscrew the center bolt on the pulley.
Now we set the marks. The crankshaft pulley bolt can be screwed back in and the crankshaft rotated using it, or with the gear engaged, rotate the CV joint hub nut. There are only two marks: the mark on the camshaft pulley should coincide with the central slot of the plastic timing protection and the mark on the crankshaft gear, coinciding with the slot of the lower plastic protection.
I draw your attention to the timing belt tensioner pulley. It has a pair of petals. The front one is made in the form of an arrow, and the rear one has a slot. When the belt tension is correct, the arrow aligns with the slot. Over time, the belt stretches and the arrow may move away. As you can see, these petals still have holes. By aligning them, you will loosen the belt. For convenience, you can insert a cotter pin into them and lock them.
Loosen the belt and remove it. At the same time, check the condition of the roller by rotating it by hand. The bearing inside should not make noise. If the roller has traveled about 100 thousand km, I advise you to replace it. If you need to replace it, remove it by unscrewing the central bolt.
Now you need to remove the camshaft gear. For the stopper, use a flathead screwdriver or pry bar and unscrew the central bolt. Make sure that the mark does not go anywhere until the gear is removed. Of course, later during installation you can return everything, but it’s better to be safe.
Unscrew the fastening bolts and remove the rear plastic timing belt protection.
So we got to the pump. There is a little trick here, so as not to bother too much with stretching, you can make a mark opposite the edge of the pump body and the seating area, along which you will place a new one. The pump itself is secured with three bolts - unscrew them and remove the pump. If it cannot be removed by hand, hit it several times with a hammer through a wooden block. Hit the body without fanaticism, we just need to move from the spot and then everything will go by hand.
Place the new pump in place, but do not tighten its mounting bolts. Make sure of this by rotating the pump body. It should rotate a little tightly and at the same time, when we put on the belt, it should not budge. Put on the camshaft gear and the belt itself. The tension roller should be locked at this moment. Now pull out the cotter pin from it and check the alignment of the arrows. If they do not match, using a special key or long pliers, rotate the pump until the arrows match. If everything is fine, tighten the pump mounting bolts and reassemble everything else in the reverse order of removal.
Before starting the engine, make 2 full turns of the crankshaft to make sure the marks match!
Changing the timing belt on a Chevrolet Lanos
Today a representative of the Zaporozhye Automobile Plant with the big name Chevrolet Lanos came to us, replacing the timing belt at 120,000 kilometers and doing a little maintenance before a long journey. We definitely need to change the pump.
If the timing belt breaks, the valve bends!
- Necessary tools and accessories
- Preparatory operations
- Set the top dead center
- Replacing the pump
- Installing a new timing belt
- Video of replacing the timing belt on a Chevrolet Lanos
Do I need to change the roller and pump?
The “useability” of these consumables depends on many factors. These include the quality of the spare parts used, the operating conditions of the vehicle, and the region in which the vehicle is used. It is almost impossible to check their technical condition without removing the belt. A pump malfunction can be detected by the presence of traces of antifreeze, or by loud noise after the destruction of the bearing assembly. The tension roller is usually replaced the second time the belt is replaced.
Experts recommend changing the timing belt after a mileage of 60 thousand km. There are known cases when the pump and tension roller work when the total mileage of the car is more than 120 thousand km.
Preparatory operations
So, for replacement, we purchased a timing belt and a tension roller, a pump, two shawarmas and coffee.
Actually, the patient himself looked like this before the replacement.
Drain the antifreeze. Remove the air filter along with the housing and all pipes. To do this, unscrew three 10 bolts securing the body and loosen several clamps.
While the attachment belts have not been removed, we loosen, but do not unscrew, the three bolts securing the power steering pump pulley.
We loosen the tension of the generator belt by unscrewing the nut to thirteen, after which we move the generator closer to the engine.
At the bottom, loosen the locking nut of the tension roller and turn the tension bolt to loosen the air conditioner belt. Remove both belts.
With the help of an assistant, unscrew the crankshaft pulley bolt. The sequence of actions is as follows: the assistant in the car turns on the fifth speed and presses the brakes; with a slight movement of your hand, you unscrew the bolt from the outside through the pipe.
Unscrew the four bolts of the timing belt protective cover. You will not remove the cover until you unscrew the power steering pump.
We unscrew the two bolts securing the power steering pump, having first removed the pulley.
Unscrew the three bolts of the lower timing belt protective cover.
Set the top dead center
Turn the crankshaft clockwise until the marks on the camshaft match.
And also the crankshaft.
Next, unscrew the timing belt tension pulley bolt and remove the belt along with it. Having locked the camshaft sprocket, unscrew the bolt and dismantle it. There are two small ten-point bolts hidden under it; we turn them out.
Replacement process
Open the hood and remove the air filter along with the air pipe. To remove the pipe, you need to loosen the clamps securing it using a screwdriver.
Now the timing case is dismantled, for which you will have to unscrew 4 bolts. Then we begin to rotate the crankshaft. We do this until the mark on the pulley aligns with the mark on the casing. When alignment occurs, this will mean that the piston of the 1st cylinder is at dead center.
Loosen the power steering pulley bolts. Unscrew the bolt on the generator. The alternator belt will now slack and can be removed. The pulley is also removed.
Now let's use the overpass, if there is one, and if not, then we lift the front part of the car with a jack. We remove the right fender liner and air resonator, after which we gain access to the plastic belt protection. We remove the protection. It is not always plastic; sometimes metal is used.
Take a wrench and unscrew the crankshaft pulley mounting bolt. Choose a wrench with a long wrench. The tension roller will be released and the air conditioning belt can be easily removed.
Now we have a view of the timing drive. There are 2 marks on one of the teeth and the crankshaft key. We remember their location.
Now you can remove the timing belt and insert it into the slot located near the power steering housing.
When you install the purchased consumable, make sure that the mark on the tension roller aligns with the cutout on the bracket.
Installing a new timing belt
We check all the marks. We install a new timing belt. First we put it on the crankshaft sprocket, then on the camshaft sprocket, with tension, then the pump and tension roller. If the timing belt does not tension on the tension roller, turn the pump counterclockwise. Pay attention to the direction of rotation of the belt.
Then we start stretching.
The photo is from another car, so don't pay attention to the color of the tension pulley.
Rotate the pump until the marks on the roller match. Shown in the filmed video.
We tighten the pump. We turn the crankshaft two turns and check the marks and tension again. If everything is normal, install all the removed parts in the reverse order of removal. Fill with antifreeze. Well, if something goes wrong, you will have to repeat the stretching procedure again.
Well, that's it, the whole procedure with a snack took two hours.
Purpose of the belt in the timing belt design
In the design of the gas distribution mechanism, the belt provides interconnection between the two shafts of its power unit. It is performed in two versions:
- metal chain
- rubber belt
In the timing system, it automatically supplies the fuel mixture to the engine cylinders, while simultaneously freeing the unit from exhaust gases. Simply put, the timing belt controls the operation of the intake and exhaust systems. Since the belt is aggregated not only with both engine shafts, but also with its other elements located in the engine compartment, it therefore quickly wears out and fails.
How to tighten the alternator belt on a Chevrolet Lanos
Not so long ago, when starting the engine, creaking sounds appeared from the alternator belt. Typically, such a squeak indicates that the belt has stretched.
That's it... the belt no longer squeaks, makes other unpleasant sounds, or slips. I will also add that it is useful to periodically use belt conditioner:
I use Hi-Gear
.
but the conditioner is VeryLube
.
which I used before - much more convenient, because... You can insert a tube into the sprayer. For some reason, Hi-Gear
does not provide this feature, so spraying the spray is not very convenient.
The belt also whistled. especially when there is a load on the generator, that is, when the fogs are on or the glass is heated. when you start, there's a whistle. I was at the service center for half a day, they did it when I opened the hood to see what they had done there, so they just sprayed the bastards with some water. Of course we took it to the fullest. They wrote in the paper - throttle traction and what does it have to do with it. I drove for a week and again the same squeak.
Recently I changed the timing belt and all the other belts and rollers. so I heard the familiar whistle of the new belt again - let it work a little, then I’ll tighten it if there’s a squeak..
with a mileage of 61500 km.)
1. Remove the front right wheel.
2. Remove the plastic protection from the wheel side. You can immediately jack up the engine.
3. Remove the air filter housing by unscrewing bolts 1,2,3 and the air duct, disconnecting the supply air temperature sensor 4 and loosening the clamps 5,6 and 7.
timing belt replacement
4. Jack up the engine, if you have not done so already, and unscrew the engine mounting bracket.
* head 17, 14, knob.
5. Block the flywheel with a screwdriver and, by unscrewing the fastening bolt, remove the crankshaft pulley.
6. Remove the generator belt and unscrew either the generator belt tensioner roller itself or the entire assembly. As we can see in the photo, the roller is worn out and requires replacement, just like the alternator belt itself.
* head 10, ratchet.
9. We tighten the pulley mounting bolt back and turn the crankshaft clockwise, aligning the marks on the crankshaft timing pulley with the mark at the bottom of the timing case. We also check the mark on the camshaft pulley with the mark on the top of the timing case.
* head 17, knob.
10. Align the hole in the adjusting lever of the automatic timing belt tensioner with the hole in the bracket for the automatic timing belt tensioner and insert a drill into the hole to loosen the timing belt and fix it in the aligned state.
* drill with a diameter of 4.5.
11. Next, use a hexagon to loosen the three bolts securing the coolant pump.
12. Using a special wrench, turn the coolant pump counterclockwise until the toothed belt tension is released.
* the key for 41 was made independently.
How to set timing marks when the belt breaks on a Lanos
For cases where the timing belt breaks while the engine is running, it will be necessary to correctly set the timing marks separately for the camshaft sprocket and the crankshaft. How to do this, detailed instructions are described below.
- Initially, it is necessary to align the mark on the camshaft gear by turning it clockwise using a ratchet wrench.
- The photo shows the marks for aligning the camshaft gear.
- By the way, if you are wondering whether the valves on Lanos 1.5 and Chance 1.5 bend, then the answer is yes.
When the timing belt breaks on a Lanos, the valves bend, but it all depends on when the break occurred. If at idle or during startup, then the probability is extremely low. The greatest danger is when the belt breaks at high speed and under load. In this case, before replacing the belt, you should check the serviceability of the valves. So that you understand what bending the valves on Lanos means, below is a photo. - To check the serviceability of the valves on a Lanos, you should rotate the camshaft sprocket 360 degrees, and at the same time listen for characteristic knocking sounds. Their absence does not at all guarantee that the valves are not damaged, and their malfunction can be more accurately identified in two ways: by installing the timing belt and starting the engine, and also visually, but for this you will need to remove the valve cover.
- After setting the marks on the camshaft gear, we move on to the crankshaft. To do this, you need to unscrew the spark plugs (it is not necessary to unscrew all of them, but only the one that is located in the well of the first cylinder).
- Remove the left wheel, and using a wrench with an extension, unscrew the crankshaft pulley mounting bolt. To do this, engage fifth gear, depress the brake pedal, and the bolt breaks off.
- Remove the crankshaft pulley and screw the bolt back into place, through which the marks will be aligned. We turn the crankshaft and make sure that the marks on the gear and the lower part of the timing case match. The mark is also duplicated on the engine block.
- An assistant should place the tip of a screwdriver into the spark plug hole, and at the same time report when the piston in the first cylinder moves to the top position (TDC).
- The mark on the pulley must coincide with the mark on the timing case housing.
- Actually, this means that the phases of the gas distribution mechanism are installed correctly. You can begin installing the timing belt.
To summarize, the timing belt is the most important structural element of the engine. Its malfunction is fraught with serious and expensive breakdowns, and a possible replacement of the valves is not the worst thing. After all, if they break, the pistons can be damaged, which will lead to the need to replace them, and this is a more expensive engine repair.
To eliminate the possibility of such situations, it is recommended to regularly replace the timing belt every 60 thousand kilometers or every 4-5 years, and for replacement use only original and high-quality products with a minimum service life of at least 100 thousand kilometers.
Changing the generator and power steering belt tensioner roller on a Chevrolet Lacetti
According to the maintenance regulations for the Chevrolet Lacetti, the tensioner roller, alternator drive belt and power steering must be replaced every 40,000 km. mileage But there are situations when a belt break or failure of the tensioner with a roller occurs much earlier. Therefore, monitor the condition of these elements of engine auxiliary units during each scheduled vehicle inspection.
Instructions for replacing the alternator belt tensioner roller, power steering and air conditioner clutch
Before you begin replacing the tensioner pulley and belt, prepare the necessary spare parts and tools.
- Dayco catalog number
- Tensioner with roller - Gates part number T38376 . Unlike the original plastic one, it is more durable)
- Also find a 12mm wrench with a long handle or a similar socket adapter
- Remove the air filter housing
- To access the power steering pump, remove the exhaust manifold protective screen
- To access the tensioner rabbit, you need to unscrew the power steering pump
- Using a 15mm wrench, set the roller to the dismantling position and remove the old drive belt
- Unscrew the tensioner roller and replace it with a new one.
- We start and install the drive belt according to the diagram
On vehicles without air conditioning, the replacement procedure and part numbers for the belt and tensioner pulley are identical. Instead of the car air conditioner clutch drive pulley, there is a roller with the same diameter.
Thank you said: 2 times
Of course, I apologize if I got into the wrong topic. I’ll ask here, if it’s off topic, please point me where to write.
In general, the car began to rattle, knock, and chatter, and I went to the service center. We looked and came up with a list of what to replace.
I wrote down the names of the spare parts, but I only found the catalog number for one, because I’m a duduk in automotive engineering, and perhaps they are called something else, but I don’t know what to look for. I want to order it on existential.
Generator Chevrolet Lanos 1.5
Any modern car, including Chevrolet Lanos, has a generator, which is a source of current and ensures the operation of all consumers. The stability of the vehicle operation depends on the proper condition of the device, and if electricity is not generated in the required quantity, it will be impossible to operate the car.
- 1 Chevrolet Lanos generator
- 2 Prices for generators and spare parts for them
- 3 Main faults
- 4 Replacing the Lanos alternator belt
- 5 Replacing generator brushes Lanos
- 6 Replacing generator bearings 6.1 Related articles:
When charging is lost, the Lanos generator needs to be repaired, but first you need to find out the cause of the malfunction.
What is a timing belt and its purpose?
A timing belt is an elastic toothed ring, which has a certain diameter (depending on the car brand and engine type), and serves to connect the crankshaft to the camshaft (or shafts, as in the case of Lanos 1.6). This element is made of rubber and fiberglass threads (cords), the quality of which affects the strength and duration of the service life. The rubber coating has a thickness of 5 mm. Nylon teeth play an important role in the design of the timing belt, due to which it not only drives the camshaft gear, but also ensures synchronization between the crankshaft and the camshaft. This allows us to guarantee a high service life of the product.
An alternative to a belt is a chain drive, which has gained less popularity due to its inherent disadvantages. The belt design is used on most vehicles, including Lanos, Chance and Sens cars. It is important to note that this type of transmission device is used not only on Lanos with a 1.5 engine, but also with 1.6-liter engines.
Over time, the belt drive wears out and can break, which can have serious consequences for the engine. The resource depends on many factors, but it is important to know that for each make and model of car the corresponding service life of the product is indicated. If on Lanos cars this resource is up to 60 thousand kilometers (although the original devices last much longer), then on models of other cars this value can reach 90 thousand or more. This information is indicated in the technical documentation for the vehicle.
Chevrolet Lanos generator
On the Russian market, the most common Chevrolet Lanos model is a sedan in a four-door body; the car has been produced under the symbol T-150 from 2005 to the present. The cars are equipped with a 1.5-liter 8-valve A15SMS engine with a power of 86 hp. pp., the generator of this power unit is three-phase, alternating current, the device has a rectifier unit and a relay-voltage regulator.
Current sources can be of different power and produced by different manufacturers. The most well-known manufacturers of generators for Lanos 1.5 on the Russian market are:
- Bosch;
- EUROTEC;
- Magneti Marelli;
- Fenox;
- Nipparts;
- GM;
- POMAX;
- MANDO;
- StartVolt.
The price of a generator device depends on the brand, power of the current source, and sales region. “Native” generators are not very powerful; standard generator units usually produce a current of 65 or 85 Amps, but there is also a high-power current source that produces 95 Amps.
Prices for generators and spare parts for them
It is advisable to repair a generator when only a few parts need to be replaced, and the cost of repairs including spare parts does not exceed or approach the price of a new generator unit. If repairs are too expensive, it is easier to replace the entire power source.
Generators can be different in price, the most expensive is the original production device, and the unit from a well-promoted brand, for example, Bosch or Daihatsu, is also quite expensive. A cheap Chinese generator costs approximately 5.5-6 thousand rubles, from StartVolt - about 7 thousand rubles. A part produced by GM will cost on average 7-8 thousand rubles, and the most expensive product from Bosch - a unit on average costs 18 thousand rubles.
Prices for voltage regulators vary widely; Chinese products are sold at traditionally low prices. For example, a Chinese-made relay regulator costs on average from 400 to 700 rubles. GM DAEWOO parts are not cheap, their average price is 2200-2400 rubles, and the most expensive relay-regulator is original production (General Motors), it costs approximately 3.5 thousand rubles, especially since you have to wait more than a week for it to order . There is also a significant range in prices for rectifier units - they are sold at prices ranging from 1,700 to 3,300 rubles.
Which belt and roller to choose for replacement
Original belt installed from the factory on a 16 valve Lanos engine 1.4 - 1.6 liters - GM 96183351 price from 1100 rubles
Original timing belt installed on 8 valve Lanos GM engine 96352407 price from 700 rub.
Original tension roller for timing belt 16 cl engine - GM 96350550 - cost from 1000 rubles
Original timing belt pulley for 8 cl engine - GM 90499401 - roller cost from 750 rubles
If for some reason you are unable to install a new original pulley and timing belt, you can choose inexpensive analogues.
Analogs of timing belt for 8 cl engine:
- Contitech CT874 (Germany) price from 900 rub.
- Gates 111RS17 (USA) price from 600 rub.
- LYNXauto 111EL17 (Japan) price from 600 rub.
Timing belt tensioner roller for 8 cl engine:
- HQ HQ96350550 (Korea) price from 600 rub.
- INA 531021330 (Germany)
- LYNXauto PB1074 (Japan) price from 900 rub.
Analogues of the timing belt installed on a 16 cl engine
- Contitech CT887 (Germany) price from 500 rub.
- Gates 5419XS (USA) price from 1000 rub.
- LYNXauto 127FL25 (Japan) price from 800 rub.
Analogs of timing roller for 16 cl engine:
- Coram C822 (Italy)
- LYNXauto PB1074 (Japan)
- INA 531021330 (Germany)
If you decide to replace the pump in addition to the roller and belt, the original number is 96352648. The cost of the GM pump 96352648 is from 2000 rubles.
Pump analogues:
- Fenox HB2801 (Belarus)
- Hepu P312 (Germany)
Once you have decided on the choice of timing belt, pulley and pump, you can begin replacing.
Basic faults
The generator of the Chevrolet Lanos car is quite reliable, but over time it still fails:
- the bearings begin to make noise;
- too much voltage is created in the on-board network;
- there are voltage surges;
- the battery is undercharged;
- charging disappears completely.
The main reasons why breakdowns occur:
- breaks through the diode bridge;
- generator brushes wear out;
- there is a break or short circuit in the stator or rotor winding;
- The voltage regulator is faulty.
But charging may disappear (or be too weak) not only because of the generator itself; often the problem arises due to the alternator belt or the car's electrical wiring.
Weak charging can occur for various reasons:
- brushes are worn out;
- the relay regulator is faulty;
- the belt is loose;
- there is wear on the rotor (armature) commutator.
If there is an overcharge (voltage more than 14.7 volts), there is only one cause for the malfunction - there is a defect in the voltage regulator. When the diode bridge breaks, the voltage begins to float - it can periodically change from 12 to 14 volts.
Conclusion
The reason for the whistling of the Daewoo Lanos engine when starting is a malfunction of the additional drive belt for attachments. Less commonly, a whistle can be caused by wear on the elements of the gas distribution mechanism and others. To eliminate the malfunction, it is necessary to diagnose and replace the failed belt in order to prevent more negative consequences for the power unit.
Lanos or Chevrolet Shans, aka ZAZ Chance, aka Sens and their derivatives. All about the mileage and repair of Lanos. Only useful letters.
Replacing the Lanos alternator belt
The alternator belt (RG) on the Lanos must be tensioned with a certain force:
- if the strap is loosely tensioned, charging may be lost and an unpleasant whistle may appear;
- If the belt is too tight, the generator bearings will hum and they can quickly wear out and require replacement.
On the Chevrolet Lanos 1.5 there are two types of alternator belts:
- normal (without power steering)
- with power steering.
The length of a regular belt is 870 mm, for cars with power steering - 970 mm. It should be noted that the belt from the 1.5 liter engine does not fit 1.4 and 1.6 liter engines.
The alternator belt has its own specific resource; it is usually changed every 60 thousand kilometers. A part may fail ahead of time for the following reasons:
- oil or coolant gets into the RG;
- the generator is installed unevenly and the belt is running askew;
- the generator pulley has defects, and therefore the RG wears out prematurely;
- low quality part (non-original production).
If the belt is worn out or has traces of defects (cracks, cord delamination), it should be replaced. Replacing the Lanos 1.5 alternator belt is not difficult, we carry out the work in the following order:
- remove the battery terminal, unscrew the top bolt securing the generator;
- move the generator unit to the motor, remove the belt;
- install a new RG, tension the belt, tighten the upper bolt.
Which timing belt to install on Lanos and Chance
As for manufacturers, belt drives are produced by various companies Dayco, KAP, Flennor, Dongil, AE, Dongshin and others. Naturally, preference should be given to the original
GM, which has serial number 96352407, as well as the Gates analogue with number 5310 XS.
It is important to note that the timing belt size for a Lanos 1.5 8 valve car is 17 mm wide and consists of 117 teeth.
Lanos with a volume of 1.6 have two camshafts, so the timing belt for them is correspondingly longer in length. The original belt for Lanos 1.6 from GM has code 96814098. Its width is 25 mm and the number of teeth is 127. The recommended analogue of the timing belt for Lanos 1.6 from Gates is number 5419XS.
It is not recommended to choose Contitech brand products, since, according to car owners, the quality of this brand’s products has significantly decreased. Preference should be given to Bosch brand products. The company values its reputation and produces high-quality products, albeit at high prices.
This is interesting! When choosing a timing belt, consider not only the brand name, but also the cost. High-quality products will not be cheap, and even if you come across devices priced below 800-1000 rubles, then avoid them. A high-quality belt for Lanos costs at least 1000 rubles or more than 400 hryvnia.
Replacing generator brushes Lanos
If the brushes wear out, charging is lost and the battery is undercharged. In order to replace the brushes, the generator must be removed and completely disassembled, and you will also have to work with a soldering iron. First, remove the generator device from the engine:
- disconnect the negative terminal from the battery;
- remove the generator belt;
- remove the generator from the engine, unscrew the nut securing the positive wire, disconnect the plug located at the back of the generator unit;
- unscrew the bolts and nuts (2 pieces each) that secure the generator to the engine;
- Having completely freed the generator unit, remove it.
To replace the Lanos generator brushes, you should disassemble the device:
- we clamp the housing in a vice, unscrew the pulley nut, dismantle the generator pulley, and also remove the bushing under it;
- by pushing the latches of the rear plastic cover with a sharp object (a beard), remove the cover from the latches;
- remove the rear bearing cover;
- unscrew the three screws securing the generator cover;
- dismantle the cover, as well as the impeller with the bushing;
- we take out the armature, solder the contacts of the stator winding from the rectifier unit with a soldering iron;
- dismantle the stator by removing it from the cover;
- remove the protective casing, it is attached to internal clamps, which also need to be pushed through with a sharp object;
- unscrew the nut, remove the contact bolt on which the positive wire is attached;
- unscrew the four bolts that hold the diode bridge, remove the rectifier block;
- we unsolder the relay regulator from the diode bridge;
- disconnect the rectifier unit with the voltage regulator, remove the cover from the brush holder (to do this, you need to release three latches);
- we take out the brushes, replace them by installing new parts;
- we put everything back together, the conclusions need to be soldered again;
- put the generator in place.
We make the replacement ourselves
The replacement process is simple and does not require dismantling large units and complex systems. There is also no need for special tools.
A quick way to replace only the drive
- If there is no hole or lift, then use a jack to raise the car.
- Remove the front right wheel.
- Unscrew the plastic protection from the mudguard.
Dismantling the protection - Let's move it a little to the side.
- Using the opened gap, release the tensioner.
- We remove the belt.
- We install a new belt.
- We install the protection and the wheel in place.
This option is suitable if your problems started on the road or far from the garage. There is another method, which is more labor-intensive and also involves replacing the roller. In this case, it is difficult to do without an overpass.
Replacing the belt and roller
If our goal is to replace only the air conditioner drive, then we should not remove other components and parts. Do everything in the strict sequence we suggest.
- The first step is to unscrew the crankcase protection securing bolts from the front. There is no point in completely dismantling it. The resulting opening is absolutely enough.
- Unscrew the nuts that secure the motor protection.
- We free up space by moving it towards the wheel for work.
- Next, you need to disassemble the tensioner mechanism.
- We carefully inspect it for defects and damage.
- We clean it of dirt.
- Having installed a spacer washer under the pulley, we begin assembling the mechanism.
Start of assembly - Install the video.
- Install the disc washer.
- Next you need to tighten the nut.
- We put on the belt.
Installed new belt - Using the adjusting bolt, we tighten it so that when pressing on the upper branch with a force of ten kgf, it bends no more than 5-8 millimeters.
- Next, tightly tighten the nut securing the tension roller.
We start the car and check how the system works. If no extraneous noise is heard and the air conditioner works as expected, then the work can be considered complete.
Replacing generator bearings
If the Chevrolet Lanos generator bearings become noisy, they need to be replaced. But before disassembling the generator assembly, you should make sure that it is the bearings that are making noise, and not the water pump or the engine itself. Eliminating engine noise is quite easy - you need to remove the alternator belt and start the engine. If the noise disappears, then the engine has nothing to do with it, and the noise is most likely the bearings. To make sure that the problem is in the bearings, you need to unscrew the generator shaft by the pulley - faulty shaft supports will create an unpleasant noise.
In order to replace the generator bearings, the generator assembly must be removed and disassembled. The disassembled bearing assembly contains:
- front – in an aluminum cover;
- rear - on the armature (stator) shaft.
To remove the bearing from the armature, you must use a puller. We clamp the rotor in a vice (carefully, trying not to damage the part), place the paws of the puller behind the base of the bearing, and compress the rotor shaft support.
Then remove the front bearing:
- install the lid on a wooden beam;
- take the adapter and knock the bearing out of the cover. You need to hit it carefully, trying not to damage the aluminum body;
- Before installing a new bearing, you should fill it with grease - usually there is little grease in factory parts. To do this, remove the plastic protective casing of the bearing (we pick it up with a sharp object, such as an awl) and lubricate the balls with lithol;
- put the boot in place;
- we hammer the bearing into the cover, making sure that it seats completely;
- We also fill the rear shaft support with grease;
- We place the rear bearing on the armature shaft, hammer it in with light, careful blows of a hammer; you can use the old bearing as a mandrel. Do not hit the parts too hard - there is a risk of splitting the new bearing or damaging the rotor shaft;
- We assemble the generator and install the generator unit on the engine.
Main causes of breakdowns
Under no circumstances should you attempt to repair a Chevrolet Lanos generator yourself; you may only permanently break it. Even changing the brushes of a Chevrolet Lanos generator is best done by specialists. The main causes of breakdowns include:
- corrosion and service life. The generator can last up to 6 years. If you want to prolong its work, you need to do maintenance on it at least once every three days.
- Generator bearing failure. The bearings of a Chevrolet Lanos generator should be replaced at least once every 3 years.
- Using a low-quality or expired battery.
- Frequent driving in high humidity.
- Installing powerful equipment on a car that consumes too much electricity.
- Trying to fix the generator yourself.
The maximum we recommend doing yourself is to remove the generator and take it for repairs, or put a new one in place of the old one.