Lada Priora is one of the most common and best-selling cars in Russia. This applies to both new and used cars, since the Priora is still in production.
It is also the most affordable car in the line of the domestic manufacturer represented by AvtoVAZ. Therefore, it is not at all surprising that conversations among car owners often revolve around this car.
In addition to the affordable price, the advantage of Priora is the low cost of maintenance. Spare parts are cheap. And the design of the car makes it possible to fix a number of faults with your own hands, without resorting to the help of car services.
One of the components that you can potentially handle yourself is the generator. It includes the generating device itself, as well as the drive belt. Moreover, the belt more often needs intervention. It is periodically tightened and replaced as it wears out. But the generator is designed for its entire service life. But it happens that it has to be repaired or replaced.
Important feature of Lada Priora
When planning to solve an issue related to a belt or alternator with your own hands, it is important to consider one point. This is the equipment of the car.
The thing is that Lada Priora can be without power steering and air conditioning. And the procedure for carrying out repair work largely depends on this.
So the replacement instructions need to be considered taking into account whether the Priora has air conditioning or power steering or not.
When does a belt need to be replaced?
Most often, motorists are faced with replacing the alternator drive belt on a Priora. This is a consumable item with a limited service life. A number of factors determine how long one belt can last.
If you rely on the car manufacturer's instructions, then according to technical regulations, the alternator belt must be replaced every 60 thousand kilometers, or at intervals of 3 years of operation. Here you need to build on what comes first.
There is also a clarification for those who use Lada Priora quite rarely. In this case, it is better to change the belt at intervals of 2 years, without taking into account the number of kilometers traveled.
The need to replace the alternator drive belt usually arises when the element wears out. It stops working effectively and clinging firmly to the surfaces of the rollers.
The most characteristic sign of wear is the appearance of a whistling sound from the belt. Sometimes the problem is solved by a tightening. If the belt shows characteristic signs of wear, the only correct option is to replace the part.
Sleep
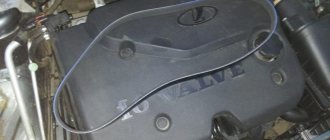
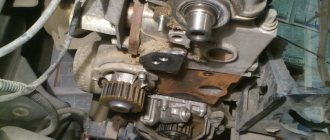
Using the “17” head, turn the crankshaft clockwise by the bolt securing the auxiliary drive pulley and inspect the belt along its entire length.
Using the “17” head, turn the crankshaft clockwise by the bolt securing the auxiliary drive pulley and inspect the belt along its entire length.
The belt should not have cracks, tears, or separation of rubber from the fabric base. We replace the defective belt.
Replacing a belt in a configuration without power steering
If power steering, that is, power steering, was not included in the configuration of the Lada Priora car, then the instructions will have a certain form.
It is best to drive the car into an inspection hole to carry out work. Among the tools, you should arm yourself with a wheel wrench, a set of regular keys, and also a puller for the fender liner.
The process of replacing a belt on a Priora, where there is no power steering, looks like this:
- loosen the generator mounting nut;
- unscrew the adjusting bolt;
- move the generator towards the engine;
- remove the front right wheel;
- remove the fender liner to gain access to the belt;
- remove the belt from the rollers;
- install a new spare part.
At the same time, check that the tension is correct. There are recommendations here, which you will learn about a little later.
Replacing the belt included with power steering
The nuance of the Lada Priora configuration with hydraulic booster is that the power steering pulley is at a low height. Therefore, the generator belt was eventually run around the power plant support.
Because of this, the process of dismantling and replacing the belt has become more difficult. The required set of tools has also expanded, consisting of:
- set of keys;
- tension wrench;
- jack;
- set of heads;
- WD-40 products.
The step-by-step process is as follows:
- using WD-40, treat the bolts that secure the engine mount and bracket;
- wait 15-20 minutes and try to unscrew the bracket nuts;
- use a jack to lift the wheel on the generator side;
- place a strong object under the engine and remove the wheel;
- lower the car a little;
- unscrew the tension roller;
- bend the belt;
- unscrew the bolts holding the pillow;
- lower the car so that the engine begins to hang out a little;
- move the pillow towards the engine;
- remove the belt and install a new one;
- lift the car with a jack so that the engine returns to its original position;
- At the same time, make sure that the pillow and the belt do not move;
- tighten the nuts and bolts tightly;
- Replace the wheel and lower the vehicle completely.
That’s it, this completes the procedure for replacing the alternator belt using the example of a Lada Priora car, which has power steering. As you can see, there are much more difficulties here than in the version without power steering.
A similar replacement is carried out if the Lada Priora is equipped with air conditioning from the factory.
Sn9shimo
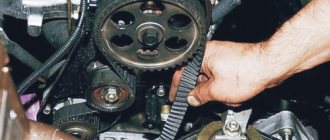
To check the belt tension, hold the belt with your fingers in the middle between the tension roller and the generator pulley and turn the belt.
To check the belt tension, hold the belt with your fingers in the middle between the tension roller and the generator pulley and turn the belt.
The belt should not rotate more than 90°. Otherwise, the belt tension needs to be adjusted. To tighten the belt, turn the tension roller counterclockwise, and to loosen it, turn it clockwise. To do this, insert a special key into the holes of the tension roller in the form of two rods with a diameter of 4 mm, welded to the base of the key (the distance between the rods is 18 mm). You can use the key for the old-style timing belt tension roller, installed on all front-wheel drive VAZ cars. If you do not have a special key, you can insert two pins (screws) with a diameter of 4 mm into the holes of the tension roller. Using the screwdriver shaft located between the pins, turn the roller.
Belt tension
Now you need to figure out how to tension the alternator belt on the Priora, since this too has its own peculiarities.
Let's start with the usual equipment. There is a generator and crankshaft pulley here. Nothing else. By pressing on the belt branch, it should bend in the range of 8-12 mm.
If it is equipped with power steering or air conditioning, then this tension will be too weak. The optimal factory indicator is considered to be a tension with a stretch of 5 mm, no more.
If anyone doesn’t know how to properly tighten the alternator belt on a Lada Priora, then take a look at the following instructions:
- loosen the tension roller nut while holding the cage with a wrench;
- rotate the roller cage by rotating the key;
- tighten the tension roller nut;
- Check the belt tension level at the longest section between the pulleys.
As already mentioned, in a simple configuration the tension should be such that when pressure is applied, the generator belt bends by an average of 10 mm. It is advisable not to allow deflection of more than 12 mm and less than 8 mm.
If you have power steering or air conditioning, you should tighten it more. It is optimal to get 5-6 mm when pressing on the belt deflection.
Try to check whether the tension is sufficient experimentally. To do this, tighten the belt and start the engine. If the tension is too strong, then the bearings will begin to hum. And if the tension is insufficient, a characteristic whistle is heard from the new belt.
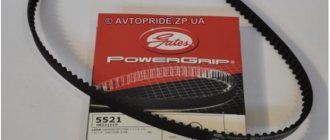
An important point is the choice of a high-quality alternator belt for replacement. Now there are many companies that can offer decent spare parts and components for domestic cars, including Lada Priora.
Based on the reviews of the Priora owners themselves, the most preferable options would be:
- Gates
- BRT.
- Luzar.
- Andycar, etc.
Moreover, the first two manufacturers are the most in demand and popular. They are considered the highest quality. It’s not for nothing that belts from these brands are supplied to AvtoVAZ conveyors when assembling cars.
Much to our disappointment, the quality of the belts supplied to AvtoVAZ factories differs significantly from the same original spare parts sold in stores. But there's nothing you can do about it.
In addition to the alternator belt, the tension pulley may also need to be replaced. Therefore, before carrying out work, be sure to check the current condition of the elements. If there are signs of wear and damage, the parts will have to be replaced as a whole. But there is nothing complicated here.
Practice shows that tightening the alternator belt on a Priora is sometimes not enough. And if the lift does not give the desired result, the only option is a complete replacement.
Another question is when the generator itself fails. There are 2 possible options: replacement or repair.
Selecting an alternator belt for Lada Priora with air conditioning
The manufacturer recommends a poly-V-element for this car with catalog number 8114096Р and size 1125 mm. Many companies produce them. But nevertheless, experts identify several popular brands:
- BALAKOVO Rubber Equipment (most often installed as standard at the factory);
- GATES;
- Bosch;
- LUZAR.
The most important thing: choose a high-quality belt, not a fake one. Otherwise, such an instance does not pass through for long, causing installation malfunctions. Modifications with the selection of similar parts are also possible.
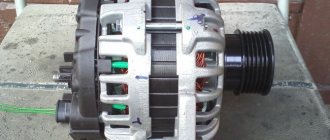
How to change a generator
Next, you will learn how to remove the generator on a Priora if the car comes with air conditioning or power steering, or was supplied from the factory in a simple configuration.
This point is really important. Often, car owners repair the generating device without removing it, since dismantling turns out to be too problematic.
Let's start with the budget configuration, which does not have air conditioning or power steering. To work on removing the generator, you will need a pit or a convenient overpass.
The process of removing a generator on a Priora without air conditioning looks like this:
- disconnect the battery (just disconnect the negative terminal);
- remove the engine protection;
- loosen the generator tension roller;
- pull the belt off the pulleys (it is not necessary to completely remove the belt);
- disconnect the wire block from the D+ connector;
- disconnect the wires from the contact pin;
- slide the rubber cover under which there is a fastening nut;
- unscrew the nut of the lower clamp, and then remove the screw of this clamp;
- then unscrew the fastening nut located on the upper bracket;
- first move the generator down and then to the right;
- unscrew the adjustment screw;
- remove the tension bar;
- make sure that the generator is no longer connected to any wires;
- remove the device from the car.
Sometimes the procedure for removing the generator is complicated by the fact that the lower mounting bolt is not very conveniently installed. It is impossible to pull it out completely, since it rested against the cushion of the Priora’s power plant.
In this situation, you can do this. First, the engine is hung out, and then the engine mounts are unscrewed. Now the bolt can be pulled out without any problems.
Or an alternative, more barbaric method. The bolt is simply cut off and a similar fastener is installed in its place.
Do not forget to perform reassembly in the same way as dismantling. Otherwise, serious problems will arise in the future, as well as difficulties in disassembling this unit.
This is how the generator is replaced if the Priora does not have power steering or air conditioning.
If the Lada Priora has air conditioning or hydraulic booster installed, then the issue of removing the generator to repair it becomes more acute. Yes, if the unit needs to be replaced, there are simply no options. But for repairs, many prefer to carry out work without removal.
The problem with the configuration with an air conditioner is that the removal of the generator according to the scheme discussed above is prevented by the air conditioning compressor. That is, the compressor is supposed to be removed here. And this is difficult and financially expensive if you contact a car service.
Craftsmen and Lada Priora owners have found an alternative solution. Even with air conditioning, the generator can be removed without touching the air conditioning compressor. To do this, the headlight is removed.
In this case you should:
- dismantle the protection over the optics;
- loosen the front bumper fastenings;
- remove the headlight;
- gain access to the generator.
Further, the principle is similar. That is, the battery is disconnected, the belt is removed, the fasteners are unscrewed, the wires are disconnected and the generator is brought out through the gap cleared by removing the headlight. And the connection diagram for the new generator on Lada Priora cars is the opposite of turning it off.
You can find information that removing the compressor to dismantle the generator is only possible if the Lada Priora has an air conditioner manufactured by the Halla brand. If there is climate control equipment from Panasonic there, then you can remove the generating device without removing the compressor. Whether this is true or not has not been officially confirmed. But you can leave a comment and tell us what you know about this.
The subsequent connection of a new generator installed on a Lada Priora car is carried out in the reverse order.
Checking the combined relay-regulator of the car
First we will check the combined relay-regulator circuit together with the brush assembly. These are now installed on many foreign cars, and by the way, on many domestic cars (often labeled Y212A).
As you understand, it is necessary to remove the generator and disassemble it, since this combined unit is attached at the back next to the generator shaft, along which these brushes run. For this:
- We look for a special “window” on the back of the generator where the brushes are immersed.
- Unscrew the fastening bolt.
- Remove the brush assembly.
- We clean it - as a rule, it will be covered in graphite dust; the brushes are made of graphite, using special carbon.
Then we need to check it, but for this we assemble a certain circuit, it is advisable to use a power supply with an adjustable load or a charger. We also need to take a regular 12V light bulb from a car, for example from a “dimensions”, we will need wires to assemble the entire system.
We may need a battery, because many chargers do not work without it. But from the wire from the battery we connect the relay-regulator, to the brushes of which we connect a 12V light bulb, this can be done with small alligator clips, the main thing is not to break the graphite elements. A small diagram for understanding.
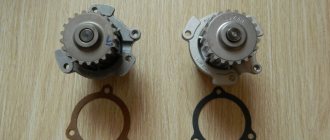
How to repair a generator
Now you know how to unscrew the pulley, remove the belt from the generator and replace it on a Lada Priora car, which can come with or without air conditioning and power steering.
But it’s worth saying that the generating device on the Lada Priora is definitely not the weak point of the car. According to technical documents, preventive checks should be carried out at intervals of 50 thousand kilometers. And this despite the fact that in practice the resource of the node is much higher.
In terms of repairs, brushes are usually changed every 150 thousand kilometers. Other elements are designed to last a lifetime.
But there is an important nuance. Brushes, as a separate element, cannot be changed on the Lada Priora. They are an integral part of the voltage regulator. The latter cannot be repaired. That is, it will have to be replaced entirely.
It's nice to know that a new voltage regulator is inexpensive. The cheapest options will cost 200-300 rubles. More expensive parts cost 600-800 rubles.
There is no specific serial number to search for the original generator, since Lada Priora is equipped with spare parts from different manufacturers, as well as with different characteristics. These are brands such as Orbita, VTN and Energomash.
Therefore, when they talk about how to change the brushes from a generator on a Priora, they mean buying a new voltage regulator with brushes assembled.
They can be changed by removing the generator or without prior dismantling.
Repair without removal
If you have a simple Lada Priora equipment, which does not include air conditioning, then replacing the brushes without removing the generating device itself will not be difficult.
To do this you need:
- disconnect the battery;
- remove the power wire from the generator;
- disconnect the control lamp input;
- unclip the 3 latches to remove the plastic protective cover;
- unscrew only 2 fasteners that hold the regulator together with the brushes;
- replace the voltage regulator;
- Reassemble in reverse order.
Be careful and careful when removing latches. Many owners of Lada Priora complain that it is quite inconvenient to snap them off. Losing patience, they often make sudden movements, and the latches eventually break. Be careful and patient. No other way.
After this, do not forget to check the correct operation of the automotive electrical system with a new part.
This option is optimal for replacing the regulator if the air conditioner is not included in the package. This is due to the presence of sufficient space in the area where the unit is located. That is, there are no problems with sticking your hand into the gap and performing all the manipulations.
Now to the question of whether it is possible to replace the regulator without removing the generator, if air conditioning is included in the package. Replacing the brushes and regulator assembly itself is no different. But there is another problem. This is the lack of sufficient space to stick your hand through and perform operations. There is no required gap between the engine and radiator. This is especially a problem for people with large hands.
In addition to trim levels with air conditioning, a similar situation is observed on Lada Priora with a 16-valve engine.
But there is a solution. It is necessary to disconnect the air filter housing and then move it to the side, or completely dismantle it. As a result, there should be enough space to avoid dismantling the generating device.
Repair with removal
Everything here is clear and obvious. In general, the unit is easier to repair when it is first removed. This is due to the fact that all the elements are in front of your eyes, you can rotate the generator as it is convenient for the master.
In terms of the procedure for replacing brushes on a removed generator, there are no differences. As in the previous case, you will need to remove the cover, unscrew the fasteners, check the condition of the element just in case, and replace the regulator with brushes assembly.
This makes it much easier to finally make sure that you did the right thing when deciding to replace the brush assembly. The need for replacement is indicated by uneven wear, brush sticking, and a length that is 5 millimeters or less. These are obvious signs.
As a result, the situation with the belt and alternator on the Lada Priora turned out to be not as simple as many expected from a domestic car. But this still does not prevent you from carrying out repair and restoration work yourself.
Has anyone had to change a belt or alternator on a Lada Priora? Did you expect something like this from AvtoVAZ? What surprised you or didn’t you like? At what stage did difficulties arise?
Other causes of low voltage
A small potential difference in the system is not always associated with a breakdown of the generator or a bad battery
If the diagnosis of these elements does not reveal any problems, then you should pay attention to the following:
- condition of the battery terminals - connection density and oxidation;
- electrical wiring problems - oxidation, violation of its integrity;
- output contacts to electrical appliances;
- correctly selected energy consumers.
Each contact must be tightly adjacent and intact, that is, there must be no formations (for example, sulfation) that will disrupt the flow of current. Incorrect connection of contacts leads to accelerated battery discharge even when the car is not running.
To improve the connection of the elements of the car's electrical system, it is necessary to clean all contacts and restore the integrity of the wires by replacing them or connecting them and wrapping them with insulating tape.
In conclusion, I would like to repeat that stable operation of the car requires constant monitoring of all elements, and the generator should attract special attention. The battery is charged from it and provides electricity to the entire car system
Pay attention to all elements: generator brushes, slip rings, voltage regulator, equipment winding.
The most correct measurements should be carried out when the battery is fully charged and in various modes. Remember that the manufacturer links the characteristics of the generator to the number of engine revolutions - they help produce a certain current.
Detailed video on how to check the generator:
Good afternoon Priora 2010 lux. The car is under warranty.
Problem: the voltage in the network when driving with consumers turned off is 13.4 V (measured according to the “State”). At idle, when parked with off. consumers, the voltage according to the “State” is 13.4V according to the multimeter, at the battery terminals, the same 13.4V, i.e. The “State” can be trusted.
Question. What should be the voltage at the battery terminals pr XX according to the standards (and what can you refer to, in which documents these standards are prescribed)?
Is the voltage measured only at idle with the consumers turned off, or are there still control measurements?
Can the guarantee providers send me away because they have installed an add-on that is not theirs? equipment if I change the voltage with the music turned off, etc. and so on.?
I watched it in motion - I was driving with the 13.5 consumers turned off, I turned on the headlights. light drops to 13.1. With ventilation, music and dimensions on - 13.4.