How to install a thermostat from Granta on Kalina
Lada Kalina Hatchback › Logbook › Installing a thermostat from Granta and completely replacing the entire cooling system
In this post, I will try to tell in detail how to install a thermostat from Granta in Kalina and completely replacing the entire cooling system. I would like to immediately thank the users and their articles: 1. kombatoleg www.drive2.ru/l/5204906/ — Thermostat from Grants for Kalina 2. SV4 www.drive2.ru/c/1759858/ — Thermostat Grants for Kalina 3. YaTyT11rus www. drive2.ru/l/5471871/ — Replacing the heater radiator without removing the panel. I used all their advice and changed a few things. Unfortunately, I didn’t take many photos, since I had to finish it at night using a flashlight. The replacement was caused by a leak in the cooling radiators and heater radiator. It was decided to replace everything except the pump, since it was replaced a couple of months ago. So, we purchased: 1. DAAZ cooling radiator
DAAZ cooling radiator
2. KRAFT stove radiator
KRAFT stove radiator
3. Thermostat from Granta with a gasket (Kalinovskaya is also suitable). 4. Stove pipes. 5. Radiator pipes (upper and lower). 6. Throttle valve heating hose. 7. The radiator pipe from the classics is s-shaped
8.Coolant flange for foreign cars (catalog number 1j0 121 087 b)
9. Expansion tank. 10. Plug of the expansion tank “Avtopribor”. 11. M8x10 studs from the classic camshaft. 12. Clamps of different sizes NORMA. 13.Sealant (Kazan). 14. Dzerzhinsky antifreeze 10 l. I’ll say right away that I replaced the radiator pipes and expansion tank 2 days after the main work, since the old lower pipe leaked and found a crack on the tank. First, I “cooked” a thermostat in a saucepan at home. The opening temperature was about 85 degrees. I decided to raise it. I disassembled the thermostat, took out the thermal insert and shortened the rod by 3 mm. I “cooked” it again, the opening temperature was about 90 degrees. Arranged. You can bet. Remove the air filter housing, air duct, battery, battery platform.
We remove the ignition coil, drain the antifreeze from the block and radiator. We remove all the pipes, the old tremostat, unscrew the old studs and clean the place of the old gasket and sealant.
Remove the cooling fan and old radiator.
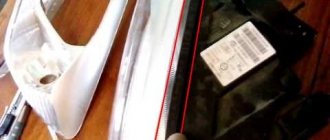
Let's go to the salon. We take off the gas pedal. I disconnected the brake pedal from the VUT and unscrewed the end cap of the brake lamp (this did not have to be done. I had enough strength to push the brake pedal down from the VUT and pull out the heater radiator). Next, we cut out the part from the body.
I sawed with a metal file and a drill inserted into a screwdriver. We take out the old radiator.
And we put in a new one. We glue the sawn part back onto the hot glue and secure it through the bar with self-tapping screws to the whole body.
We install the stove pipes. Installing them was not difficult, it was VERY difficult and time consuming to put the clamps on them and tighten them. I had to do all this blindly, since the steering rack is in the way, and I don’t have a hole in the garage. But he did. I’ll say right away that I lubricated all the pipes from the inside with sealant. Next, we insert our classic s-shaped radiator pipe into the “saxophone” and try on where we can insert the coolant flange for foreign cars. We tried it on, cut off where necessary the s-shaped pipe and the lower radiator pipe.
By the way, I forgot to mention that the thin outlet from the flange is 2 mm smaller than the throttle heating hose. The solution is simple: heat the outlet with a lighter and press it against the wall, you get a “mouthpiece” of the required size, and the hose is pressed normally with a clamp.
We replace the old temperature indicator sensor with a sensor from a VAZ 2101 TM106 with a regular flat chip, re-soldering the connector (then I realized that it was possible not to change it. There is enough space for the old one). Next, we screw in new studs (on the top stud we had to increase the thread by about 1.5 cm) and install a new thermostat. We put the heater supply pipe on it and screw in the fan switch sensor. We are installing a new radiator and then I had a sad moment... When I was tightening the clamp of the steam exhaust hose, its pipe on the radiator broke off... I thought for a long time what to do. Invented! I ground the pipe down to the base of the radiator. Next, we look for a suitable metal fitting, preferably with a thread with a diameter of no more than 6 mm on one side. I found it, I don’t know why, with a diameter of 6 mm. I bought steel epoxy adhesive DD6540
We apply it to the threads and screw it into the radiator, coat it well around it, pull on the steam removal hose, tighten the clamp and leave everything to harden (at least 2 hours, but I left it overnight). We put the radiator in place, connect the lower pipe, install the fan, connect the upper pipe, collect everything else, fill in antifreeze, start it, remove the plug, and rejoice. Among the changes: 1. Previously, the engine temperature was about 80 degrees, now it remains stable at about 90. 2. The stove is not connected in parallel as in stock, but in series, therefore the interior will be warmer in winter. 3. Warming up the engine while driving is noticeably faster. 4. Gasoline consumption has also decreased. Good luck to everyone and smooth roads. I will answer your questions with pleasure.
In the engine cooling system in a Lada Kalina car with an engine of 8 valves, as well as 16 valves, the thermostat plays a significant role, because it is a regulating link, thanks to which the operating temperature necessary for the normal implementation of the combustion process is maintained in the circuit. The main signs of failure of this part are:
- unit overheating;
- inability of the motor to reach its operating temperature.
Let's look at how to replace such an important component as a thermostat using the example of a Lada Kalina 8-valve engine; similar work is performed on a 16-valve engine. Doing this work yourself will allow you to gain enviable experience and save a lot of money.
Throttle valve heating
Another modification of the “thermos” on the VAZ-2190 is the installation of a heating circuit for the throttle assembly. This is how some car enthusiasts insure themselves against freezing of the throttle valve. To do this, an additional threaded hole is made in the cover of the part, where a fitting is welded through a copper washer to drain the heated liquid. The studs for attaching the “thermos” will also have to be enlarged.
In the end, I would like to note that the engine temperature also depends on the brand of antifreeze used and the viscosity-temperature properties of the oil. Low temperatures in the cabin may be caused by problems in various vehicle systems.
In the engine cooling system in a Lada Kalina car with an engine of 8 valves, as well as 16 valves, the thermostat plays a significant role, because it is a regulating link, thanks to which the operating temperature necessary for the normal implementation of the combustion process is maintained in the circuit. The main signs of failure of this part are:
- unit overheating;
- inability of the motor to reach its operating temperature.
Let's look at how to replace such an important component as a thermostat using the example of a Lada Kalina 8-valve engine; similar work is performed on a 16-valve engine. Doing this work yourself will allow you to gain enviable experience and save a lot of money.
Features of replacing the thermostat on Kalina
How to replace a thermostat? To successfully implement the indicated procedure, the owner will need to adhere to the steps below.
- First, disconnect the connector of the sensor connected to the intake air tract filter element unit.
- To ensure better convenience, we recommend that you completely remove the air filter housing from the engine compartment. It is held in place by three fastening points, 2 of which are based on elastic bands, and the third is located in the battery area.
- Before draining the antifreeze from the cooling circuit, we determine how to carry out this manipulation. Here we highlight two of the most convenient methods.
- The first method is a procedure that allows you to perform a drain using a conventional air compressor used to inflate tires. This option eliminates the need for a pit or lift, and the work itself can be done in any suitable location. Now you know how to change it, but let’s add that the undeniable advantage of this method is that there is no need to remove the pipes and unscrew the plugs located on the engine block and radiator.
- Before the procedure, we stock up on an empty container, the capacity of which is equivalent to 4-6 liters of liquid, as well as directly on the compressor with the device.
- Open the cap on the expansion tank, from which we also remove a small diameter hose. We seal the “bare” tank fitting with adhesive tape.
- We place this hose in a pre-prepared container and hold it securely inside the container.
- The hose leading from the discharge pipe of the compressor unit is inserted into the hole in the expansion tank (sealed).
- By briefly turning on the compressor, we force compressed air to penetrate into the system. Air displaces liquid from the circuit, and it flows into the container.
- We carry out the procedure until the antifreeze is completely removed from the LADA Kalina system.
- The second common method is to drain through open plugs on the radiator and engine block.
- For this purpose, we also prepare a suitable container and, using the indicated manipulations, completely drain the liquid. Don't forget to screw the plugs back in.
- Now, using a convenient screwdriver, we loosen the fasteners of all pipes suitable for the thermostat and then remove them.
- To dismantle the thermostat itself, we arm ourselves with a hex key, size “5”, and unscrew the 3 screws.
- If, after unscrewing, the unit does not “want” to be disconnected from the lines, then using the same screwdriver, we loosen it, running the tip between the adjacent surfaces.
- We clean the mating sections of the main pipes with the LADA Kalina thermostat from scale formations and at the same time replace the sealing gaskets.
- We install the new product in its original place, tightening the bolts securely.
- After this, we connect all the dismantled pipes to their original places, not forgetting to tighten the fastening clamps.
- We check the reliability of the screwed plugs and fill the system with antifreeze. We do this through the neck in the expansion tank of LADA Kalina.
- In some cases, it will be convenient to replace the thermostat along the way if its service life suggests this action or is approaching such a need.
- Upon completion of filling, install the housing with the air filter and connect the previously disconnected sensor. Now you know how to change the thermostat in your car, so replacing the thermostat will not be too difficult for you.
Preparing to install the thermostat
First you need to remove the standard Kalina thermostat. Before this, the battery, air filter and pipe leading to the gas throttle are removed. Having finished with the air filter, begin to drain the antifreeze from the cooling system. It is better to place a basin under the engine, so the coolant will not spill.
After loosening the clamps, remove all pipes from the thermostat. Then they begin to unscrew the nuts on the studs. Unscrew the nuts and remove the thermostat. This completes the procedure for dismantling the old device. Preparations begin for installing the thermostat from the Granta car. To do this, you need to unscrew the old studs. This is easy to do with a hairpin driver, but if you don’t have such a wrench, you just need to screw a nut onto the hairpin, and then another one. Pull them tightly and unscrew them using a regular wrench. After removing the old studs, clean the thermostat installation site from old sealant and gasket residues. This is where the preparation ends.
READ Timing replacement LADA Granta 16 valves
Important points when replacing a thermostat
When replacing the thermostat, eliminate the risk of antifreeze getting onto the sensor connectors and into the air path of the Lada Kalina. To prevent such situations, we recommend wrapping electrical connectors and components in plastic bags. Due to the low cost of the thermostat, a more rational action would be to replace the entire thermostat. It is better to purchase original products, since analogues may not match their fastening characteristics (hole diameters, etc.). This will avoid difficult moments during installation.
Checking for correct installation
It is very easy to check the correct installation and operation of the thermostat in the Lada Kalina. Here you will need to warm up the engine and then immediately turn it off. Next, open the hood and feel for the lower pipe that goes from the radiator to the cooling jacket of the engine block. If it is heated, the thermostat opens, and there is no risk of the Lada Kalina engine overheating. When this phenomenon does not occur, the system components require careful diagnosis. Therefore, it would be a good idea to check the functionality of the new thermostat before installation.
Category: All about repairs
Vehicle characteristics: The dimensions of the car are as follows: length - 3595, width - 1100, height - 1693 mm. The wheelbase is 2940 mm. Ground clearance 207 mm. The car is equipped with a hybrid power unit. The 2-cylinder engine is equipped with a system that provides engine power output. There are 4 valves per cylinder. The diameter of one cylinder is 73 mm, the piston stroke is 70 mm. The engine crankshaft accelerates to 7000 rpm. Maximum torque is maintained up to 2000 rpm.
Posted by admin: at the request of Lukyan
Watch the VIDEO about the grant thermostat for viburnum 8 valves.
Review from a car owner named Maniy: Reliability, handling, design.
Original title: Termostat prispevok na Kalina 8 ventilov
Release date: 07/12/2022
Laughter on topic: Only on Russian roads can you hear: “Oh! A piece of good asphalt!”
Characteristics of the Lada Kalina thermostat
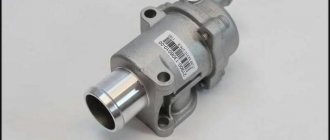
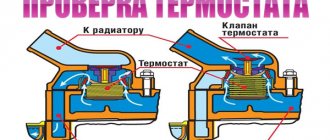
The thermostat is an important engine cooling system; it occupies a place between the radiator and the cylinder block of the power unit. By design, this is a housing with an automatic valve, which, when the coolant is heated to a certain temperature, opens a large circulation circuit through the main cooling radiator. By closing the large circuit when the engine is cool, the car warms up much faster when circulating through the small circuit. The wear of its moving parts is reduced, overheating is eliminated, and the volume of harmful substances released into the environment is reduced.
A working thermostat allows you to warm up the engine to operating temperature, which for Kalina is 90-95 degrees. Over time, the valve wears out, and the heater maintains a temperature of no higher than 80 degrees. A working device helps the engine quickly warm up even in severe frost. Thanks to this device, the stove on Kalina is considered one of the warmest on VAZ cars. According to experts and car enthusiasts, the best price-quality ratio is the standard thermostat produced by DAAZ. It's all about a special screw, with which you can independently adjust the valve opening temperature. It is impossible not to take into account the reliability of factory products, which in this regard are superior to most analogues.
Thermostat from grants for viburnum
The same thermostats are used for 8- and 16-valve engines.
Sources:
https://avtotehpomosch-kruglosutochno.ru/diagnostika-i-remont/kak-postavit-termostat-ot-granty-na-kalinu.html https://osensorax.ru/klimat/termostat-granta-na-kalinu https: //automotocity.com/avtovaz/lada-kalina-ustanovka-termostata-ot-granty.html
Features of replacing the thermostat on the Lada Grant 8-valve
The thermostat in a Lada Granta car is a regulator of the temperature of the liquid that circulates in the cooling system. The design of the regulator allows you to redirect antifreeze flows in a large (small) circle to speed up engine warming up.
Appearance of the thermostat on the Lada Grant
Periodic overheating of the engine and insufficient amount of antifreeze contributes to premature failure of the thermostat. Let's look at how to carry out the replacement yourself using the example of a Lada Granta car.
What tasks does a thermostat perform?
The thermostat is an important component of a vehicle's engine cooling system, which simply will not function adequately or effectively without this element. It is tasked with maintaining the “ideal” temperature of the liquid used for cooling.
The thermostat copes with it by closing and opening the valve, which directs the flow of coolant in a small or large circle.
In simple words, the node being described is:
- reduces the time required to warm up to the optimal temperature of a car engine;
- saves (and quite significantly) car fuel in winter;
- prevents the possibility of overheating of the vehicle engine.
A working thermostat on the car model we are interested in begins to open already at 85 °C, and its full opening is noted at 100 °C . This element works according to physical postulates and laws known to all due to mechanical automation. It contains a heat-sensitive solid element that melts when heated, causing the damper to open.
The need to replace the thermostat on Kalina arises when the driver notices the following symptoms:
- increased engine temperature,
- increasing the time spent warming up the engine.
Sequence of actions when replacing the thermostat on a Lada Grant with 8 valve
- We park the car within the perimeter of the repair area.
- Drain the antifreeze (antifreeze).
- Remove the clamps and disconnect the pipes in the cooling system.
- Unscrew the three screws securing the regulator to the cylinder block.
- We remove the thermostat.
- We carry out troubleshooting.
- We install new parts and assemble the mechanisms in reverse order.
Where is the thermostat located on the Lada Granta
In the Lada Granta family of cars, the “flow regulator” is fixed on the outer casing of the cylinder block on the rear side. Schematically, it is located on a section of the line between the cylinder block and the radiator of the cooling system.
Spare part location
When the temperature reaches 90°C, the regulator redirects the flow of antifreeze from the small circle to the large one. The small circuit structurally consists of:
- water jacket;
- pump (pump);
- stove heater.
Note to the driver! In modifications of the Lada Granta, the heater is looped into a small circuit, and not in parallel, as was the case in previous VAZ models.
When the temperature reaches 90°C, the regulator valve opens and the antifreeze begins to circulate in a large circle, passing through the cooling radiator.
The advantage of a small circle is that the antifreeze, leaving the block, immediately goes to the flow regulator, which allows you to more accurately determine the degree of antifreeze.
At the same time, the thermostat on the Lada Grant opens at 85°C, and not 90°C, as the manufacturer indicates in the instruction manual. The actual range varies from 78°C to 93°C.
Fortunately, underheating does not have critical consequences, but it is not desirable. Such systematic actions lead to deterioration of lubrication, underheating of the combustible mixture, as a result of which the fuel does not burn completely in the cylinders.
Changing the thermal insert
You can replace the entire thermal insert. Wahler inserts are ideal for the standard Grant thermostat: 3017.87 D (at 87° C) and 3091.92 B (at 90° C). The insert changes along with the spring. This modernization is carried out using thermostats manufactured by BEHR (which is equipped with the new BAZ-2190 car). There is no need to make any modifications or fit new parts. The BEHR thermostat is dismountable, and the Wahler “thermos” will have to be cut with a hacksaw in order to remove the thermocouple.
Alternatively, you can use a Daewoo Nexia, Renault Logan or Vernet 4898.92 part as a “donor”, but the diameter of the latter’s thermoelement is slightly larger than necessary and requires adjustment. For Luzar models such a replacement is not possible.
Resource for replacing the thermostat on Lada Granta 8 valves
There is no clear interval for replacing the regulator; even the manufacturer does not provide such figures. In practice, owners are guided by the principle of reducing the efficiency of the stove heater.
The average service life of the thermostat for the Lada Granta is 65 – 75 thousand km. Subject to the manufacturer's recommendations and careful use of equipment, the interval can be increased by 5 - 7 thousand.
Assembling parts - preparing for installation
Sequencing
- We place the car within the perimeter of the repair area.
- Loosen the clamp of the air supply pipe (Phillips screwdriver).
- Remove the mass air flow sensor (MAF).
- We unscrew the expansion tank cap and remove the vacuum.
- We unscrew the three clamps on the cooling system distributor and pour the waste into a plastic container (about 3 liters).
Preparatory processes before installation
Note to the driver! If the drained antifreeze is free of sediment, it can be reused later. Otherwise, replace the entire cooling system fluid.
- We press the block with wires from the engine control unit, disconnect the temperature sensor terminal.
- Using a key set to “13”, unscrew the negative terminal and remove it from the regulator body.
- Using the “8” head, we loosen the clamps of the supply pipe – the antifreeze return to the radiator.
Supply pipe clamps
- Remove the rubber pipes from the regulator.
Disconnect the rubber pipes
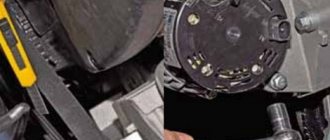
- Using the “13” socket, unscrew the two nuts that secure the thermostat to the wall of the cylinder block.
Two nuts - clamps to the block
- We remove the mechanism from its normal place and clamp it in a vice for preventive maintenance.
Clamp in a vice
- Using a Torx T-30 wrench, unscrew the three screws of the cover and remove it.
Removing the cover
- The connection between the cover and the body is sealed with a rubber gasket. We inspect it, if there is mechanical damage or deformation, we replace it with a new one.
- We grab the spring with pliers, press it, and release the metal plate.
Metal plate
- Release the regulator bottle.
Regulator bottle
- To check the functionality of the distributor, lower it into a container of water, gradually heat it up, bring it to a temperature of 85 - 90°C. We observe the movement of the rod. In good condition, it will move closer to the top.
Temperature adjustment
- We assemble the parts in the reverse order and install them in their original place.
Note to the driver!
At a water temperature of 96 – 98°C, the cylinder rod should fully extend to a distance of at least 8.0 mm. We replace the sealing ring with a new one. Before installation, clean the surface of the cylinder head from possible deposits.
How can you modify the heater?
The new models LADA Kalina 2 and LADA Granta use a cooling system operating scheme with parallel connection of the heater radiator. Because of this, the operating temperature is reduced to 85 degrees, which is slightly lower than on previous models of the VAZ family. Many car owners seriously believe that this temperature cannot be normal - there is increased fuel consumption, as well as a decrease in the service life of moving engine parts due to premature wear. But according to experts, there is no connection between the reduced operating temperature and engine life.
The cooling system of the Lada Kalina works more efficiently thanks to a single-circuit design. Such a modernization only benefited the engine; it made it possible to change the ignition timing, resulting in fuel savings. The inertia of the thermostat is also reduced. The downside was the mediocre heating of the cabin at sub-zero temperatures. The way out of the situation is to independently modify the thermostat. Modification involves two main methods:
- shorten the rod of the solid-state temperature-sensitive element;
- replace the thermocouple.
For cars with a cable gas pedal, a heated throttle assembly from the cooling system is used. In this case, an additional circulation circle is added.
Reviews
| № | Positive |
| 1. | Vasily: I’ve been actively using the car for a year and a half, there are no complaints, the cooling system works stably. I added antifreeze several times because the level was below average, but this is not so critical. |
| 2. | Gennady: after buying the car, I immediately drained the original antifreeze from the interior and filled it with imported antifreeze. The heater operates at full power, the cabin is always warm, and the engine does not overheat. |
| 3. | Vladlen : at 45,000 km the rubber fluid supply pipe burst, replaced it with a new one. I didn’t contact the service center, I handled it myself. |
| 4. | Kirill: in two years of using the car there were no major breakdowns, and minor ones were fixed on my own without the help of a service station. |
| 5. | Dmitry: at 50,000 km, I replaced all the original clamps on the cooling system pipes, since the old ones had lost their tightness and the liquid began to leak. There are no comments about the stove heater. |
| 6. | Denis: mileage 85,000 km, just now replaced the thermostat with a new one. I think that the resource is more than sufficient, as for a domestic car. |
| 7. | Ivan: in three years, I replaced the antifreeze once with a new one, and changed the rubber seal on the body. I am satisfied with the quality of workmanship, there are no particular complaints. |
| Negative | |
| 1. | Victor: low-quality parts, at 45,000 km I replaced the thermostat with a new one, the old one jammed. The antifreeze did not circulate in a large circle due to a malfunction. |
| 2. | Ivan: My regulator lasted for a year and a half, after which the spring jammed. I think that the resource is too small, even for a domestic car. |
| 3. | Vladimir: A year has passed since I bought the car, and I already regret the purchase. Crude assembly, many defects that the manufacturer does not eliminate. |
Adjusting the new thermostat
Conclusion
The cooling system on the Lada Grant is implemented an order of magnitude higher than previous analogues. Direct connection of the stove heater radiator made it possible to achieve maximum heat transfer.
In older versions, the connection was implemented in parallel, which led to heat leakage.
Provided you follow the manufacturer's recommendations and take good care of the vehicle, the service life exceeds 80,000 km.
Engine cooling system
The internal combustion engine must be intensively cooled. Without this, the unit will overheat and jam. The bulk of the “cooling energy” is required by the cylinder head and block. While small power engines can be cooled using an air flow, more powerful, multi-cylinder power plants cannot be brought to an optimal temperature without using a liquid cooling system.
- a cooling jacket through which liquid flows, taking away excessive heat from the cylinders;
- a pump that forces antifreeze to move through the cooling system;
- a thermostat that regulates the temperature by adjusting the flow of coolant in a small or large circle;
- fan and radiator, causing the liquid to cool faster as it moves around a large cooling circle;
- heater radiator that heats the interior of the car;
- connecting hoses and pipes connecting all devices into a single cooling system.
As mentioned above, the thermostat is responsible for movement in a large or small circle. This device is a spring-loaded valve with a thermocouple placed in a housing with several pipes. Under the influence of high temperature, from 85 ° C to 90 ° C, the technical paraffin contained in the thermoelement expands and opens the valve. Antifreeze begins to flow through the opened hole in a large circle, cooling in the radiator. When the liquid cools, the valve falls into place and the coolant stops flowing into the large circle.
And the story will be about replacing the thermostat of a LADA Kalina car with a thermostat from a Lada Granta.
Briefly about these machines. Both models represent a small class of domestic passenger cars. Kalina was produced from 2004 to 2022, and then it was replaced by Granta. The article will discuss replacing the thermostat that is installed in Kalina with an 8-valve engine with a Lada Granta thermostat .
Thermostat from grants for VAZ Kalina
How to install a thermostat from Granta on Kalina
Rules (changed on April 14, 2013): 1) Respect the worldview of others because you respect your own! 2) Do not create topics of the same type, because...
Read
It’s hard to find something useful in the midst of a bunch of such topics! (secondary topics will be deleted!) 3) Do not flood, try to answer the questions posed clearly and on topic. 4) Mat is prohibited! Right up to the exclusion of the user from society. 5) Commercial activities are permitted with the consent of the administration. And now attention: 6) If we want to implement something, we write here: 7) We want to buy something for the Priora, then we ask here: Xenon Tires and wheels Auto Sound Suspension 9) Forum here we write what you did with the Priora, write what you want enlighten people, get excited! =) (for example: bought new light bulbs, lowered the car, painted reflectors, cleaned the ashtray, etc.) In the title, indicate what exactly was manufactured.
It is better to insert text with a small description and a link to the on-board magazine. Entries with links to the logbook without the main text will be deleted! 10) Blog here we ask questions that arose during the operation of the Priors or if we want to get advice on what and how to do! (for example: how to lower a Priora, how to change a light bulb in the glove compartment, how to make a Shumka, etc.), or maybe they just decided to share the result of how they solved some serious problem. If some kind of discrepancy appears, it is better to outline it and add a video or photo. Entries with a link to the in-flight magazine will be deleted! Entries with advice on appearance will also be deleted; after all, the blog is for urgent and fundamental issues. For example: what color should I buy the wheels? what color should I paint it? etc.