Prevention of breakdown of the VAZ 2114 crane
Following a few useful tips will help you prolong the service life of your heater tap.
In order to prevent the faucet from turning sour, it is necessary to periodically move the closing/opening lever
faucet from one position to another. This problem is especially relevant when the seasons change, when you drive all winter with it open, and in the summer you turn off the supply. By the way, in the heat or when you have to drive in low gears, in order to avoid engine overheating, it is recommended to slightly open the heater valve (move the control lever to the “red zone”), but to prevent heat from the radiator from entering the cabin, completely close the air damper.
Modification of the heater tap
On some faucets (in particular, very often these are Luzar and YAVVA), not only the locking mechanism itself can break, but also the plastic tube can burst, so to make the faucet last longer, you can select the diameter and insert an additional tube
. Recently, the box from Luzar already has such a through tube and it is made of brass. According to many experienced car owners, installing a YVVA faucet without modification makes no sense at all - the passage pipe is flattened. And in its through tube it is necessary in any case to install a long (thin-walled) tube with an outer diameter of 15 mm.
It also goes without saying that regular preventive examinations
components - timely detection of problems will not only minimize your costs, but also protect your health and your passengers from danger, since antifreeze vapors are highly poisonous!
WHICH TAP IS BETTER?
All owners of VAZ 2114, 2115 and other models unanimously claim that the original faucets that are equipped with the stoves of these cars are the most unreliable. The locking mechanism is a rubber membrane. Aluminum housings are susceptible to corrosion and quickly turn sour. True, the price of these parts is low - 80-120 rubles. Apparently, the price is calculated on the fact that the faucets will change every season.
Ceramic faucet is considered the most wear-resistant
But car owners don’t want to crawl under the car every time it gets cold, spoil their shoes with leaking antifreeze, and freeze inside the car. Yes, and this is a troublesome task - replacing the faucet on the VAZ 2114 stove. Therefore, motorists give preference to more reliable models of faucets:
- ceramic, their locking mechanism is made of ceramic plates, and the body is made of high-quality plastic;
- Ball valves, the locking element of which is a ball with holes.
Most VAZ 2114 owners prefer the Yavva ceramic faucet as one of the highest quality and most reliable. Although these models have lower heat transfer than ball models. The latter are susceptible to oxidation, but to a lesser extent than the duralumin models of AvtoVAZ cranes.
Step-by-step instructions for replacing the VAZ 2114 heater radiator
- The first step should be to drain the coolant, which will then need to be replaced. Next, you need to move inside the car and unscrew the self-tapping screw, which is located under the plastic plug, as shown in the photo.
Unscrewing the fastenings on the dashboard
Next, you need to release the instrument panel from the fastening - it is held in place by self-tapping screws. There is no need to remove the shield itself yet. After unscrewing the fasteners from below, you need to remove the steering column cover. Now you need to deal with the connector that goes to the cigarette lighter. The next step is to dismantle the radio, if there is one. Its removal usually takes place without problems, the main thing is to remember to disconnect all the plugs. In order not to forget their ownership, it is recommended to mark or sign them. After completing this operation, access to the plastic console appears - you need to remove the screws on both sides, they are located symmetrically. Then the switch for the interior heater fan and the adjustment flags are removed. The center console can now be detached from the dashboard. Next, the terminals from all buttons and plugs are removed. Afterwards you need to dismantle the diagnostic connector; it is held in place by self-tapping screws. The center console is free - it can be pulled out of the VAZ 2114 interior. The photo shows where you need to remove two screws - they hold the metal base. On the other side of the cabin they are located symmetrically. The next step is to remove the dashboard mounts, which are located on both sides. The iron base also has fasteners that need to be unscrewed. When the iron structure is completely free, it can be removed by first pulling out the electronic control unit (ECU). By lifting the dashboard a little and placing a piece of wood under it, you will have access to the heater radiator.
The radiator can be removed through the slot
The heater radiator is held in place by clamps - they should be removed. All that remains is to drain all the coolant and replace the radiator.
How to replace the radiator of a VAZ 2110 stove - step-by-step instructions
We replace the heater radiator as follows:
Replacing an old-style heater core
To replace the old-style VAZ-2110 heater radiator, the windshield trim with rubber seal is initially dismantled. To remove it, first unscrew the lining mounting bolt under the brake cylinder and the four bolts for its upper fixation on the passenger side. Next, the clamps with which the pipes and hoses are secured are dismantled.
Then be sure to disconnect the fan electrical wires from the vehicle body. After carrying out such manipulations, access to two fasteners on the driver's side of the windshield trim will open. They need to be dismantled, after which you can move the frill slightly forward. You don't need to remove it completely. Then the remaining nuts and bolts that hold the windshield trim are unscrewed. After this, the plastic lining between the windshield and the engine compartment can be completely removed.
Next, it is important to disconnect the terminal of the sensor, which indicates the coolant level, and remove the steam drain hose from the expansion tank. Subsequently, it is necessary to remove one by one the windshield washer hose, windshield wipers, fasteners on the heater housing, the front block of the fan housing, the fan, the cabin air purifier, the remaining part of the fan housing and all hoses of the heating system
After this, you can easily pull out the radiator housing.
The next stage of work is replacing the failed heat exchanger with a new part and installing all dismantled elements in their original places
When assembling, focus on installing the plastic fan housing
It is important that the pedal fits into the appropriate slot, otherwise the vehicle heater will not function
It is also necessary to check the condition of the cabin filter; it may also need to be replaced. If there are visible defects on the pipes and hoses, they must be replaced. Make sure that all connecting clamps and fasteners ensure a tight fit of the parts, otherwise you will not get any heat in the vehicle interior. At this point, the replacement of the stove radiator can be considered complete.
Replacing a new heater radiator
Replacing the radiator of a new VAZ-2110 stove has features related to the method of connecting the heat exchanger to the vehicle body. In order to dismantle the part, you will need to unscrew the central bolt in the lower segment of the windshield. Then unscrew two nuts above the intake manifold and one near the cabin filter on the left. The next step is to remove the air filter, which is attached to the stove with four screws.
The modified heater is formed from two parts, which are connected by three self-tapping screws. You need to unscrew the large self-tapping screw and two additional bolts that connect the components of the stove. After this, the right component of the stove is moved to the right to its maximum possible position. Holding the left segment with your hand, you need to stretch the right side, turning it towards you and lifting it up. Next you can remove the left side of the stove. A hose for removing steam is led through the passage of the soundproof shield.
The right segment of the stove is divided into two more components. To separate the right side, you need to remove the mounting brackets. The right side of the stove can then be opened without significant effort. The heater dampers will open to view, and it is also advisable to replace them. The best option for this would be aluminum valves, which are wear-resistant and less subject to deformation.
The last stage of work is installing a new part and assembling all elements of the heating system in the reverse order. Make sure that all connections are well tightened, as this will significantly affect the functionality of the interior heating system.
Cooling system design
The interior of the car was disassembled after an antifreeze spill, and at the same time noisy, since the factory heat and sound insulation had become unusable
Before finding the reasons for the smell of antifreeze in the cabin, you need to understand the design of the cooling system.
So, let's look at how the engine coolant system works:
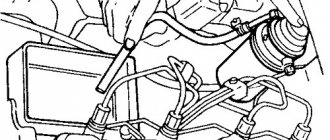
Scheme and design of the cooling system
1 – expansion tank plug; 2 – expansion tank; 3 – coolant drain hose from the throttle pipe; 4 – hose from the radiator to the expansion tank; 5 – radiator outlet hose; 6 – left radiator tank; 7 – aluminum radiator tubes; 8 – plug; 9 – right radiator tank; 10 – drain plug; 11 – radiator core; 12 – electric fan casing; 13 – electric fan impeller; 14 – electric motor; 15 – pump gear pulley; 16 – pump impeller; 17 – camshaft drive toothed belt; 18 – engine block; 19 – pump supply tube; 20 – radiator supply hose; 21 – heater radiator outlet hose; 22 – coolant supply hose to the throttle pipe; 23 – exhaust pipe; 24 – filling hose; 25 – heater radiator supply hose; 26 – thermostat; 27 – coolant temperature sensor; 28 – coolant level indicator sensor
Reasons for the appearance of antifreeze under the rugs and on the bottom of the VAZ-2114
It’s good if the weather is warm outside, it will dry quickly. If it's frosty outside, you'll have to heat it up.
So, when the issue of the design of the cooling system has been considered, we can proceed directly to considering the reasons for the appearance of the smell of antifreeze in the car interior:
- Problems with the cooling system pipes.
- The heater radiator is faulty.
- The interior floor is filled with antifreeze.
- Smell from a new heater radiator.
- The smell is coming from the engine compartment.
The main reasons have been identified, and now we can proceed directly to considering methods for eliminating the effect.
Elimination methods
There are several reasons for the smell of antifreeze in a car. Of course, to eliminate this you will need some tools, as well as knowledge of the design of the VAZ-2114 cooling system, which was discussed above.
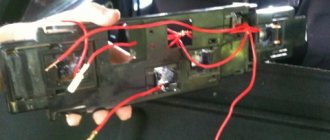
Stove faucet
In the process of replacing the stove valve
One of the most common reasons. In this case, the antifreeze will be mainly under the driver's mat. The faucet can only flow in certain modes, for example, in heat. Therefore, when diagnosing the heater valve, try turning on different heater modes.
Problems with the cooling system pipes
Leaking coolant system pipes
The most common reason for the smell of antifreeze in the car interior is that cracks appear in the heater pipes, which cause coolant to leak onto the radiator. When heated, this element causes antifreeze to evaporate in the cabin, which actually causes this effect.
The elimination method, in this case, is simple - inspect the inlet and outlet pipes of the stove, and if cracks are found, they must be replaced. Diagnostic operations must be carried out hot, with the interior heating system running.
Heater radiator is faulty
Faulty heater radiator
The heater radiator repeatedly causes the smell of antifreeze to appear in the cabin, which flows out of it and evaporates. In this case, it is necessary to disassemble the heating system and diagnose the stove radiator. If cracks or defects are found on it, the part must be replaced with a new one.
The interior floor is filled with antifreeze
Smudges are visible on the upholstery, but traces of antifreeze are more clearly visible on the mat itself
Many motorists have encountered antifreeze found under the floor mats, which evaporates during the heating of the interior, and also in an inert state soaks into the floor covering and causes an unpleasant odor.
The elimination method is quite simple - dry cleaning the interior . Also, it is worth understanding how the antifreeze got onto the floor of the car. This can be caused by leaks from the radiator and heater pipes during the period when the car is used without a heater and the outside temperature is not too low to turn on the heater.
Smell from new heater radiator
After replacing the old heater core, the smell of antifreeze may appear in the cabin. This may be due to two reasons. Firstly, loose connections between the pipes and the radiator . To diagnose and fix it, it is necessary to check whether the clamps connecting the pipes and the heater radiator are tightly tightened.
Secondly, the odor may be caused by the spare parts storage lubricant . They are very similar to antifreeze, so they are easy to confuse. If there are no signs of antifreeze leakage, but there is a smell, then you should wait until the lubricant has completely evaporated.
The smell is coming from the engine compartment
Repeatedly, you may notice that the smell of antifreeze can penetrate into the cabin from the engine compartment. Thus, damage to one of the elements of the engine cooling system, as well as leakage of antifreeze, can be accompanied by the appearance of a smell directly in the car when the engine is heated to operating temperature.
The clamp stopped holding, antifreeze began to drip onto the battery platform, and the heater fan carried the smell of antifreeze into the cabin
The elimination method is to inspect the cooling system directly in the engine compartment, as well as identify the causes and eliminate them. Often, these are breakdowns in the pipes or leakage of antifreeze through loose clamps.
Silicone cooling system hoses have proven themselves
Dirt could have entered the cooling system through breakdowns; in this case, a complete change of the coolant is recommended.
Why is antifreeze leaking from the stove?
A coolant leak in the heating system can occur from:
- stove radiator;
- stove tap;
- stove pipes.
If a coolant leak occurs from the radiator, it is usually replaced with a new one. Repairs to restore tightness are usually complex and labor-intensive. In addition, if the radiator has been in use for a long time, its tubes become clogged with deposits and dirt, and, as a result, heat transfer decreases.
The valve opens and closes the coolant supply to the radiator, thereby regulating the heat in the cabin. Over time, it may begin to leak, as evidenced by the characteristic smell of antifreeze in the cabin, a puddle on the floor on the passenger side and a decrease in the coolant level in the expansion tank. The faucet cannot be repaired and in such cases is replaced entirely.
If the heater radiator starts to leak, it is usually replaced with a new one.
The cause of coolant leakage from the pipes is usually their wear - the rubber ages and cracks over time. When diagnosing a problem, you need to wipe the suspected leak areas with a rag and observe the outlet and inlet pipes on a warm engine. Worn hoses are always replaced with new ones.
Smell of fuel
Most of us are familiar with the standard smell of fuel, both gasoline and diesel. And if you encounter a similar phenomenon, there may be a substance leak somewhere. The intensity of the odor is strong enough to determine where the leak is located. In most cases, the source of the “aroma” is a crack in the fuel tank, leaking injectors and other elements of the fuel system.
Heater dampers don't work
The distribution of air flows throughout the cabin is carried out by dampers, which, in turn, are controlled using cables. When these cables fail, problems arise with directing the air flow to the windshield or to the foot area. In addition, the damper that blocks the flow of air from the street begins to work incorrectly. In this case, adjustment of the damper drives is required.
Such situations can arise even on a new car. Slightly warm air begins to flow from the lower, upper and side deflectors, and hot air begins to flow from the center console. This is due to the poor build quality. There are gaps between the joints of the air ducts and the dampers, which leads to warm air entering only from the center console and heating the panel from the inside.
The drive cable is always taut. Therefore, over time it bends, breaks off or stretches. In this case, it is necessary to adjust the damper drive, which is performed in the following order:
- In the stove, we look for a bracket with which the cable sheath is held on the heater body.
- A galvanized metal lever located on the left side is pulled back. This position corresponds to the maximum opening of the damper.
- The length of the cable is tightened and adjusted. The long lever on the lever block in the extreme right position should open the damper completely.
- After adjustment, the cable is securely fixed.
Repair of VAZ 2114 crane
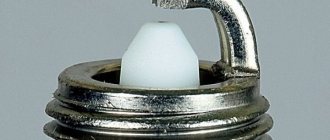
As a rule, faucets are not repairable and if they become sour, leak, or changing the lever does not produce the desired result, they are replaced. This is much faster than trying to repair it. But what if it is not possible to buy a new faucet, and the problem has already occurred? Then there is only one way out - to try to repair the heater control valve. When liquid runs out from under the rod, you, of course, are unlikely to be able to somehow eliminate this, because only a few can select bushings or machine a new rod and sealing rings. But if the through pipe bursts or shrinks, then installing a tube of the same diameter into it and coating it with sealant will help for a while.
In the case when we are dealing with plastic, the cause of the leak is a damaged rubber membrane; the problem is also fixable, although not simple. You need to remove the valve from the heater and disassemble it. You will have two parts: the body itself and the lid with a cone and cuff. To remove the cover from the body, it is necessary to cut off the rolling belt from the side of the cover. The easiest way to do this is with an electric drill, in the chuck of which you attach a chisel or scraper.
Where to loosen the clamps
Next we have to do the flaring. To do this, drill 4 holes through (size from 0.1 to 3 mm.). This should be done strictly along the edge of the rolling. Do not allow the drill to deviate towards the middle of the cover. If this happens, further work on repairing the VAZ 2114 crane will be greatly complicated due to damage to the sealing band located on the seating surface of the cuff in the body.
The next step is to drill out the rivet that is in the cone, remove the old cuff and the remains of the rivet. You will get a hole where you need to make an M4 thread.
The new cuff can be cut from a car inner tube (preferably from a truck). The heater valve must be in the closed position. Next, you need to cut along the contour of the cover (top), making four holes for fasteners at their location (along the edges and in the middle).
A new cuff is secured to the top of the cover using a screw (M4 - the hole for it is already ready), as well as the valve itself, then you need to align the holes and tighten them with screws (M3). In this case, the nuts will be on the side of the cover.
Inlet pipe
In general, the work on repairing the VAZ 2114 heating tap is completed; now we check the tightness by first closing the outlet channel and blowing from the inlet pipe.
Think about whether you have the strength to repair it yourself? No? Then there is only one way out - only replacement.
How to identify stove malfunctions
First, you need to visually inspect the unit and determine the acceptable level of antifreeze in the expansion tank. Raise the floor mats and see if there are any signs of special fluid leaking. Also, the malfunction may be a consequence of a ruptured pipe, their mechanical damage, or the operation of the radiator.
When the coolant supply regulator can no longer be repaired, an urgent replacement of the VAZ 2114 heater valve is required. To do this, you don’t have to involve professionals, but just repair the system yourself.
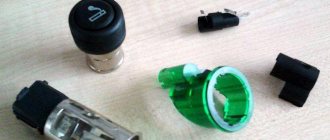
First of all, you need to buy a new mechanism; there are three types:
- factory
- ball
- and from ceramic plates
Ceramic heater tap VAZ 2114
All of them have their disadvantages and advantages, and only the owner can decide which crane will be more profitable for his car (in terms of functionality and price equivalent).
Attention: before replacing the stove faucet on a VAZ 2114, you need to make sure that the pipes connecting the heating unit and the radiator are intact and undamaged. Otherwise, over a long period of use, they become less functional and can cause fluid leaks
What tools are needed for the job?
- Phillips screwdriver.
- Empty container more than 5 liters.
- New faucet.
- Clamp 16-23 mm.
- Antifreeze.
- Regular dry cloths.
- Keys No. 10 and No. 13.
- Silicone sealant.
- If possible, a car inspection pit or a lift.
When everything is in stock, then we can safely change the heater valve of the VAZ 2114.
Detailed product installation instructions
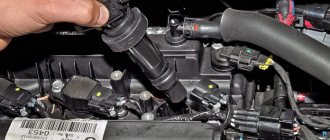
The first thing to do is drain the antifreeze into the prepared container. We place it under the engine and remove the plug on the cylinder block. The valve is located under the center console, and to remove it you need to remove the right side dashboard flap. It is secured with five bolts.
When the liquid is completely glass, do not remove the container far. We find the pipes that lead from the motor to the stove regulator. Loosen the clamps, pull out the tubes, and pour the remaining liquid into the prepared container.
Replacing the heater valve on a VAZ 2114 at the next stage involves lubricating two mounting studs, cleaning them with a brush with steel bristles and “soaking” them with brake fluid.
This must be done, since the nuts can turn when unscrewing, thereby turning a simple job into a huge problem. Why does this happen? The stove faucet is fixed not on studs, but on bolts (the caps are included in the plastic housing).
The nuts securing the unit are self-locking, have a plastic ring, and therefore do not unscrew so easily. What if we add rusted threads and oxidation on the contacts? As a result, stress occurs on the bolt, which can cause damage to the plastic around the head. To fix them, pliers or special keys are used.
Now we need to consider how to remove the heater valve of the VAZ 2114.
After removing the pipe, you need to get into the cabin again and unscrew the faucet nuts with a ten-point socket wrench. After preliminary efforts, they should unscrew without complications.
And here is the last stage - we take out the faucet, making small motor efforts on the passenger side, then we remove the latch and remove the control cable of the furnace unit of the heating system.
Installation of a new mechanism
The fastening process is performed in reverse steps. The cable is disconnected, then the crane is screwed to the body
It is important to secure the cable with a fastening fastener in advance, since this will be quite difficult to do with the installed unit (pay attention to this)!
This is how to replace the heater tap on a VAZ 2114. The matter is not very troublesome, and with the help of basic training and practical advice it is quite easy to do.
The space between the crane and the body, according to the “operation code,” must be sealed with clamps. To install the pipe, you must use silicone sealant.
At the last stage of replacing the coolant regulator, you need to screw in the plug and fill in the coolant. Next, start the car, give it time to run, and then turn on the heater. Visually inspect the entire system, check for the presence or absence of antifreeze leakage.
If everything is in order, then everything was done correctly. After a few weeks, the new clamps should be tightened. When the air flowing from the stove is cold, then the fault must be looked for in the air damper of the car’s radiator.
Now you know perfectly well how to change the heater faucet on a VAZ 2114.
Have an easy job and have a nice journey! Let fewer breakdowns “meet” on your way!
Replacing and connecting the stove
Installing a new heater radiator is done in the reverse order. When installing rubber hoses, it is recommended to treat them with sealant. When connecting electrical connectors, use the markings applied during disassembly.
After assembly, coolant is poured into the system. To prevent an air lock from forming, remove the hose from the throttle assembly after loosening the clamp. Antifreeze should be poured into the expansion tank slowly, observing the disconnected hose. As soon as coolant flows out of it, the hose should be put back on the fitting and tighten the clamp. If everything is done correctly, the operation of the stove will not cause any complaints.
When installing a new heater radiator, it is recommended to pre-treat the pipes with sealant
When installing a new heater radiator, it is recommended to pre-treat the pipes with sealant
Why does the VAZ 2106 stove heat poorly?
In the winter season, every driver wants to feel comfortable in the interior of his car. If it’s cold inside the car, then there can be no talk of any comfort. Unfortunately, many domestic cars have the same weak point - their heater often fails, causing the air temperature inside the car to become too low.
VAZ 2106 cars are no longer produced at AvtoVAZ factories. These cars are outdated, but many car enthusiasts continue to use them, and they often face the problem of poor interior heating.
This question often arises among owners of this model. There are many reasons why the VAZ 2106 stove begins to heat the interior poorly. However, among them there are the most common ones.
So, most often the VAZ 2106 stove begins to heat poorly due to impaired circulation of the coolant, which must pass through the heater radiator. This happens when the tap jams, which is why antifreeze simply cannot flow into the radiator. Also, the reason for this phenomenon may be the radiator itself - the circulation of the coolant is disrupted when the radiator is dirty.
By the way, to determine whether the coolant circulation is disrupted, you can turn off the oven motor and run the engine a little. You need to wait until the heater radiator warms up. After this, you must turn on the stove itself. If when you turn on the stove there is a temperature jump, that is, there is much more heat, then the problem is precisely in the circulation of the coolant.
In addition, the cause of poor interior heating may be a coolant leak, and leaks usually occur due to leaks in the radiator, which, in turn, appears due to corrosion and rust.
What to do if the VAZ 2106 stove does not heat well?
What to do if the VAZ 2106 stove does not heat well? First, of course, the cause should be identified, and then it will need to be eliminated.
If the reason for the poor operation of the VAZ 2106 stove is problems with the faucet, then it can be replaced. This does not cause any particular difficulties, however, it is worth keeping in mind that it is not easy to get to the tap from inside the car
It is also important to remember that when replacing a faucet, it must be seated on new rubber gaskets
If the reason is the formation of a thick layer of scale that appears inside the radiator over time, then you can either try to clean this device or purchase a new radiator. It should be borne in mind that it is very difficult to completely clean the radiator of scale - some of it still remains, as a result of which heat transfer deteriorates.
To clean the radiator, you need to add a special additive to the antifreeze, which will remove scale. You can also completely remove the radiator and wash it with water from a hose, directing the water stream into the outlet pipe.
Remember that you should not flush the radiator with high-pressure water - this may damage the device.
After flushing the radiator with water, you will need to remove scale - this is done using special preparations, anti-scale agents or a concentrated solution of water and vinegar.
If you decide to use an anti-scale agent, it is best to purchase one that does not require boiling after mixing with water. The solution should be poured into the radiator and wait 30-60 minutes, and then you will need to rinse the radiator with a stream of water. This procedure will have to be repeated several times.
Finally, the radiator should be washed with household detergent and thoroughly cleaned again with a stream of water. Also, instead of antiscale, you can use a solution of water and citric acid - in this case, it is best to leave the solution in the radiator for several hours.
If the reason for the poor performance of the stove is a leaking radiator, then you need to find out what it is made of. A copper radiator can be repaired. If the channels of a copper radiator are clogged, you can pour acid into one end of the tube, close it with a rubber stopper and wait. This operation will clean the channel of all dirt and rust. But the aluminum radiator will have to be replaced with a new one.
Musty smell
It often appears due to banal vehicle downtime or constant operation with the windows closed. Try to ventilate the interior - the smell should disappear. You should also check the air filter and air deflectors - there may be mold or mildew on them.
Also, a musty smell, perhaps even similar to the smell of an unventilated dressing room/locker room, may indicate that there may be fungi or mold in the evaporator of the air conditioning system. But more often than not, a musty smell can be a sure sign to replace the cabin air filter in your car.
Causes of poor-quality stove operation
Based on the complex structure of the stove, it becomes clear that it may not work correctly for many reasons. A malfunction of at least one of the components and components of the heating system can lead to a malfunction of the stove. In this case, a malfunction may occur due to the driver’s fault, or it may be a consequence of aging or incorrect operation of other vehicle systems.
Problems with the stove can manifest themselves in the following ways:
- Poor interior heating.
- Cold air from the stove.
- Variable temperature of air supplied from the stove.
- Weak flow of hot air from the stove.
- The heater in the car does not turn on.
Knowledge of the structure of the stove itself and possible breakdowns will make it possible to avoid large expenses when repairing a car. Let's look at the most common causes of poor-quality stove operation below.
Fan doesn't work
A fan malfunction can often be one of the problems with heating the interior. The cause of this failure is usually damage to the bearings or graphite brushes, which may require complete fan replacement. Also, the fan may be faulty due to the blown fuse or relay in the electrical power circuit, which is also a reason to contact a car service center.
If the fan makes a whistle during operation, and its rotation speed changes from minimum to maximum and vice versa, then the cause of the problem may be a failure of the fan motor. In such conditions, the radiator may remain hot, but it will not be possible to warm the interior to the desired degree.
Insufficient coolant level
A malfunction of the stove can be caused by a coolant leak, as a result of which heat stops flowing into the cabin radiator in the required volume. This in turn leads to a decrease in the volume of antifreeze in the expansion tank. To fix the problem, you need to find the location of the leak, add antifreeze to the expansion tank, and sometimes it may be necessary to replace the coolant supply valve.
Engine pump faulty
The pump is used to circulate antifreeze and to ensure proper functioning of the stove. If such a pump breaks down, a malfunction may occur in many engine components, including the vehicle interior heating device.
A malfunction of this part can be caused by wear on the inside of the impeller, a broken crankshaft belt, or even jamming of the pump itself. It is better to eliminate this kind of problem by completely replacing the pump, and to avoid such breakdowns, it is recommended to regularly check the hose leading to the pump, and also listen to sounds under the hood.
Blown engine head gasket
The head gasket is designed to connect the block and the car engine head itself, ensuring tightness and preventing coolant and fuel from mixing with each other. Burnout of the gasket in the engine cooling jacket leads to the generation of exhaust gases, which can enter the cooling system through the pipes. In this case, the heat exchanger becomes airy and the efficiency of its operation decreases, the coolant can heat up, and malfunctions are observed in the operation of the stove.
Thermostat malfunction
The thermostat is a device directly involved in the circulation of coolant, so its malfunction will affect the air temperature in the cabin. Since the thermostat can be in an open or closed position, its failure is characterized by jamming in one of these positions.
If the thermostat is stuck in the closed position while driving in city traffic, the temperature of the antifreeze may increase, and subsequently the engine may overheat. When stuck open, the interior temperature will be low when driving in high gears, while the temperature will remain normal at low speeds.
Heater core blockage
The heater radiator can become clogged for various reasons, and this can happen both from the outside and from the inside. For example, the outside of the radiator may become clogged due to dust, leaves, and insects entering through the protective casing. On the inside, clogging occurs due to dirt and deposits that can form in the engine cooling system.
Cabin filter clogged
A heavily contaminated cabin filter is one of the common causes of stove malfunctions. Many drivers treat it quite dismissively and do not replace or throw away the old one for a long time.
It should be remembered that a clogged filter is an obstacle to the flow of heated air into the cabin. In addition, when the filter is clogged, dust and mold spores can enter the cabin and accumulate in the filter itself.
conclusions
The reasons and methods for eliminating the effect of antifreeze leaks on the interior mats in the VAZ-2114 are considered. So, when a motorist discovers such a problem, he must eliminate it immediately, because the consequences can be very diverse. If the car owner is unable to solve the problem, it is recommended to contact a car service center.
I had no idea that antifreeze was so harmful to health. Personally, I think that the antifreeze in these VAZs is the biggest problem and the main drawback. It generally flows for different reasons and from different places. This cooling system with antifreeze was a very bad idea. Use spring clamps - I installed these myself and am very pleased.
In fact, the most unpleasant consequences are engine overheating. And not the smell in the cabin. In any case, it is better to treat the malfunction at a car service center. In winter, this is extremely inconvenient to do if you don’t have a garage.
How to fix the stove if it blows cold air?
The resulting airiness in the stove is unlikely to disappear on its own - the radiator contains narrow tubes, and the antifreeze does not have such a strong pressure to eliminate the created plug.
You can do this in the following way:
- warm up the engine, but only to such a state where you can manually carry out repair work without burning your hands - you can get serious injuries;
- loosen the clamp located on the hose connected to the stove;
- carefully remove it from the tube, but only until a small gap appears, which will allow you to get rid of the resulting plug.
A faulty faucet can also disrupt heating. The reason is that it was high time to replace it because it was broken or clogged. To make sure that this is the reason - cold air enters the cabin instead of warm air - check the inlet hose: it comes from the heater radiator.
In the event of a malfunction, it heats up and the output remains cold. If it is not possible to open the faucet manually, then a new one must be installed.
If it turns out that the damper is in perfect order, there is a risk that the radiator is clogged with scale. This means that it will have to be replaced.
If the faucet does not open, then there is a possibility that there is a problem with the cable drive, since the operation of the faucet depends on this type of drive. A weakened cable, which lengthens over time as it wears out, will not allow the faucet to open even in the “open” position, or it will open only slightly.
You should check how the radiator works by warming up the engine, but you do not need to turn on the fan. At the same time, you need to check the temperature of the hoses.
Having figured out how the stove works, you can understand the reasons for its breakdown, but fixing it will take time and certain skills, since the stove itself is located behind the front panel of the cabin. This means that, at least partially, disassembly cannot be avoided.
Sources
Draining coolant from the radiator
According to experts and car enthusiasts who have already drained antifreeze or antifreeze from the radiator on their own more than once, this process is quite simple and understandable if done in stages:
- Unscrew the 4 fixing elements from the engine protective cover.
- The valve of the element called the heater opens. To open the tap, you need to turn the heater temperature regulator, which is located inside the car interior, all the way to the right.
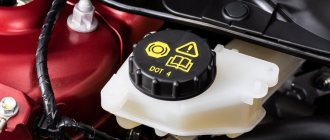
- The protective cap of the cooling expansion tank must be removed. However, it is worth noting that not everyone recommends removing the lid from the barrel, explaining that when draining the liquid, it can splash heavily. The car enthusiast himself must decide whether to open the tank.
- The drain container must be placed exactly under the radiator.
- Under the car hood you need to find the drain plug and carefully unscrew it. This process is done slowly so that the liquid does not flood the generator.
- In order for antifreeze or antifreeze to completely drain from the radiator, you need to wait 15-20 minutes, and then you can start draining the liquid from the engine block.
Fix it yourself or go to a service station?
Once again I want to draw your attention, this is very important! All work on replacing cooling system elements is carried out exclusively with the engine turned off and the coolant cooled down.
You can replace the pipes, thermostat, radiator filler cap, and expansion tank cap yourself. Remove the filler cap on the radiator. Unscrew the drain plug on the engine and drain the coolant into a clean container.
As for replacing the gasket between the valve head and the piston block, repairing a rotten engine cooling jacket and repairing radiators, these works are best done at specialized stations. Since such repairs will require the use of specific tools and the necessary experience and knowledge.