Reversing lights ensure the safety of the motorist and his car on the road, so it is absolutely forbidden to operate a vehicle in which they are faulty. If the reverse light on the VAZ 2114 does not light up, then you need to immediately stop driving and begin repairing it. There may be several reasons for such a malfunction; we’ll talk about how to detect and eliminate them below.
Reversing lights VAZ 2114
Faulty reversing lights on VAZ 2114
Reversing lights for VAZ 2114
What are reverse lights? These are white road lights that turn on in reverse gear, guaranteeing safety while driving. If the reverse lights are not on, then the possibility of the driver getting into an emergency increases; it is very difficult to park in the dark when the road is not visible, and passengers will not be able to predict the actions of vehicles, which can lead to unpleasant consequences.
The frog signal device is a necessary device. As they say “in the language of a motorist”: everything that is in the car must function properly, the safety of vehicle traffic depends on it!
So, at the slightest breakdown or short circuit of the reverse light, you need to immediately begin repairing it. This can be done both at service stations and at home, quickly and very simply. And this theoretical basis will be a great help!
CAUSES OF REVERSE DIRECTION FAILURE
What could cause the lack of illumination to the rear headlights?
- The light bulb has burned out and you simply need to replace it by checking the contacts.
Reverse light on VAZ 2114
- The fuse has failed, which can disrupt the functionality of the complete circuit of contacts.
- Lack of mass on the board, which is located under the lamp.
Rear light board for VAZ 2114
- Plaque and oxidation have formed on the contacts.
- If the wiring is broken, you can check it visually and also make a call.
- The contact on the headlight film burned out.
- Malfunction of the gearbox mechanism.
Reverse sensor for VAZ 2114
- The reverse frog of a VAZ 2114 is broken.
This is why the reverse lights on the VAZ 2114 do not light up!
There can be many reasons, which means that every driver should know how to properly eliminate such malfunctions.
Causes of the malfunction and ways to eliminate it
If the reverse lights of a VAZ 2114 do not light up, the reason may be as follows: 1. The light bulb has burned out. We simply replace it with an identical part. 2. Fuses are defective. Replace fuse F 16 and check the others. It is possible that the reason lies in one of them. 3. Contacts have oxidized. Remove the taillight block and clean all the contacts there, as well as at the 3/4 sensor. 4. A situation in which the reverse gear of a VAZ 2114 does not light up may occur due to the fact that there is no ground on the board (located under the lamp). We put it in place or just tighten it. 5. The power supply wire of the Z/X sensor is broken. We find an open circuit and fix it. 6. The travel sensor is faulty. This part must be checked, since it is a common reason why the reverse lights of the VAZ 2109, as well as many other car models, do not light up. Place the car on the overpass, disconnect the wires from the “frog” and connect them “directly”. Turn on the ignition and reverse gear. If the light comes on, this means that the sensor is faulty and needs to be replaced. 7. The contact located on the headlight film has burned out. But this is one of the most common cases when the reverse gear of a VAZ 2115 does not light up, since this malfunction is a “disease” of all Lada SAMARA cars. You can cure it by replacing the standard board with an improved one, or by installing the contact group yourself. We present to your attention some examples of such improvements.
That's all we wanted to tell you about this important and responsible topic. We hope you don’t need to explain how to change the reverse light on a VAZ 2114 or change any of the fuses. However, all other work to “eliminate” this problem is also not particularly difficult.
The reverse sensor is a fairly reliable element in the VAZ device, but at some point it can still fail.
This is easy to determine, since in this case the corresponding lights on the car stop working. However, something else is interesting here: the white lights could well have failed without breaking the sensor. To understand the situation, let's try to outline the range of possible problems.
As we have already found out, this device is responsible for turning on the rear lights on the car. If the white light does not appear when the driver backs up, then a pressing problem arises. It is necessary to determine the cause of the malfunction.
Not only the sensor could break, but something else as well. For example, a fuse or some kind of cable.
And without a rear light, driving in the dark is not very pleasant. It is simply difficult to inform other road users about your intentions to move back. In addition, they illuminate the path for the driver himself.
Even if this malfunction does not seem critical (like, for example, a breakdown of the knock sensor), it still needs to be corrected. And you can do this as follows.
REMOVAL OF THE BACK BOARD
First you need to remove the rear lights on the VAZ 2114, and for this you will need:
- Open rear trunk
- Remove unnecessary things
- Remove decorative trim
- Unscrew the plastic casing
- Take out the back panel
Now you have access to the socket and lamp of the rear license plate lamp, which also needs to be removed. The frog mounting pins are removed and the flashlight is already in your hands. The main thing is not to confuse it with the speed sensor, which is also located on the gearbox.
HOW TO CHECK THE OPERATION OF THE FROG?
The contacts from the sensor are removed and clamped together, after which the ignition is turned on. If there is light, then you need to replace the sensor. And if not, then the problem is in the circuit, but the frog is fine.
When the reverse lamp does not light up, it is often necessary to replace the old sensor with a new one.
What should be done:
- place the car on the overpass;
- install the handbrake;
- remove protection;
- remove the contacts of the old sensor;
- place the container and remove the frog;
- Unscrew the faulty device and replace it with a new one.
Then let it sit for a while and check the oil in the gearbox. Fill it up to the required level and put the entire structure back together.
Attention, the price of a new sensor is within 250 rubles.
The next option is if the reverse light does not light up on a VAZ 2114, then the problem is in the light bulb. To replace it, you need to disconnect the wiring block, remove the plastic contact panel from the flashlight, while squeezing the side fixing elements.
We rotate the light bulb counterclockwise and, pressing slightly on the socket, remove it. Now we install a new one, check the contacts and put the entire unit back together.
We visually assess the condition of the wiring; if necessary, we strip the wires, check for breaks using the ringing method, and check the contacts on the headlight film.
A blown fuse is a common cause, which means you need to know exactly where they are located and how they change.
The products are located in the fuse box, which can be found under the steering wheel on the left side. It can be easily removed with just one touch of your hand. There is no need to unscrew anything.
When the reverse light does not light, you need to check the condition of the fuses. How to do this? You can visually look at the fuses and determine the breakdown - the integrity of the middle part.
But the burnt jumper is not always so clearly visible, so you need to turn on the dimensions and, without removing the fuses, check the voltage; if one end is on and the other is not, the device is faulty.
Attention: when such a breakdown often occurs, you need to check the entire electrical wiring system, which causes such malfunctions in the car.
To replace the product, you don’t need tools, just take tweezers, remove the old unit and install a working one.
MAIN CONCLUSIONS AND RECOMMENDATIONS OF PROFESSIONALS
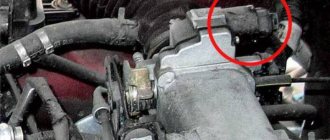
You can find out where the VAZ 2114 reverse sensor is located very simply by looking up at the gearbox, and if the driver cannot get under the car, then the hood opens and thus the condition of the frog is checked.
To completely verify that the brake gearbox is damaged, you need to turn the wheels to the left and look at the gearbox from the driver’s side. There is a protection with contacts inside on the side, remove it, close the contacts on the DZH and turn on the ignition. When everything is in order, a white light appears.
If not, then use a tester to measure the voltage on ground and on the orange wire that comes from the frog. If voltage is present, then we check the flashlight board itself and clean the contacts.
There is also a chance that the contact between the frog and the fuse block has “frozen”; you need to find it and check its condition.
Attention: when everything is normal, but the lights do not light, the reason may be the contact of the lamp, so even when screwing in a new one, you must check its functionality. As the people say, it’s no joke, because a breakdown can be the easiest, but it can lead to a lot of troubles.
This is why the reverse light on the VAZ 2114 does not light up, as you can see, there can be many reasons, and for the motorist it is important to carefully check the integrity of all frog mechanisms, identify the malfunction and repair the functionality of the lighting.
Have a nice journey, good fellow travelers and a smooth road!
Repair methods
To repair the reverse signal, you can proceed in two ways. They differ in the way the sensor is accessed.
- Drive the car onto a lift or pit.
- Do the work by climbing under the car.
If you have already encountered a similar problem, then you will probably agree that replacing the DZH is best done using a pit or overpass. This makes access to the sensor as comfortable as possible, plus you minimize the risk of being splashed with oil from the gearbox.
Replacing the DZH is not the cleanest job
Of course, there is another cleanest way - sending the car to a car repair shop. But then you will have to pay not only for the sensor, but also for the services of the specialists. And this is another 2-3 times the cost of the sensor. The choice is yours anyway.
Self-replacement
It’s not difficult to get to and replace a failed DZH on your own. Follow the instructions, do not break the sequence of operations, and then the process will not take you much time and effort.
- Place the car on a pit or overpass. Be sure to apply the handbrake and place the transmission in first gear. This will help prevent your car from accidentally rolling away.
- Remove the protection from the contacts of your sensor, disconnect the contacts.
- Prepare a container into which the oil will be drained when unscrewing the DZH.
- When the container is ready, remove the sensor. In some cases, it may not be unscrewed by hand. In such a situation, use a 22 mm socket.
- Very rarely even the key cannot help, since the sensor becomes stuck to its location. Here you will have to arm yourself with a hammer and chisel and try to remove it as carefully as possible.
- Take out the failed device and insert a new one in its place.
- If oil gets on the gearbox housing, remove it with dry rags. There is no need for extra dirt. Plus, it can lead to a decrease in the efficiency of the device.
- Return all contacts to their places, put the protection back on.
- If a decent amount of lubricating fluid has spilled out of the box, be sure to top it up. Just use fresh ones. By the way, this is one of the reasons to completely change the oil in the gearbox if it has been there for more than the first season.
- The decision to change the oil will simplify the task when removing the sensor. If the liquid is drained in advance, it will not flow in different directions when the sensor is unscrewed. The work will be cleaner, plus you will kill two birds with one stone - replace the sensor and gearbox oil.
Removal and replacement
After completing the work, do not forget to check whether the reverse traffic warning system is now working. For this:
- Turn the ignition key, but do not start the engine;
- Engage reverse gear on your gearbox;
- See if the white lights turn on. If yes, everything went great.
Causes of failure
The main reasons for malfunctioning reverse lights are as follows:
- light bulbs burned out;
- fuses are blown;
- oxidation of contacts in lamp sockets occurred;
- lost contact with the mass;
- the reverse wires have broken;
- the reverse sensor (otherwise called the frog) is broken;
- Damage has occurred on the contact board.
Thus, if the reversing lights of the VAZ 2114 do not light up, then the problem lies in one of the reasons given above. For a more accurate search, you should check all the specified elements one by one, starting with the light bulbs and their sockets and ending with the contact board and the sensor itself. And if the simplest faults can be eliminated almost instantly - by replacing light bulbs or wires, then replacing the reverse sensor requires a more serious approach.
Signs of sensor malfunction
To locate the device, just look at the suspension of the 14th VAZ model. There, at the checkpoint there should be two sensors - the one in question and the one indicating the speed of movement. A more labor-intensive way to get the device is to access it through the open hood.
Before diagnosing its performance, possible causes of failure should be taken into account.
These may include the following:
- oxidation of contacts;
- lack of contact with the transmission wiring;
- lack of contact with the fuse console;
- failure of one of the fuses (for example, F16);
- sensor looseness;
- broken wires;
- bulb malfunction.
The last point should not be discounted, since the lamp can also fail. It’s trivial to burn out, in other words. In this case, the reverse sensor 2114 itself will work properly. To find out the truth, you need to take matters into your own hands.
Checking and replacing the contact panel and DZH
In order to remove the panel you need to do the following:
- Open the trunk.
- Remove all contents from it that may interfere with the repair.
- Remove decorative trim.
- Remove the plastic casing.
- Remove the back panel.
- Disconnect the studs securing the reverse sensor.
To remove the sensor itself and replace it, you need to proceed in this order:
- disconnect the minus from the battery;
- remove the sensor protection;
- disconnect the contacts of the wires suitable for the DZH;
- place an oil container under the sensor;
- Unscrew the sensor using a 22mm wrench;
- remove the old sensor and insert a new one;
- wipe the box from traces of leaked oil;
- perform assembly in the same sequence and in reverse order;
- if too much oil has leaked out, it should be replenished to the required level (the level itself should be checked immediately after replacing the sensor in order to avoid the gearbox operating when the oil level is low).
The entire operation of replacing the old reverse sensor with a new one should be performed very quickly. Otherwise, very large amounts of oil may leak out and cause contamination of the surrounding surface.
You can check the sensor quite simply - you just need to close its contacts and turn on the ignition. If the rear white light comes on, then the sensor is working and the problem lies in the electrical network. If the light does not light up, it means the auxiliary switch is broken and needs to be replaced with a new one (how to do this was described above)
If the frog turns out to be in good condition, then you should check the continuity of all wires suitable for the sensor and headlights, and also check the condition of the contacts of the lamps and sockets (if they are oxidized, you need to clean them or wipe them with WD-40). It is also necessary to check the serviceability of the reversing lamp fuses located in the common fuse block.
If the rear lights fail quite often, and the cause of this is blown wiring or fuses, then you should check all the electrical wiring of the car as soon as possible. After all, some other, serious malfunction of the internal electrical network can lead to such breakdowns.
If, even with a working sensor, light bulbs and wiring, the reverse gear of the VAZ 2114 still does not light up, the reason may lie in a burnt-out contact located on the headlight film. This kind of malfunction is very common on VAZ cars. In order to solve it, you can either modify the contact group on the board yourself, or simply replace the board with a new one.
Sensor failure
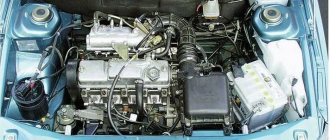
The VAZ 2114 gearbox has a special sensor responsible for turning on the rear running lights. When reverse gear is engaged, a contact closes in the sensors, which sends a signal to turn on the rear lights. It often happens that this part is to blame for the breakdown of the rear running lights.
Location
The sensor is located on the gearbox housing, and it is screwed into it using a threaded connection. A connector with wires is put on the sensor to connect the sensor to the lights.
Below in the picture you can see the location of this part.
If you have problems with the rear lights, you need to look under the bottom of the car. Perhaps the problem is not even in the sensor, but in its connector, because the connector from the sensor can easily fall off, especially if you drive in deep snow.
Replacing the sensor
Replacing this part is quite simple; such work does not require special skills in car repair. You just need to prepare a 19mm open-end wrench.
- To replace, you will need to crawl under the car;
- Remove the connector from the sensor;
- Unscrew the sensor itself;
- Install a new working sensor;
The replacement process is complete.
Opening the black box or treating reversing lights
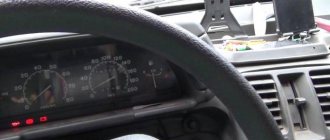
I’ve been making frequent recordings in recent days, but it’s empty and thick :-D, but oh well, today we’ll talk about how I struggled with the reverse lights.
About two months ago, when the tree was still standing, I took it to the car wash, washed up all right, drove it home, left the car behind the fence and went home. In the evening I went to drive the car into the garage, I turned on the rear and my tidy went out, the side and the rear too. . . What the f*ck did you think, let’s run to GOOGLE, they say fuse, look, idiot. . I look at the fuse and it’s not a thorn.
Here it is F16 - highlighted in red
I put another one on and turn on the rear one and the same story, well, that means the black box lock (aka fuse block or fuse box) I should have thought of sticking it under the drain. . . on the street there was no desire to fiddle with an oak tree with a block, and the wires were oak, so I took the easier route, threw the chip off the sensor and forgot about it, washed it down, and killed it. . . You can drive like this, of course, but it’s not comme il faut, especially in a parking lot when you’re driving and people don’t even know which way. Today I began to solve this problem, first I found out which contacts of the fuse block the wires from the sensor go to (Base X6, contacts 2 - green and 12 - orange), threw off the CYA, took this block and rang the wires to the sensor with a multimeter for a short circuit (a goat in the people) , the wires are fine, let's continue digging. I took it apart and let’s see what’s wrong where, in principle, all the normal tracks have not oxidized, there’s nothing to short-circuit either, but it’s one thing to just look and another to call and make sure that everything is fine here. To dial the tracks I had to delve a little into the diagram. From the diagram it follows that “+” goes from fuse F16 to the 12th contact of the X6 block and goes to the sensor (orange wire), passing through the sensor it returns to the 2nd contact of the X6 block (green wire) and from it goes to the X9 block Pin 16 (Output for reversing lamps)
I sketched out what goes where
Connection of blocks X6 and X9
You can see from the photos and the diagram that everything is simple here, I called, everything is fine, there is no goat, I started looking further. . . I dismantled the rear lights, maybe there is a goat walking from them and butting, but here too everything is in order, no hints of a goat, the wire from the CY to the lights rang, everything is also in order. . . Then great thoughts began about where and what could be. . . After sitting, thinking about it, weighing all the arguments and evidence, I decided to check the sensor itself, because... The fuse blows only after reverse gear is engaged, everything is in order in the control unit and wiring. I rang the contacts on the ground sensor, everything is fine and I started thinking again. . . then something pulled me to turn on the reverse gear and ring IIIIII BINGO again, one contact in the on state goes to ground!
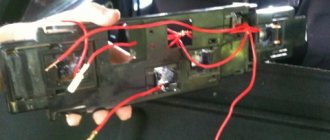
Here it is, the green wire contact
How are car wash and reverse gear sensor related? There are mudguards in the engine compartment; a jet of pressure simply could not get to the sensor and damage it! I don’t understand shit at all. . . but the fact remains that the sensor needs to be replaced. I changed the sensor, assembled the fuse box, stuck it in place and here is the result
» />
Everything works great
Literally a week before, the dimensions on the left side and the lighting in everything in the cabin disappeared, the fuses were intact, the problem turned out to be in the CY
The solder contact spot between the bottom board and the top board is highlighted.
The soldering was oxidized and the output was only 5 volts instead of 12, 5 minutes of work with a soldering iron, two strokes of nail polish and everything returned to normal)))
To everyone who finished reading this entry, my respect, because not everyone will read this dregs))) Of course, it was possible to write everything in short, but I don’t like writing like “I spat, stuck it, put it on top with tape,” and I wanted to tell the full story of my misadventures!) ) So don’t rush to immediately throw off the fuse block and tear it to pieces, everything may turn out to be much simpler))) Learn from other people’s mistakes)))
Why doesn't the reverse light come on?
If your reverse lamp does not light up, then the reason may lie in several problems:
- The reverse light does not light up. We replace the corresponding light bulb. How to replace a light bulb, see Replacing side lights
- Circuit breakers. Fuse f16 simply blew. Look and check, if necessary, replace it. Just in case, check the other fuses and maybe the problem lies there. How to check fuses, see Fuses.
- The contacts have oxidized. Remove the taillight unit and clean the contacts. Clean the contacts on the reverse sensor.
- There is no ground on the board. We put the mass or just tighten it. The mass is located under the lantern.
- Broken reverse sensor wire. We check and call.
- The reverse sensor is broken. First you need to check the reverse sensor. To do this, we put the car on an overpass, disconnect both wires from the reverse sensor (frog) and connect them together. Then turn on reverse gear and ignition. If the reverse light does not light up on your 2109, then you need to change the reverse sensor.
- The contact on the headlight film has burned out. This is a disease of all samars, and it can be treated by replacing the stock board with a modified one, or making the contact group yourself without using headlights. Here are some examples of improvements.