Constant velocity joint (abbreviated CV joint or “grenade” is the same thing) - this name for one of the elements of a car’s transmission can often be heard at car service centers and workshops, but not all motorists understand what it is and what the consequences are may cause this unit to malfunction.
There are several types of constant velocity joints, differing from each other not only in design, but also in the places where they are used.
In this article we will consider the following questions:
- Why is a CV joint needed in a car and where is it located?
- Types of constant velocity joints, how are they structured and how do they work?
- How to check the CV joint for serviceability, and what are the external manifestations of the malfunction of this unit and the consequences of its failure?
KINDS
The CV joint was invented quite a long time ago; according to the most common version, it was invented back in the twenties of the last century by Alfred Rzepp. Therefore, it is not surprising that since then many varieties of this part have appeared:
- cracker - installed exclusively on trucks;
- tripod - usually used as an internal CV joint;
- twin hinge – used quite rarely due to its complex design;
- ball, or CV joint, is the most common type, which is most often used on the axles of passenger cars.
It was this invention that became revolutionary for the design of passenger cars with front-wheel drive.
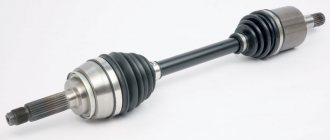
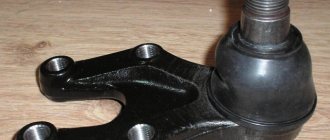
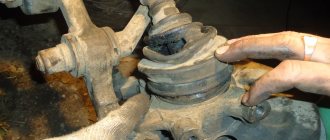
CV joint device
Here you can see a photo of a ball CV joint, thanks to which it will become clearer what this part is like in the assembled state. If we talk about its components, then, in fact, there are not so many of them:
- Housing with outer ring.
- Separator.
- Inner ring.
- 6 balls.
- Shaft.
- Stop ring.
- The anthers are external and internal, they are held in place by clamps.
If you put these elements together, they actually look like some kind of grenade.
All these parts are assembled into an external CV joint and an internal CV joint. The internal one transmits rotational movements to the external mechanism, which results in a change in the angle of the axle shaft relative to the axis.
Drive shaft device
The CV joint itself cannot transmit rotation from the gearbox to the wheels, so a drive shaft is required. The basis of the drive shaft is a steel pipe that connects the inner and outer CV joints. The inner CV joint constantly operates at a rotation angle of 10 - 30 degrees. The rotation angle of the outer CV joint is the same when moving forward in a straight line. When the wheels turn, the operating angle of the outer CV joint increases up to 60 degrees. When driving a car on an uneven surface, the distance from the outer to the inner CV joint is constantly changing. Therefore, the shaft on which two “Rtseppa” type hinges are installed is fixed inside the hinges in such a way that when the distance changes, it moves inward, or vice versa, moves outward. Therefore, the use of a shaft on which an external hinge of the “Rtseppa” type and an internal hinge of the “Tripod” type are installed allows the pipe to be rigidly secured, increasing the overall strength and reliability of the shaft. However, the production of such a shaft is more expensive than with two Rtseppa hinges, so it is not used on budget cars.
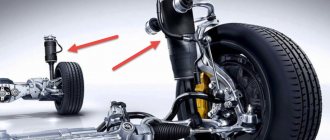
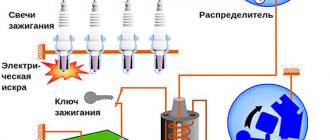
Why do you need a CV joint in a car?
The need to invent a CV joint arose simultaneously with the advent of the first front-wheel drive cars. The 3 main advantages of front-wheel drive cars are well known to every motorist:
- better handling;
- efficiency.
But, when transmitting torque to the steered wheels, which were constantly changing their position, serious power losses and other negative consequences occurred:
- Conventional hinge mechanisms quickly became unusable.
- Rotation was transmitted unevenly to the wheels.
- A strong additional vibration occurred.
- The transmission shafts and gears operated under significant overloads.
The invention of the car grenade in the 20s of the last century made it possible to completely solve this complex technical problem. With the help of a CV joint, torque is transmitted to the steered wheels without loss of power or other disadvantages.
Due to its reliability and simplicity, the constant velocity joint is also widely used on rear-wheel drive vehicles that have independent suspension.
A high-quality grenade has a long service life. If you use your car carefully, the need to replace or repair it is extremely rare.
Types of front hinges
The ball joint design described above is the most common, but far from the only one. In machines of various classes and load capacities, other types of hinges are used:
- cam-disc;
- tripoid;
- paired crosses.
The cam constant velocity joint is a disk located between two semi-cylindrical bushings, which, in turn, are inserted into semicircular cam forks. The latter stand at the ends of the drive and driven shafts. This device allows the hinge to rotate in two planes and withstand high operating loads. The units are used on heavy-duty vehicles, including the front-wheel drive of the domestic Kamaz truck.
The design of the tripoid joint is reminiscent of a ball CV joint and functions on a similar principle. There are 3 grooves inside the grenade body into which rollers with a spherical surface are inserted. The latter are mounted on the fingers of a support (tripoid) mounted on the drive shaft. The rotation of the rollers is ensured by needle bearings.
When the front wheels turn, the rollers rotate on bearings and move inside the grooves, transmitting torque in any position. The scope of application of the unit is passenger cars and light-duty commercial vehicles.
We recommend: Motor oil labeling
The principle of operation of paired crosses is extremely clear. The “break” of the shaft in two planes is achieved by installing an additional adapter between the two crosses. Such joints are reliable and cheap, but are unable to transmit torque at high speeds. Twin CV joints are used on low-speed drives, for example, in agricultural or construction equipment.
Signs of CV joint failure
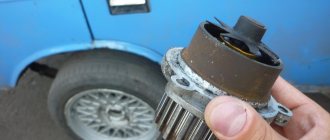
CV joints belong to the category of the most reliable and durable car components. To protect against adverse impacts, the hinge joint inside the device is protected by a flexible boot. Anthers prevent dirt, moisture and dust from penetrating to the contact points of the hinge parts. When driving on well-paved roads and timely maintenance, car grenades serve the car owner for many years without repair.
Malfunctions of constant velocity joints most often occur when the vehicle is actively used on bad roads or off-road. The main reasons for failure of CV joints are:
- Damage to the boot and penetration of dirt into the hinge joint.
- Lack or use of low-quality lubricant.
- Use of defective metal or violation of technology in the production of the device.
A characteristic sign of a malfunctioning car grenade is the appearance of extraneous sounds when operating the car (a specific crunch, clicking or grinding sound). They arise due to dust or dirt particles getting into the space between the hinge elements (clips and balls). When repairing, it is necessary to replace the entire CV joint with a new analogue.
But, in general, a constant velocity joint is a device that ensures reliable, durable and efficient operation of a car. CV joints rarely become the reason for visiting a car service center.
Advice for car owners
To prevent the CV joint from breaking prematurely, it is necessary to visit a car repair shop from time to time to check the integrity of the protective casing. If there are any defects on the boot, then it is worth replacing it along with the lubricant.
If a crunching sound occurs, you should immediately check the CV joint. If you replace the boot and lubricant in a timely manner, you will not have to pay for expensive repairs later. The faulty part will not cause any serious consequences at first, so you can still drive it. However, a faulty CV joint tends to become blocked when driving. This could lead to a fatal accident.
We must not forget that an aggressive driving style disables the mechanism faster than it should. Calm driving and regular boot diagnostics will make the part work for a long time.
Unfortunately, not everyone can detect a faulty CV joint by ear. Other elements of the chassis can also produce a crunch. To determine the location of the breakdown correctly, it is recommended to contact trusted specialists.
Instructions for replacing the CV joint with your own hands.
The first thing you need to do is make marks for the general location of the inner and outer races using a marker or scriber and then follow the instructions below, I also advise you to read the article replacing a VAZ CV joint.
- First you need to hold the hinge in a vice and turn out the inner part of the cage until it stops, remove the balls in pairs. In this case, you should help yourself with a screwdriver and tap with a hammer.
- After removing all the balls, proceed to install the separator, which is placed in a vertical position, and its windows should intersect with the end of the body.
- Next, remove the fist with the separator, rotating it and at the same time retracting one of the protrusions that are located in the separator window. After this work is done, you need to separate the specified parts.
- Now you need to look through all the parts and be sure to wash and dry them. If there are no chips, wear or discoloration in the areas, then the device can still serve for some time. But one of the defects on the parts was still discovered, which means they should be replaced with new ones.
The mechanism must be reassembled only in the reverse order, but before doing this, all parts must be lubricated. This assembly begins by inserting the inner race with the separator into the outer one (here you should not forget about the marks that were placed at the very beginning). The balls are placed in pairs. The hinge must be filled with lubricant, for example, “CV joint-4”, approximately 80 - 100 grams of the product per hinge. You can also use “litol” and other similar consistencies.
Remember, you shouldn’t skimp on them, since the performance of the CV joint largely depends on the amount of lubricant you apply to it. By the way, you still need to put it in a case, 40 - 50 grams. Next we knock out the hinge along the splines, put on the boot and tighten the clamp. This is the only way the boot will ensure a good seal on the joint. In addition, when lubricating, try to rotate the CV joint so that the lubricant is distributed evenly. Well, at the very end of the assembly, experts recommend checking whether there will be strong resistance during rotation. If everything is in order, then the CV joint replacement procedure was successful.
Service life and maintenance
There are different types of CV joints, but they all have almost the same service life and maintenance methods. The grenade is considered a consumable item that requires periodic replacement.
The service life of a factory part depends on the following aspects:
Driving style.
Car brands.
Service time.
The first factor can be called decisive, since during aggressive driving the unit experiences heavy loads. With a quiet ride, the service life of the part is 100,000 miles.
It is also important to undergo timely maintenance, inspection of boots and lubricant filling. If the rubber parts crack, the CV joint will fail completely within 14 days. If moisture gets in, this process will happen even faster, as the water will wash away the lubricant.
You can extend the life of a grenade by fulfilling only two conditions:
Do not press too hard on the gas when starting or turning.
Change the grease with anthers.
The outer CV joint, unlike the inner one, experiences more loads, so it makes itself felt more often.
As for lubricant, there are rules for replacing it. It changes in the following cases:
While replacing the boot.
If the boot has been damaged.
If the CV joint has been in use for more than 5 years.
The car has covered over 100 thousand km.
There is no need to think that the more lubricant is applied, the better. This rule works in reverse.
Principle of operation
First, watch the video clip for a general understanding.
Now let me tell you the work point by point:
1) The CV joint body itself, as well as the lower part, has longitudinal grooves, one for each ball, that is, six in total.
2) The balls, in turn, are held by a separator; they are located between the body and this lower part, that is, they are a kind of connecting element. They move along these longitudinal grooves.
3) The force is transmitted to the drive shaft, to which the housing is attached, and then transmitted to the balls, which in turn are transmitted to the lower part, to which the driven shaft is attached.
4) If the car turns (the angle of rotation between the shafts changes), then the balls move along the grooves and transmit force with the same force.
This structure allows you to install these elements on the front drive wheels, which change their angle thanks to the steering rack.
What is needed for verification
The hinge transmitting rotation from the gearbox experiences considerable loads associated with constant changes in the position of the axle shafts, friction force and other factors. As a result, gaps form, noise and sounds arise. In such cases, verification is necessary.
To understand how to check the inner CV joint, you can use several techniques.
- With the car on a lift, turn on first gear. A faulty CV joint will immediately indicate a problem with a crunch.
- With the car stationary, turn the steering wheel all the way. Start the engine and move off. If a crunching sound appears when accelerating, you need to stock up on a new device.
- Pay attention to the appearance of weak jerks at the beginning of the machine’s movement, slight accelerations or decelerations.
- Check for a crunching sound when driving over uneven surfaces, holes, snowdrifts or suddenly accelerating.
Backlash, which leads to vibration at speed, requires special attention. To check, technicians advise grasping the inner hinge in the place where the outer hinge drive comes out of it. Swing in different directions. If the play is more than one and a half tens of millimeters, the device must be immediately replaced along with the shaft. Operating a vehicle in this condition is dangerous.
Before checking the CV joint, it is better to agree with an assistant who will record signs of malfunction from the outside. Checking the internal CV joint, as a preventative measure, is necessary every couple of months, and immediately after driving in difficult road conditions.
Structure
As you understand, we will consider the ball CV joint, because the others are practically not used in construction (I don’t presume to be responsible for all brands). The structure is “dry”; the structural elements are not in oil (like the rear axle), they only have a slight lubricant. This device may seem complicated, but everything is simpler than it seems at first glance.
This unit has only 4 main parts:
1) Housing - made in the shape of a spherical bowl into which the driven shaft is installed.
2) The lower part is a spherical cam with a drive shaft.
3) Separator - made in the shape of a ring with holes where the balls are located and held.
4) Metal balls - there are six of them in the design, hence the name “ball”.
Such a simple structure is highly smooth; the car can reach speed smoothly without any jolts. If you compare it with a universal joint, there is no such smoothness.