Bleeding the brakes of a Lada Kalina car
We bleed the hydraulic drive of the brake system after its repair, which resulted in a violation of the tightness of the system and if air is suspected of getting into the system.
In the latter case, you must first determine and eliminate the cause of air getting into the hydraulic drive and only then begin pumping it.
The presence of air in the hydraulic drive of the brake system is determined by the behavior of the brake pedal: it becomes soft (you can’t feel the stop at the end of the pedal stroke) and drops below its normal position.
To complete the work you will need an assistant, as well as:
— a special wrench for the bleeder fitting or an 8 mm socket wrench;
- a transparent vinyl tube of suitable diameter;
— container for draining brake fluid;
— new brake fluid recommended by the manufacturer.
— inspection ditch or overpass (preferably).
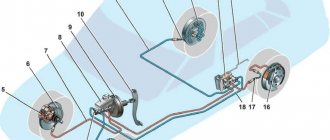
1. We prepare the car for work.
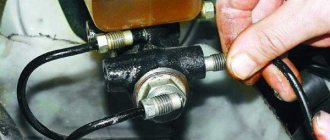
2. Disconnect the wiring harness connector from the brake fluid level sensor connector and remove the reservoir cap
To prevent air from entering the hydraulic drive of the brake system, when bleeding the drive, make sure that the brake fluid level in the reservoir does not fall below the MIN mark.
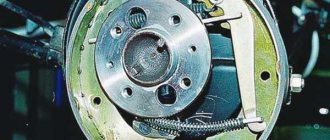
If the rear axle of the car is suspended (the car is on a lift or mounted on stands), the pressure regulator will block the path of brake fluid to the rear wheel cylinders. Therefore, to bleed the rear wheel cylinders, it is necessary to open the regulator valve.
3. To open the pressure regulator valve, insert the blade of a slotted screwdriver between the lever and the plate, recessing the regulator rod.
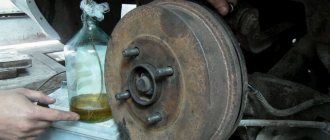
4. Clean the brake cylinder fitting of the rear right wheel and the surface around it from dirt.
5. Remove the protective rubber cap from the bleeder fitting.
6. We put a special or 8 mm socket wrench on the bleeder fitting, and then a transparent vinyl tube (the diameter of the tube should be such that it fits tightly on the fitting), lower the other end of the tube into a transparent container partially filled with brake fluid.
7. An assistant presses the brake pedal several times and, after the last press, holds the pedal in the lower position.
8. Loosen the fitting, unscrew it approximately half a turn until liquid begins to flow out of the fitting.
9. After the brake fluid stops coming out of the tube, tighten the fitting.
10. The assistant again presses the pedal several times and holds it pressed.
11. We repeat the steps described in paragraphs 7 and 8 (see above).
12. We carry out bleeding until the release of brake fluid with air bubbles from the cylinder fitting stops, after which we finally tighten the fitting.
13: Remove the vinyl tube and spanner from the fitting, and put a protective rubber cap on the fitting.
14. Next, pump the brake cylinder of the front left wheel.
15. Similarly, we pump the cylinders of the secondary circuit:
rear left and front right wheels in the specified order, monitoring the fluid level in the master cylinder reservoir.
16. By pressing the brake pedal, we check the operation of the hydraulic drive and the absence of fluid leakage from the bleeding fittings.
If the pedal is soft or it drops below its normal operating position, we re-confirm that the system is tight and repeat pumping the hydraulic drive.
Why isn't one of the rear wheels bleeding?
The reason for the failure, if the rear left wheel on the Kalina does not bleed, is most often the reaction of the brake fluid pressure control device.
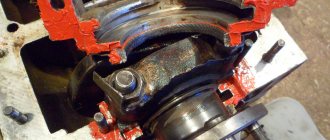
Rear brakes on Kalina
This occurs due to misalignment of the drive lever. Before pumping, it must be adjusted, and if unsuccessful, replaced.
One of the tubes is clogged or squashed
Often, driving on uneven roads and failure to comply with speed limits lead to damage to brake pipes and hoses. Kinks and other damage to tubes and reinforced hoses cannot be restored and must be replaced.
Pressure regulator faulty
Adverse environmental influences or inappropriate fluid for filling the brake system can lead to damage to the pressure regulator with the need for its subsequent replacement.
The pressure regulator drive is faulty or out of adjustment
When the rear left wheel on a Kalina does not bleed, you need to carefully inspect the pressure regulator drive device, which is a combined lever openly located under the bottom of the car and exposed to an aggressive environment.
Adjusting the brake pressure drive
Due to contamination and corrosion, its correct operation is impaired. You can try to restore it by adjusting it (it is adjusted with a nut at “13”, which fixes the position of the lever relative to the head of the pressure regulator rod).
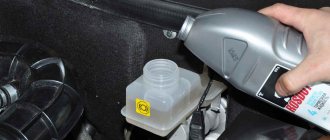
Replacing brake fluid
To complete the work, you will need an assistant, as well as a rubber bulb.
1. We prepare the car and the necessary equipment to perform the work.
2. Remove the tank cover
To prevent air from entering the hydraulic drive of the brake system, when replacing the brake fluid, make sure that its level in the reservoir does not fall below the MIN mark.
3. Use a blower to remove the working fluid from the master brake cylinder reservoir.
4. Fill the tank with new fluid up to the top edge of the tank.
5. We pump the circuits of the hydraulic drive system, starting with the rear wheels of the car.
6. We pump each wheel cylinder until new (lighter) brake fluid begins to emerge from the fitting.
7. After replacing the fluid in both circuits, we check the operation of the hydraulic drive and bring the fluid level in the master brake cylinder reservoir to normal.
Replacing the brake pressure regulator
The replacement of the sorcerer on VAZ-2110 cars and other vehicles equipped with an RTD is carried out on an overpass. You need a 13 mm spanner, a powerful screwdriver and a special 10 mm wrench designed for unscrewing brake pipes. Before starting work, the assembly must be cleaned of dirt and rust, doused with WD-40 or another penetrating compound, and then wait half an hour.
Work begins by unscrewing the bolt securing the bracket to the spring. Afterwards, the brake pipes are dismantled, the position of which is recommended to be pre-marked.
Bleeding hydraulic brakes Kalina 1117
Tool:
- Medium flat screwdriver
- Split spanner 8 mm
Parts and consumables:
- Brake fluid
- Rags
- Bottle
- Hose
- Master brake cylinder
- Brake slave cylinder
Note:
To complete the work, you will need an extra pair of hands, so it is advisable to find an assistant. In addition, it is most convenient to work with many components through an inspection ditch or overpass.
1. Bleeding the brakes is necessary to remove air from the hydraulic drive after it is depressurized, when replacing the master cylinder, brake cylinders, hoses, tubes, as well as when replacing the working fluid or when the brake pedal becomes “soft”.
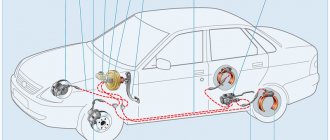
2. When the engine is not running, we remove air from the system, first from one circuit and then from the other in the following sequence:
- right rear wheel brake;
- left front wheel brake mechanism;
- left rear wheel brake;
- brake mechanism of the right front wheel.
3. If air gets into one of the circuits, it is enough to bleed only this circuit, and not the entire hydraulic drive. If the rear wheels are hanging out, insert a screwdriver between the lever and the plate spring of the pressure regulator in the hydraulic drive of the rear wheel brake mechanisms, fixing the regulator piston in the recessed position. We check the level of working fluid in the hydraulic brake reservoir and, if necessary, add fluid.
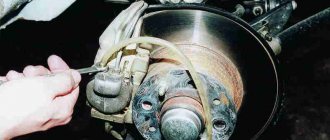
4. We clean the brake bleeder fitting of the right rear wheel from dirt and remove the protective cap from it.
5. Using an 8-mm spanner, loosen the tightening of the bleeder fitting. We put a hose on the fitting, and immerse its free end in a container partially filled with working fluid.
6. An assistant must vigorously press the brake pedal all the way 4-5 times and keep it pressed.
7. Using the “8” wrench, unscrew the bleeder fitting 1/2-3/4 turn. In this case, liquid with air bubbles will flow out of the hose, and the brake pedal will move forward. As soon as the liquid stops flowing out of the hose (the pedal should be pressed all the way), tighten the fitting, and only after that can the assistant release the pedal.
8. We repeat pumping until air bubbles no longer appear in the liquid coming out of the hose. We remove the hose, wipe the bleeder fitting dry and put a protective cap on it. We pump, as described above, the brake mechanism of the left front wheel.
9. Similarly, we bleed the brake mechanisms of the other circuit. When pumping, you need to monitor the fluid level in the tank and add fluid if necessary.
10. If, when you press the brake pedal, you feel its “softness” and increased travel, it means there is air left in the system. In this case, we repeat pumping until the pedal becomes “hard”, i.e., when pressed, go no more than half the distance to the floor. If air cannot be removed, check the tightness of connections, pipelines, hoses, master and working cylinders. We tighten leaking connections, replace faulty master and working cylinders.
The article is missing:
- Photo of the instrument
- Photos of parts and consumables
- High-quality photos of repairs
Bleeding the brake system | Car Hobby
Today, as you may have guessed, we will talk about bleeding the brake system. Why do you need to do this? First of all (and secondly, and thirdly) in order to expel all the air from the brake system. Air, unlike brake fluid, tends to compress. Therefore, when braking, in the brake system, due to the presence of air, the pressure created may not be enough to release the brake pads.
The brake pedal will simply fall to the floor without any effect. This is why the brakes need to be bled. Air is the main enemy of the braking system. How does he get into it? It gets into it because of its lack of tightness. Also during any repair work (replacing hoses, cuffs, etc.). And you don’t need to hope that you did everything carefully. The repairs were completed - the brakes were bled. Golden Rule.
Enough theory. Let's get down to business. Bleeding the brake system is a procedure that is performed the same on any vehicle with a hydraulic brake system (without ABS). The main difference is only the sequence of pumped wheels. It is better to familiarize yourself with this in the operating instructions.
Bleeding Kalina brakes
I will tell you how to bleed the brakes on a Lada Kalina car. The pumping sequence is as follows:
- rear right
- front left
- rear left
- front right
We start with the first wheel in order to bleed (rear right). What will you need for this? Brake fluid (the same as what was poured into the system), a small hose (in my case with a diameter of 5-6mm, about 30 cm long), an empty container for collecting brake fluid, a partner and a set of keys. There should be a special fitting on the back of the wheel for bleeding the brakes. We remove the protective cap from it, put on the hose, and lower the other end into an empty container (a bottle, for example).
Please note here that the brake drum must be on. Otherwise, the resulting pressure when you press the pedal will simply push the pistons out of the brake cylinder and you will have to remove it and reassemble it. IMPORTANT! Bleed the brakes WITHOUT jacking up the wheels, use a pit or overpass. Otherwise, the adjustment of the “sorcerer” (the brake force distributor between the front and rear wheels) will go wrong.
It is better to use a transparent hose. This way you will see the presence of air in the escaping liquid.
Now we put our assistant behind the wheel and ask him to press the brake pedal several times and keep it pressed. You slowly unscrew the bleeder fitting (it is enough to unscrew it half a turn). Brake fluid should leak and the brake pedal should drop to the floor. As soon as the main flow of liquid with air comes out, tighten the fitting. Only after this can the pedal be released. We perform this simple operation until air stops escaping (the liquid will be free of bubbles). Then we move to the second wheel (front left) and do the same. And so with all the other wheels.
Bleeding the brakes on Kalina
Welcome! Bleeding the brakes - this procedure is carried out after removing (Disconnecting) things that relate to the brake mechanism, in other words, let’s say you wanted to disconnect the brake hose from the caliper in order, for example, to replace the caliper separately, in general, when disconnecting the hose, it is recommended to completely drain the brake fluid, but you can essentially don’t do this, you’ll just have to plug it with a plug when it’s disconnected and thus fluid won’t flow out of it, but after this disconnection the brake system becomes airy, that is, air gets into it, and air with brake fluid is a very bad sign , by the way, if the brake hose suddenly breaks a little somewhere, then the system will become airy in the same way, and therefore (depending on how airy it is) the brakes will very noticeably disappear, but if a lot of air gets into the brake system, then in this case the brakes will literally it won't happen at all.
Adjusting the regulator sensor or adjusting the sorcerer.
I would like to immediately make a reservation about services. Have you seen anywhere where masters adjusted the sorcerer in the way described in the book? Usually several options are offered or all together:
— replace rear pistons
- Replace worn rear brake pads
- place a washer between the rod and the sorcerer’s plate
etc. And NO ONE will be engaged in ADJUSTING the sorcerer. Maybe I'm behind the times, of course. but if someone shows me that treasured service where they do THIS, then he (the service) should immediately be given a rolling flag