Pumping the brakes
Now you can get started. On a VAZ 2112 we pump the brakes ourselves. The price at a service station for pumping is small, but you can save money, and by the time you get to the station, you can already have time to pump the brakes.
Master brake cylinder
After replacing the main brake or parts that are connected directly to it (pipes), it is necessary to bleed it. This is done differently than bleeding the brakes on wheels!
VAZ 2112 bleeding the brakes yourself
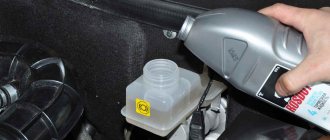
- After installing the new cylinder, fill the expansion tank of the VAZ 2112 brake system with brake fluid to the level. In general, fill the tank full.
- Then your partner should be seated behind the wheel, and you yourself should take a seat on the left side of the car to ensure maximum access to the master cylinder.
- All fittings that secure the brake pipes to the master cylinder must first be tightened.
- Now the procedure is as follows. The partner pumps up the pressure in the system with the pedal, then presses the brake pedal to the floor and holds it there.
Your partner presses and holds the pedal
- You should use a bleeder wrench or a regular 10 wrench to unscrew one of the fittings of the master brake cylinder.
- After unscrewing it, you will be able to observe how a small amount of brake fluid comes out from under the fitting along with air bubbles. So, there shouldn't be any bubbles.
- Tighten the fitting. After which the partner releases the pedal. And then he presses it again.
- At this time, you unscrew the SAME fitting and observe what is happening.
- This procedure must be performed until there is no air left.
- But that's not all. Next, you should do the same operation with each fitting.
There is another option for bleeding the main brake cylinder:
The essence of the process does not change. The steps are the same and the order is the same. In order to speed up the process, while your partner holds the pedal, you unscrew and tighten each fitting in turn
This is all done with ONE PRESS OF THE PEDAL, please note. But nevertheless, all the air will not come out with one press and the procedure will still have to be repeated.
System malfunctions
There are quite a lot of elements in the system, so it can be very difficult to determine the malfunction. The main malfunctions and their symptoms are described below:
- Braking is too slow.
A common problem that can be caused by grease or brake fluid getting into the friction area of the brakes. Also, a decrease in efficiency occurs due to wear or damage to the pads (only replacement will help). If the adjustment is made incorrectly, the system will overheat, and as a result, braking efficiency will noticeably decrease. Dismantling the amplifier - Increasing pedal stroke. Usually, with such a defect, the braking force decreases significantly, but sometimes it remains at the same level. The most common reason is a leak. First of all, you need to inspect the drums and calipers. If a damaged part is found through which the liquid escapes, it must be replaced. Air in the system hydraulic line can also cause an increase in stroke - to eliminate the problem, the brakes need to be properly bled (the process is described in detail below).
- After braking is completed, the “ten” wheels are partially released. The cause of the defect may be a violation of the protrusion of the adjusting nut on the vacuum booster rod. This malfunction can also be caused by jamming of one of the parts of the brake mechanism.
Service
It comes down to checking the condition of the pads, drums and discs, checking and adjusting the free play of the pedal, periodically replacing the fluid, checking the rubber part of the lines for leaks.
Checking the condition of the cuffs of the working cylinders and bleeding the system to remove air from it.
Read on the topic: What to do if there is air in the brake system.
All elements of the VAZ 2110 brakes are repairable, except for the vacuum booster and rubber parts of the lines.
The amplifier and rubber lines cannot be repaired, so if problems arise, they are replaced.
Repair of the master cylinder comes down to replacing all rubber elements (cuffs, gaskets).
It is performed when liquid leakage is detected from it. The same applies to working cylinders.
Repair of VAZ 2110 brake mechanisms includes replacing pads, discs and drums if severe wear is detected.
Alarm Signals
The following symptoms are quite unsafe, please note:
- If the brakes are completely gone, then it’s clear that you can’t go any further, even to a service station! If independent repairs on site are beyond your capabilities, or simply impossible, you need to call a tow truck;
- When braking there is a strong vibration, especially felt in the steering column. You press the pedal, and it’s just hard to hold the steering wheel in your hands. There can be several reasons for vibration: • Many argue that vibration can occur due to the fact that there are non-ventilated disks. Their design is such that they really don’t like it when braking occurs in the rain, or even right in a puddle. No repair will help here - you need to replace the disks with ventilated ones; • Vibration may also occur if there is a problem with the rear drums. If upon inspection you find dark spots on the working surface, this indicates uneven wear. The vibration is usually very strong. Such drums need urgent repairs, and possibly replacement with disc brakes; • Check the front brake discs for deformation. At the same time, vibration is also observed.
- The brake pedal is too tight. There may also be several reasons for this: • A clogged air filter for the vacuum booster can cause the pedal to become stiff; • Check the vacuum booster itself. Its possible malfunctions are destruction of the diaphragm, tip, sticking of the check valve, damage to the hose connecting the intake manifold to the amplifier. In all these cases, a stiff pedal syndrome may occur, and repair of any of the indicated faults is necessary; • Also, the pedal may become stiffer as the pads wear, check them too.
- Hisses when you press the brake. If it hisses exactly when you press the pedal, you need to urgently check the vacuum booster, and then decide whether it needs repair or replacement. But if it hisses when you release the brake, then this is a normal phenomenon. Unless, of course, the hiss is too obvious.
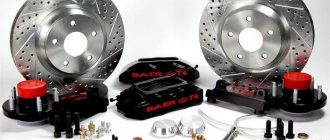
Many, believing that the brakes are bad and repairs do not help them, decide on significant alterations and tuning. For example, tuning the brake system of a VAZ 2110 may include replacing the rear drum mechanisms with disc ones.
It is especially important to know here that braking of the rear wheels should be softer and occur a little later than the front wheels to prevent skidding. Another possible tuning idea is to replace the vacuum booster and the brake master cylinder
Instead of standard ones, they are installed from Lada Priora. This usually helps, first of all, in that vibration is not felt and the pedal works with optimal force.
Another possible tuning idea is to replace the vacuum booster and the brake master cylinder. Instead of standard ones, they are installed from Lada Priora. This usually helps, first of all, in that vibration is not felt and the pedal works with optimal force.
And do not forget - after each intervention in the brakes, they need to be pumped.
Amplifier (vacuum)
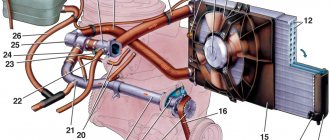
The vacuum amplifier consists of:
1 – amplifier housing; 2 – cups; 3 – rod; 4 – adjusting bolts; 5 – seal for the rod; 6 – sealing rings for the main cylinder flange; 7 – diaphragm springs (return); 8 – studs; 9 – flange for fastening the tip; 10 – valve; 11 – hose tip; 12 – diaphragm; 13 – amplifier covers; 14 – sealing cover; 15 – piston; 16 – protective cover of the valve body; 17 – air filter; 18 – pusher; 19 – pusher springs (return); 20 – springs on the valve; 21 – the valve itself; 22 – valve body bushings; 23 – buffers; 24 – valve body; Chambers: A – vacuum; B – atmospheric; Channels C and D.
Using the rubber diaphragm 12 and the valve body 24, the cavity of the vacuum amplifier is divided into chambers: atmospheric chamber B and vacuum chamber A.
Chamber A is connected to the engine inlet pipe using tip valve (return) 11 and a hose.
The housing 24 is made of plastic. The outlet from the cover is sealed with a protective cover 16 (corrugated). The valve body is equipped with: a master cylinder drive rod (3) with a support sleeve, a curtain buffer 23, a valve body piston 15, a valve 21, a pusher return spring 19, a valve spring 20, a valve, a pusher 18 and an air filter 17.
- Pressing the pedal.
- Moving the pusher 18.
- Piston movement 15.
- Following steps 2 and 3, valve 21 is moved all the way into the seat of the valve body.
- Chambers A and B are separated.
- The piston seat lags behind the valve and is connected to the atmosphere (through the formed gap in chamber B).
- Air enters through filter 17 and the gap between the valve and the piston, as well as through channel D.
- By performing step 7, pressure is created on the diaphragm.
- Since a pressure difference is created in chamber A and chamber B, the valve moves, followed by rod 3, which in turn acts on the piston of the master cylinder.
- When the brake pedal is released from the body seat, valve 21 moves away, creating a gap. Through this gap and channel C, chambers A and B communicate with each other.
GTZ malfunctions
The VAZ 2101 brake system has many parts that can fail due to wear, poor quality or untimely maintenance. The following characteristic symptoms of problems can be identified:
- slow stopping of the vehicle after pressing the brake pedal. One of the reasons is that the lip seals of the pistons have become unusable, which led to a loss of tightness;
- high pedal effort. This problem appears when the cuffs increase in size, for example, when installing a low-quality repair kit;
- The brake pedal has a short stroke. The working environment, i.e. the brake fluid, has nowhere to go due to the fact that the compensation hole is clogged. In addition, the canal may be blocked by swollen cuffs;
- The car only brakes when the pedal is pressed to the floor. This indicates a complete failure of the lip seals when the liquid goes into the tank and not into the system;
- Brake pads do not move away from the discs and drums, causing them to become hot while driving.
The reason lies in the jamming of one of the pistons or the formation of a blockage in the bypass hole. If the seal is lost, liquid begins to flow out of the cylinder
These symptoms may also occur if there are problems with other parts of the braking system. For example, the pedal may fail if there is no fluid in one of the wheel cylinders or if air gets into the system
Therefore, for a final diagnosis, it is necessary to pay attention to additional features of the car’s behavior. For example, there are certain signs that clearly indicate problems with other components of the brake system, and not with the GTZ:
- pulling the car to the side when braking;
- jamming of the brake mechanisms on one of the wheels;
- the appearance of sounds uncharacteristic of normal brake operation (creaking, squeaking, grinding);
- heating of brake pads or discs on one wheel.
Checking the brake master cylinder
The most common cause of GTZ problems is wear of the seals. When replacing cuffs, you need to take into account that repairs only make sense if the piston and cylinder walls do not have wear. Otherwise, replacing the rubber seals will not bring any results and soon you will still have to install a new part. Before you start checking the main hydraulic brake drive, you should make sure that there are no problems with other elements of the system:
- Inspect the wheels from the inner surface to identify any leaks of brake fluid from the brake fluid brake system.
- Check the integrity of the tank and hoses connecting it to the gas turbine engine, as well as the presence of fluid and its level.
Fluid leaks on the inside of the wheel indicate a leak in the brake system.
A clear sign that there is a problem with the master cylinder is the appearance of liquid on the unit body. A working mechanism should always be dry without a hint of leakage. If the hydraulic drive has lost its seal, it must be dismantled for further disassembly and repair. You can determine that the gas turbine engine bypasses fluid, i.e., it does not enter the system, but returns to the expansion tank when you press the pedal:
- Open the tank lid.
- An assistant is seated in the driver's seat. The engine does not start.
- Your partner presses the brake pedal, and you listen to the sounds coming from the reservoir.
- If gurgling is heard from the container, and the pedal is pressed lightly, it means that the liquid is entering the tank instead of the system. The malfunction lies in the wear of the seals, which are unable to create the necessary pressure in the cylinder circuits.
Master brake cylinder
Now let's talk about the master brake cylinder on a VAZ 2110 car. If you do not want to allow the brakes to fail while driving, they should be checked periodically, and if problems arise, take appropriate action immediately.
A common reason for replacing the master brake cylinder of a VAZ 2110 is precisely the fact that the brakes are lost.
Symptoms of a problem
Of course, brakes can completely lose their effectiveness for various reasons, but now we are talking specifically about the master cylinder. If the reason lies therein, then it can be determined by the following signs:
- The master cylinder shows signs of brake fluid leakage;
- The pedal has an idle motion, that is, when it is pressed, no force is created;
- The brake pedal simply won't press.
Replacement
The most difficult process is disassembly. Therefore, let's talk about it in more detail.
Carefully disconnect the master cylinder from the pipeline. Disconnect the block, which is equipped with wiring, from the emergency brake fluid indicator. The connection to the “ten” is made by terminals. Cover the pipe and assembly openings with something to prevent brake fluid from leaking. It will pollute the interior space, which is undesirable. Now remove the cylinder along with the reservoir. To do this, simply unscrew the fastening nuts that connect the element to the vacuum booster. After removing the brake fluid level sensor, drain the brake fluid present from the cylinder and the cylinder itself. If there is no serious need, you should not remove the tank. But for complete assembly, the tank is removed and then installed in place in strict order. Before reassembly, each element is washed with purified brake fluid.
A good alternative is isopropyl alcohol. Do not forget to dry the parts with a compressor and wipe with a clean, dry cloth. Carefully avoid contact of the main cylinder with fuel or kerosene. Pay special attention to the O-rings. If you wash them with special alcohol, do not keep the rings in this liquid for more than 20 seconds.
After processing, immediately dry and wipe the seals. Treat the surface of the piston and mirror to remove all rust. When replacing the master cylinder, new O-rings must be installed, regardless of their current condition. Check the elasticity of the piston springs under load. Refer to the VAZ 2110 repair manual, which indicates the appropriate loads and forces for testing. When free, the length of the spring should be 59.8 millimeters. If the indicator deviates from the norm, be sure to replace the springs.
Leveling up
If you think that after replacing the brake master cylinder you can safely go out on the roads, then you are mistaken. In fact, a complete repair of brake cylinders on a VAZ 2110 includes bleeding.
The procedure is not complicated, but requires following the instructions:
- Find someone who will help you in this matter. One will be near the car, and the second will be directly in the cabin.
- Inflate the brake pedal by pressing it several times.
- The assistant presses the pedal, and meanwhile you slightly unscrew the fitting on one of the brake system pipes.
- This should release air, as well as a small amount of brake fluid. Don't be alarmed by leaks, this is completely normal.
- Retighten the fitting using the same wrench as when unscrewing - 10.
- Command your assistant to lower the part.
- The procedure is repeated until air bubbles begin to come out when unscrewing the fitting.
- Each of the four circuits is pumped using similar actions.
- First make sure that the brake fluid in the expansion tank is filled to the required level.
Actually, at this point the repair work related to the master brake cylinder can be considered complete. Experience in operating a car like the VAZ 2110 suggests that you should always store a container of brake fluid in the trunk. All sorts of situations happen on the road, and you need to be prepared for them.
If you find an error, please select a piece of text and press Ctrl+Enter.
Leveling: detailed instructions
Bleeding is required to remove all air from the system.
In this work, it is important to remember that the circuit diagram is diagonal, so you need to bleed it as follows: first the rear wheel goes on the right side, then the front wheel on the left. In general, the work is done “diagonally”
To bleed, you will need a standard set of tools and materials: a jack, brake fluid, a set of wrenches and sockets, as well as screwdrivers.
First, consider working with a friend:
- The first step is to fill the reservoir with brake fluid to the “max” mark;
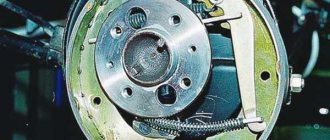
- Next you need to hang the rear wheelset. A screwdriver must be placed between the piston and the plate, thus blocking the brake mechanisms. The main thing is not to forget to take out the screwdriver after completing the work;
Now you need to insert a screwdriver between the plate and the piston
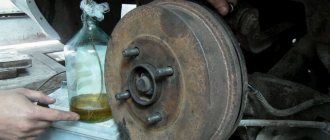
The cap must be removed from the air release valve. A clean hose must be placed on the valve head, the other end of which must be in a transparent container filled with brake fluid;
Place the hose in a container to drain the liquid
After this, the partner must press the corresponding pedal several times (the intervals between presses should be 1-2 seconds). When pressing the last time, the pedal must be pressed to the bottom and not released; The next step is to adjust the valve - it needs to be unscrewed 0.5-0.75 turns, after which liquid will begin to drip, along with it air bubbles will come out of the system. When everything comes out, the valve must be closed, while the partner must remove his foot from the pedal; Next, check the fluid level; if everything is in order, then reassemble in the reverse order.
To do the work yourself, you need to purchase a unit called “AERATOR”. Some people make the device with their own hands, but it is better to buy a ready-made unit for 70 rubles. Pumping is carried out as follows:
- The valve on the tank must be combined with the wheel valve using a new tool;
- The VAZ 2110 should be jacked up and the wheels should be hung;
- The bleeder fitting should be removed; the brake fluid will flow away due to the created compression;
- To do this, enough air from one tire.
Advice! Some motorists struggle with the air supply. The easiest way to do this work is with a pump that inflates tires. If there is a compressor in the garage, then it is better to use it.
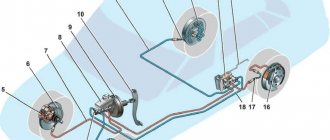
Principle of operation
Hydraulic dual-circuit brakes with diagonal distribution are predominantly efficient and reliable. This is due to the fact that if one circuit fails, the second will allow your car to brake.
The circuit system is arranged as follows - one of them is responsible for the left rear and right front wheel, and the second circuit is responsible for the left front and right rear wheel.
This way, you will be able to brake without damaging the brakes or causing other problems with the system.
Problem in the operation of the central locking electrical circuit on VAZ cars
The first possible problem follows smoothly from those mentioned in the previous section. Overload in the operation of activators leads to an increase in the operating current in the supply circuit above the rated value. As a result, the fuse blows and the central locking of the VAZ 2110 simply “dies”.
It is by checking the fuse that the diagnosis of central locking malfunctions begins. By the way, it is located in a very specific place and it is not easy to find it right away even if you know where to look. In order to get to it, you will need to fold back the central panel with the fuses and dig into the entire wiring harness in the niche that opens behind it. The “comrade” you need is packaged in a special plastic cup and connected to the pink wire.
Central locking unit VAZ 2110
Another very common and obvious problem is the central locking connector. It is located in the most unfavorable place for this in the interior body, under the foot mat. A large amount of moisture and dirt inevitably gets there. Electrical contacts are intensively oxidized. As a result, the power supply circuit involuntarily breaks at the point where the plug connector is connected.
Leveling up
So, we come to the main question - how to properly bleed the brakes on a VAZ 2110. But the important point here is whether you are going to do the work yourself, or call a friend for help. Depending on this, pumping is performed in a slightly different way. Let's talk about each of them.
Self-leveling
If you couldn’t find an assistant, you can easily handle the task yourself.
Container with TJ
To get started, arm yourself with:
- Brake reservoir cap without sensors, regular black;
- Automotive nipple;
- Use a round file or a 14 mm drill.
- Make a hole in the lid, insert a nipple into it so that there are no gaps and the element fits tightly. This device replaces a ready-made aerator, which is sold in stores.
- Using the manufactured device, connect the valve of the spare tire or removed wheel with the valve of the reservoir.
- Jack up the car and remove all wheels.
- Unscrew the fitting intended for bleeding the brakes. The air will expel the brake fluid with air bubbles.
- If it is not possible to use a tire or you have a compressor, use it. Just make sure the pressure is no more than 1 atmosphere.
- Perform a similar sequence of procedures on each brake, following the sequence indicated above.
https://youtube.com/watch?v=jkYHTz9lNgM
With an assistant
If you still managed to find a partner to work with, that’s good. This way, pumping the brakes is not only more convenient, but also more fun. Plus, the quality of the operation is often higher.
Top up
The sequence of your actions in this case will be as follows.
- Check the car for brake fluid leaks.
- Add TJ into the tank to the maximum level. It is designated as MAX.
- Hang up the wheel on which you plan to bleed the brakes. You already know the sequence.
- The rear brakes have a pressure regulator that can be locked with a screwdriver. It is inserted between the plate and the piston.
- The brake device has an air release valve. Dry it thoroughly, remove the cap and place the rubber hose on the head.
- Prepare a transparent container with a volume of about 3 liters in advance and pour into it some of the brake fluid used in your car. The other end of the hose must be immersed in this brake fluid.
- Command your assistant to sharply press the brake pedal about 5 times in a row. During the last press, the pedal is held in the down position.
- While he holds the pedal, you open the valve about 50-75 percent and watch the brake fluid flow out through the hose.
- Initially, liquid with bubbles should come out. As soon as the leak stops, the valve closes.
- Is the valve closed? Then tell your friend to release the pedal.
- But this is not how the brakes on a VAZ 2110 are pumped in just one step. For a high-quality procedure, you will have to repeat it 3 more times. You need to achieve a result in which no air bubbles come out of the hose.
- Carry out a similar procedure with all brake mechanisms in the specified bleeding sequence. Don't forget to remove the screwdriver that is blocking the pressure regulator.
As you can see, bleeding the brake system is not as difficult as it might seem at first glance. The easiest way is to work together, since then the process is much easier and does not require the creation of any special devices.
The main thing in this matter is not to rush. Consistent operation, careful actions in a strict sequence of brakes. Doing all this yourself is not a problem if you competently tackle bleeding the brake system of your car.
Loading …
VESKO-TRANS.RU
AutoNews / Reviews / Tests
How to Bleed Brakes on a VAZ 2112 Video
As it is also called, together with a partner they brake a VAZ 2110
Almost all car owners are faced with the need to pump their brakes, regardless of the brand of car they drive. But let's talk about how to turn off the brakes
, read the rules, pumping order.
When it is necessary?
If our customer has nothing left to do, the brake components are working properly, the brake water paths are tight, then they do not require bleeding. But if there is a TJ leak due to the "overpass" being damaged and its level falling, it will be useful to repair the brakes and the stable pump.
This is a particularly necessary procedure, because airing the accounting system leads to the fact that at the moment when everything still needs to be done for our client, seconds are decided, the brakes do not work. Nothing will pump right now, no one.
Therefore, we will immediately take such a step if we find that the brake pedal has increased its travel; it becomes “soft,” as car owners say. brake. "cotton".
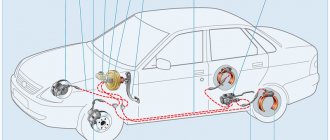
Hydraulic brake circuit
There are already other prerequisites for pumping:
- For you, you had to interfere with the accounting system;
- Cracks appeared in the hoses, TJ leakage;
- The brake fluid turned out to be bad and requires a complete replacement;
- You've changed your brake discs (sometimes you need to do this);
- The water content of liquid fuel has increased (it is hygroscopic, i.e. it absorbs and retains water), so it must be changed as needed.
What can't be done?
You must add TZ for all brake repair work. Remember: you can only add “native” liquid. exactly the brand that is already filled in your VAZ 2110.
Brake water from different manufacturers
It is impossible to combine different brands under any circumstances, because the result is unpredictable! If not, this is the only way out. completely change TJ in the system.
a priority
There is a strict sequence for bleeding the brakes
on a VAZ 2110. It’s better not to violate it. To do this you need to drive right rear first and then front left. Later. rear left, and the last one. front right.
We work with a partner
The best thing. It's more convenient, safer, to turn off the brakes together. When more than 80% of VAZ 2110 owners create this operation.
First of all, make sure that TJ is not leaking anywhere, and everything else is tight. Then add water until it reaches the Maha rice.
Now let's start bleeding the brakes:
- The wheel where you will pump the mechanism needs to be hung; how to rotate the wheels correctly has already been said;
- The rear brake has a special pressure regulator. It must be unlocked by inserting a screwdriver between the piston and the plate;
- Locate the release valve on the appropriate brake mechanism. Wipe it down, remove the cap and put the rubber hose on your head;
- Pour some of the same brake water that is in the system into a previously prepared three-liter jar (otherwise into another transparent container), lower the end of the hose so that the hole is immersed in the liquid;
- The driving assistant presses the brake pedal sharply about 4 or 5 times at full speed. Holds the pedal when pressed for the last time;
- At this time, you open the valve halfway, saying ¾, and watch the TG run down the hose. There need air bubbles there. When the leak stops, close the valve completely;
- Only then can your assistant release the pedal;
- Then again the assistant “presses” the brake and holds the pedal down, and you repeat the manipulation of the valve;
- The brake mechanism is considered fully inflated when no more air bubbles are emitted. This is natural, it will take 3-4 steps;
- Now remove the hose, wipe the fitting, attach the protective cap to it;
- Repeat the same procedure with all brake mechanisms. Remember to use the diagonal principle correctly;
- Pull out the screwdriver in which the pressure regulator is blocked.
How to bleed the brakes on video 2112.
Certainly
If there is no assistant, it is possible, although not so convenient, to brake the VAZ 2110 without assistance.
Naturally, the special device is the aerator, which they purchase, as they call it, without the help of others.
For this you will find:
- brake reservoir cap (“classic”). without sensor, normally dark;
- auto nipples;
- Drill 14mm (use round ratchet).
Make a hole in the lid, insert the nipple tightly without gap. It's all on the device. It is necessary to connect the wheel valve (spare wheel or removed from the connected vehicle) to the tank valve.
How to bleed the brakes, aka the braking system on a VAZ 2110-VAZ 2112?
Note! Before you get to work, remember one thing for yourself, in cars of the tenth family the brake system is built in such a way that the contours do not go along one horizontal line like on the classics, but diagonally, for some these words mean little because not everyone will understand them, let's explain all these points in detail. To begin with, let's move a little away from the cars of the tenth family and talk about the classics, as many already know, the classics are the very first family of cars that appeared at the factory, later there were nines, tens, etc.
(Read the continuation in the “Important!” section at the very bottom of the article)
1) First, you will need to drive the car into the inspection hole and then open the hood and find the brake fluid reservoir there (shown with an arrow in the photo below), you open this reservoir by unscrewing the cap and then add it to the MAX mark new brake fluid.
Note! Do not under any circumstances add any other liquid, namely liquid from another manufacturer (Even if the composition is the same), and especially not underfill liquid of a different brand, because different additives are added to each liquid, and each manufacturer has their own, and therefore if you If you mix them, then the mixing will occur, thereby possibly ruining the brake system of your car, leading to corrosion, or the brakes will simply become ineffective! (If you don’t know what kind of fluid is in your reservoir, then replace the brake fluid; for information on how to replace it, see the article entitled: “Replacing brake fluid on a VAZ”)
2) After topping up, close the lid of the tank so that no air gets into it, or simply put it on top and after all this move under the so-called bottom of the car, and ask your assistant to sit behind the wheel of your car at this time and, by the way, give him some more hand brake fluid which he will periodically add to the system.
Note! If you have a question, why actually add liquid to the system, then we will now try to explain it. The whole point is that by pumping the brakes, we thereby remove air from the braking system, not many of you know, but still the air is very harmful to the operation of the brakes, or rather, nothing will happen to the system itself, the whole point is that when you press the brake pedal, the car stops your situation will be much worse than it should be, and all this will happen because of the air that accumulates in the system!
3) Next, explain to your assistant to monitor the level in the brake reservoir, namely, it should not drop below 15 mm during the entire pumping period, and it is better to generally add brake fluid to the reservoir more often, otherwise you never know.
Note! If it suddenly happens that the liquid in the tank completely leaves, then your system will depressurize again and then you will need to pump it again!
4) Next, ask your assistant to get into the car and tell him to press the brake pedal 5-10 times with smooth movements, and on the last press, tell him to squeeze it and hold it on the floor while you perform one operation at the same time.
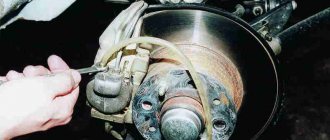
5) So now to you, at this time (Depending on which wheel you are bleeding) remove the protective cap from the bleeder fitting, for example, on the rear wheel the bleeder fitting itself is located where shown by the arrow in the right photo, and on the front wheel this The part and its protective cap are located where indicated in the left photo:
6) So, you will need to remove this cap and put on the bleeder fitting the same hose that was mentioned at the very beginning of the article, and lower this hose with the other end into a small container which will be filled in advance with a little new brake fluid and after all the operations done, carefully loosen the fitting 2-3 turns and the waste liquid will begin to flow into the container, in which there will be air bubbles, so after the liquid stops flowing, tighten the fitting and then tell the assistant to remove his foot from the pedal and then do the same with the assistant operation but only until the liquid begins to come out without air bubbles. (The photo below shows an example on the front wheel; on the rear, everything is done identically)
Checking the brakes
After bleeding the master cylinder as well as the wheel cylinders, you need to check the functionality of the brakes before you go on a trip. So:
- The first is the pedal. She must take it high. Pump the pedal a few times, then press and check if the pedal falls off when pressed for a long time. If it falls, we pump the brakes again or look for another reason (we diagnose the brake system).
- Before leaving the garage, press the pedal several times.
- Select a suitable, spacious area to test the brakes.
- Accelerate the car a little (first gear will be enough).
- Let go of the steering wheel and apply the brakes. If the brakes work correctly, then all wheels will brake (visible from the marks of braking) and the car will not pull to the side.
- If it pulls away, it means that one wheel is working weaker. The reason for this may be the presence of air in the brake circuit of the wheel or a malfunction of the brake elements (working cylinder, piston or pads).
Watch the video which clearly shows how to bleed your brakes. Take care of the condition of your car, and it will serve you for a long time and safely!
What is the purpose of the brake pressure regulator?
Most VAZ 2110 owners are familiar with this device under the name “sorcerer”. At the same time, it is not clear to everyone why it is needed. The brake pressure regulator is located on the rear suspension of the car. It is equipped with a lever that has a movable position; when the springs are loaded, it changes its static position.
The resulting voltage is distributed to the system piston. After pressing the pedal, the piston helps reduce the load in the rear wheel decks. If the braking system is working properly, all loads are distributed evenly. For an adequate response of the regulator, a setting is required that prevents untimely wheel locking. A balanced braking system is needed to match the timing of the car's wheels locking.
The main elements of the brake system of a modern car
Hydraulic drive
- this is the main type of design used to install a service brake system, which includes the following elements:
- pedal;
- amplifier (vacuum);
- network of pipelines and hoses;
- one main and several working cylinders.
Main task
– supply of liquid through pipes to the pistons located directly on the wheel. The force must be instantly transmitted from the pedal to the main mechanism, after which the pads, under the influence of hydraulic pressure, compress the brake mechanism. The main signs of a hydraulic line malfunction are a sinking or soft brake pedal and fluid leakage, which must be constantly topped up.
Replacing the brake cylinder on a VAZ 2110
may be necessary if liquid begins to leak from it - as a result, the tightness of the system will be compromised and its mechanisms will not work to stop the car. The wheel pistons push the pads apart, causing the disc to stop spinning. Failure of the listed elements is a direct threat to people's lives - the pedal will fail and in an extreme situation the car will not stop moving.
To replace it yourself, the car enthusiast will need to purchase the necessary parts and prepare the tools to carry out the “operation.”
Device
Cars of the Lada Samara series received a hydraulic drive that operates on two circuits. The connection of these circuits is cross-connected - this design is used in almost all cars with front-wheel drive. The operation can be explained simply: one circuit includes one rear and one front wheel from different sides. The brake system is equipped with a working fluid level indicator, while the driver is “helped” by pressing the corresponding pedal by a vacuum booster.
The system has two main nodes:
- Front brakes. Disc mechanisms are installed at the front, the operation of which is carried out by calipers with a single piston. The mechanisms are equipped with wear alarms and ventilation.
- Rear brakes. The VAZ 2110 car received standard drum mechanisms; their main elements are pads. These elements are activated by hydraulic pistons.
It is also worth mentioning the brake master cylinder (MBC) and the vacuum booster, which form a common unit. The amplifier is a non-separable structure, so if it breaks, it must be completely replaced. The VAZ 2110 manual contains a detailed diagram where all elements of the brake system are indicated and listed. Almost all mechanisms can fail, but most often the owner of the “ten” has to repair the rear mechanisms. The operating manual also indicates how often the condition of the brakes should be checked.