Lada Granta Liftback Orange › Logbook › Rain sensor
I continue to complete the car. This time I decided to install a rain sensor. The thing should be useful in operation, since now you won’t have to constantly pull the wiper lever.
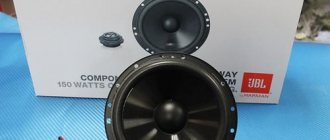
And so, the rain sensor itself was directly purchased DDA-25
The installation took about 15 minutes. First I glued it to the glass
Next you need to run the wire from the sensor through the ceiling and the rack trim to the fuse box
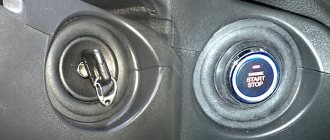
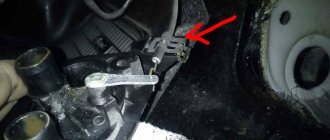
After connecting the wire to the block, you need to pull out the standard wiper relay and insert the relay from the sensor
Now you can insert the relay from the sensor
You can check. The rain sensor starts working when the wiper lever is in the 1st position. At the same time, the blue LED on the sensor should light up
Since there was no snow or rain outside at the time of installation, the only way to check the sensor was by pouring water on the glass
The sensor has 2 functions: rain and snow. If the rain function is set, then the blue light on its body lights up, if it’s snowing, then the green light turns on. I tried both modes and this is what I want to say; In rain mode, the sensor works adequately, but again not always. In mode the snow rubs frequently. There is no snow on the glass, but he turns on the wipers. Thus, it turns out that sometimes the wipers rub almost dry, which is not good. It also includes adjustment of the sensitivity of the sensor itself. I haven’t yet chosen an adjustment that’s convenient for me. Perhaps the sensor itself needed to be installed in a different place so that it could adequately sense water. I'll drive it, maybe I'll get used to it, but so far the impressions from the sensor are somewhat blurry. It seems to work, but everything is spoiled by an inadequate reaction at some moments.
Replacing DTOZH
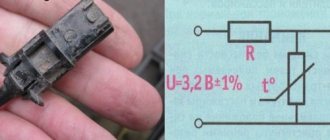
Sensor catalog number - 21120385101005 The issue of replacing the sensor should be raised if there are significant problems indicating its malfunction. Replacing the sensor is carried out in several simple steps:
- First thing you need to do is drain the coolant
- disconnect the block with wires from the sensor
- unscrew the sensor using a 19 mm wrench
Installing the sensor is done in the reverse order and does not pose any special problems. However, in some cases, after installing a new sensor, a small leak may form, which will require replacing the copper nut or applying a temperature-resistant sealant to the sensor threads.
What the control panel will look like in the future
When climate control is installed on the Lada Vesta, the general appearance of the control panel will remain the same. However, the content will change. So there will no longer be icons on the left vernier, but divisions will appear, which you need to navigate by. With their help, the driver will be able to visually control the level of warm or cold air supply.
But this is for manual control mode. In Lada Vesta it will be possible to switch to automatic, and then the climate system will independently set the temperature in the cabin, based on the sensor. To switch to automatic mode, just press the desired key in the bottom row.
You can switch from the air conditioner to the stove and vice versa by pressing the vernier. Air recirculation is started in the same way, only with the right handle. The temperature display in the Lada Vesta is displayed on a small digital display installed in the place where the graphic temperature scale is located in cheaper models. As in the simpler version, all buttons and knobs are equipped with indicator lights that light up after the mode is activated.
Dismantling
Self-installation of a washer level sensor on a Lada Vesta begins with dismantling the tank. First you need to remove the plastic frill near the windshield.
First we remove the Vesta frill
Vesta's frill is made in the form of a single piece, and therefore it will have to be removed completely. To work you need the following tools:
- Ratchet;
- Head 17;
- Torx T20 sprocket.
First you need to remove the hood seal, then pry up and remove the plastic decorative caps at the base of the wiper holders to gain access to the nuts. When this is done, you need to unscrew the nuts and remove the wipers - you need to work carefully so as not to inadvertently tear off the slots on the seats.
Next, all that remains is to unscrew 6 screws (3 on each side), using a Torx T20 sprocket, and remove the frill.
After this, access directly to the tank opens, which needs to be removed. This is not difficult to do, since it is secured with just one bolt. The situation is a little more complicated with the plug, as well as the washer pump hose. To disconnect the plug, pull up the blue flag.
Dimensions
Externally, the cars do not differ much from each other in size. However, if we look at everything in more detail, we can see that everything is different.
The Lada Vesta is almost 300 mm longer than the X-Ray, and therefore it is more comfortable due to its larger base. The cars are completely identical in width. The heights of the models are different: Vesta is 73 mm lower than X-Ray, although visually this difference seems larger. This is due, in particular, to the ground clearance - for the X-Ray it is 17 mm larger and equal to 195 mm, while for the Vesta it is 178 mm. When it comes to luggage compartment capacity, the sedan wins - its volume is 480 liters instead of 361 liters for the hatchback. Although the X-Ray looks larger in appearance, it weighs 40 kg less.
For those who value space and capacity, it is considered better to buy a Vesta; the X-Ray is less spacious. In addition, it is more comfortable due to its wheelbase. If there is a need to overcome light off-road conditions, then it is better to give preference to the X-Ray. It is worth noting that with the rear seats folded down, the luggage compartment volume of the hatchback increases to 1207 liters. Vesta does not have such an opportunity.
Air conditioner for Lada Vesta
Typically, models in entry-level configurations, which are purchased by those who are strictly limited in finances, do not have this option. At the moment, the Russian sedan has 8 versions, and its price varies from 524,000 rubles. up to 760,000 rub. However, the latest configuration is the Anniversary and it is unlikely to be on sale for a long time, so it is reasonable to consider the top modification Luxe Multimedia, which sells for 672,000 rubles.
Lada Vesta has air conditioning in almost all versions.
Moreover, they all have either air conditioning or climate control. It is not available only in the basic version of LADA Vesta Classic.
“Comfort” package, is it more comfortable with it?
In this version, in addition to everything listed above, the car is equipped with:
- Electrically driven and heated exterior mirrors.
- Heated windshield.
- Parktronic.
- Front seat heating system.
In addition, the car will be equipped with a full-fledged audio system, which includes a 4.3″ diagonal monochrome monitor, a hands-free system, Bluetooth, AUX, USB, “Lada Vesta”, thanks to which it becomes a real find for those who like to travel with playing video games. salon music.
INSTALLATION OF RAIN SENSOR DDA-45
Installation of rain sensors DDA-45.
Yesterday a parcel arrived from Togliatti with a rain sensor DDA-45, I decided to install it without delay. Everything turned out to be much simpler than it seems!
Although I’m not the first to install DDA-45, I’ll still write back and make it more detailed and accessible. So that forum members are not afraid to do it themselves. In truth, I myself thought that everything was much more complicated than it actually was. And so, we have the following connection diagram on the manufacturer’s website.
For those who are “afraid” of schemes, I will further explain, so to speak, “on the fingers”. First of all, we prepare everything for installation. To do this: 1.Remove the right door seal from the pillar lining.
2. Remove the rack lining itself, pulling it back and overcoming the resistance of the latches.
3.Remove the air duct lining by prying it with a flat screwdriver and pulling it towards you with force.
4.Remove the upper part of the steering column casing by unscrewing the two bolts from below.
Next, we glue the sensor itself to the windshield, wherever it is more convenient for you, most importantly in the area where the wipers operate. I installed the sensor behind the rear view mirror.
Next, we stretch the sensor cable under the ceiling trim above the windshield and lower it along the left pillar to the dashboard area.
We fix the cable with ties to the common harness to avoid damage when installing the rack cladding.
Then, using a wire, we stretch the sensor cable first to the air duct,
and then to the steering column.
After this, we release the white connector from under the steering wiper switch by pressing the latches. Then the connection itself begins. The process will involve three connector wires: beige, purple and black. We cut the beige wire with side cutters and clean the insulation from both ends. Black and purple are simply removed from the insulation, approximately 1 cm.
Then we screw the sensor wires to the connector wires. Red and yellow break to beige ends, green to purple, and black to black. Everything is clearly visible in the photo.
After this, we solder the twists with a soldering iron and thoroughly insulate them. That's it, the connection is complete!
We put everything back in place and check the operation of the sensor. Believe me, it took less time to connect the DDA-45 than it took to write this message. At the end of the installation, we configure the operation of the DDA-45 to suit our needs, guided by the operating instructions.
Now all that remains is to enjoy driving your car without being distracted by the work of the wipers!
source
Schematic location in the engine compartment
| Numbers/current | Functionality / where they are located |
| P(F-1) / 20 | Windshield washer |
| P(F-2) / 5 | Understeering's shifter |
| P(F-3) / 10 | High beam (left headlight) |
| P(F-4) / 10 | Steering column switch (left) |
| P(F-5) / 20 | Heated seats |
| P(F-6) / 30 | parking lights |
| P(F-7) / 30 | Rear dimensions |
| P(F-8) / 7.5 | Rear fog lights |
| P(F-9) / 10 | Right turn signal repeaters |
| P(F-10) / 10 | Automated gearbox selector |
| P(F-11) / 10 | Low beam (left side) |
| P(F-12) / 10 | Direction indicators |
| P(F-13) / 30 | Power circuit |
| P(F-14) / 30 | Stop signals |
| P(F-15) / 10 | Rain sensor, external lighting, hydraulic headlight range control |
| P(F-16) / 15 | Fuel pump, charging |
| P(F-17) / 15 | Illumination of the glove box, thresholds |
| P(F-18) / 10 | Turn signal repeaters (left) |
| P(F-19) / 10 | Low beam (right) |
| P(F-20) / 10 | Heated mirrors (external) |
| P(F-21) / 5 | Instrument panel (panel) |
| P(F-22) / 5 | central locking |
| P(F-23) / 5 | Canister, air flow sensor, timing valve |
| P(F-24) / 5 | ERA GLONASS |
| P(F-25) / 5 | Radio tape recorder |
| P(F-26) / 5 | Gasoline pump |
| P(F-27) / 20 | Parktronic |
| P(F-28) / 15 | Electric power steering |
| P(F-29) / 15 | Line output to tow hitch |
| P(F-30) / 20 | Reversing light |
| P(F-31) / 15 | Anti-theft alarm |
| P(F-32) / 15 | Illumination of the engine compartment, interior |
| P(F-33) / 5 | Window lifters |
| P(F-34) / 15 | Steering wheel rotation sensor |
| P(F-35) / 5 | Door program block |
| P(F-36) / 15 | Radio, diagnostic connector |
| P(F-37) / 15 | Generator |
| P(F-38) / 15 | Beep (optional) |
| P(F-39) / 15 | Daytime Running Lights |
| P(F-40) / 20 | High beam (right) |
| P(F-41) / 20 | Standard cigarette lighter |
| P(F-42) / 20 | Bus power |
| P(F-43) / 20 | Door locks, ABS, airbag |
| P(F-44) / 20 | Window lifters |
| P(F-45) / 20 | Heater fan (interior) |
| P(F-46) / 20 | Windshield wiper (windshield wipers) |
| P(F-47) / 15 | Air conditioner |
| P(F-48) / 15 | Windshield wiper (optional) |
| P(F-49) / 15 | Heated rear window |
| P(F-50) / 15 | Stability Program (ESP) |
| Name | Block pinout |
| RP 1 | Lighting, seat heating |
| RP 2 | Responsible for the cigarette lighter |
| RP 3 | Heated rear window |
| RP 4 | Front windows |
| RP 5 | Interior heater (stove) |
| RP 6 | Window lifter for rear doors |
| RP 7 | Gasoline pump |
| RP 8 | Car socket (powered by 12 Volts) |
| RP 9 | Heated windshield |
| RP10 | Heating relay |
| RP11 | Starter |
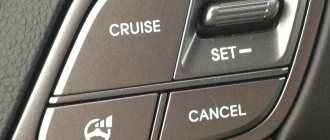
| RP12 | Cruise control |
Salon
The cars are very similar inside. And it’s impossible to say that Vesta is better than X-Ray. They have almost identical steering wheels, center panel design and seats. However, there are still differences. The interior of both models is well designed, all elements are well assembled. There are no squeaks or backlashes while driving. The seats are quite comfortable, however, on the rear sofa with the headrests lowered down, the seating position for passengers is uncomfortable, as they rest against the shoulder blades.
The interior of both models is equally good. It is very difficult to answer the question of which is better: Vesta or X-Ray. All elements are made from approximately the same materials. In terms of sound insulation, the differences are also minimal; it is at a decent level. The X-Ray is better here only because it is much more comfortable for tall passengers to sit in it due to the structure of the roof. It also has more luggage space with the seats folded down.
Power plants
When comparing the Kia Rio and Lada X-Ray, it’s worth saying a few words about the engines.
The Kia car comes with the following power plants:
- 4 liter petrol engine with 107 horsepower.
- 6 liter engine with 123 horsepower.
The first installation option is installed on budget versions of Korean cars. The 107-horsepower engine accelerates the vehicle to 100 kilometers in 11.6 seconds. The maximum speed is 185 kilometers per hour.
Special mention should be made of the very low fuel consumption, which when driving around the city does not exceed 8 liters per hundred kilometers.
The older model of the Rio car's power plant, complete with a 123-horsepower engine, is equal to 190 kilometers per hour. The increase in engine displacement had a slight effect on fuel consumption.
When driving around the city, the power plant empties the fuel tank by 8.5 liters per 100 kilometers traveled.
Domestic engineers equipped the Lada X-Ray with the following units:
- 6 liter petrol engine with 106 horsepower.
- 8 liter petrol engine with 122 horsepower.
From the comparison it is obvious that, despite the larger volume, AvtoVAZ engines could not compete with their Korean counterparts. The Kia Rio has similar dynamics to the Lada X-Ray, but at the same time consumes significantly less fuel and develops a higher maximum speed.
Installing a rain sensor
The rain sensor is mounted under the windshield on the back of the rear view mirror. During installation of the device, the following nuances are taken into account:
The sensor must be located on the windshield in such a way that it does not interfere with the driver's view of the road
It is important to install it in an area that is cleared by the wipers while they are running. Otherwise, the device may not function correctly. There should be no cracks or other defects in the area where the sensor is located, since the efficiency of its operation depends on this. Before attaching the device, you need to make sure that the wipers effectively clean the windshield and do not leave dirt.
The sensor can be installed either at a service center or independently. Moreover, it is not at all difficult. No special tools are required for installation.
Below we provide instructions for installing a simple rain sensor DDA-35.
First you need to “aim” - select a place on the inside of the windshield where the sensor will be glued. As mentioned earlier, it should not interfere with the driver's view. For beauty, it is advisable to check the location and install the sensor at the top in the middle, next to the mirror mount.
Purchased rain sensors most often come with a special cloth for wiping and degreasing the glass. Thanks to this, the sensor is attached better.
If such a napkin is not included in the kit, you can use any glass napkin.
Carefully wipe the area on the windshield where we will glue the rain sensor.
We remove the protective film from the inside of the sensor, thereby revealing the fasteners that will hold the sensor on the glass.
After this, apply the rain sensor to the selected place on the glass and carefully press the device against the glass. We try to make sure everything goes smoothly, since we won’t have a second chance. With each disconnection, the holder will stick to the surface worse and worse.
We push the wire from the sensor under the headliner.
If there is not enough space under the upholstery, then slightly loosen the screws securing the visor.
Remove the cover plate from the rack and lay the wire under it. After this we put the cover back on.
Let's go lower. Carefully push the cable under the rack seal.
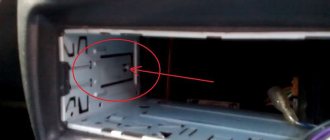
We open the fuse box (in different models it is located in different places), and install the rain sensor in place of the windshield wiper control relay (be sure to follow the markings and the position of the key). If we don’t know exactly where to install the relay, look in the documentation.
If necessary, the remaining cable can be wound up and left in the mounting block.
This completes the process of installing a rain sensor on a car. All that remains is to check its performance by splashing water on the windshield (with the car's ignition on, of course).
Checking the functionality of the rain sensor
You can also watch a video about installing a rain sensor:
After connecting the device, the wipers can be controlled manually. This may be necessary when moisture gets onto the glass from under the wheels of a car moving in front and does not reach the sensor’s coverage area. In this case, the driver turns on the wipers manually.
It is necessary to set up the device immediately after installation, so as not to be distracted by such actions while driving. The DDA-35 has 3 operating modes - standard, rain and snow. Modes are switched by pressing a single button one by one.
The built-in factory rain sensors are adjusted using the steering column switch. The power handle standardly has 5 positions (sometimes more and less). In position “0” the device is turned off. Numbers from 1 to 4 indicate the degree of sensitivity of the sensor. When you turn on the device in mode 4, it will operate in maximum sensitivity mode. To turn it off, simply turn the knob to position 0.
The rain sensor is adjusted using the steering column switch
Advice! In dry weather, it is recommended to turn off the device, as it may operate periodically. An example is insects getting on the windshield.
Exterior
In terms of appearance, a lot will depend on personal preference, as designs vary significantly. X-Ray is definitely suitable for those who like a cocky and aggressive look. Of course, the production hatchback doesn’t reach the level of a chic concept car, but it looks great.
In its style, one cannot help but pay attention to the stampings on the body, which catch not only the doors, but also the fenders and even the bumpers. However, these ornate curves in the shape of the letter “X”, together with the 15-inch wheels that come as standard, and the impressive ground clearance, visually make the car shorter, and not everyone likes it. However, one cannot help but admit that the muscular body shapes, feet, headlights, chrome and trims look very advantageous.
As a result, they got a pretty and moderately correct image, which, on the one hand, does not have any features that break out of the overall picture, and on the other, never gets boring. A wide radiator grille, sharpened headlights, short overhangs and a line of side glazing extending upwards combine perfectly with branded lining on the front fenders and nice wheels.
Engine characteristics
As for engines, the Lada X-Ray still has the advantage. The manufacturer offers a choice of 3 engines at once, which cannot be said about the Lada Vesta, since there is no choice here, and only one engine is offered.
If we talk about general features, then for both cars a domestic engine of the VAZ-21129 series is produced. Engine power is 106 horsepower. The unit has a reliable and simple design: 4 cylinders and 16 valves, as well as a distributed fuel injection complex.
- The Lada Vesta can be accelerated to 100 km/h in 11.2 seconds, the X-Ray in 11.4 seconds, despite such a small power.
- As for the maximum speed, the difference is small. X Ray overtakes Vesta by 1 km/h (176 versus 175 km/h).
- Fuel consumption also has a slight difference: Vesta - 9.3/6.9/5.5 liters, X-Ray - 9.3/7.2/5.9 liters.
However, Lada X-Ray can offer its customers several more engines with 110 and 122 horsepower. The first option reaches speeds of up to 184 km/h and has a volume of 1.6 liters. The second one is a little more powerful: the maximum speed here reaches 186 km/h, the volume is 1.8 liters. As for fuel consumption, it is almost the same for both cars.
TTX Lada x Ray
Lada "Luxe" - elite filling. Let's take a closer look at it
The top version of the Lada X-ray car has two subtypes of configurations:
In light of the topic of our article, we will consider the second version, since the differences between the first and the “Comfort” configuration lie exclusively in the plane of mechanics and design.
So, “Luxe Multimedia”. This option features:
- Rear view cameras.
- Light and rain sensors.
- A multimedia system equipped with a navigator and a 7″ diagonal touchscreen.
- Cruise control.
- Speed limiter.
- Electric window lifts on the rear doors.
In addition, in this version of the Lada Vesta, the heating system of which is already quite well thought out, is also supplemented with a heated windshield.
Interestingly, the manufacturer plans to supplement and improve these lists of configurations, so the final version has not yet been invented.
Many car owners consider a rain sensor to be an unnecessary device that they can do without. To understand whether it is really necessary, it is worth learning about the features of such devices.
Table of contents:
Lada Xray: review from Kalina owner
Experience in operating cars: my father’s IZH-412, still with an iron torpedo, and he already has his own car, Kalina, for more than 5 years.
I took Kalina to the next maintenance and decided at the same time to see what the dealer had.
I looked closely at the news and took the robot for a test drive. There was also a minimally equipped hrey in the cabin, I sat in it and almost had an attack of claustrophobia, all the surfaces were vertical, black, the glazing line was high, as if I had climbed into a closet. The tidy, compared to the West one, also seemed frivolous. But at the same time, the quality of the plastic in the cabin is good, reminiscent of a SLR camera, and overall the car makes a good impression.
After a couple of months I decided to update my car.
I was waiting for the release of Chevy Niva 2, but it didn’t happen.
I was waiting for the West station wagon 1.8 by the fall, but that didn’t happen either.
I took a ride on the rapid, the machine was ok. But in an acceptable configuration it cost more, and that’s with 90 hp. engine,
besides, the dealer could not clearly say about the delivery time, and in stock there were either maximum saucepans with a machine gun, or completely empty ones, there weren’t even provisions for pots (and you look on the street, people actually take these pans).
I haven’t looked at a used one, I can’t drag it from an auction, and I have no desire to deal with hucksters.
I also happened to take a ride in a new Logan taxi, which I liked more than the Ford Focus in the same taxi, and the platform, as you know, is one with a yardarm.
In general, the choice finally fell on the yard. I also rode it. At maximum speed, the interior was no longer dull, plus the plant threatened to release the 1.8 version with fur.
I looked and read reviews and comments, they were drug-fuelled - like “Porskaen is better”, “why is it more expensive than 300 thousand”, but mostly positive.
I was aiming for the maximum, but such cars were not expected in the next 1-2 months, and since I was going to buy with a trade-in + credit, I wanted to close the deal before the end of the year. I also wanted a beige interior, but they only had those since 1.6.
- Radio 2din usb, cd, fm, handsfree
- Heated windshields, mirrors, front seats
- Climate control
- Multifunctional steering wheel
- Rear parking sensors
- All lifts
- Rain and light sensor
- Two peeps
- + I spent about 80 before leaving the salon - comprehensive insurance, insurance, signaling, winter tires on rims, floor mats and other small things.
I didn’t pick it up right away, because... Firstly, I drove it to install the signaling system, and secondly, the winter tires have not yet arrived.
I signed up for registration through government services faster and without a queue.
After Kalina the sensations are cosmic))
On the way from the salon, I saw everyone in the traffic somehow driving slowly, even the Markovnik trudged along sadly - I thought there was some kind of accident ahead, looked at the speedometer and realized what was what)).
Driving around the city in 3rd gear it goes from 40 to 70, you don’t need to quickly tuck in 2nd or twist until it rings before 4th. I got used to the gearshift lever instantly, the moves are short but clear - I never missed a beat in speed.
The handle is comfortable, allowing both a regular overhand grip and a joystick grip. The clutch picks up smoothly, almost like an automatic. If you don’t specifically set yourself such a goal, then moving off with a jerk or slipping will not work. The gap itself during which the clutch engages is long, you let go, it seems that everything is off, you drop the pedal, and it still makes a jerk, i.e. Before this, it was not completely released. When starting uphill, the anti-rollback is activated and holds the brake in both forward and reverse gears.
I tried handsfree, it attaches easily, shows contacts and calls on the radio (NOT multimedia).
I installed an alarm with auto start, it shows the temperature in the cabin and the engine.
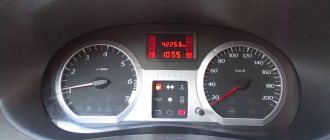
The engine cools down slowly; on Kalina, after an hour of parking, it showed the street temperature. I don’t know what this is due to, better thermal insulation or a different location for installing the sensor. The lack of a temperature indicator on the dashboard is annoying!
The electrics are well made; when the starter is turned on, other consumers are turned off - music, stove.
Datsun mi-DO - hatchback specially for Russia
Many will begin to argue that mi-DO is not a crossover at all. But, on the other hand, X-RAY is also a crossover at a stretch. This car offers you a very interesting appearance, which also places it in the class of tall hatchbacks. What’s most interesting is that the Russian company AvtoVAZ has warmed up this Japanese budget car on its chest. The Datsun mi-DO is assembled in Togliatti, the car has been sold in Russia for quite some time now and has already gained some appreciation. It may be a big competitor for Kalina, but X-RAY also has a lot to learn from this model:
- the car looks great, offering the buyer very interesting external features, aggression and discreet modern style without any surprises;
- the interior is quite suitable for Russian travel conditions, it is very democratic, but made with a certain taste, the car is quite adequate in terms of assembly;
- the ground clearance of 160 millimeters is sufficient to overcome even the most unpleasant places, and the well-arranged torque makes trips confident;
- the only 1.6-liter engine has a very modest number of horses - the power is 87 horsepower, the unit is equipped with a manual or automatic;
- It’s interesting that the company offered a lot of configurations, but the car base is not without interesting new products and features in terms of comfortable technologies;
- the cost of the new product is 462,000 rubles for the cheapest version - you must agree, this is a very serious bid for leadership in the class of tall hatchbacks.
It’s interesting that the Datsun corporation positions its car in a certain way between Kalina and X-RAY, so there is no direct competition. However, many Russian drivers prefer the Japanese model for a number of reasons. Among this series, you can find such arguments as the work on the car by the best engineers in Japan, control of the assembly, and the development of all parts in accordance with Russian conditions. Mi-DO may not be the most interesting representative of its segment, but it offers very interesting technical characteristics and opportunities for the buyer.
What functions does the sensor have?
The functionality of the DS is small: activation and deactivation of low beam, instrument panel illumination when the light brightness reaches in the range from 100 to 3500 units.
How the light sensor works: while moving, the sensor constantly “scans” the visibility area, assessing the lighting brightness parameter. The microprocessor receives data from the photocell about the brightness range and decides to send a signal to activate the low beam.
In a Lada Vesta DS car, the DS is programmed to activate the BS and the dashboard backlight. If necessary, the vehicle owner can reprogram the DC to additionally use fog lights and DRLs.
You can update the firmware at any certified service station that has portable scanners. “Upgrade” does not guarantee the functionality of the equipment on its own.
Review of Manufacturer Prices
| Name / catalog article | Price in rubles |
| Lada / VAZ 285356725 (original) | From 2000 |
| Fram 2458753 (analogues) | From 2000 |
| Otex 3697412 (analogues) | From 2000 |
| *prices are current as of 05/01/2019 | |
Conclusion
The process of replacing a rain sensor yourself is not at all difficult, but it requires care on the part of the repairman. Do not violate the manufacturer's regulations. When laying the wiring, be extremely careful not to damage the insulating layer. A short circuit to ground will damage the digital controller.
Advantages and disadvantages
First of all, DDs help the driver forget about the need to constantly switch the wipers. Thus, driving becomes more comfortable and safe. There is no need to be distracted by wet windows, so you can fully concentrate on the road.
Many are sure that at night such sensors are completely useless. In fact, infrared radiation is not affected by the time of day, since it has nothing to do with light. Therefore, the device works equally day and night.
In addition, some modern devices also have a built-in light sensor. Thus, it is possible to automate not only the wipers, but also the inclusion of headlights.
However, this does not mean that you should not be prepared for surprises. Any electronics fails sooner or later. Some people configure or install the DD incorrectly, so the device starts to operate very late or, conversely, is activated by any touch to the windshield.
Characteristic symptoms of malfunctions
| Signs | Malfunctions |
| When moisture gets on the glass, the wipers do not move. | Damage to the light element DD |
| Brushes operate in the same mode, despite changing speed | Failure of the relay-breaker |
| Brushes work late | The digital controller has failed, the contact board has oxidized |
| Increased speed of windshield wiper blades | Short circuit in the on-board circuit. The relay breaker fuse has blown (No. 38) |
We load cubes into the trunk according to the method of the magazine “Behind the Wheel”
The manufacturer claims that the trunk volume of the Kia Rio X-Line is 390 liters. Compared to the Lada, the Kia has a good 10 centimeters lower loading height, and the trunk opening is wider. Moreover, under the floor of both cars there is a full-size spare tire. According to the methodology of the magazine “Behind the Wheel”, the compartment was able to accommodate 340 liters.
KIA-Rio-X-Line: split rear seat backrest, low loading height and wide trunk opening.
KIA-Rio-X-Line: you don't have to worry about punctures.
The declared trunk volume of the XRAY Cross is 360 liters. There is enough space in the underground for small items, but if you remove the false floor, the fastening points somewhat interfere with the placement of large containers. Using the cubes in Xray we managed to measure 308 liters.
We placed 308 liters in the trunk of the Lada-XRAY-Cross.
The Kia Rio X-line managed to fit 32 liters more into the trunk than the X-ray.
The score is 1:4, the Korean leads even further.
XRAY Cross vs Rio X-Line - in pursuit of fashion and competitors.
The Kia Rio X-Line cross-hatch appeared on our market a year and a half ago - in November 2022. Last year, the model's circulation exceeded 50 thousand copies, that is, every second Rio was purchased in an elevated version!
Cross hatch Kia Rio X-Line
However, Kia did not stop there and prepared an update - since February of this year, the X-Line's ground clearance has increased from 170 mm to 190 mm, and in the maximum configuration with sixteen-inch wheels to 195 mm. The modernization was a quick response to customer wishes: X-Line owners complained about insufficient cross-country ability compared to direct competitors.
Now the X-line is raised, let's see if it lives up to the X in the name.
Messages 18
1 Topic by Axel 2015-11-05 18:00:25
- Axel
- Participant
- Inactive
- Messages: 973
- Thank you: 139
Topic: Self-installation of the backlight control
How can you implement backlight adjustment on Vesta? And how will this affect the dealer's warranty?
2 Reply from Patriot 2015-11-05 18:08:52
- Patriot
- Participant
- Inactive
- From: Irkutsk region.
- Messages: 3,156
- Thank you: 443
Re: Self-installation of the backlight control
How can you implement backlight adjustment on Vesta? And how will this affect the dealer's warranty?
3 Reply from Fan 2015-11-05 19:22:22
- Fan
- Moderator
- Inactive
- From: Smolensk region
- Messages: 1,017
- Thank you: 204
Re: Self-installation of the backlight control
How can you implement backlight adjustment on Vesta? And how will this affect the dealer's warranty?
Electrical/electronics warranty expired. And to implement it, you need to have an electrical circuit.
4 Reply from Axel 2015-11-05 19:32:05
- Axel
- Participant
- Inactive
- Messages: 973
- Thank you: 139
Re: Self-installation of the backlight control
But there’s no way without it, maybe the dealer himself will install it, is this option for installing this regulator possible?
5 Reply from Fan 2015-11-05 19:50:32
- Fan
- Moderator
- Inactive
- From: Smolensk region
- Messages: 1,017
- Thank you: 204
Re: Self-installation of the backlight control
The dealer will not interfere with the circuit diagram of the car, he can only connect to it. Radio, heating, signaling.
6 Reply from Axel 2015-11-05 19:52:46
- Axel
- Participant
- Inactive
- Messages: 973
- Thank you: 139
Re: Self-installation of the backlight control
The dealer will not interfere with the circuit diagram of the car, he can only connect to it. Radio, heating, signaling.
And the signal does not interfere? To make adjustments, simply install one regulator. What kind of intervention is there compared to installing a heater or alarm system?
Main differences between the models
The main difference, judging by the reviews, between the Lada-Vesta and the Lada-X-Ray is that the sedan is a car developed completely from scratch. Its development lasted for quite a long period, but people started talking about Vesta already in the early stages of construction. The model is popular because people have been waiting for its appearance for a long time. With regards to X-Ray, we can say that it was not developed from scratch. The model was based on the no less famous Renault Sandero model, and it was built on the basis of the Logan, which has been tested over the years by many taxi drivers in Russia.
In this case, people get confused in their choice. They think about what is better to choose - new developments and sensations or a reliable platform that has long proven itself to be good. So far there are no exact answers to this dispute. All differences will be discussed in more detail below. Which is better - Vesta or X-Ray?
Versions of Vesta X-ray, from the most modest to the most expensive
The new Lada is in no way inferior to its classmates produced by any other global auto giant.
Its internal electronic filling includes a high-end audio system, a set of airbags, air conditioning, as well as many other pleasant little things, the number of which is constantly growing, depending on the version of the car purchased.
By the way, I finally installed an alarm transmitter on my brainchild, working on the basis of the Era Glonass system, which, in the event of an accident, will send a message to rescuers, which will contain the coordinates of the accident site.
And now in more detail about each version of this car model.