Hydraulic compensators are knocking: establishing the reasons
So. Car enthusiasts with extensive experience claim that there will be no knocking on a fully operational car. And if extraneous noise appears, it means something is wrong. Why can these nodes knock?
Among the main reasons are mechanical wear or wear that forms on the surface of the plunger pair. Also, extraneous sounds may occur due to unstable operation of the valve responsible for the oil supply.
The compensators do not knock all at once. Sounds can appear due to wear or failure of even just one part.
Basics of the design and operation of a hydraulic compensator
The negative side of the design approach is the capriciousness of the system. Very often the hydraulic compensators on the Priora 16 valves knock and the reasons for this phenomenon are unknown to the inexperienced owner. The situation becomes clearer after studying the features of the compensatory mechanism.
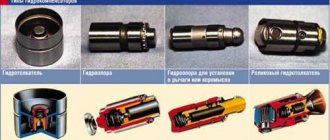
Configuration
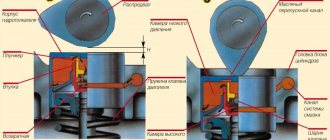
The idea of automatic regulation of thermal clearances can be implemented in two versions: a conventional hydraulic pusher and a hydraulic support. The latter is used in gas distribution modules with rocker arms. On the Lada Priora in the sixteen-valve version, the intake and exhaust are equipped with individual camshafts. The optimal solution for this arrangement is the use of a hydraulic pusher.
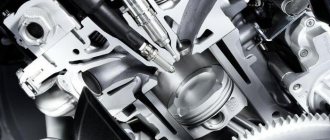
The Priorov hydraulic compensator on the 126 engine consists of the following parts:
- A plunger pair, including a cylindrical cage and a piston with a ball valve.
- The outer housing is a pusher.
- System of grooves and holes for oil supply.
Principle of operation
The oil composition enters the internal cavity of the piston and, overcoming the resistance of the spring, pushes the ball away to fill the closed cylinder. When filling the liner, oil pushes the piston out and the hydraulic tappet rests against the cam. Next, the ball valve is locked and the assembly unit works like a regular pusher on motors with an adjustable valve mechanism.
Various causes and solutions to hydraulic compensator knocking
Next, we will look at the causes of extraneous noise in the hydraulic compensator and how you can eliminate the problem causing it.
- Extraneous sound on startup:
- reason: when the system is idle for a long time, oil leaks from some hydraulic compensators;
- elimination: a short knock of a few seconds is not a sign of a breakdown. Long lasting – has one of the reasons mentioned in the following paragraphs.
- Knocking when cold or hot, but disappears after increasing the speed:
- Reason No. 1: The check valve ball is damaged or worn. Elimination - only complete replacement of the hydraulic compensator;
- Reason No. 2: contamination of the mechanism due to low-quality or dirty oil. Elimination - cleaning the elements from wear products and changing the oil.
- Knocking when hot, but disappears after increasing the speed. There are no problems with a cooled engine:
- reason: oil leaks through the gaps between the plunger and the sleeve, which appeared due to wear. Remedy: replacing the broken hydraulic compensator assembly.
- Knock at high speeds, disappears at low speeds:
- Reason No. 1: foaming of residual oil when there is excess oil in the crankcase due to churning by the crankshaft. The resulting mixture enters the hydraulic compensators. Remedy - restore the oil level to an acceptable amount;
- Reason #2: Low oil level causes the pump to suck in air. Remedy - restore the oil level to an acceptable amount;
- Reason No. 3: The oil sump is deformed due to an impact with the road surface, which damages the oil receiver. Elimination - replacement of defective parts.
- Constant knocking of one or more valves, which does not depend on the intensity of the crankshaft:
- reason: the presence of a gap between the cam and the pusher due to damage or contamination of the mechanism elements. Remedy - check for gaps according to the example described earlier and compare the speed of movement relative to other elements of the hydraulic compensator. Clean parts from dirt and replace damaged parts.
- Knocking when cold:
- reason: rarely happens, but it does happen. This happens to varying degrees of complexity for the same reasons that were described earlier. If the knock is short-lived (a couple of seconds), this does not mean that something is broken. Troubleshooting - Troubleshooting depends on the cause and is fully consistent with the actions for knocking in other situations.
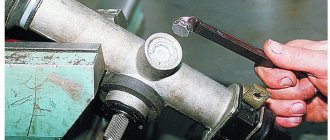
Disassembly of the structure
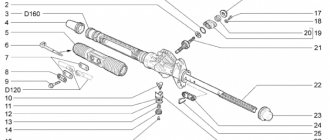
1. Take the spring tie prepared earlier and install it on the second coil of the spring from above and below as shown in the photo. The second screed is installed on the other side symmetrically to the first. The process of bringing the spring together is carried out as follows - tighten the bolts of the first tie until you feel that the second one begins to move freely on the coils, then tighten it until you remove the load from the previous one. That is, in turn on each side.
2. Take the “22” socket and hexagon and unscrew the fastening nut that secures the strut rod to the support.
3. Remove the limiter (bump stop), support bearing, support, and compression limiter.
4. Replace the old rebound limiter washers with those that came with the Acomi struts. Please note that the bottom one is smaller than the top one.
5. Next, remove the spring cup with rubber damper, compression buffer, spring and boot.
Now it is necessary to carry out a visual inspection of the dismantled rack.
The first test of swinging the rod to the top point demonstrated the cause of the malfunction. The resistance in the upper part of the working area quickly disappeared, after which the piston hit the upper part of the cylinder. As you understand, this was the source of the dull knocks.
Consequences
Incorrect operation of hydraulic pushers can lead to the following problems:
- reduction in compression and engine power;
- deterioration of its launch;
- burnout of valve plates and seats;
- an increase in shock load on vehicle components and parts, which will lead to their rapid failure;
- increase in fuel consumption.
If the knocking of the hydraulic pushers disappears a few seconds after starting the engine, then in this case there is no need to talk about a malfunction of the mechanism.
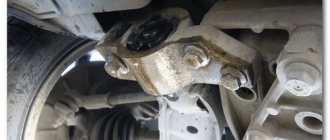
Worn support bearing
These sounds appear in the same way as with an inelastic damper, but they are sharper and much louder. In order to make an accurate diagnosis in this case, it is necessary to remove the stand. It is recommended to take into account one rather interesting feature that is inherent in such breakdowns: bearing wear is always uneven. So, maximum wear is where it is constantly located when the car is driving straight. If after turning the steering wheel the knocking noise disappears for a while, then it is definitely a support bearing.
There is also another diagnostic method. It is quite old, but effective. You will need an assistant again. The second person should rock the machine up and down. At this time, the driver should feel the shock absorber rod with his hand. The knock will be transmitted to this rod.
Another possible reason is that the nut on the upper support is loosely tightened, sometimes this happens.
Hydraulic compensators and “Accent”
The reasons for the knocking are standard here. The owners write that the problem can be solved by changing the oil. More experienced owners believe that if hydraulic compensators knock when cold (Accent is no exception), this is nothing more than a feature of the engines.
But in general, most drivers change oil with a viscosity of up to 5W30, and this allows you to completely get rid of the knocking of these mechanisms in the engine.
Spherical bearing
On car forums, in topics dedicated to this knock, a variety of reasons for knocking in the front suspension are discussed. Ball joints are one popular reason. One can say even more - this is a classic among all possible sources of extraneous knocks.
But there is one peculiarity here. On front-wheel drive cars, knocking noises from ball joints are very rare. It is more typical for classic VAZ models.
Thus, a worn joint can cause sharp vibrations when crossing small irregularities in the road. It is quite easy to diagnose this malfunction - pull the front wheel in a transverse direction. Naturally, it is advisable to lift the car for this. Beginners may confuse play in the ball joint with wheel bearing movements. In this case, the assistant must hold the brake before pulling the wheel, this will eliminate the hub play.
Sometimes an extraneous knock can be caused by a real trifle - check the rubber boots. Hinges cannot last long if the protective cover is torn.
Replacing hydraulic compensators on a Priora (16 valves)
For work, prepare the following tools:
- flat-head, Phillips-head screwdriver;
- socket wrenches;
- You may need a cylinder head gasket; replacing it will allow you to be safe from the fact that the spark plugs may flood the spark plugs with oil;
- sealant;
- magnet - for convenience.
- Stop the car with the handbrake. Lift the hood.
- Loosen the clamp securing the crankcase ventilation hose (main circuit).
- Disconnect the hose from the cylinder head fitting. Cover the fitting with rags to prevent any objects from getting inside.
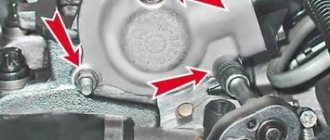
- Remove the bracket for the wires of the injectors and ignition coils, having first unscrewed the bolts with the “10” head.
- Disconnect the throttle assembly wiring harness from the cylinder head, having first removed the fastenings with the same head.
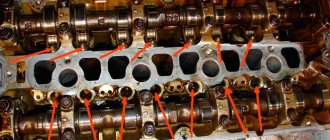
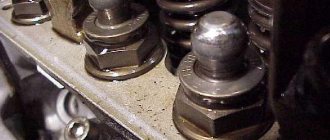
- Let's move on to the cylinder block cover. All fifteen screws will have to be unscrewed. To do this, use the E-8 head. Please note that it is additionally secured with sealant.
- Therefore, use a plastic screwdriver to carefully pry the cover in places where there are visible gaps, and then lift it. At this point, evaluate the camshaft lobe wear. It should not be covered with chips or other signs of mechanical damage.
- Now you can check the faulty hydraulic compensators. Avoid damaging the valves of the gas distribution mechanism; handle them carefully.
- Remove the faulty hydraulics with a magnet and put new ones in their place, securing them in a level position.
- Along the way, you should inspect all parts, assessing the degree of wear. This will help to find the reasons for the wear of the hydraulics or the consequence - something that has worn out faster due to their improper operation.
- Replace sequentially. Do not forget to coat the cylinder head cover with sealant to ensure maximum adherence to the body.
- Reassemble the components in reverse order, check the operation of the new hydraulic tappets by starting the engine.
Particular attention should be paid to oil seals, as they are most susceptible to wear. The seals of the Russian manufacturer of wear-resistant auto components CS20, which specializes in the production of silicone, polyurethane and rubber spare parts, have proven themselves to be good. Detailed review follow the link.
How hydraulic compensators knock: video
Detailed diagnostics of hydraulic compensators on Lada Priora
Sometimes, to determine the causes of knocking hydraulic compensators on a 16-valve Lada Priora engine, the thermal state of the engine alone is not enough. A set of tests makes it possible to more accurately determine the factor that causes extraneous noise.
Diagnosing the condition
One of the common complaints is knocking noise both cold and hot. However, as the speed increases, the symptom disappears. One of the following options is relevant:
- Worn or damaged ball valve. You can't do without replacing the hydraulic compensator.
- Contamination of the internals of the hydraulic fluid with wear products due to the choice of incorrect lubricant or untimely replacement. Washing the internals and changing the oil composition to a standard one eliminates the problem.
If the clatter appears only on a hot power unit and disappears at high speeds, and on a cooled unit no extraneous sounds are observed in any mode, the plunger pair has worn out. The hydraulic compensator must be replaced as an assembly.
The knocking is observed only at high speeds in any thermal state, and at idle there is silence, a problem with the oil level or in the low emulsion suction system. It is not recommended to go beyond the extreme marks on the dipstick; driving with a damaged oil receiver is also not recommended. Restoring the acceptable level resolves the problem.
For your information
- New hydraulic compensators can also tap. This usually happens after capitalization and is observed within a short period of time after the first start-up. It is not a malfunction if it does not recur during subsequent starts.
- If the hydraulic modules knock after changing the oil, the reason is the quality of the lubricant or the filter.
- The knocking of hydraulic pushers during startup should not be considered a malfunction. Over a long period of parking, the oil is drained from the working chambers and at the beginning of work the containers are filled.
Are the consequences dangerous?
What are the consequences of ignoring the fact that the hydraulic compensators on the Lada Priora 16-valve engine are knocking or neglecting to investigate the causes of the noise? At a minimum, acoustic discomfort. At the most, the camshaft cams will wear out and will have to be replaced.
Frequent front suspension malfunctions
Maintenance and repair of the front suspension in Priora involves identifying the exact cause of the breakdown:
- If there is extraneous noise or a distinct thud is heard, the struts may need to be replaced. Check the tightness of the bolts securing the stabilizer hoses, tighten if necessary. If the cushions are worn out, replace them with new ones. If the supports at the top of the suspension strut are loosened to the body, tighten them. Assess the condition of the rubber component of the strut mount, ball joint, spring device, and compression motion buffer. If they are damaged or defective, replace them. Alternatively, check the wheels for imbalance.
- Liquid may leak from the strut, for one reason - the rod seal has worn out and collapsed. This will be indicated by the appearance of burrs on the rod, damage to the chrome surface, and mechanical defects in the sealing ring located on the strut body. Replace the old telescopic stand with a new one.
- If the suspension in the Priora breaks, you will have to replace the spring device and telescopic strut.
- It has become difficult to drive the car, it constantly skids to the side - it’s time to check the air pressure in the tires and normalize it. If the wheel alignment angles leave much to be desired, perform a wheel alignment. It may be necessary to replace the rubber lining in the suspension mounts or springs.
Knock of hydraulic compensators on Lada Priora: diagnostics and troubleshooting
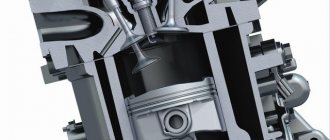
Lada Priora is equipped with a VAZ 21126 engine with an automatic gas distribution mechanism adjustment system. The gap between the camshaft cam and the valve stem is selected by a hydraulic tappet, the successful operation of which is ensured by the engine oil system. The mechanism allows you to avoid making various types of adjustments in the timing belt, reduces fuel consumption and increases the efficiency of the power plant. Fundamentals of the design and operation of a hydraulic compensator
Basics of the design and operation of a hydraulic compensator
Configuration
The idea of automatic regulation of thermal clearances can be implemented in two versions: a conventional hydraulic pusher and a hydraulic support. The latter is used in gas distribution modules with rocker arms. On the Lada Priora in the sixteen-valve version, the intake and exhaust are equipped with individual camshafts. The optimal solution for this arrangement is the use of a hydraulic pusher.
The Priorov hydraulic compensator on the 126 engine consists of the following parts:
- A plunger pair, including a cylindrical cage and a piston with a ball valve.
- The outer housing is a pusher.
- System of grooves and holes for oil supply.
Principle of operation
The oil composition enters the internal cavity of the piston and, overcoming the resistance of the spring, pushes the ball away to fill the closed cylinder. When filling the liner, oil pushes the piston out and the hydraulic tappet rests against the cam. Next, the ball valve is locked and the assembly unit works like a regular pusher on motors with an adjustable valve mechanism.
Why do hydraulic compensators knock on a Lada Priora with 16 valves both hot and cold or causes of noise
Successful operation of the hydraulic compensator (HC) is possible only with a constant supply of oil under pressure. The oil emulsion drainage prevention system allows you to eliminate knocking during startup. It is implemented in the form of a ball valve that closes the oil channel in the cylinder head after stopping the engine.
How the main guns knock
Some owners of Lada Priora have heard about problems with hydraulic pushers, but are not aware of the acoustic nature of the malfunction. It is not difficult to determine whether the modules are rattling: the sound will be similar to the operation of a diesel power plant. Indeed, the clatter can be compared to a running fuel injection pump of a diesel engine or a modern gasoline unit.
Tapping on cold
On the new motor, the hydraulic modules operate silently. This is explained by its ideal condition and confirms the quality choice of lubricant by the manufacturer. Deviations from factory recommendations or mediocre vehicle care require not only decoking of the piston rings in the future, but also a search for the factors that caused the piston ring to knock.
What causes the hydraulic compensators to knock on the Lada Priora 16 valves or the reasons for the knocking when cold can be the following:
- Contaminated or poor-quality oil emulsion.
- Unsuitable oil viscosity. Deviations in viscosity characteristics lead to the inability to push fluid through a small network of channels, which causes oil starvation in hydraulic compensators.
- Clogged oil system holes. A decrease in the flow area leads to a decrease in pressure in the chambers of the hydraulic module.
- Low pressure in the main oil line. Usually the oil pressure light comes on along with this.
- Jamming of the plunger mechanism due to the presence of a large layer of carbon deposits on the surfaces of the assembly unit.
- Wear of plunger pair parts. Defects in the ball valve or on the mating surfaces lead to fluid leaks from the sub-plunger space.
Life hack: hydraulic compensators for a Priora car with 16 valves, device, price
Compensators are needed for automatic valve adjustment; if they were not there, it would be necessary to adjust the valves every 10 thousand, as on 2109. On the Prior, hydraulic compensators knock under different circumstances - and this is not always a malfunction. They have a special knock, so experienced car enthusiasts will recognize it almost immediately.
A knock that comes from the engine of a Priora car is not a very good sign that should alert you. Each car needs to be approached differently. Therefore, when hydraulic compensators on a Priora knock, make proper preparations for repairs - you need to find out what is the reason for what is happening and how you can eliminate it by correcting the situation. In this article, we have collected for you the main signs: why these parts make noise, whether the car is cold or hot.
These parts have 16 valves on the Priora. (if taken as a complete set) they are not so little. The price starts from 4000 rubles and above. Replacing hydraulic compensators is labor-intensive and I don’t recommend getting into the engine yourself without experience. At a service station, such work for a Priora car will cost from 5,000 rubles and more.
The standard “hydriki” for the Priora were inherited from the “ten”. Even the catalog number testifies to this - 21120-1007300-86. A complete set will cost approximately 4,000 rubles. A set from (she collected Priora coupe, Sport and Premier), article number - 1-59718-219, sold in eight pieces, price - about 300 rubles.
Configuration
The idea of automatic regulation of thermal clearances can be implemented in two versions: a conventional hydraulic pusher and a hydraulic support. The latter is used in gas distribution modules with rocker arms. On the Lada Priora in the sixteen-valve version, the intake and exhaust are equipped with individual camshafts. The optimal solution for this arrangement is the use of a hydraulic pusher.
The Priorov hydraulic compensator on the 126 engine consists of the following parts:
- A plunger pair, including a cylindrical cage and a piston with a ball valve.
- The outer housing is a pusher.
- System of grooves and holes for oil supply.
Principle of operation
The oil composition enters the internal cavity of the piston and, overcoming the resistance of the spring, pushes the ball away to fill the closed cylinder. When filling the liner, oil pushes the piston out and the hydraulic tappet rests against the cam. Next, the ball valve is locked and the assembly unit works like a regular pusher on motors with an adjustable valve mechanism.
Chassis SS20
Life hack: clearance of a Priora car
These spare parts for domestic and foreign cars are produced under the “System Technologies” brand. These racks have become so popular due to their high quality. For Priora, the manufacturer offers 4 product options that differ in hardness. Which stands are better? They need to be selected according to your driving style. The softest ones are the “Standard” series racks. Rear shock absorbers from the same series are also offered.
A reinforced version is offered to increase the load capacity. Next are the “Comfort” racks. According to reviews from many car owners, this is the best option. They are stiffer than the Standard, but the suspension works equally well on bad and good roads.
The “Highway” kit is suitable for those who like stiff suspension and high speed. With these racks you can drive on bad roads, but it will be uncomfortable. “Sport” is the toughest option from this manufacturer for Priora cars. A front suspension of this type is not very suitable for the city, but for sports competitions it is just right.
How to replace hydraulic compensators on Lada Priora?
The transition from adjusting washers, which were used on Soviet “eights” and “nines” to hydraulic compensators (HC), made it possible to abandon manual adjustment of the gaps. However, hydraulic compensators are installed only on 16-valve engines, so owners of 8-valve Prior and Kalin have to adjust the thermal clearances the old fashioned way, with washers. In this article we will talk about how to independently change hydraulic compensators on a 16-valve Lada Priora engine.
Tools and materials
To replace the HA you will need:
- jack;
- safety stand;
- wheel wrench;
- set of open-end wrenches;
- ratchet wrench with a set of sockets and a flexible extension;
- wrench for 10 and 12;
- flat and Phillips screwdrivers;
- clean rag;
- automotive oil-resistant sealant;
- thread locker.
What you need
Before starting work, we recommend that you carefully read the article Why hydraulic lifters knock when hot and cold. If you have hydraulic lifters knocking on a Priora, you will understand what to do. After all, replacing hydraulic compensators is a rather complicated matter, so it is better not to touch the timing belt unless unnecessarily necessary, because incorrect alignment of the crankshaft and camshaft marks can lead to a drop in engine power and damage to the valves. If you decide to change hydraulic compensators, then read about safety precautions for car repair and maintenance in order to responsibly approach wheel removal and work under the car.
Replacing hydraulic compensators
Below are step-by-step instructions that will help you replace hydraulic compensators on a Priora.
- Open the hood, let the engine cool and disconnect the battery.
- Jack up the front right side of the car, install a safety stand, and remove the front right wheel.
- Remove the plastic casing covering the injector, the air filter pipe, and the filter itself.
- Remove the spark plug wires.
- Loosen the two bolts securing the generator and remove the belt from it. If the car has air conditioning, then remove the belt from it too.
- Unscrew all the bolts of the intake manifold (receiver) and remove it. One of the mounting bolts is located under the generator and can be unscrewed using a ratchet and a flexible extension. If you cannot remove the receiver, then follow the next step and then remove the receiver.
- Unscrew and remove the fuel rail and injectors. Plug the nozzle holes with clean cloths.
- Remove all ignition coils.
- Align the crankshaft and both camshafts to the marks.
- Unscrew the tensioner roller bolts and loosen the eccentrics to remove the belt.
- Remove the belt, then unscrew the camshaft gear bolts. Don't lose the shaft keys, they are very small.
- Unscrew the valve cover bolts and remove it.
- Unscrew the bolts of the upper head plate, including the bolts located under the camshaft gears, and remove it.
- Remove the camshafts and replace their seals if necessary.
- Using a magnet, pull out the hydraulic compensators and insert new ones in their place, or replace the faulty one if you know which one it is.
- Clean the valve cover and top head plate of sealant.
- Place the shafts in place and turn so that the cams of the first cylinder are facing up and slightly towards each other.
- Wipe the cylinder head and top plate with a clean rag, then apply new sealant and install the plate onto the head.
- Apply thread locker to the bolts, screw in and tighten with a force of 2 kgf•m (20 N•m).
- Wipe the top surface of the stove and the valve cover with a clean rag, then apply sealant and install the cover in place.
- Apply thread locker to the bolts, screw on the cover and tighten the bolts with a force of 2 kgf•m (20 N•m).
- Install the camshaft gears and tighten their bolts with a force of 7–8 kgf•m (70–80 N•m).
- Align the camshaft and crankshaft gears to the marks and put on the belt.
- Adjust the belt tension using the roller eccentrics and tighten their bolts with a force of 4 kgf•m (40 N•m).
- Check the marks on the camshafts and crankshaft; if everything is fine, turn the engine two revolutions of the crankshaft and check the marks again. If everything is fine, then continue assembling the motor; if not, align the gears to the marks.
- Install the injectors, ramp and receiver, tighten their bolts with a force of 2.5 kgf•m (25 N•m).
- Install the air filter and its pipe.
- Connect all wires and ignition coils.
- Install the decorative plastic cover.
- Put on and tighten the wheel.
- Connect the battery.
- Start the engine. At first, the hydraulic compensators should knock, but after 3-5 minutes the knock should completely disappear. If the sound disappears, you did everything right. If not, then something was wrong.
practical guide
To ensure proper rolling of the vehicle's wheels, taking into account the operation of the suspension and steering, the front suspension elements must be installed in a certain position.
It is recommended to check and adjust the angles of the front wheels in specialized technical centers that have the appropriate equipment.
The installation angles of the front wheels are indicated in the “Reference Data” section.
The camber angle of the front wheels is the angle of inclination of the plane of rotation of the wheel relative to the vertical. Incorrect camber angles of the front wheels cause the car to pull to the side when driving in a straight line. Too much positive camber (where the top of the wheel sticks out) will cause the outside of the tire tread to wear faster, while too much negative camber will cause the inside of the tire tread to wear faster. The camber angle of the front wheel is adjusted by the upper bolt securing the steering knuckle to the strut. The bolt holds the eccentric head, and it holds a special washer.
Toe of the front wheels is the angle between the plane of rotation of the wheel and the longitudinal plane of symmetry of the car in the position of straight-line movement. Toe is defined as the difference in distances between the rims of the front wheels in millimeters (B - A, Fig). Misalignment of the front wheels impairs the vehicle's handling and directional stability and leads to intense tire wear.
The toe-in of the front wheels is adjusted by changing the length of the steering rods by rotating the threaded inserts.
The longitudinal inclination of the steering axis is the angle between the steering axis of the front wheel and the vertical in a plane parallel to the center line of the vehicle. Violation of the correct angle of inclination of the steering axis of the front wheels causes deterioration in vehicle handling. A large caster angle increases the resistance to rotation of the steering wheel, while a small caster angle impairs the stability of the front wheels in the direction of travel straight ahead.
The inclination of the steering axis of the wheel is adjusted by changing the number of washers installed at the ends of the longitudinal extension of the front suspension.
1. We prepare the car for work.
2. Unscrew the nut of the bolt securing the stabilizer bar to the lower arm of the front suspension and knock the bolt out of the holes in the strut and arm.
Similarly, remove the bolt connecting the stabilizer link to the right suspension arm.
3. Using a 13 mm socket wrench with an extension, unscrew the two nuts securing the bracket of the left stabilizer bar cushion to the body.
Similarly, unscrew the nuts securing the bracket of the other stabilizer bar cushion to the body.
4. Remove the stabilizer bar assembly with struts and cushions.
Disassembly
1. Remove the rack from the rod (see above).
2. Use any available method (marker, adhesive tape) to mark the installation location of the cushions on the bar.
3. Remove the cushion from the rod, having first removed the stabilizer rod mounting bracket from it.
Installation
Install the stabilizer in reverse order.
To make installation of cushions and posts easier, apply a soapy solution to the rod.
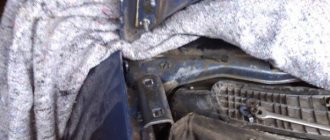
To replace the anti-roll bar struts on a Lada Priora, you will need an inspection ditch or overpass.
Removal
1. We prepare the car for work.
2. Using two 17 mm wrenches, unscrew the nut of the bolt securing the stabilizer link to the transverse arm.
3. Using a bit of suitable diameter, knock out the bolt from the rack and lever.
4. Lubricate the end of the stabilizer rod with soapy water.
5. Insert the barb into the hole in the lower silent block and, using it as a lever, rotate the stand from side to side, gradually moving it towards the edge of the rod.
6. Remove the stand from the bar.
Similarly, remove the strut from the other end of the stabilizer bar.
Installation
We install the racks in the reverse order, having previously lubricated the ends of the stabilizer rod with soapy water.
You will need spring ties to get the job done.
Disassembly
1. Remove the rack from the car.
2. Clamp the stand in a vice.
Be careful! A compressed spring has great force and when the tie breaks, it straightens out and can cause injury.
3. Install the couplers and tighten the spring evenly, without distortions, until the load is removed from the upper spring cup.
4. While holding the shock absorber rod from turning with a 6 mm hex wrench, use a 22 mm wrench to unscrew its nut.
5. Remove the limit washer from the upper support of the rebound stroke from the strut rod.
6. Remove the upper compression stroke limiter and the upper support from the rack.
7. Remove the bearing from the upper support.
8. Remove the upper spring cup and rubber gasket.
9. Remove the spring from the rack.
10. Remove the compression stroke buffer and the protective casing of the shock absorber rod.
11. To replace the spring, loosen the spring ties.
Assembly
We assemble the front suspension strut in the reverse order.
Before assembling the strut, by fully extending and retracting the rod by hand, make sure that the shock absorber is in good condition. If you feel dips, jerks, or hear strange sounds when moving the rod, replace the shock absorber. Check the integrity and serviceability of all elements installed on the rack. Replace a damaged or cracked shock absorber rod guard, damaged compression stroke bumper, or cracked or weakened suspension spring.
Front suspension springs are divided into classes according to their stiffness. The class of the spring is indicated by paint on the outside of one of its coils. The front suspension must have springs of the same class installed.
To do the job you will need a reliable stand under the car.
Removal
1. We prepare the car for work.
2. Disconnect the tie rod end from the strut swing arm.
If removing the strut for disassembly, loosen the shock absorber rod nut with a 22 mm spanner while holding the rod with a 6 mm hex key.
3. Using a 13 mm socket wrench, loosen the three nuts securing the upper strut support to the car body.
4. Remove the front wheel.
5. Remove the brake hose from the strut bracket.
and the wheel speed sensor wire.
6. To minimize the violation of the camber angle of the front wheels, use a punch or paint to apply marks on the bolt of the upper mounting of the steering knuckle and on the strut bracket.
7. Using a 17 mm socket wrench, unscrew the nuts of the bolts of the upper and lower fastening of the steering knuckle to the strut, holding the bolts from turning with a 17 mm socket wrench.
8. Remove the washers from the bolts (the washer of the upper bolt is eccentric and remove the bolts.
How to eliminate the knocking of hydraulic pushers on Lada Priora
Timely and high-quality maintenance of the engine oil system is the key to flawless operation of the hydraulic compensator mechanism. After all, the unit is designed for use throughout the entire resource of the power plant.
Use of recommended lubricant
When the hydraulic pushers just start knocking, the manufacturer recommends changing the lubricant to a proven option. Therefore, when the question arises of what kind of oil to pour in principle, it is worth analyzing reviews to determine the acceptability of a certain model of oil product for hydraulic compensators.
Of course, the best choice for Lada Priora will be the composition recommended by the manufacturer, specified in the instruction manual. However, not all current popular products are included in the list.
An analysis of opinions shows that, indeed, with the universal viscosity of 10W-40 or 5W-40 specified by the factory, not every oil is suitable. For example, Shell Helix Ultra 5W-40 causes knocking already at 15,000 km, while on Liqui Moly Optimal Synth 5W-40 the hydraulics are silent even at 80,000 km.
Reviews show that it is optimal to choose the following lubricants:
- Total Quartz 9000 Energy 5W-40.
- Mobil Ultra 10W-40.
- Wagner Windigo 10W-40.
Flushing
Many owners, in advanced cases, resort to general engine flushing. However, the effectiveness of such an event in the fight against knocking GCs is low. This is explained by poor oil pumpability in the area of the hydraulic pusher chambers.
If changing the lubricant does not help, the best solution is to remove the cylinder head cover and find which hydraulic compensators on the Lada Priora 16-valve engine are knocking and determine the reason for this. Defective parts are identified by diagnosing running resistance with a wooden wedge. A fast movement speed in comparison with other hydraulic supports indicates wear of the hydraulic module, the presence of a constant gap indicates its coking.
Attention! The wooden wedge must be pressed against the non-working surface of the cams.
Effective removal of carbon deposits inside the cylinders is their local washing. Worn assembly modules cannot be repaired.
Additives
Additive compounds help delay identifying the causes and cleaning the timing belt. There are several products available in the market. The most popular products are from Liqui Moly and XADO. The effectiveness of substances depends on the specific case. Fans of motor additives often equate this class of chemistry with a waste of money.
Which stands are better?
It is difficult to answer this question. Although manufacturers have quality certificates, very often spare parts for the chassis cannot provide the declared comfort of movement and the specified service life. Reviews also do not allow us to understand which is better. It all depends on the preferences of the car owner. Today, Priora is equipped with air suspension.
You can make this system yourself or contact a service station. This solution shows itself very well in terms of comfort and reliability.
The VAZ-2110 is considered the predecessor of the Lada Priora; their front suspensions are almost identical, the only differences are in the spring parts and shock-absorbing components. The problems that drivers noted with the VAZ-2110 with front suspension migrated to the Priora - the wheel bearings leave much to be desired, the ball joints wear out quickly and must be regularly replaced.
Hydraulic lifters rattled on the Priora, what should I do?
Lada Priora is equipped with a VAZ 21126 engine with an automatic gas distribution mechanism adjustment system. The gap between the camshaft cam and the valve stem is selected by a hydraulic tappet, the successful operation of which is ensured by the engine oil system. The mechanism allows you to avoid making various types of adjustments in the timing belt, reduces fuel consumption and increases the efficiency of the power plant. Fundamentals of the design and operation of a hydraulic compensator
Knocking after replacement
Usually new parts don't knock.
If you still hear sounds, then this is a manufacturing defect or a problem with the valves. In order to perform an accurate diagnosis and make sure that there is nothing wrong with the valves, it is necessary to check their fastenings. There is a possibility that the parts did not shrink as required. We simply tighten them and thereby remove the knock of the hydraulic compensator.
Sources
- https://maslo-5w30.ru/avto/stuchat-gidrokompensatory-priora-16-klapanov-prichiny
- https://medwegonok.ru/dvigatel-lada-priora-16-klapanov-stuchit-gidrokompensator/
- https://avtonomnaya-gazifikaciya.ru/dvigatel/pochemu-stuchat-gidrokompensatory-na-priore.html
- https://zsm-miass.ru/polomki-i-remont/gidriki-na-prioru.html
- https://avtonomnaya-gazifikaciya.ru/dvigatel/kompensatory-priora.html
- https://medwegonok.ru/stuk-gidrokompensatorov-priora-16-klapanov-kak-ustranit/
- https://AvtoSotka.ru/motor/stuk-gidrokompensatorov-na-holodnuyu-priora.html